Welcome
To
Yambaba Ecommerce
Ultimate solution for your ecommerce business
System Requirements
System Requirements
The Laravel framework has a few system requirements. All of these requirements are satisfied by the Laravel Homestead virtual machine, so it's highly recommended that you use Homestead as your local Laravel development environment.
However, if you are not using Homestead, you will need to make sure your server meets the following requirements:
- PHP >= 7.1. 3
- OpenSSL PHP Extension
- PDO PHP Extension
- Mbstring PHP Extension
- Tokenizer PHP Extension
- XML PHP Extension
- Ctype PHP Extension
- JSON PHP Extension
- BCMath PHP Extension
To run the application in your server make sure your php.ini file meets the following requirements . Please try change below info on php.ini.
- max_execution_time 30000
- max_input_time 30000
- memory_limit 512MB
- post_max_size 512MB
- upload_max_filesize 128MB
Installation
Database and database user creation on Server
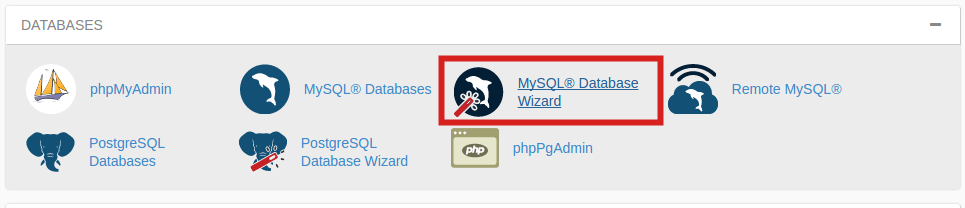
Log into your cPanel.
Click the MySQL Database Wizard under the Databases heading.
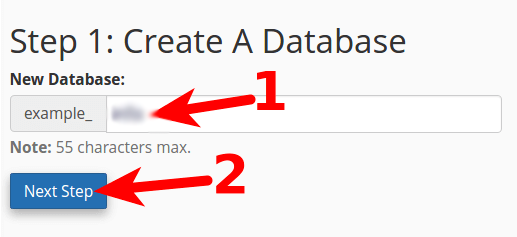
Next to New Database enter a name for your database and click Next Step.
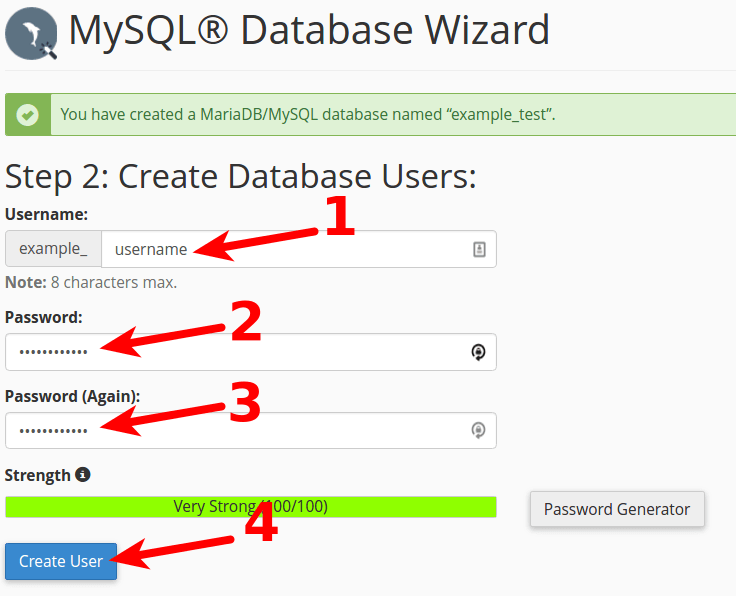
Next to Username enter a username.Enter a password next to Password, enter it again for Password (Again) and then click Create User.
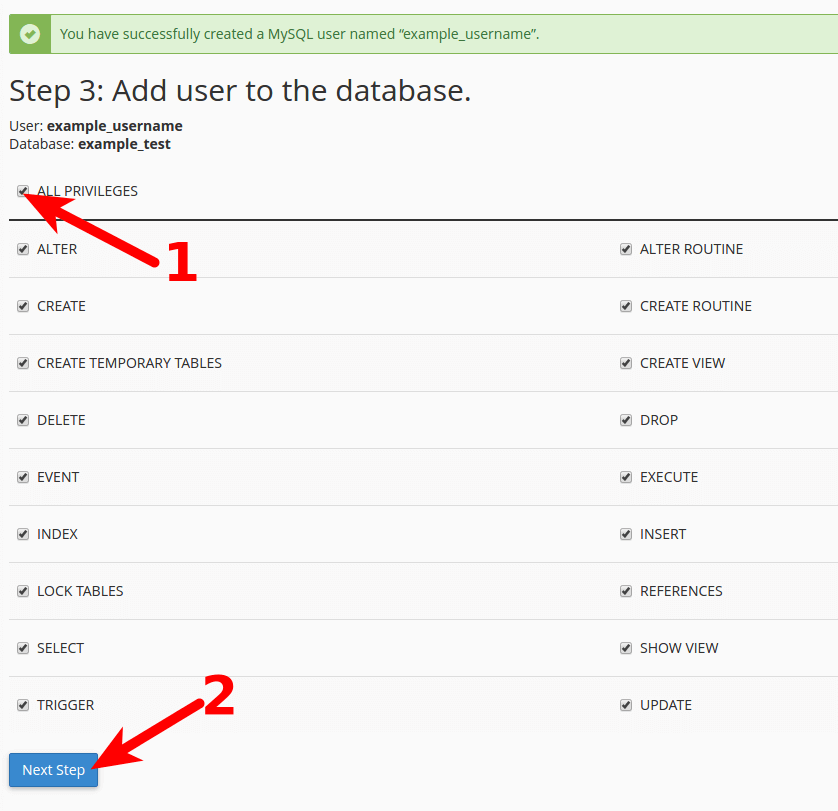
On the next page, you'll assign privileges for the user to the database. Check the box next to All Privileges and then click Next Step.
Upload the package to your host
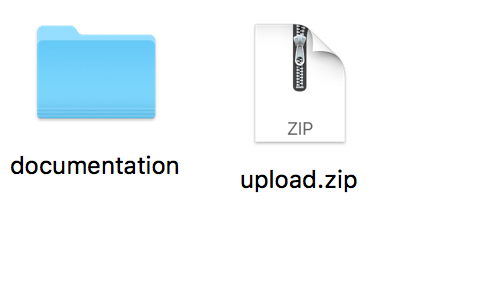
Upload file "upload.zip" to your host inside the desired location using cPanel File Manager
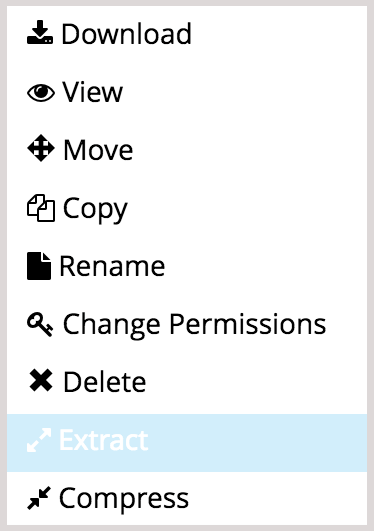
After upload is completed, Right click on the package and select Extract. That will extract the zipped file contents
Adjust the folders Permissions
- Change the permissions of uploads folder and all it's contents (Files & Folders ) to 777
- Change the permissions of storage folder and all it's contents (Files & Folders ) to 777
Installation Note For Local Server
To run the application in localhost make sure your php.ini file meets the following
requirements .
Please try change below info on php.ini
max_execution_time 30000
max_input_time 30000
memory_limit 512MB
post_max_size 512MB
upload_max_filesize 128MB
Also, make sure PHP -v see in command line min version 7.4.x
Dashboard
Dashboard
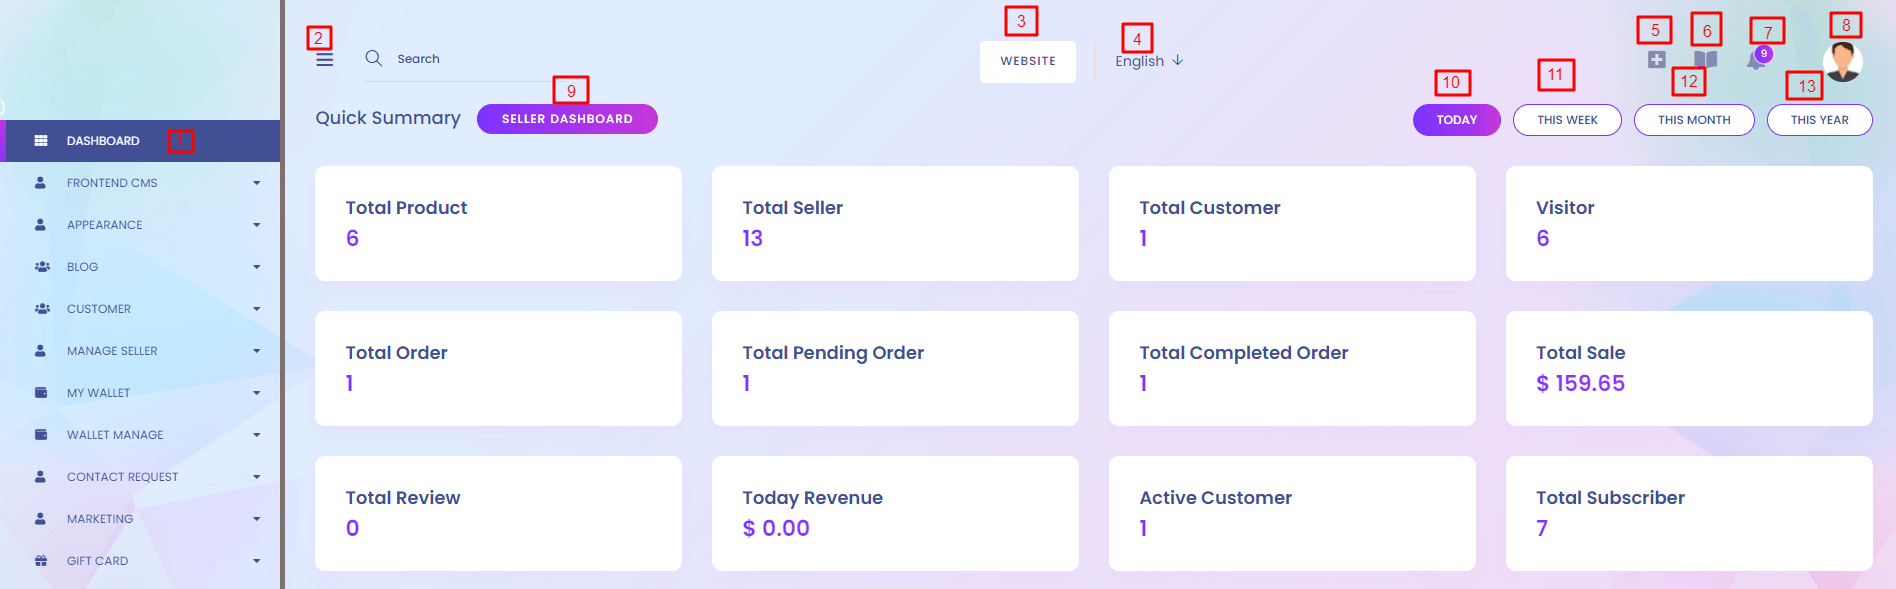
1. Dashboard
At the top menu of left sidebar is Dashboard. There are several view port in dashboard. we can see the number of products, seller, customer etc. at a glance. Summary of the system is important. After login admin can see the update for that day.
2. Toggle Bar
To hide and show the side menu bar.
3. Website
The button lead you to the main website.
4. Language
Delivered to you equiped with diffrent languages : English and Arabic. You can also add laguage with your own customization.
5. Quick Menu
Most important quick menu are there so that admin can find easily.
6. Knowledge Base
This link can lead the admin to Knowledge Base.
7. Notification
Different types of notifications are created in the system. You can find it here.
8. Profile
Admin can see their profile, change their existing password, update profile setting etc. Logout button at the bottom of this profile section.
9. Seller Dashboard
Go to your seller dashboard panel.
10. Today
When admin login to the system he shows the todays summary.
11. This Week
By clicking this week button admin can show this week summary.
12. This Month
By clicking this month button admin can show this month summary.
13. This Year
By clicking this year button admin can show this year summary.
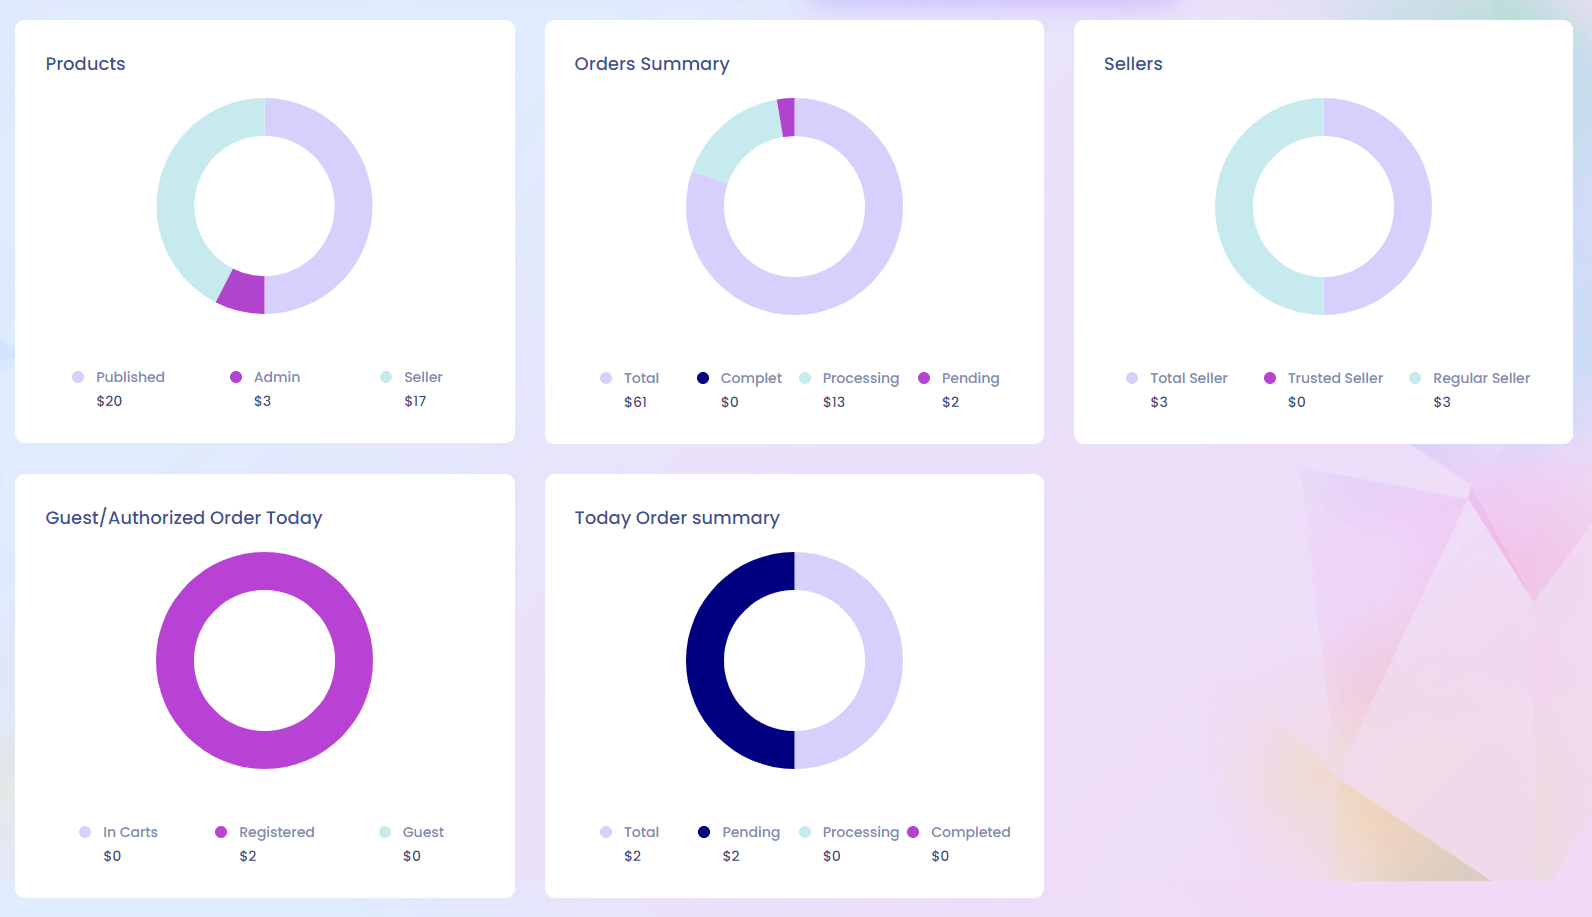
Different Summaries In Chart
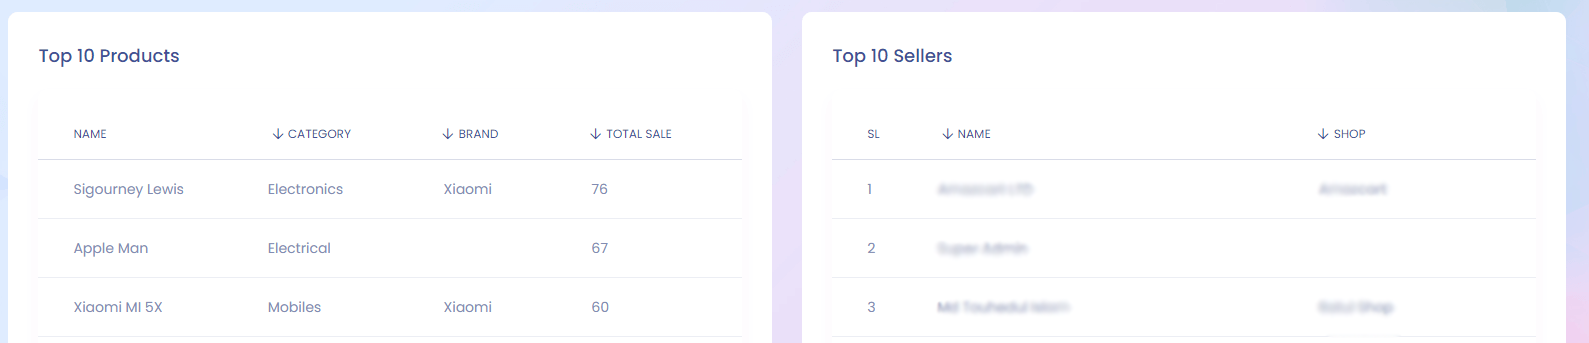
Top Product and Seller List
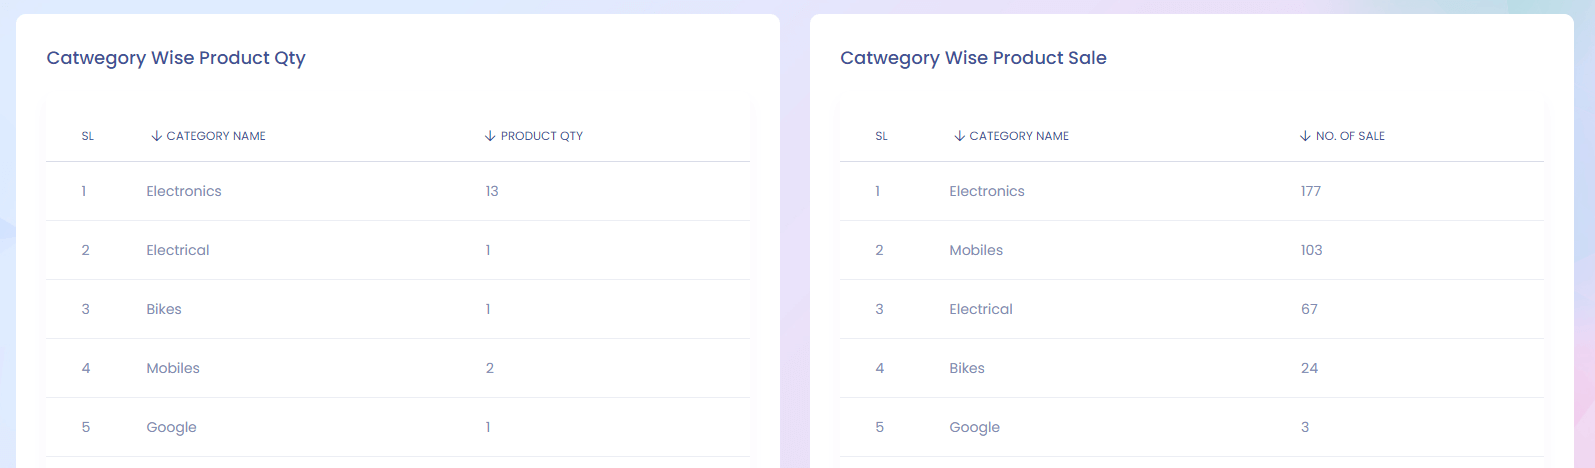
Category Wise Product and Product Sale List
Coupon Wise Sale and New Customer List

Recently Added Product and Top Refferer List
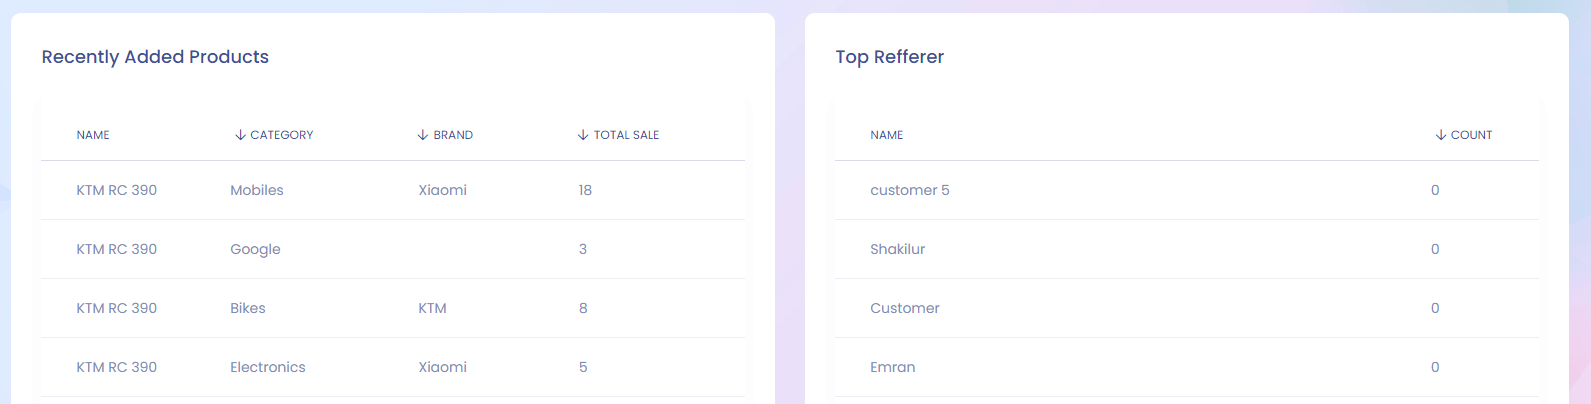
Latest Order and Keyword Search List
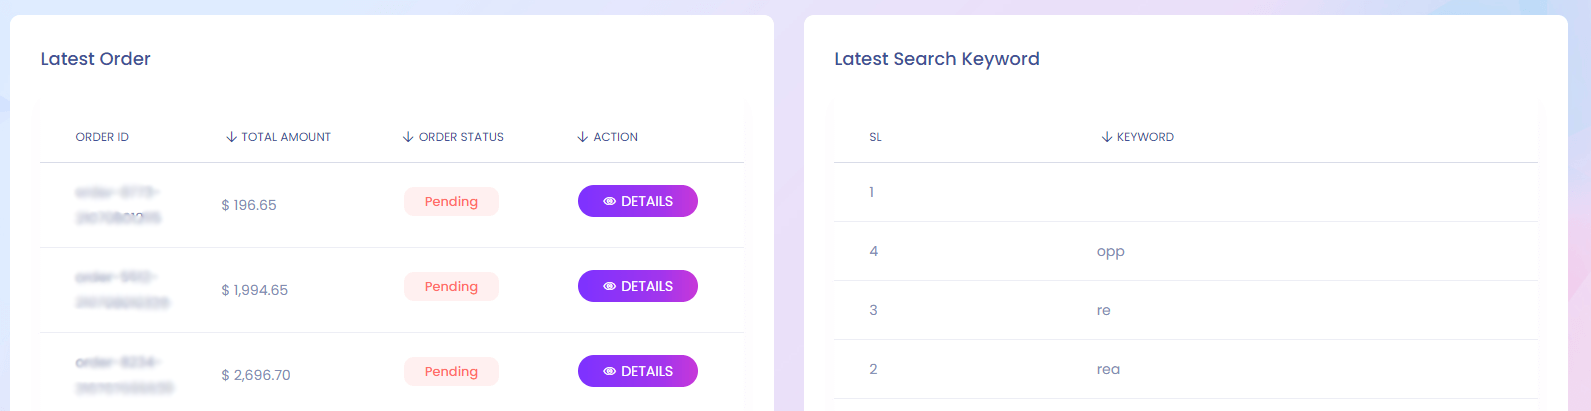
Admin can also show order details from here.
Top Customers & Recent Reviews
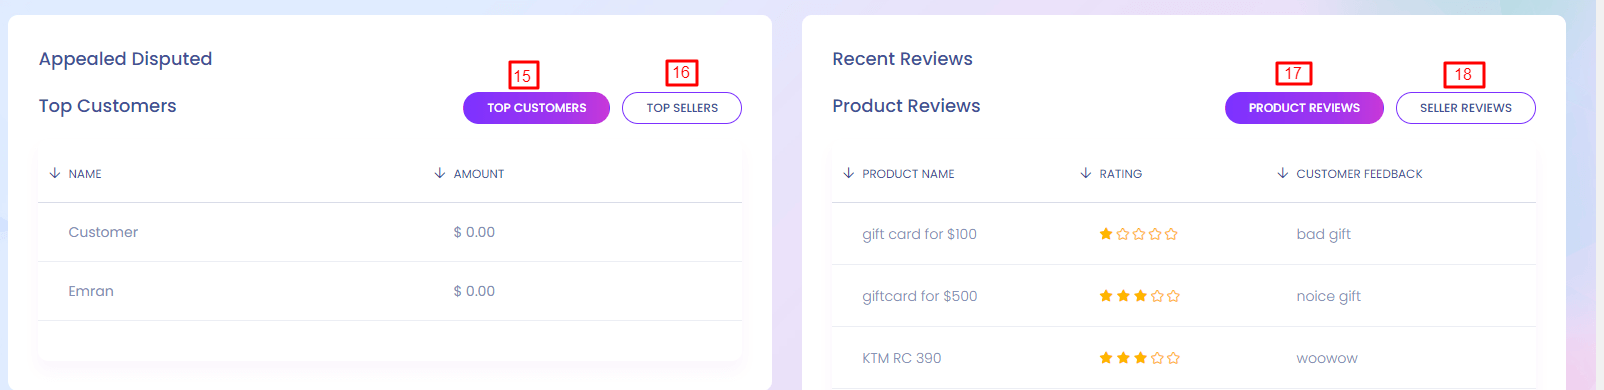
15. Top Customer
View top customer.
16. Top Seller
View top seller.
17. Product Reviews
View the reviews of the products.
17. Seller Reviews
View the reviews of the Seller.
Personal Notification Setting
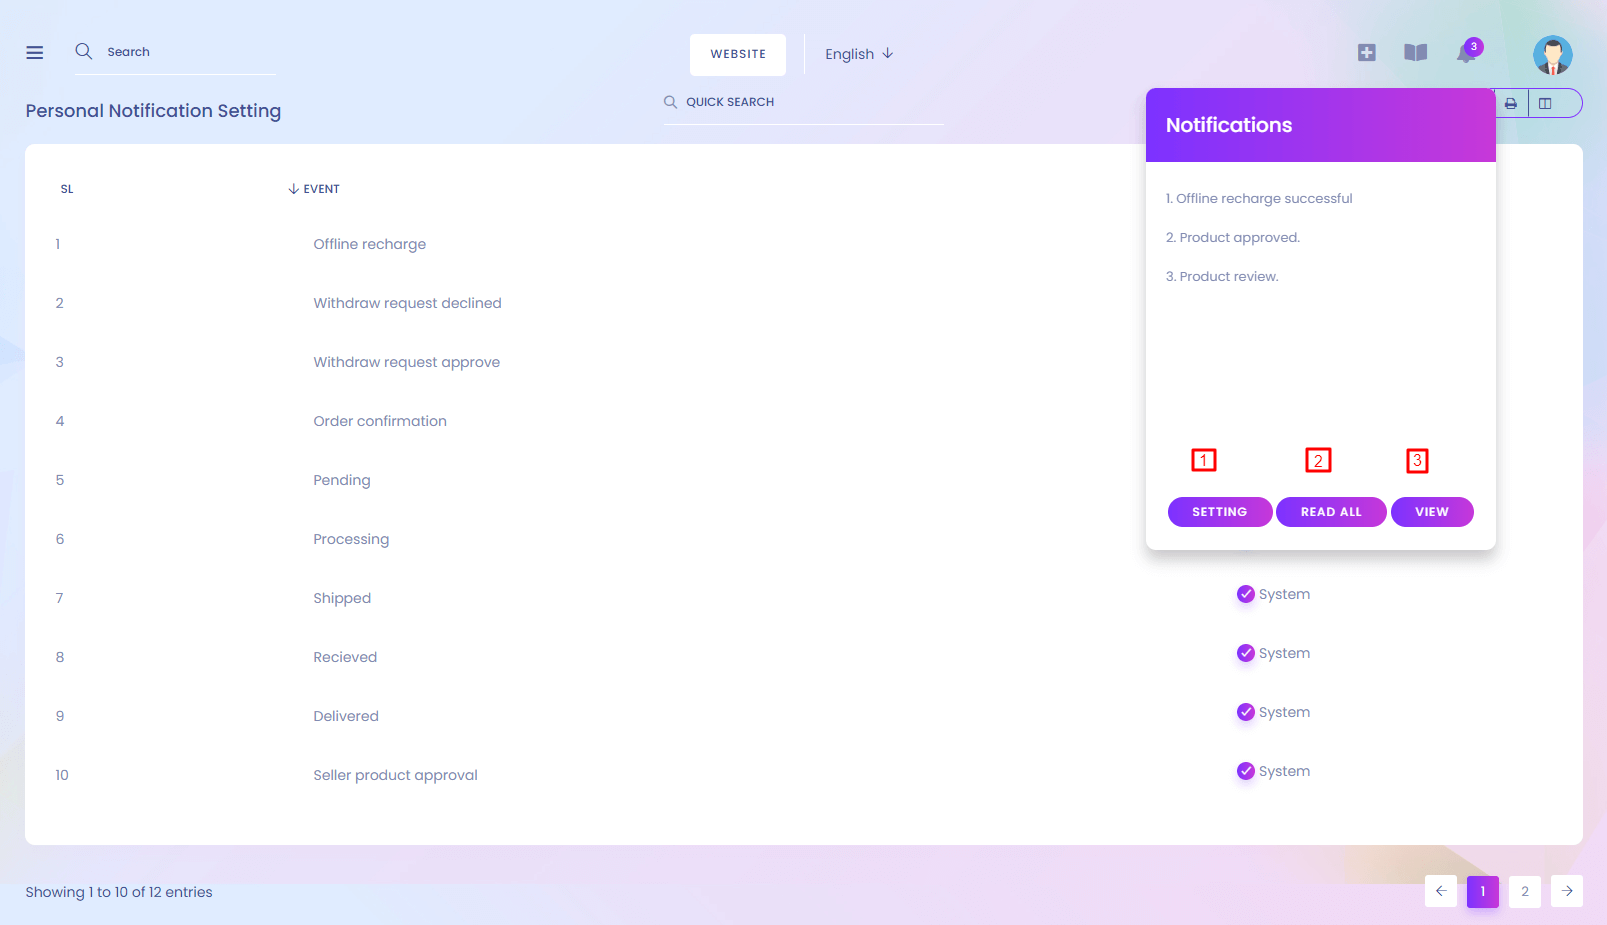
Personal Notification Setting
You can set up which notification you want to get.
1.Setting
Lead you to the notification setting page.
2.Read All
This will mark the notification as read.
3.View
View all notifications.
Frontend CMS
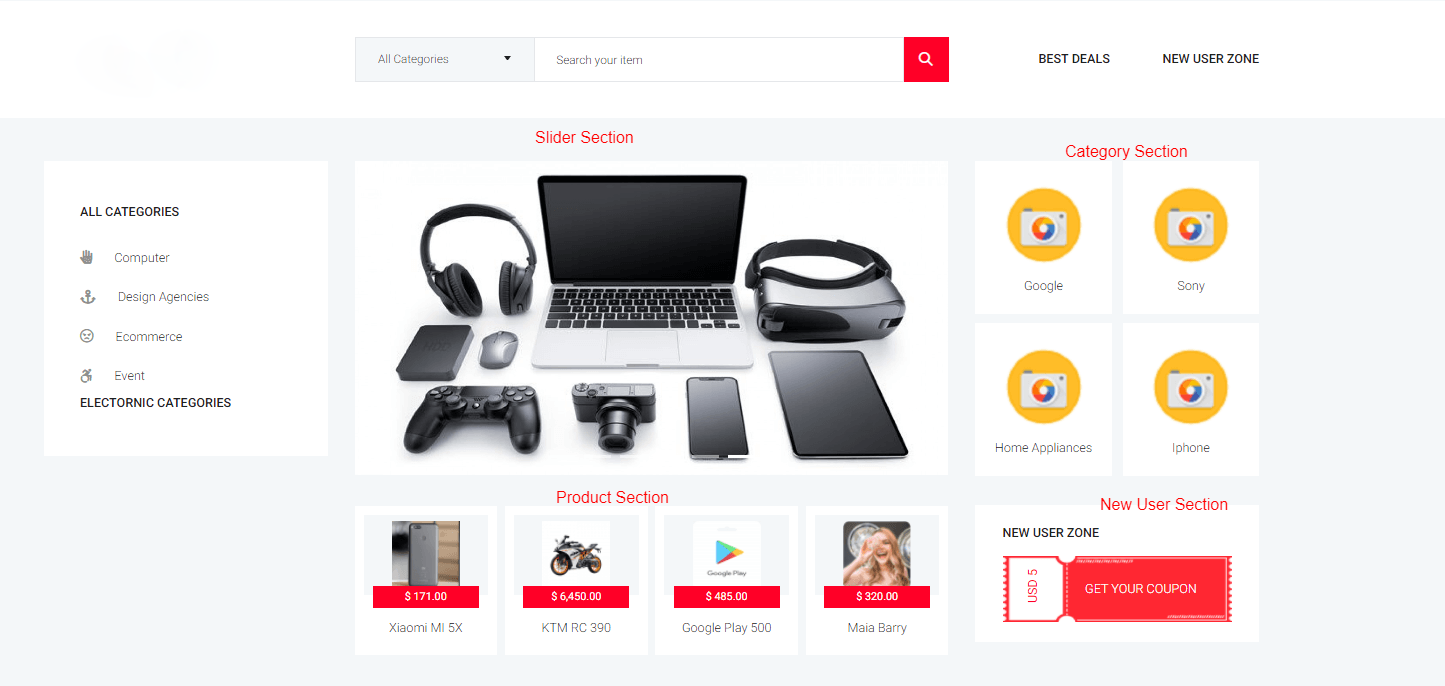
Homepage
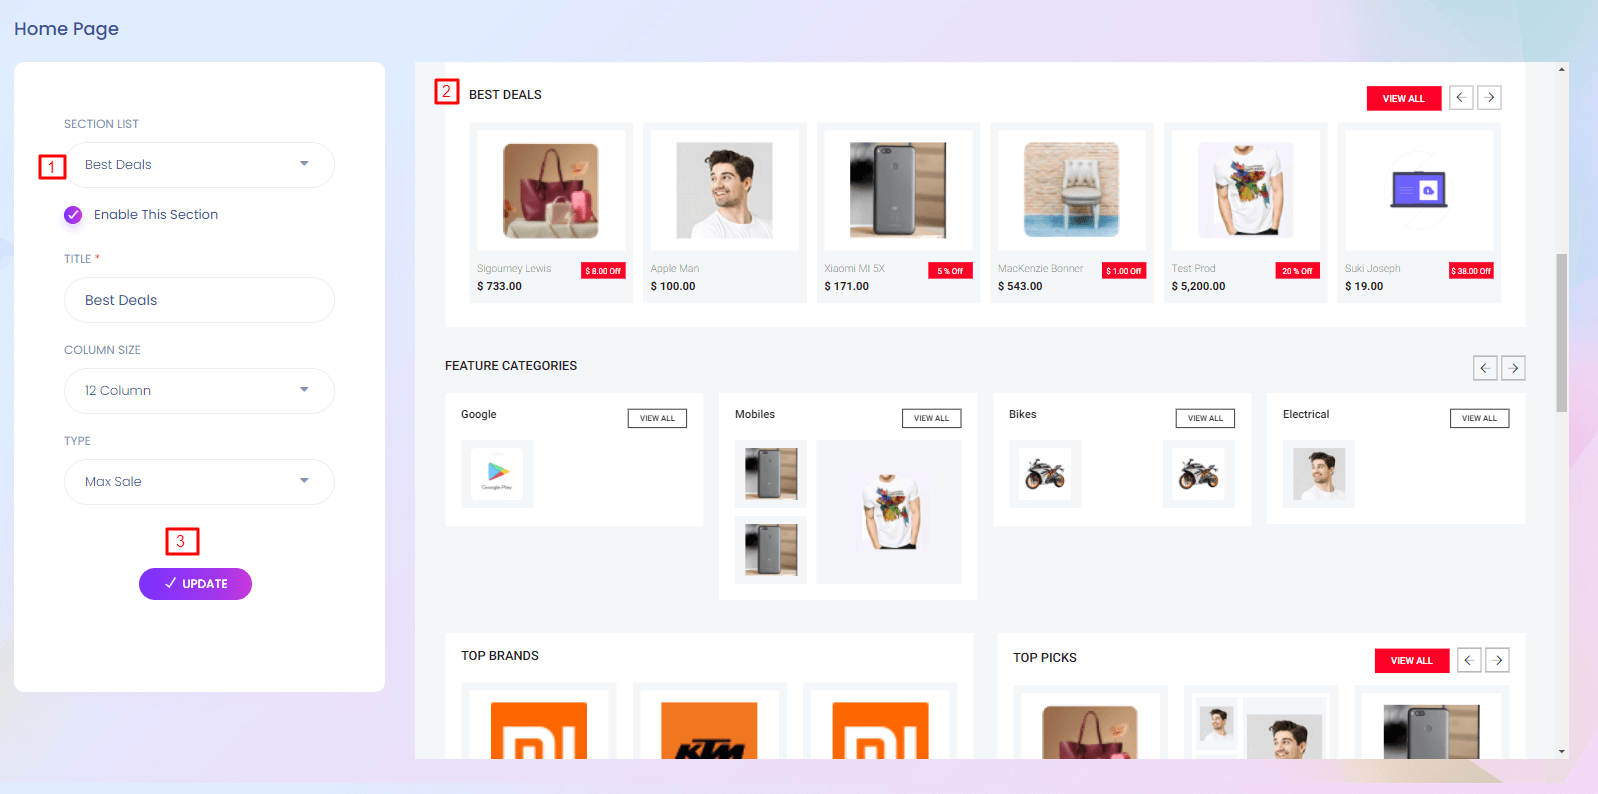
Home Page
This is the landing page of the website. You can customize this page according to your wish.
1 & 2. Select List
This section describe how the home page will show. To change the view of the website you can change it from here. Different selection options are here. Product list changes according to the selection. Admin can enable and disable any section. Disabled section will be hide from the main website.
3. Update
Admin can change title, column size and type. If you want to change the home page column from 6 to 4 , you can update the column size here.
Features
Features
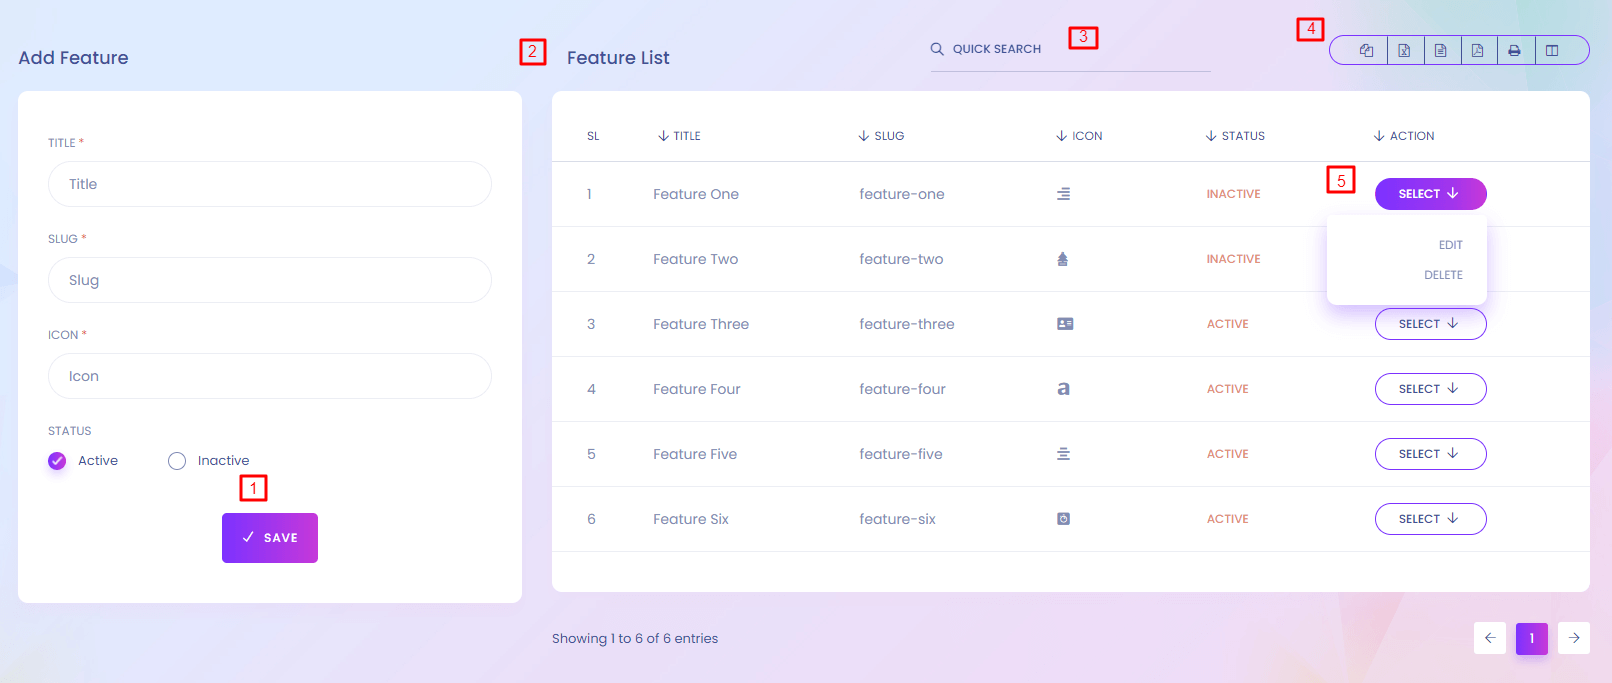
Features
Features describe what your website offers. You can visually represent the features so that users can easily understand what you website offers. You can find the website view at the bottom of any page.
1. Save Feature
Admin can add new feature. Active features are shown in the website.
2. Feature List
Feature List is shown here.
3. Quick Search
Easily search the table by entering any key.
4. Icons
The icons are used for copy,csv,excel,print,pdf all the data from the table.
5. Action
Feature can be edit or delete from here.
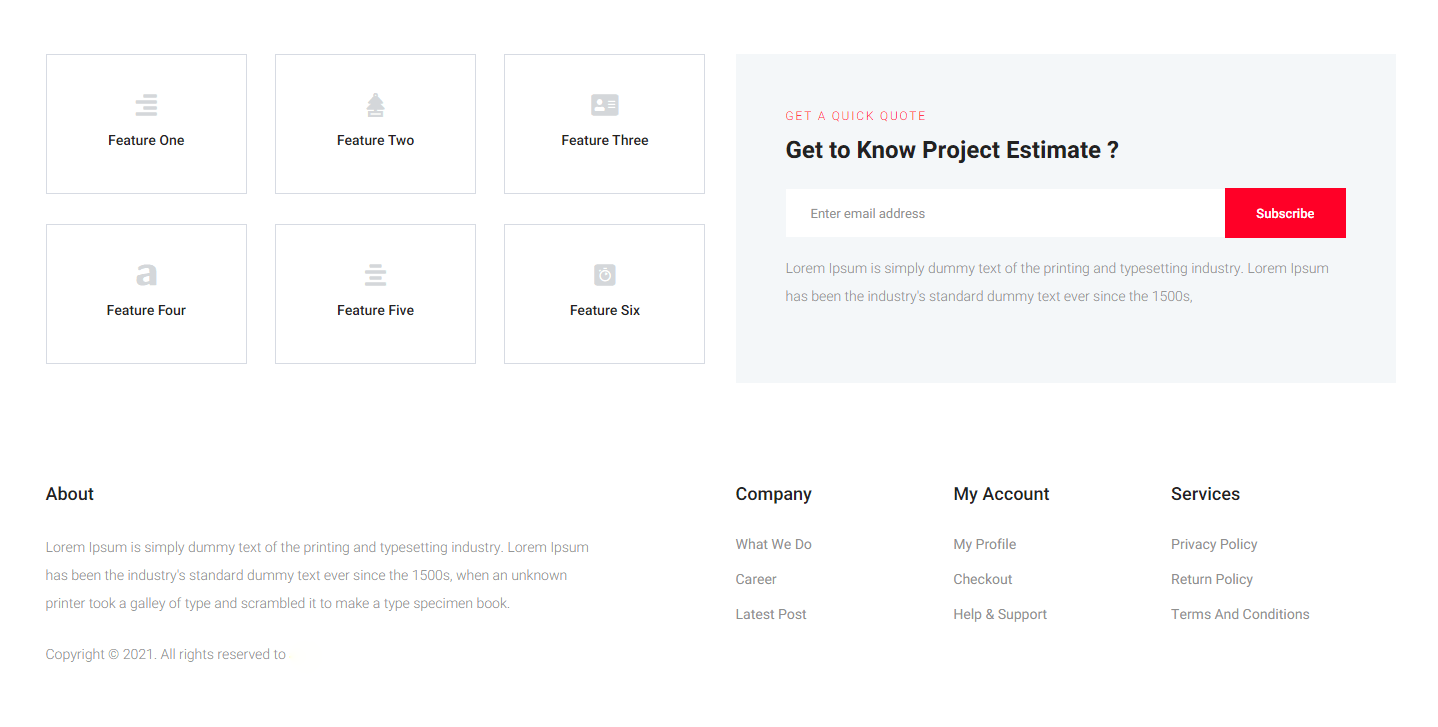
Features Website View
Merchent Content
Merchent Content
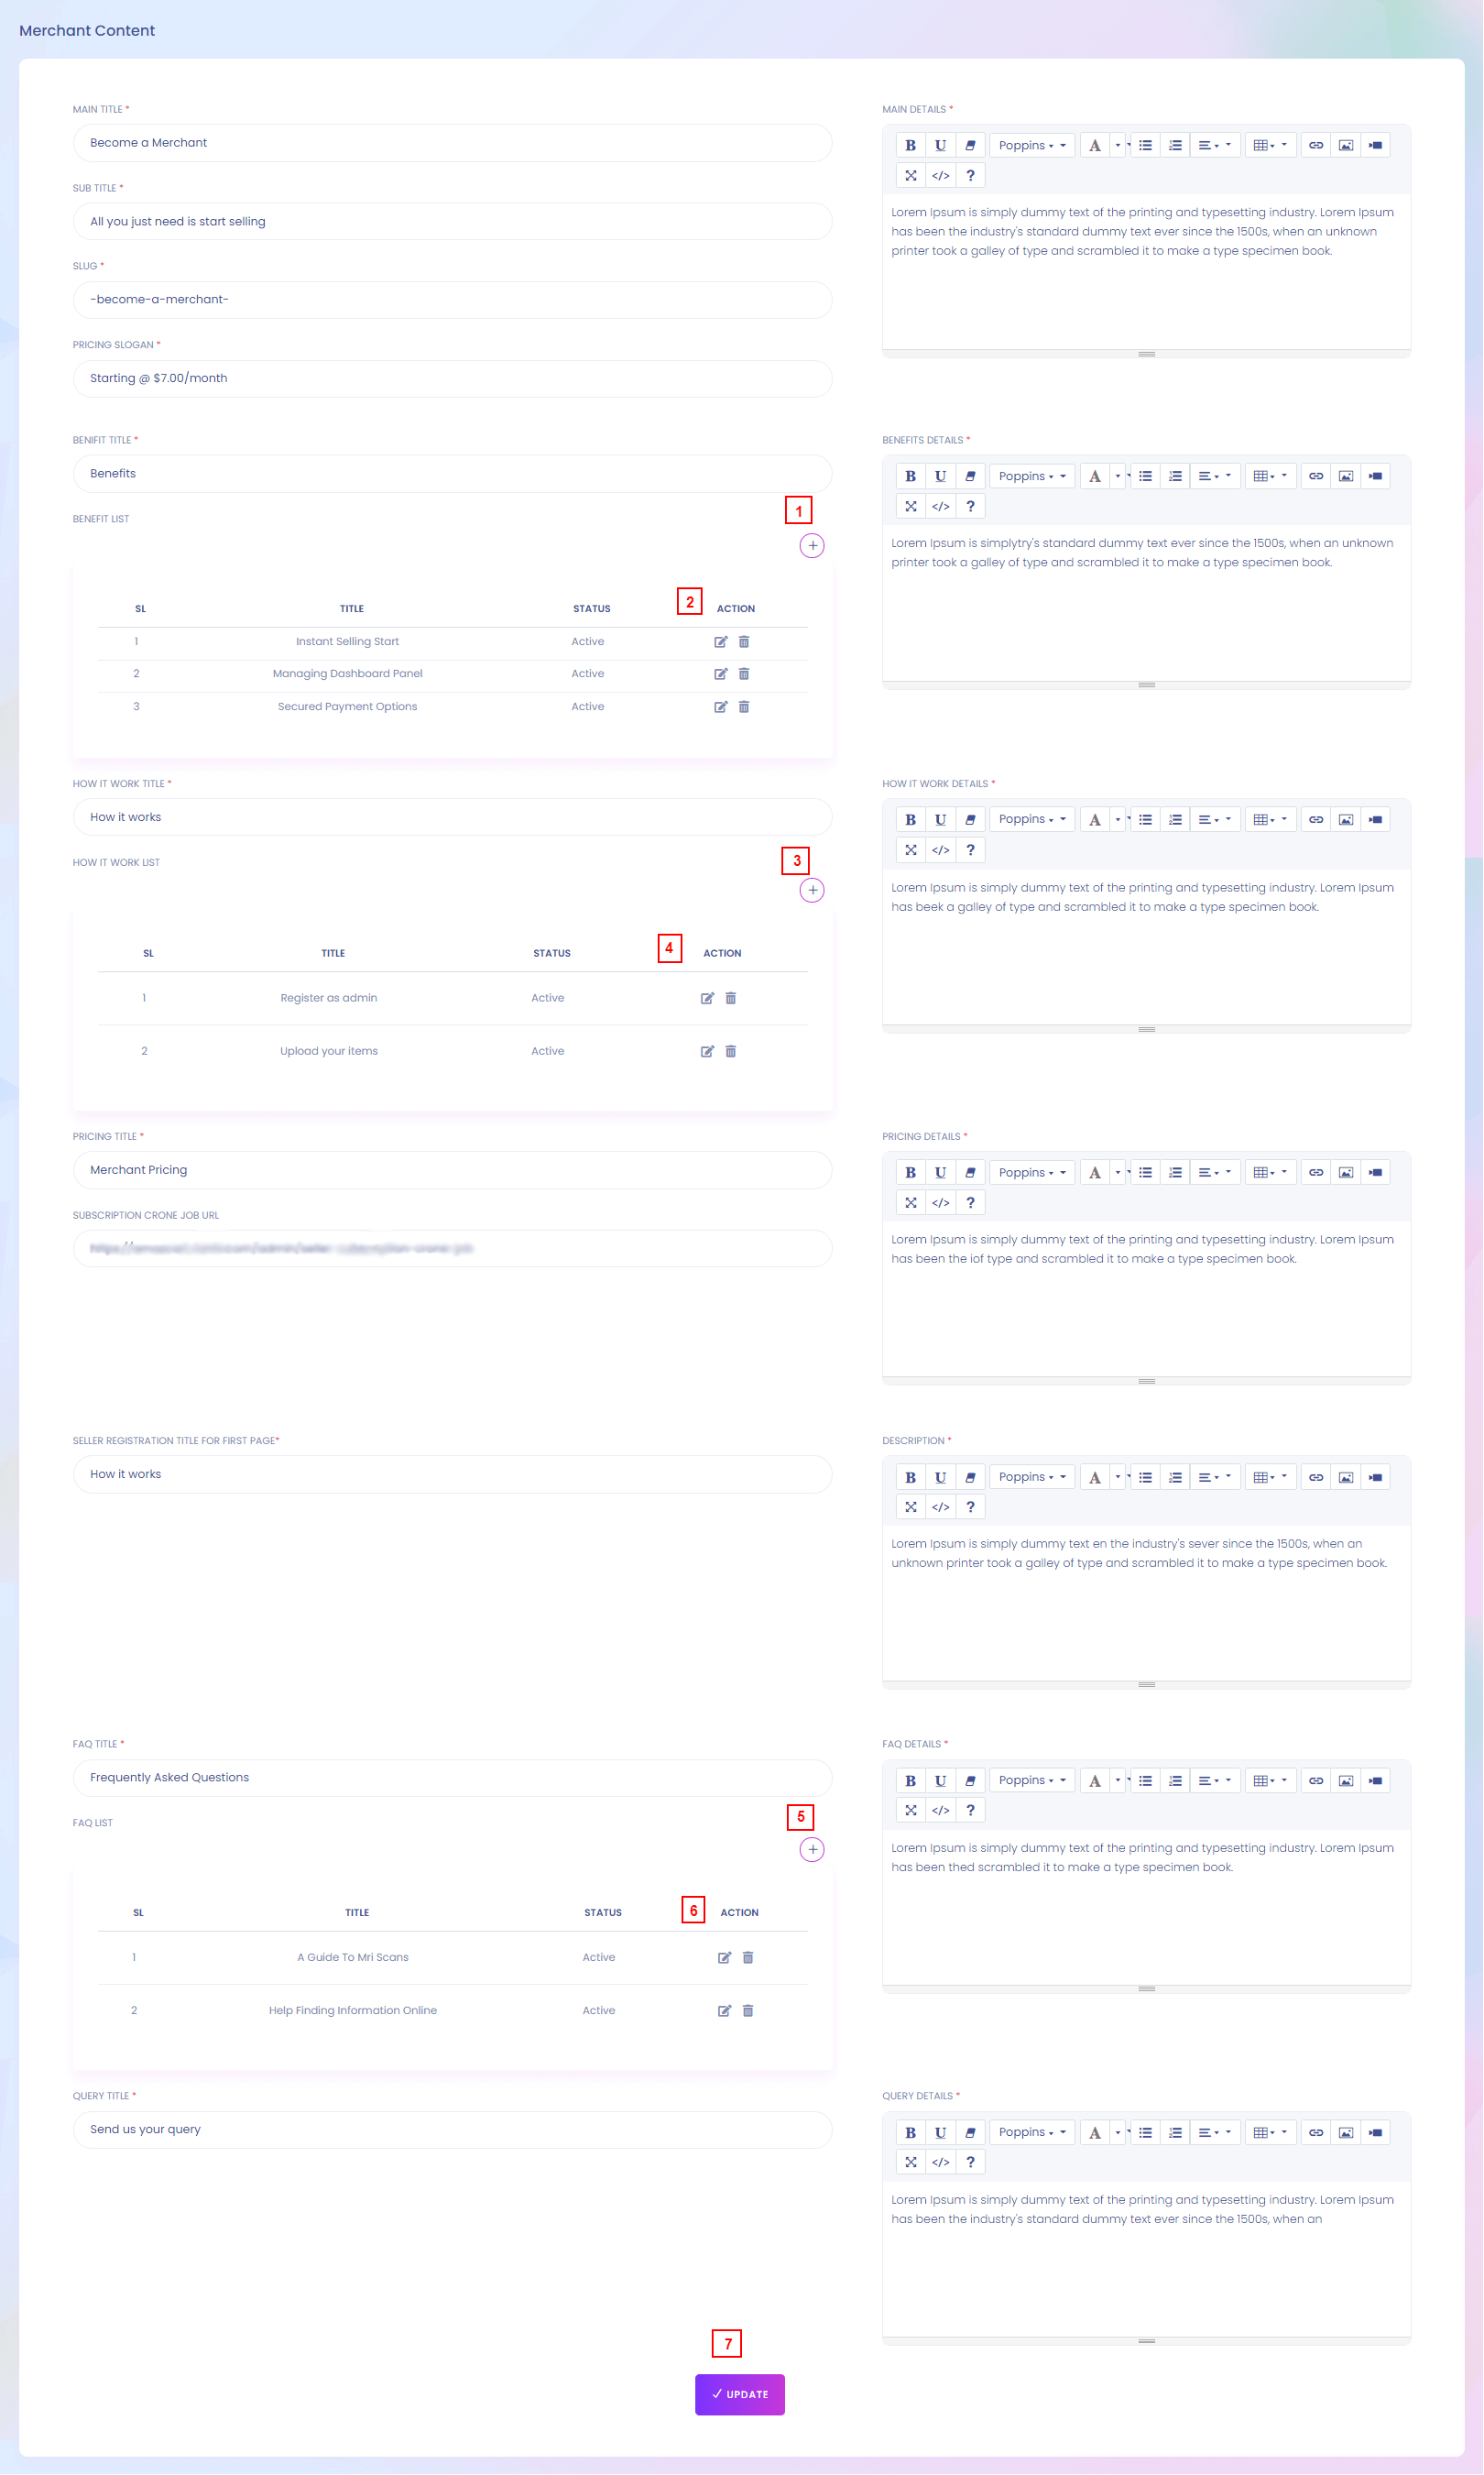
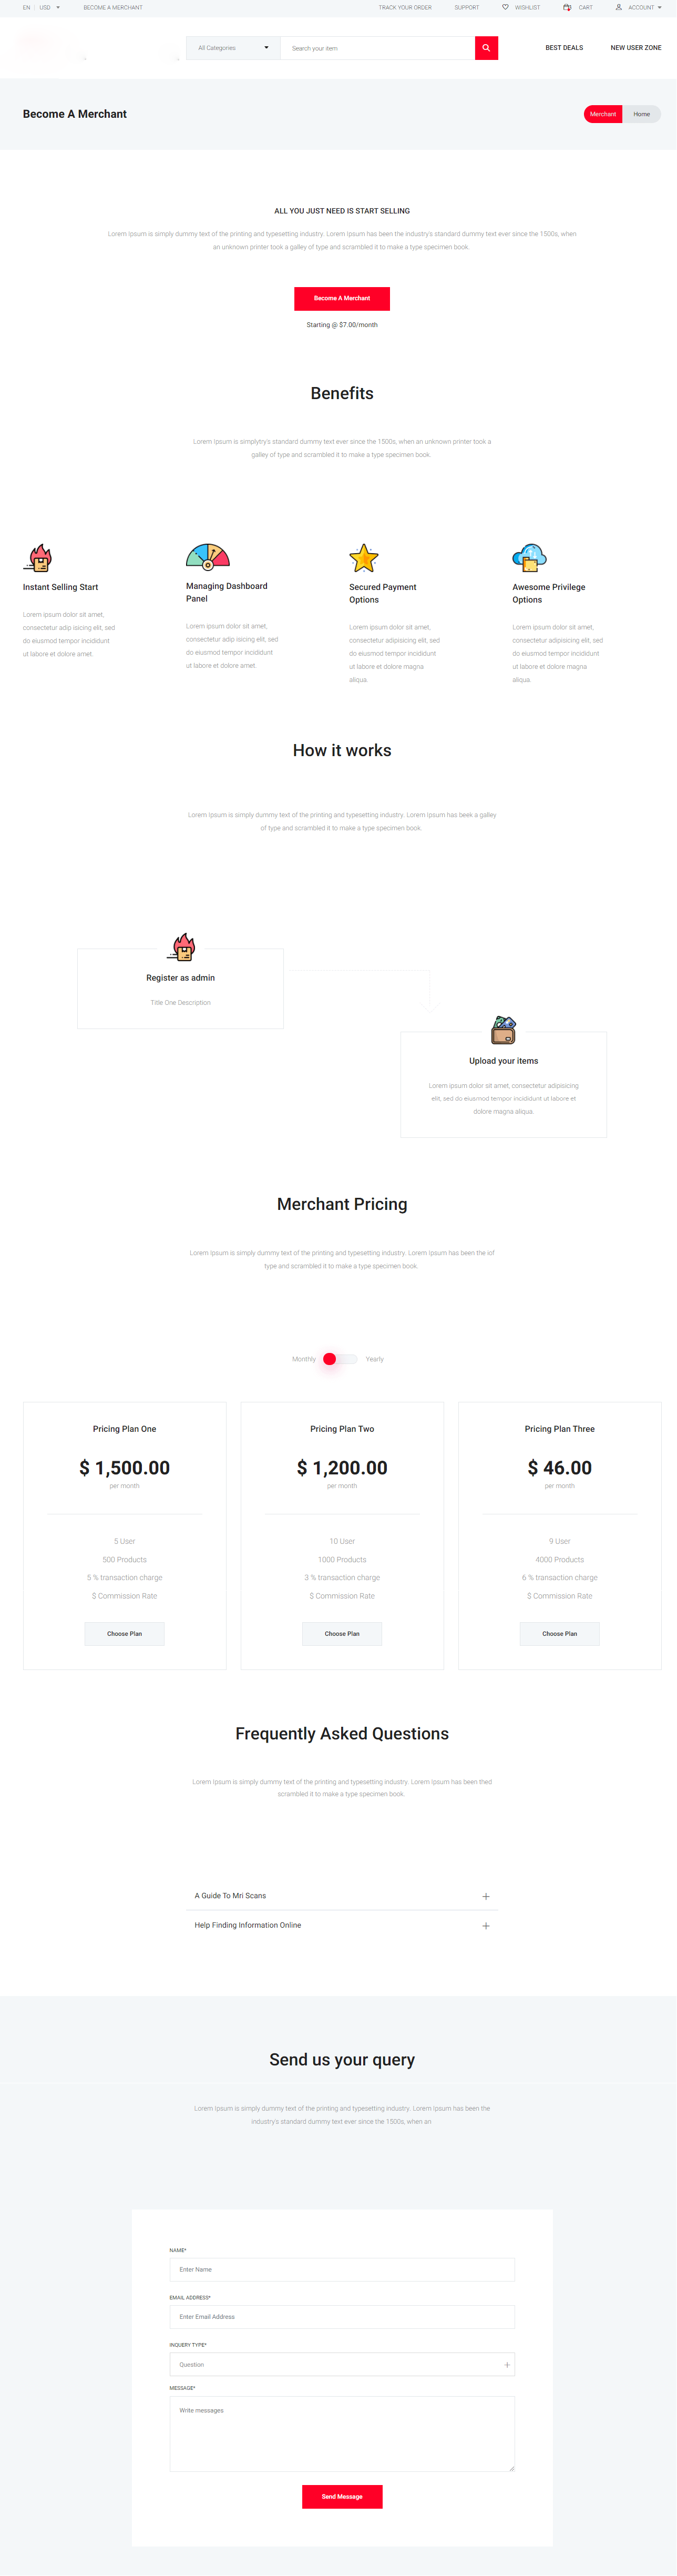
Merchant Content
This is the merchant page for regestration. You can customize this page. You can find the page here https://yourdomain.com/merchant.
1. Add Benifit List
Admin can add new Benifit List. Benifit List are shown in the merchant page.
2. Benifit Action
Benifit List can edit or delete.
3. Add How It Work List
Admin can add new How It Work List. How It Work List are shown in the merchant page.
4. Benifit Action
Benifit List can edit or delete.
5. Add Frequently Asked Question List
Admin can add new Frequently Asked Question List. Frequently Asked Question List are shown in the merchant page.
6. Frequently Asked Question Action
Frequently Asked Question List can edit or delete.
7. Update
All the details of the merchant can be updated..
Merchent Content Website View
Return & Exchange
Return & Exchange
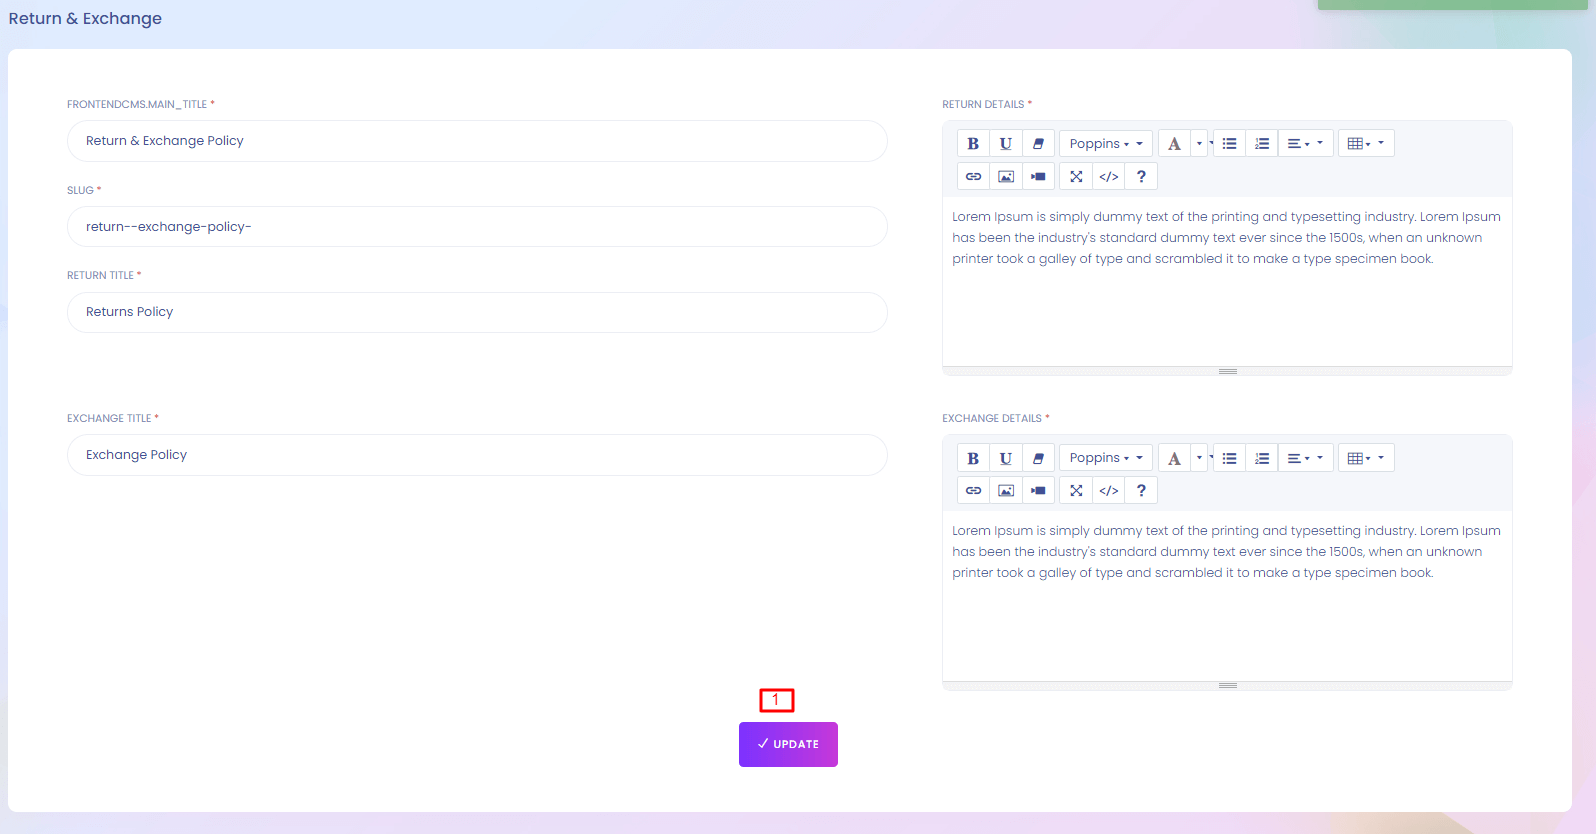
Return & Exchange
If any user wants to return any product he/she has to follow the return and exchange policies. You can find the page here https://yourdomain.com/return-exchange .
1. Update
Admin can update Return & Exchange . (*) marked fields are required
Return & Exchange Website View
Contanct Content
Contact Content
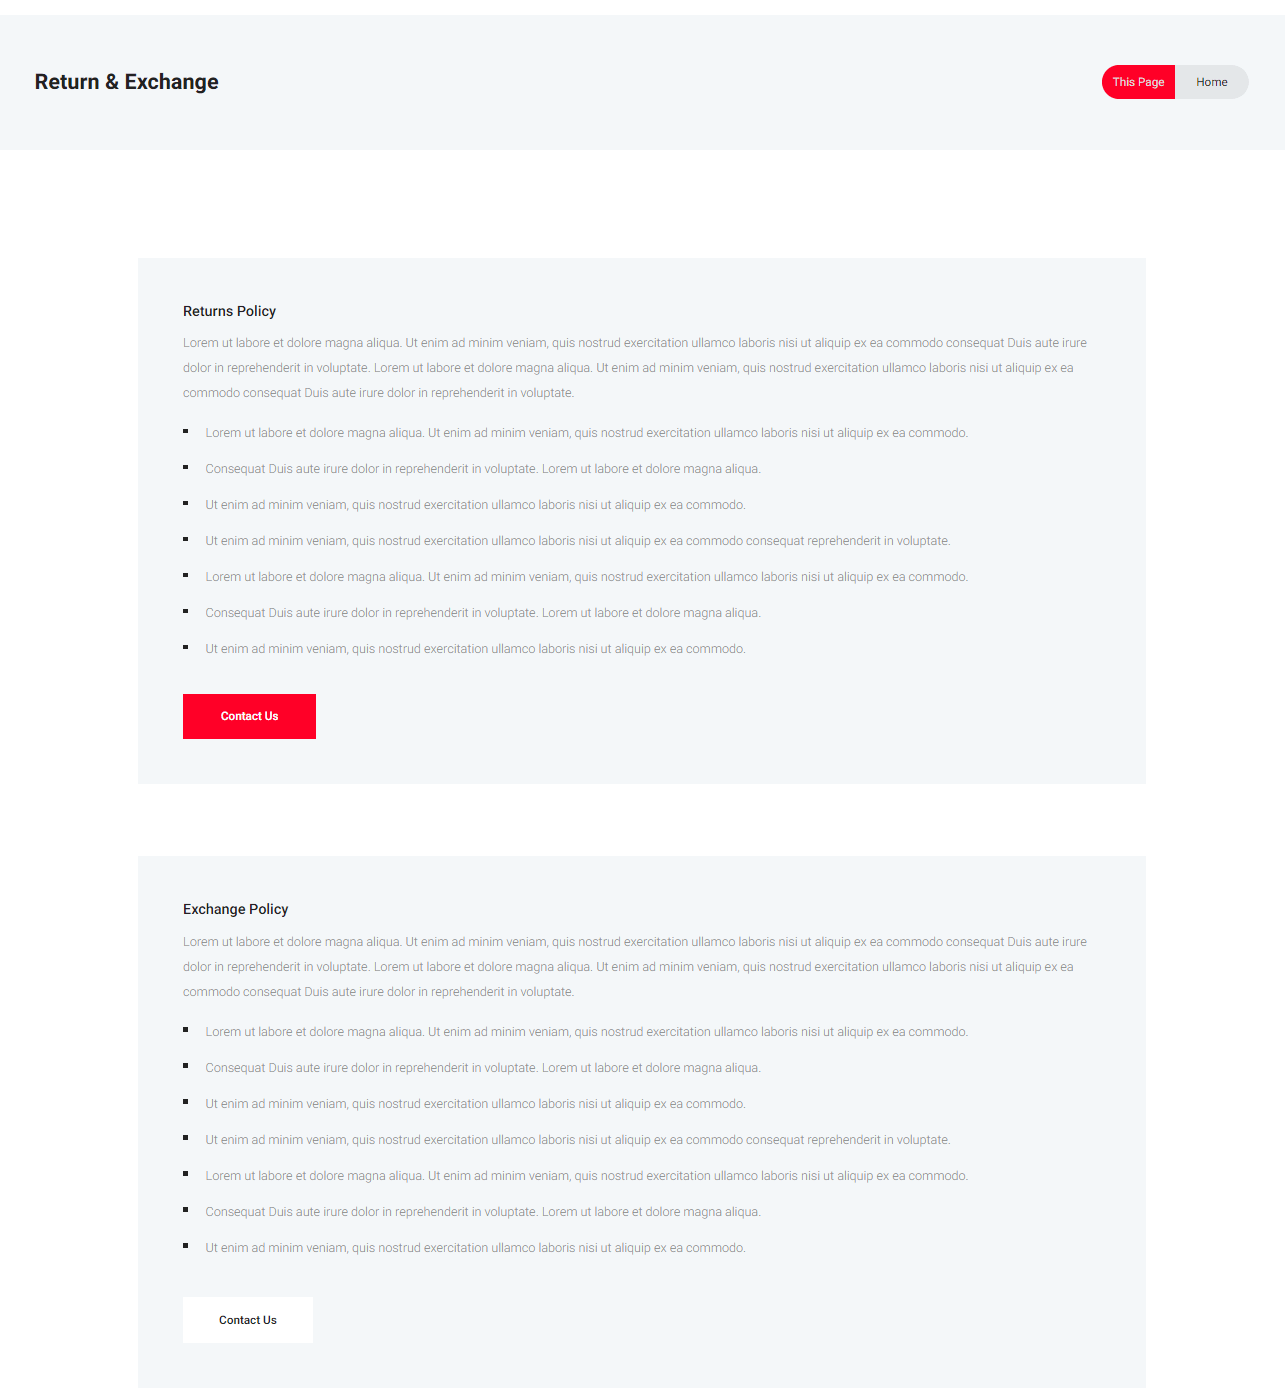
Contact Content
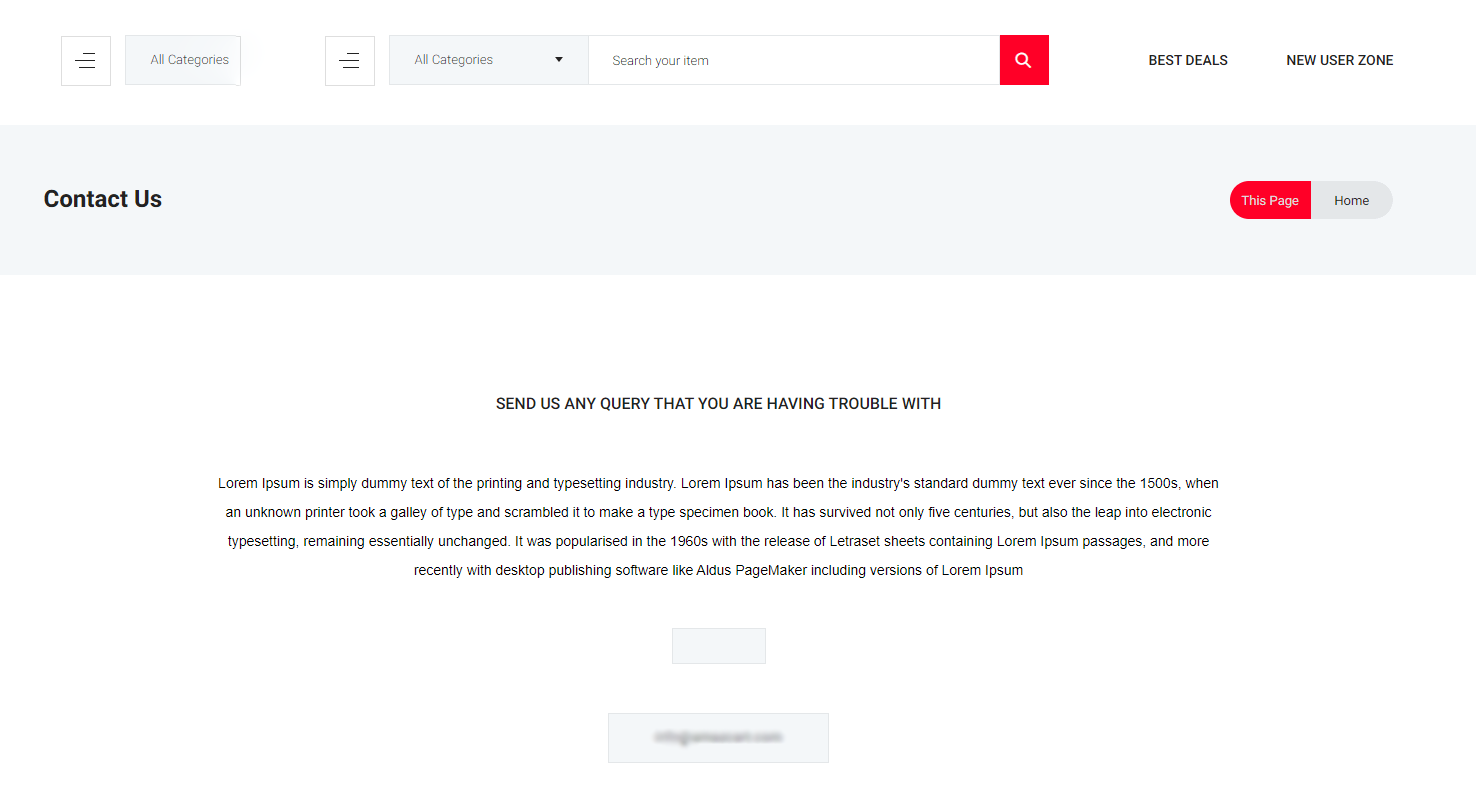
Setup your "contact us" page for users. You can find the page here https://yourdomain.com/contact-us .
1. Update
Admin can update Contact Content. All the fields are required.
2. Save
Admin can add edit and delete inquery.
Contact Content Website View
Dynamic Pages
Dynamic Pages
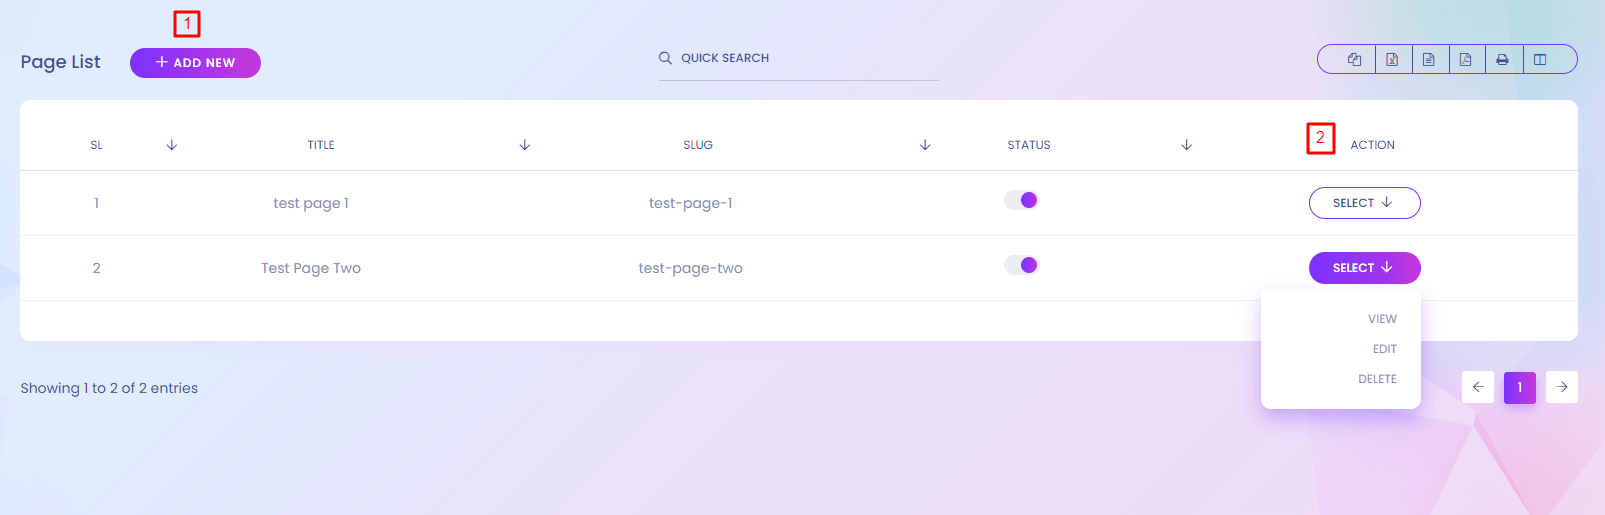
Dynamic Page
Dynamic pages are not directly shown in the website. When you add any dynamic page you can find it in many section like footer, menu etc where you can add the page.
1. Add New
Dynamic Pages can be added from here.
2. Action
Admin can view, edit and delete the dynamic pages.
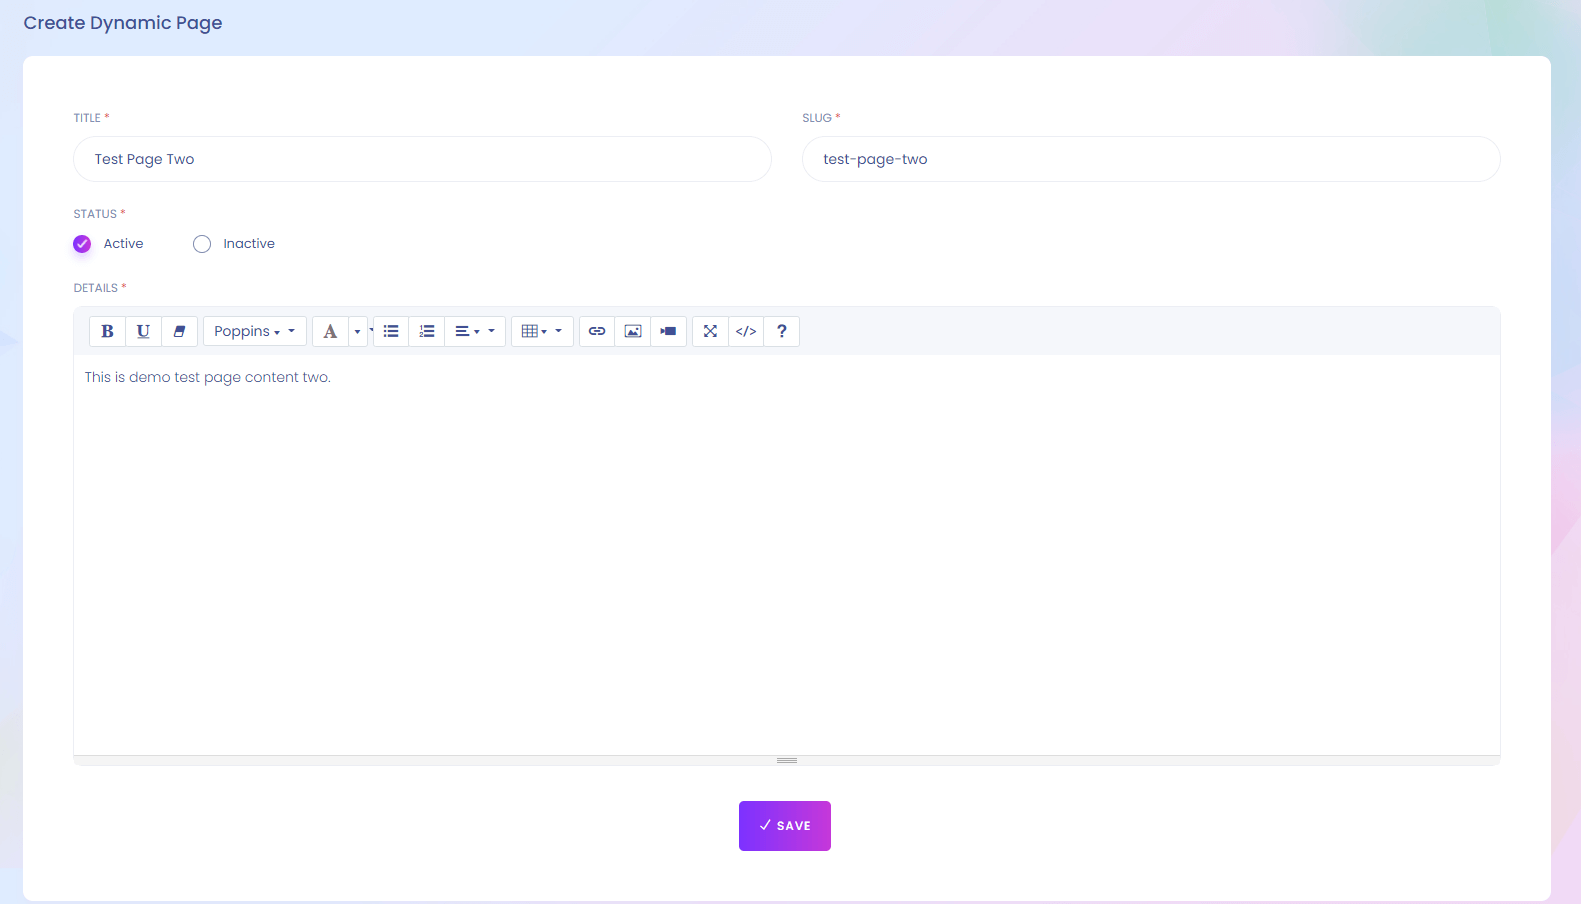
Dynamic Page (Create)
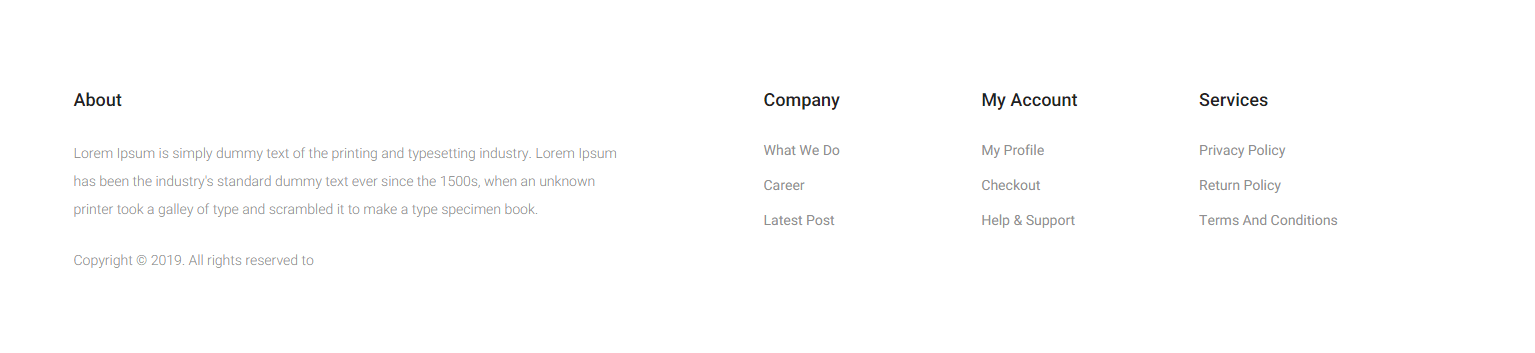
Footer Setting
Footer Setting (Copyright)

Footer Setting
You can dynamically change your footer contents. It is the bottom part of the website.
1. Copyright Text
Admin can update copyright text content.
Footer Setting (About)
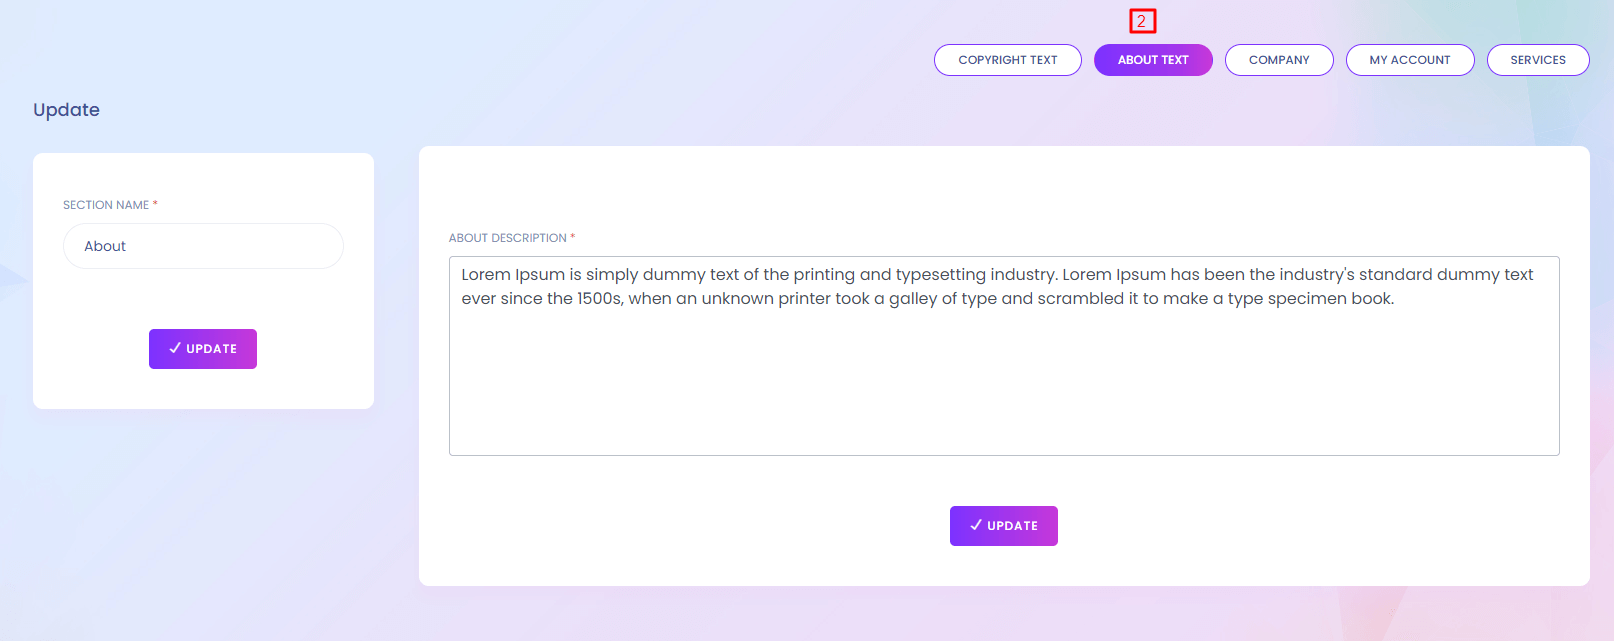
2. About Text
Admin can update about text content.
Footer Setting (Company)
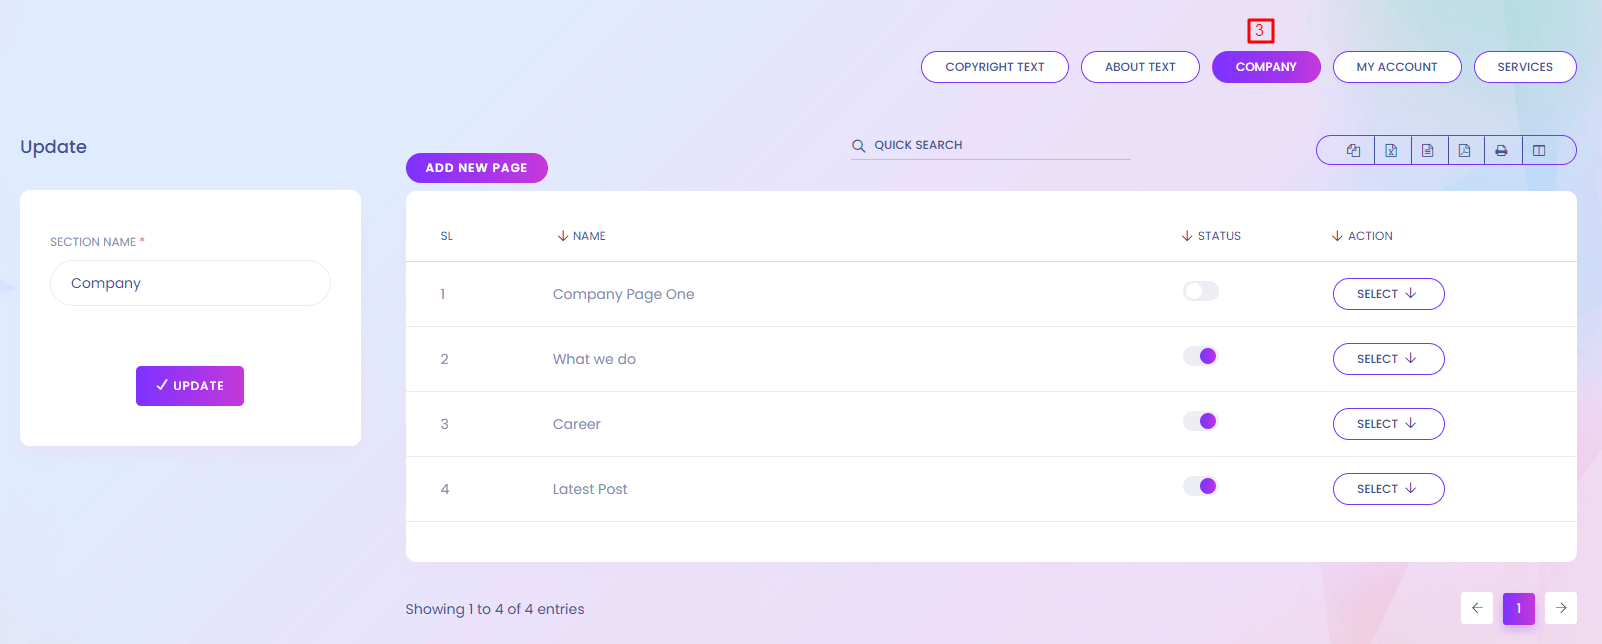
3. Company
Admin can add new page and update the section name "Company".
Footer Setting (My Account)
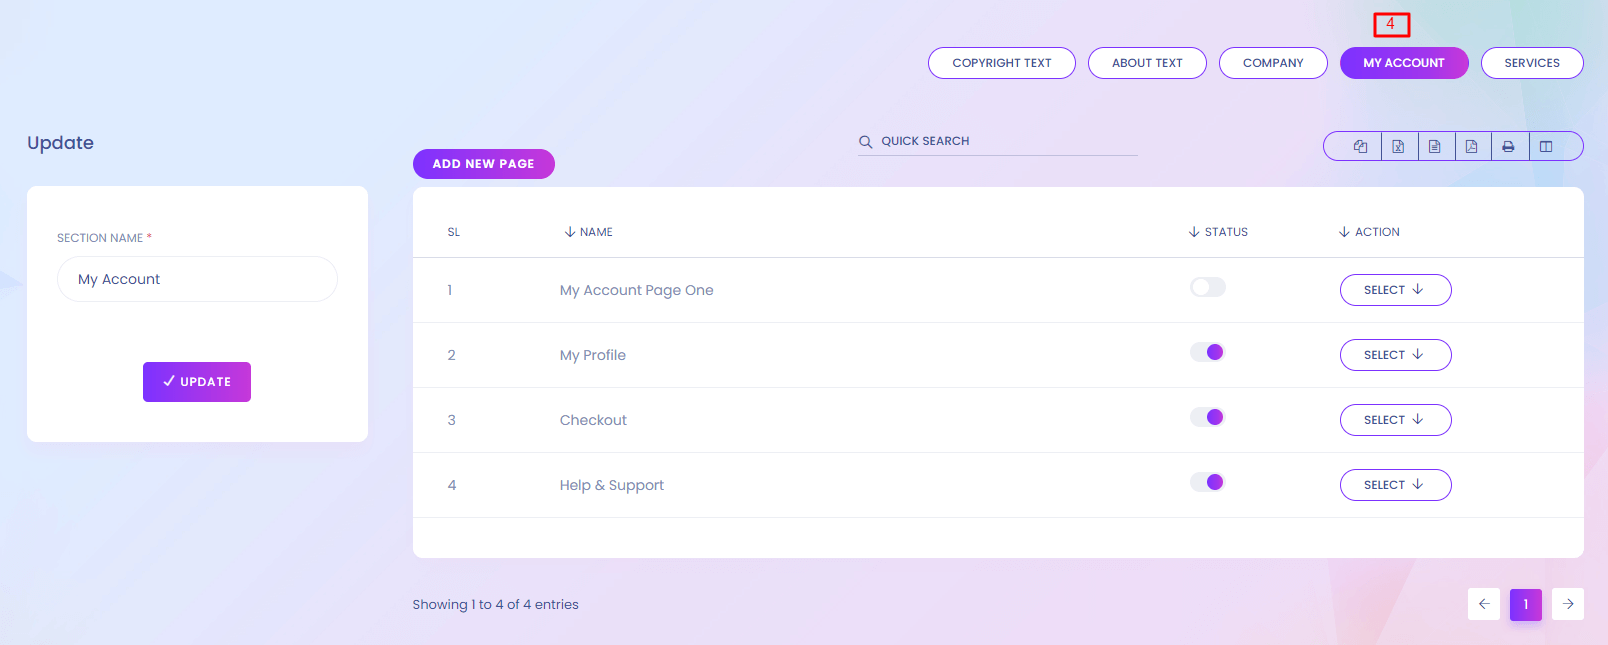
4. My Account
Admin can add new page and update the section name "My Account".
Footer Setting (Services)
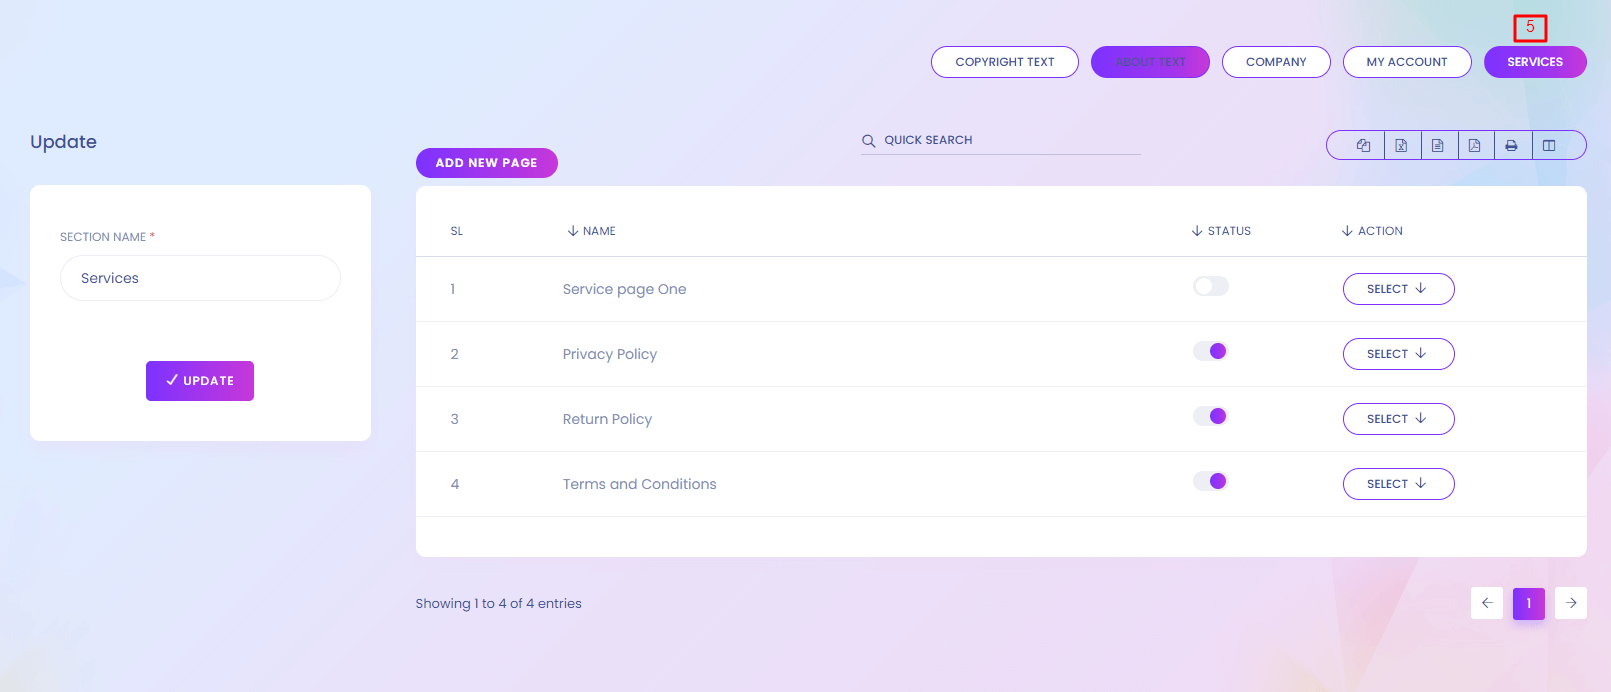
5. Services
Admin can add new page and update the section name "Services"
Footer Setting Website View
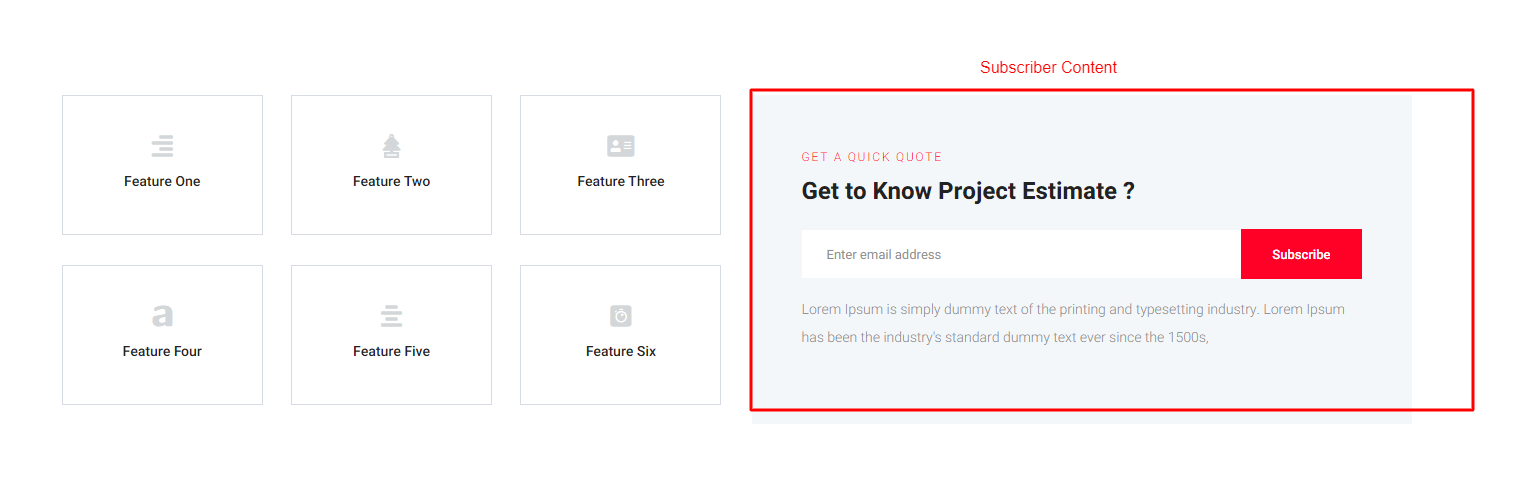
Subscribe Content
Subscribe Content
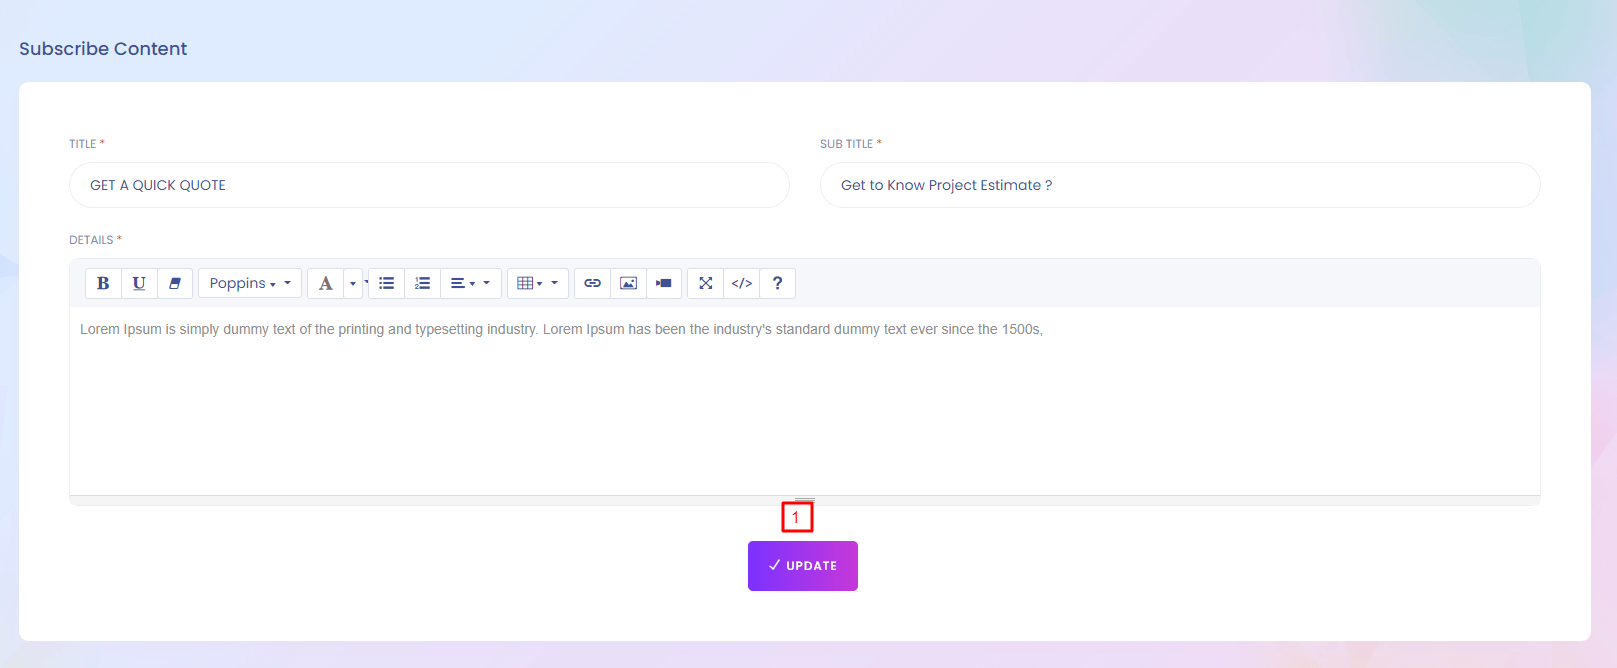
Subscribe Content
You can update the subscribe content text.You can find it in the bottom of the website.
1. Update
Subscribe Content can be updated from here. All the fields are required.
Subscribe Content Website View
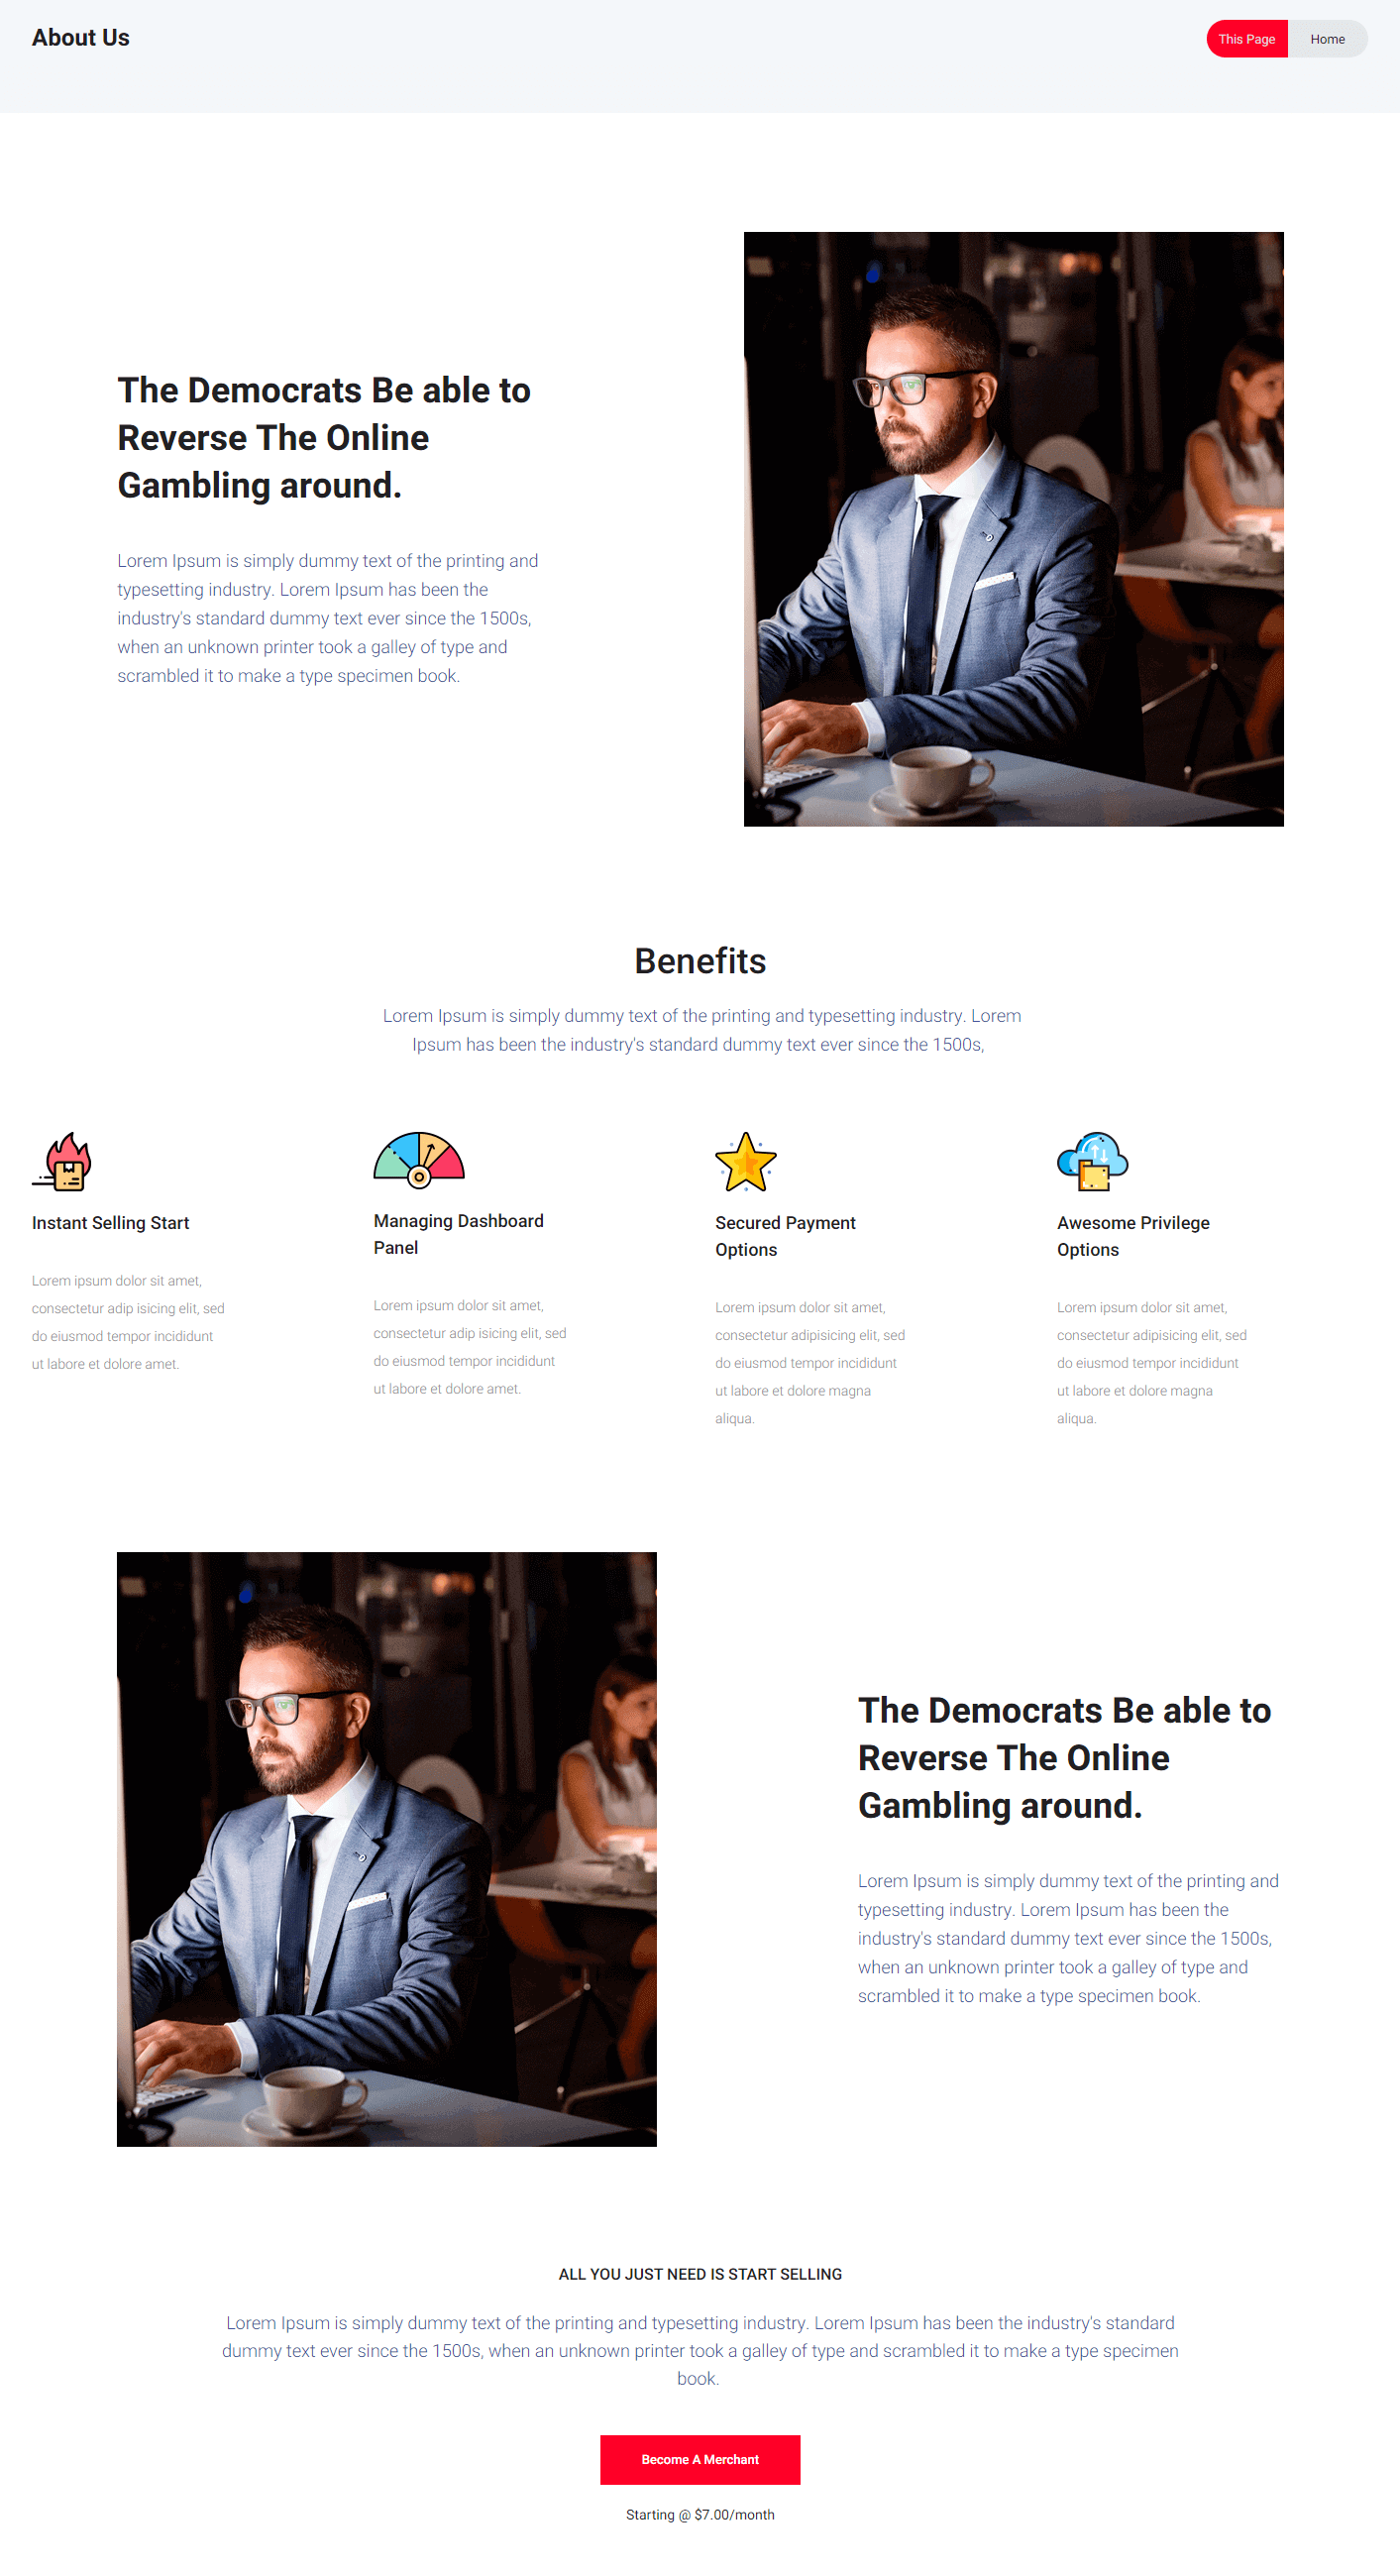
About Us
About Us
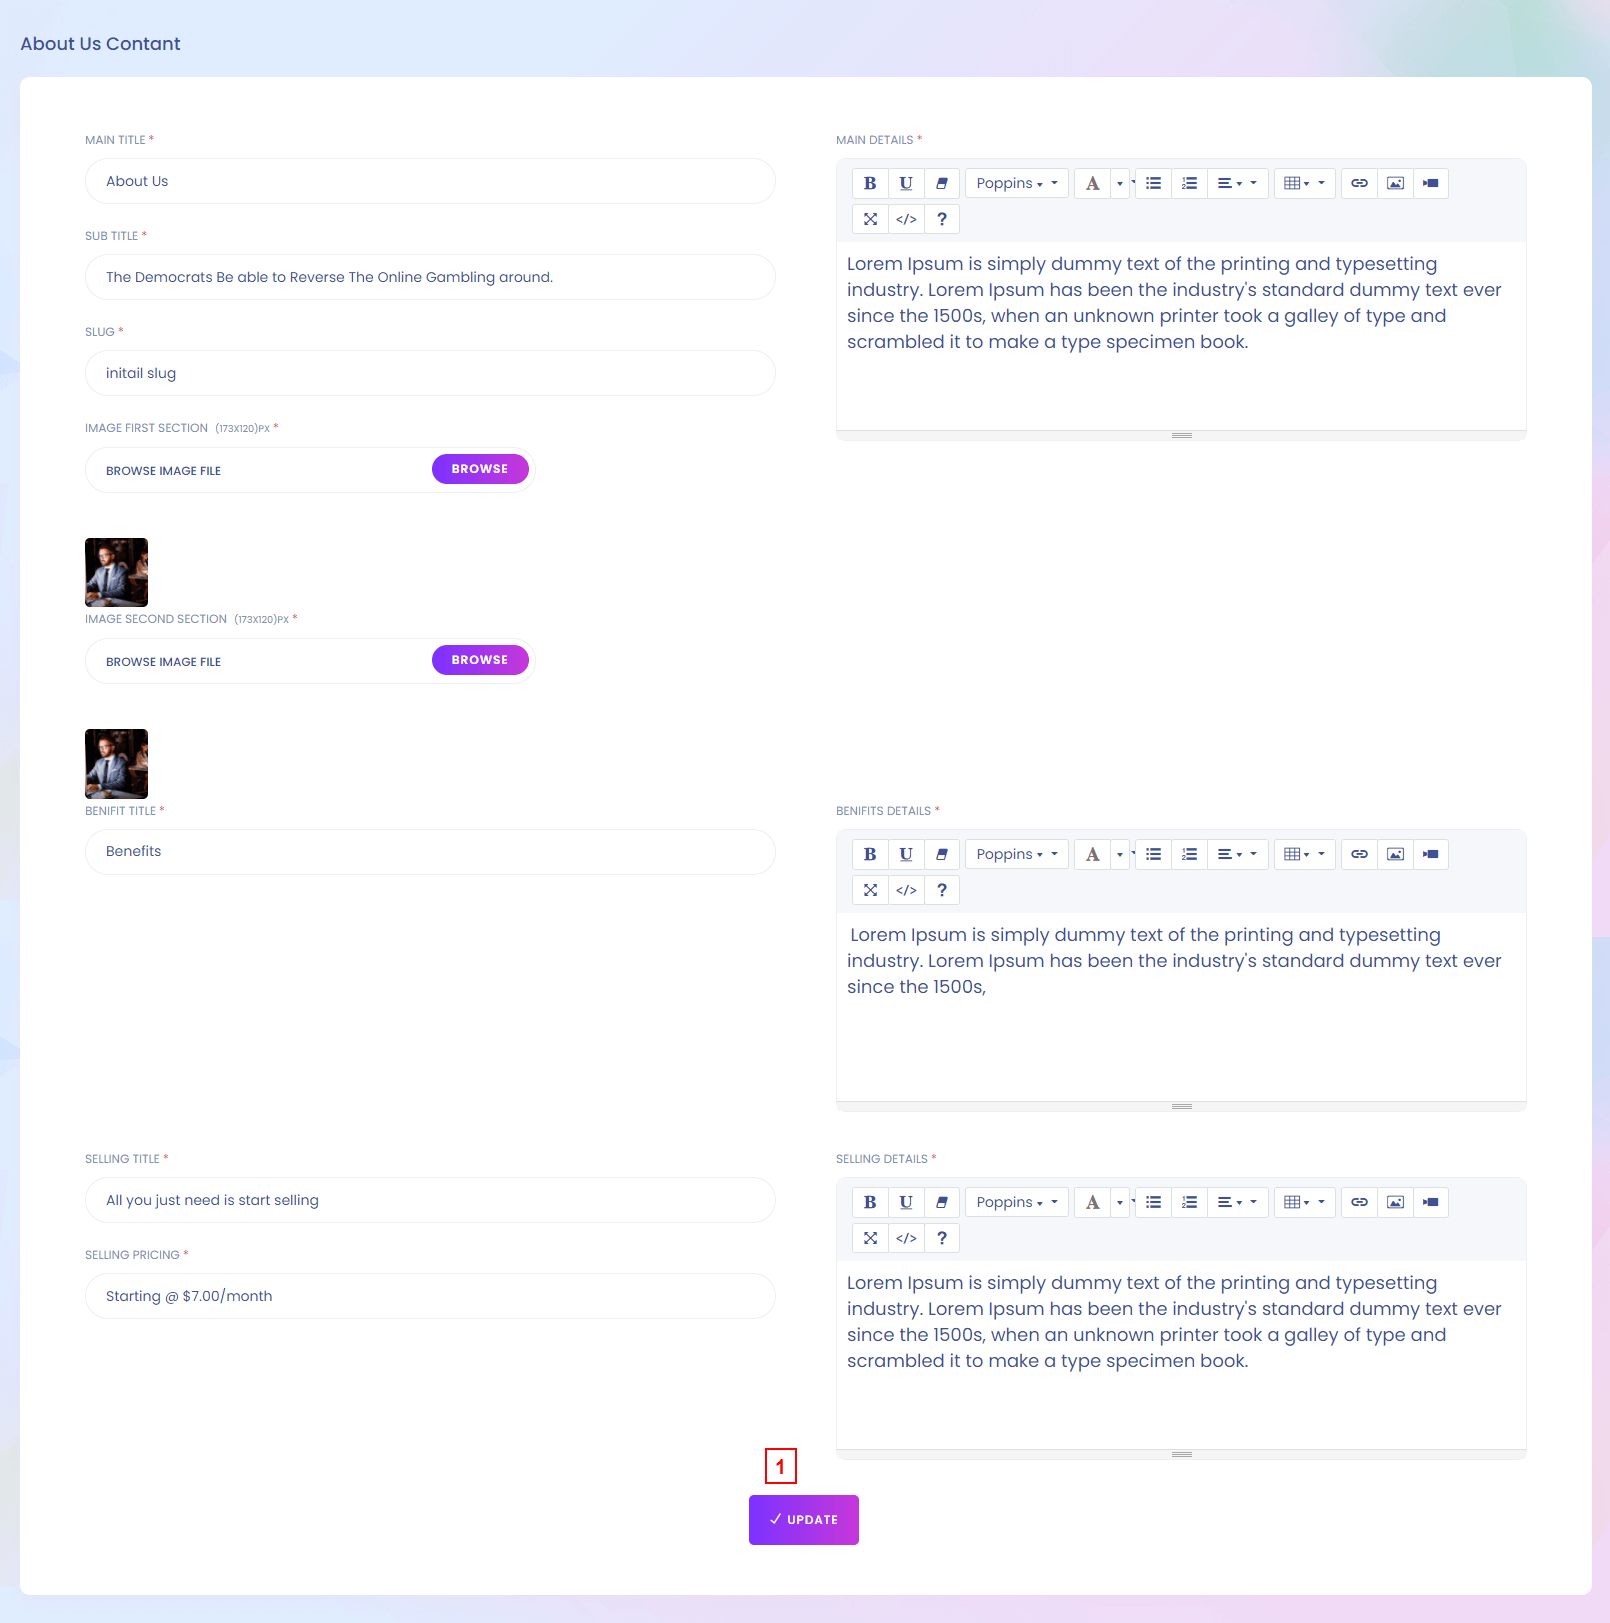
About Us
This is the about us page details. You can update your about us page information from here. You can find the page here https://yourdomain.com/about-us
1. Update
Admin can update about us page Content. All the fields are required.
About Us Website View
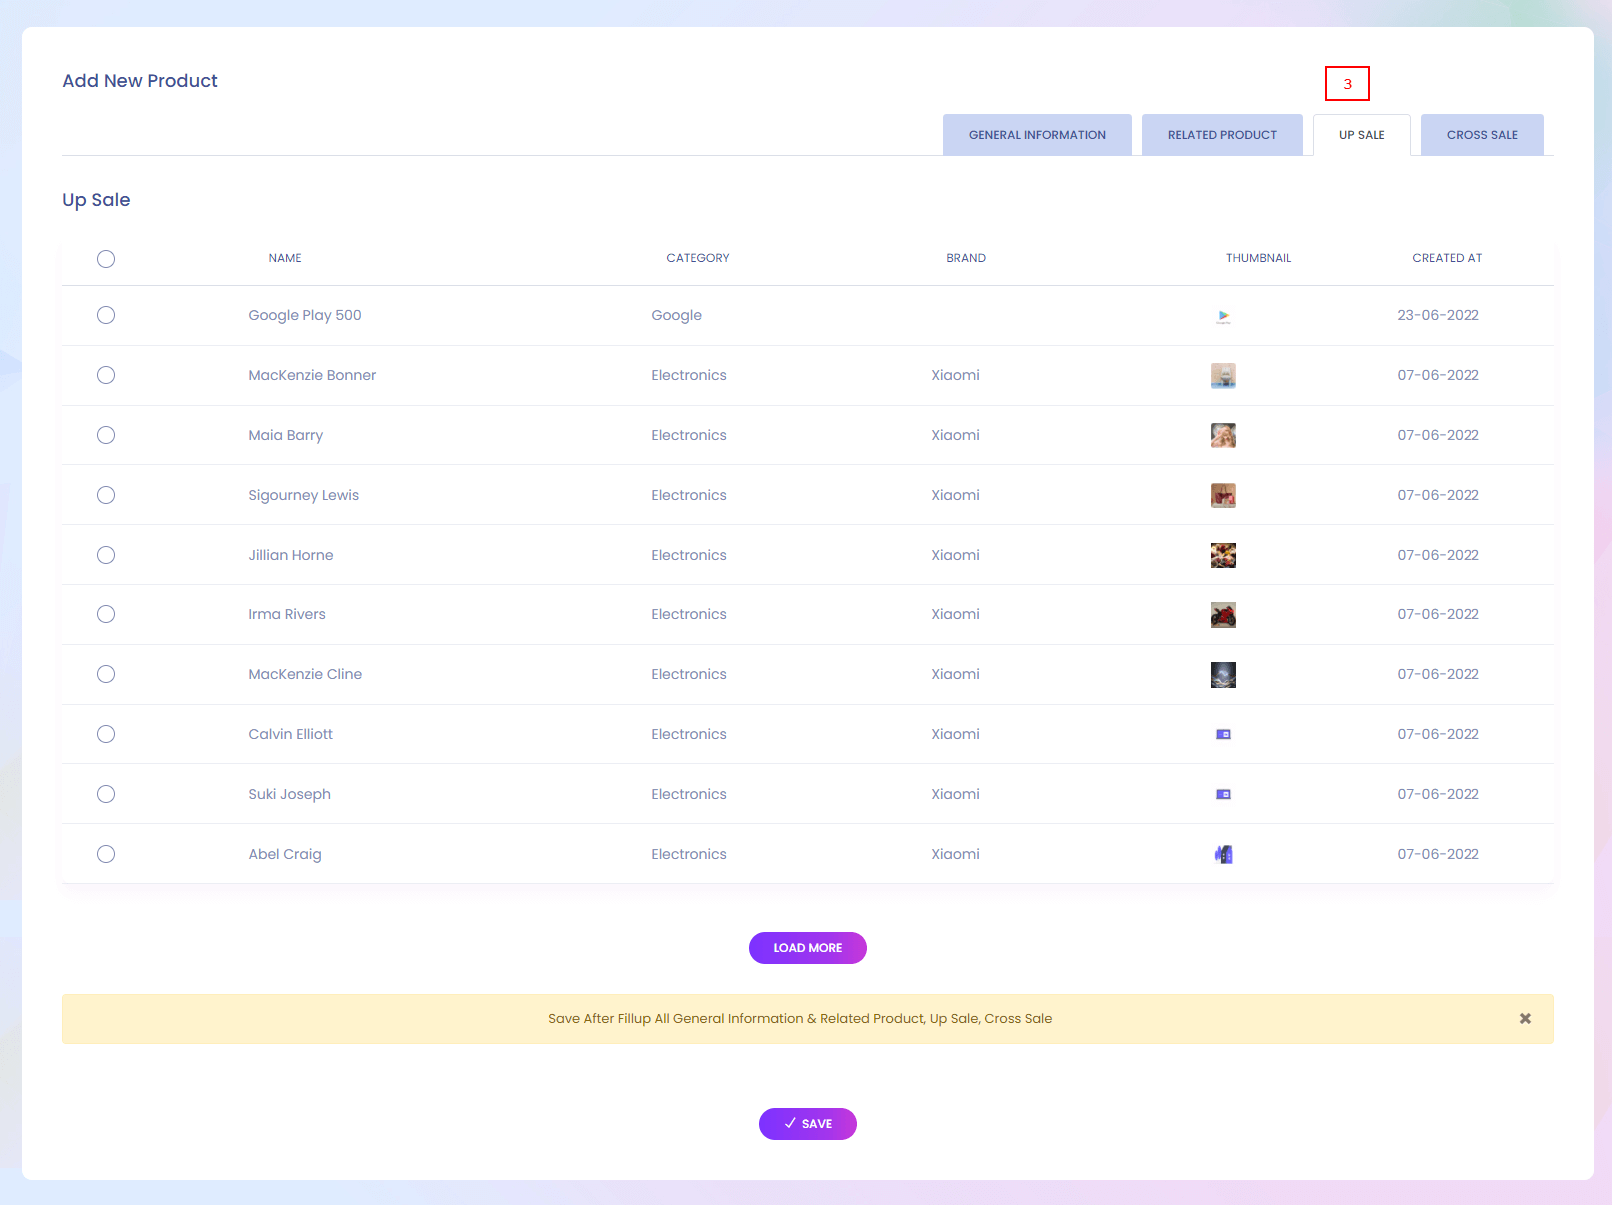
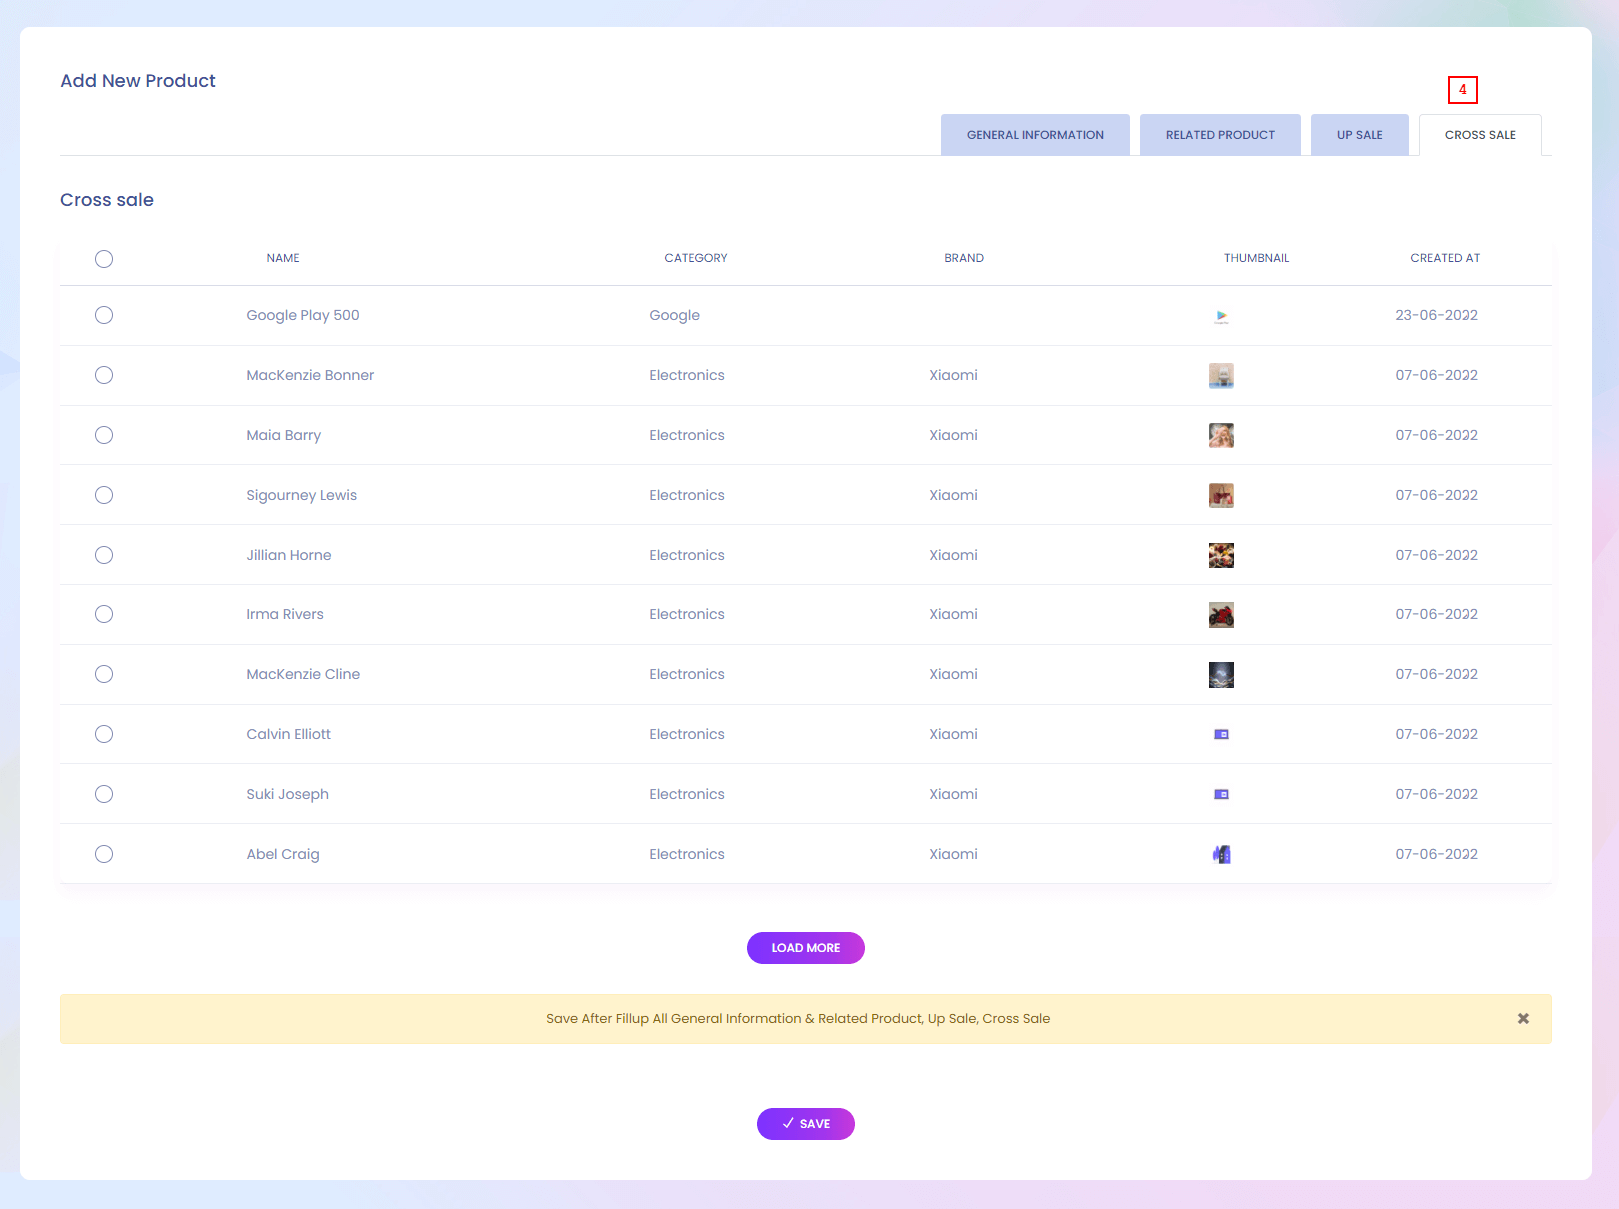
Related Sale Setting
Related Sale Setting

Related Sale Setting
There are two types of product. Up sale product and cross sale product. You can change the title of this two type product title.
1. Save
Admin can update up Sale Product and Cross Sale Product title.
Themes
Themes
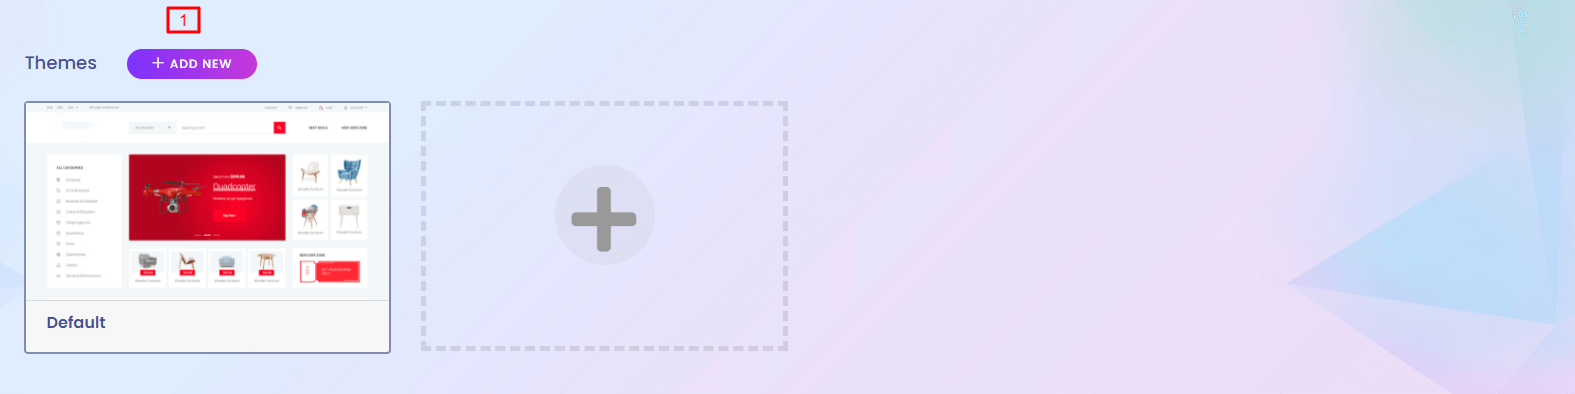
Themes
Themes represent how the website will look. You can add new theme.
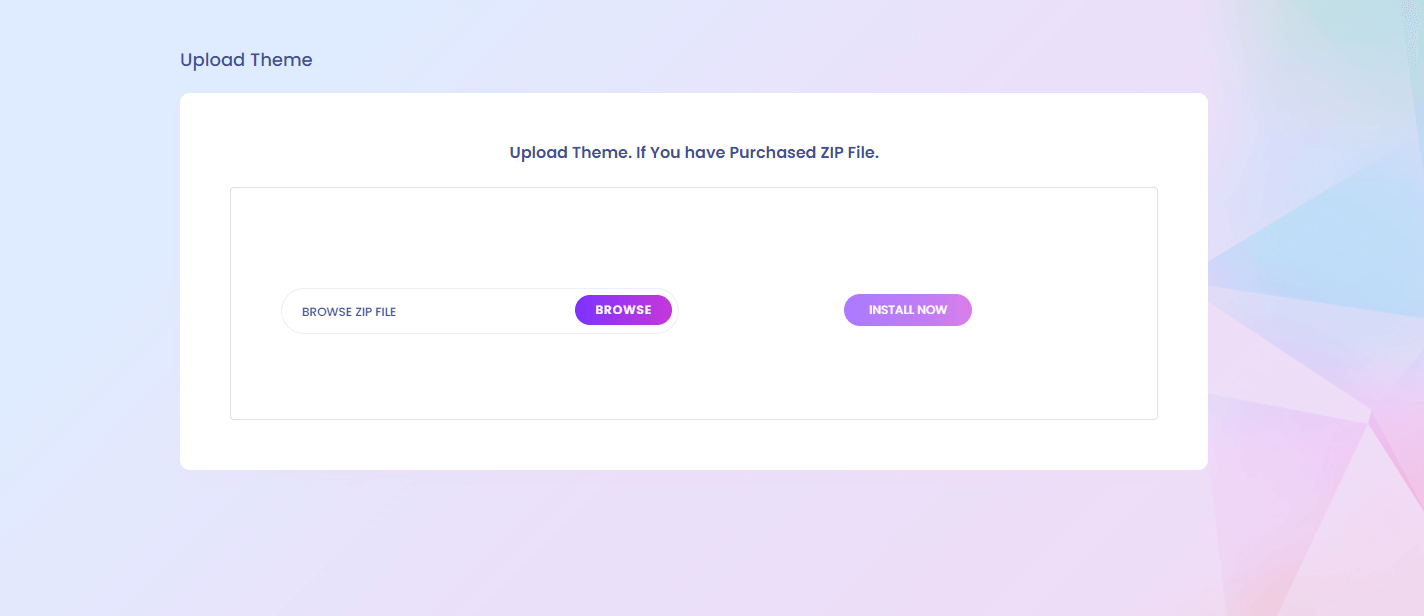
1. Add Theme
Admin can add new theme from here. A zip file will be uploaded for theme.
Upload Theme
Color Scheme
Color Scheme
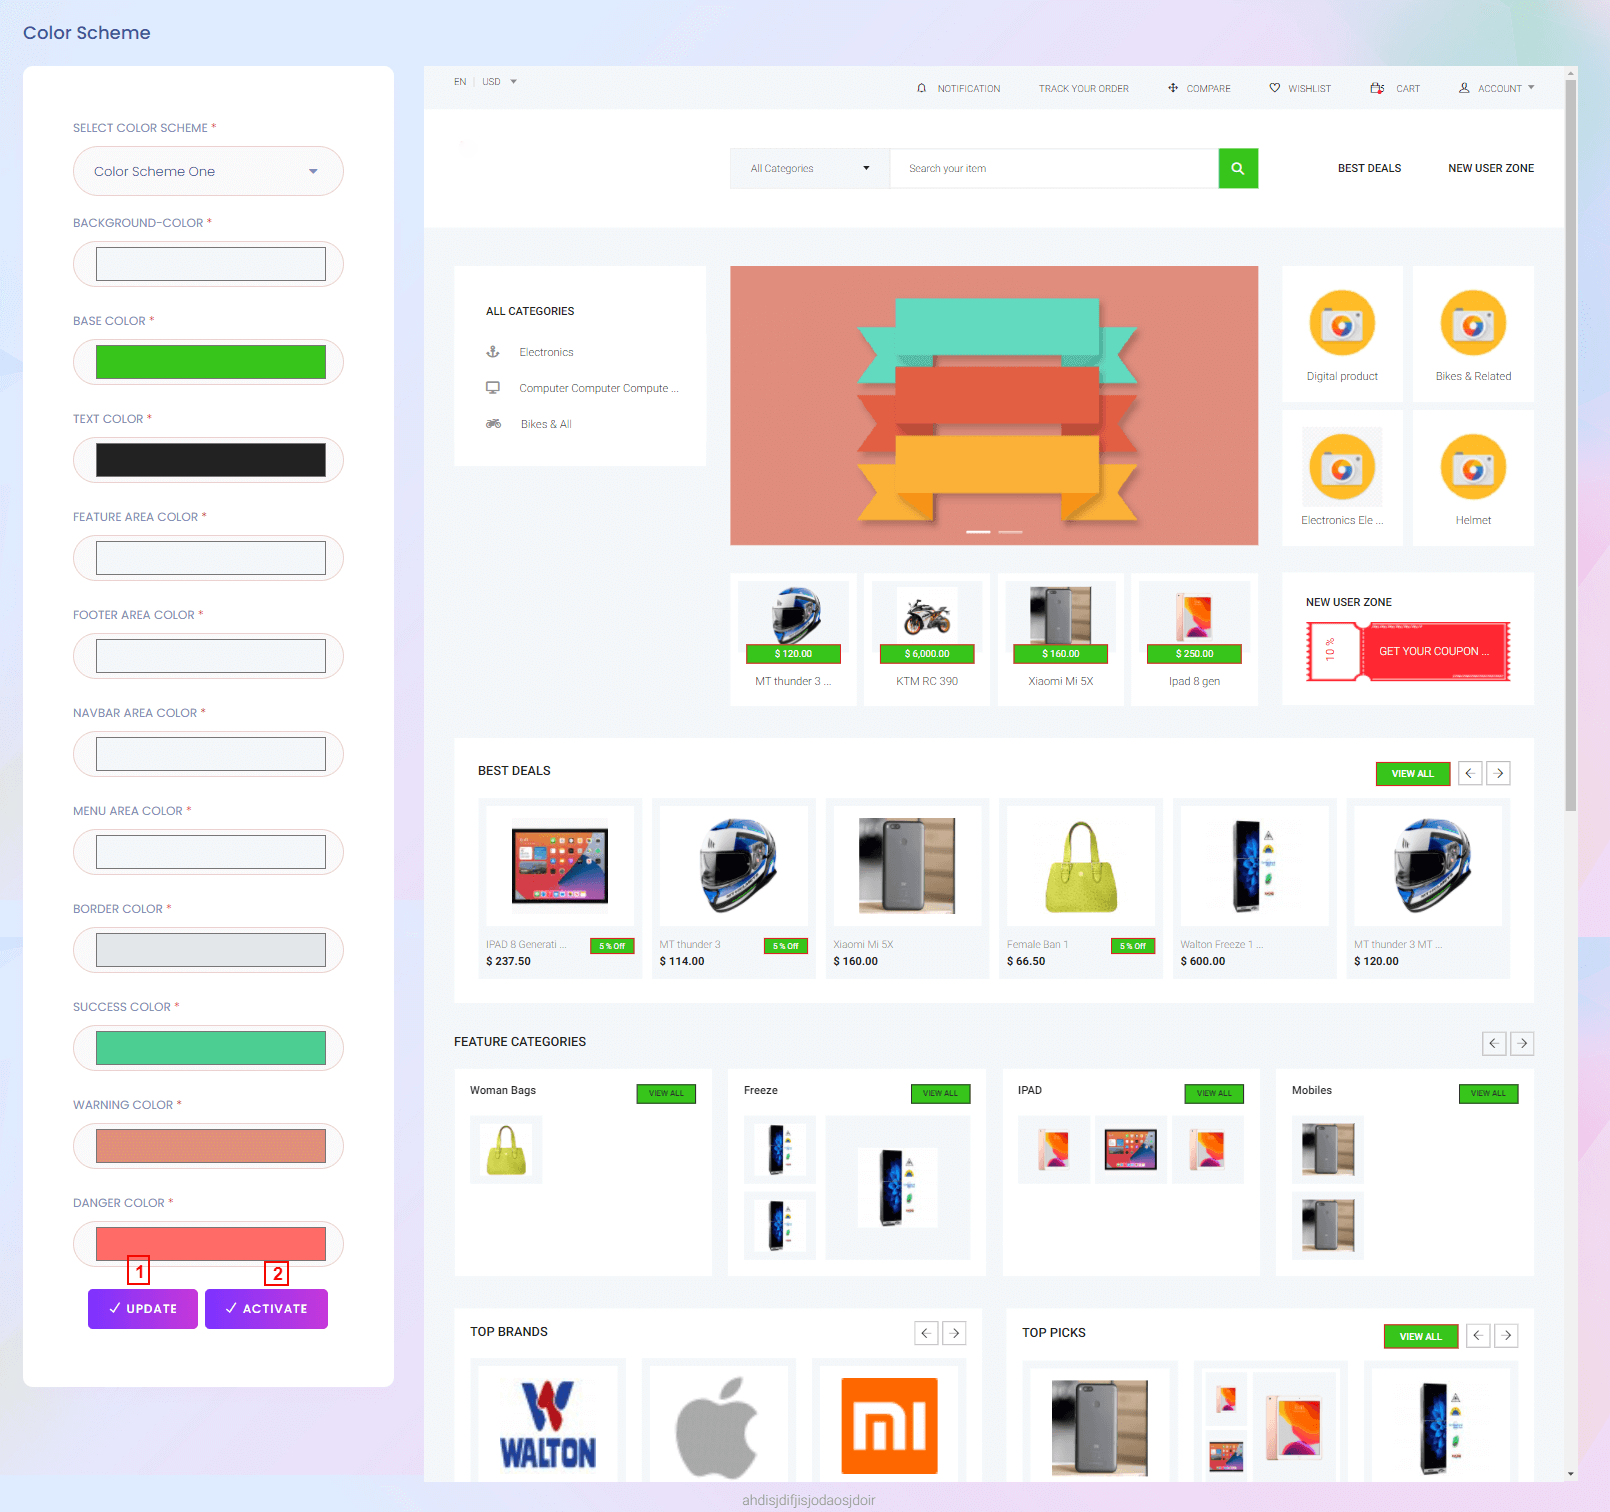
Color Scheme
You can change the color of the website.
1. Update
Update the color scheme.
2. Activate
Activate the color scheme.
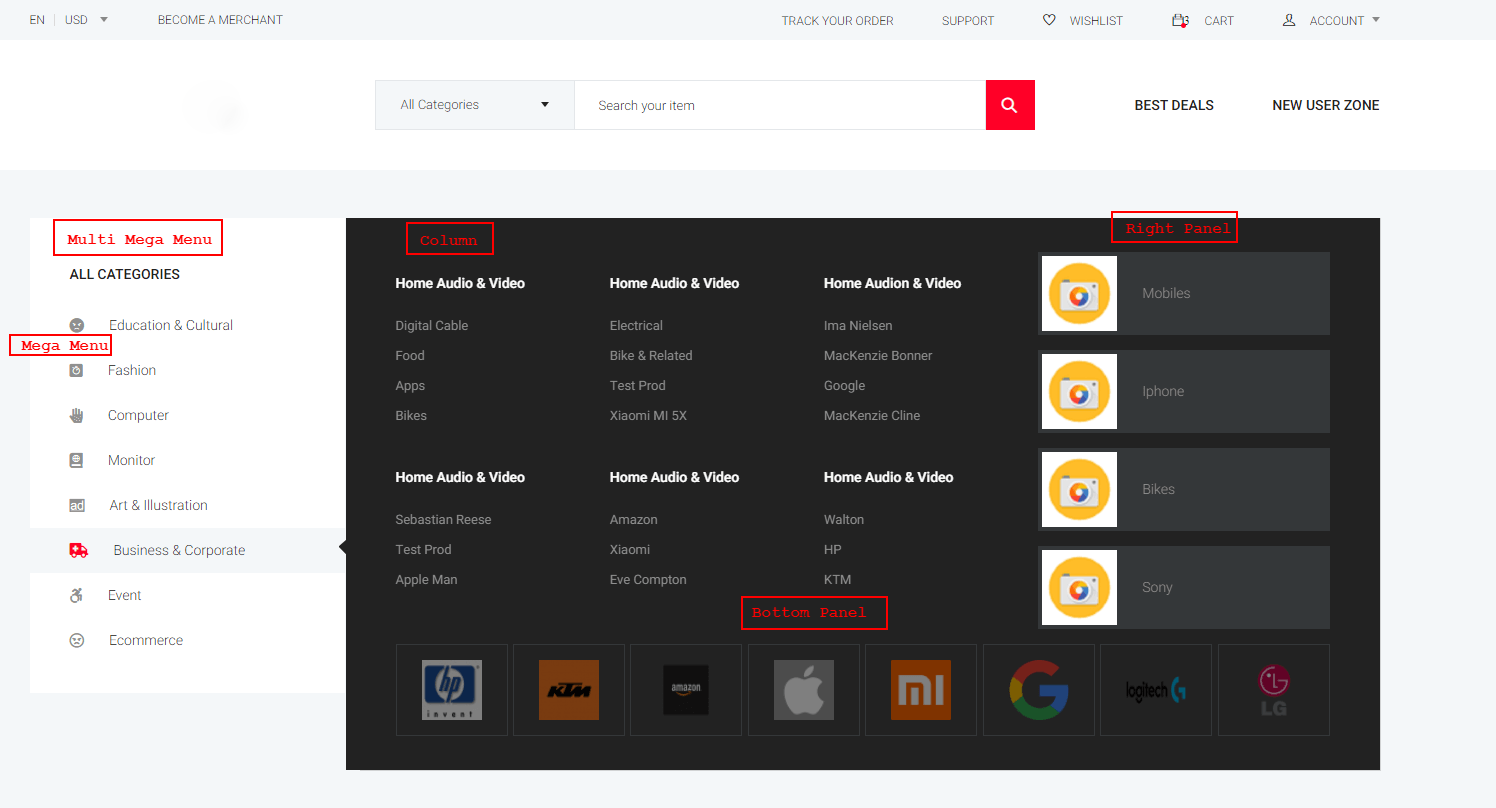
Menus
Menus
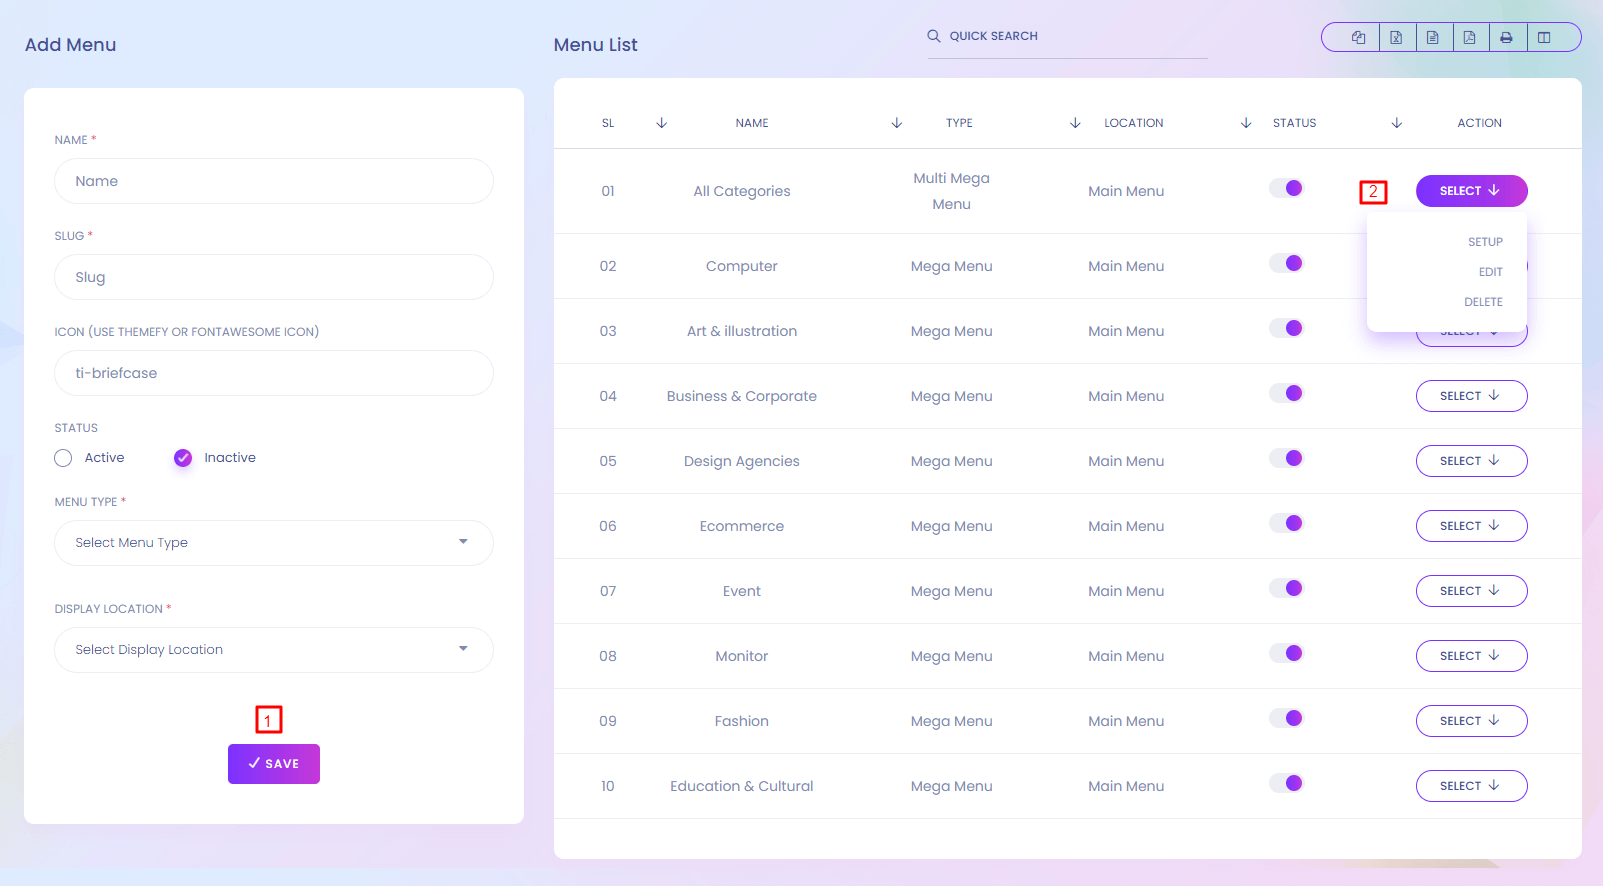
Menus
There are different types of menus in the website. You can manage and customize the menus from here.
1. Save
Admin can add menu from here.(*) marked fields are required. Active menus show in the website sidebar.
2. Action
Admin can edit or delete menu from here. Menus are rearrengable. To rearreng a menu use mouse click and drag. Menu setup is also done from here.
Menu Setup
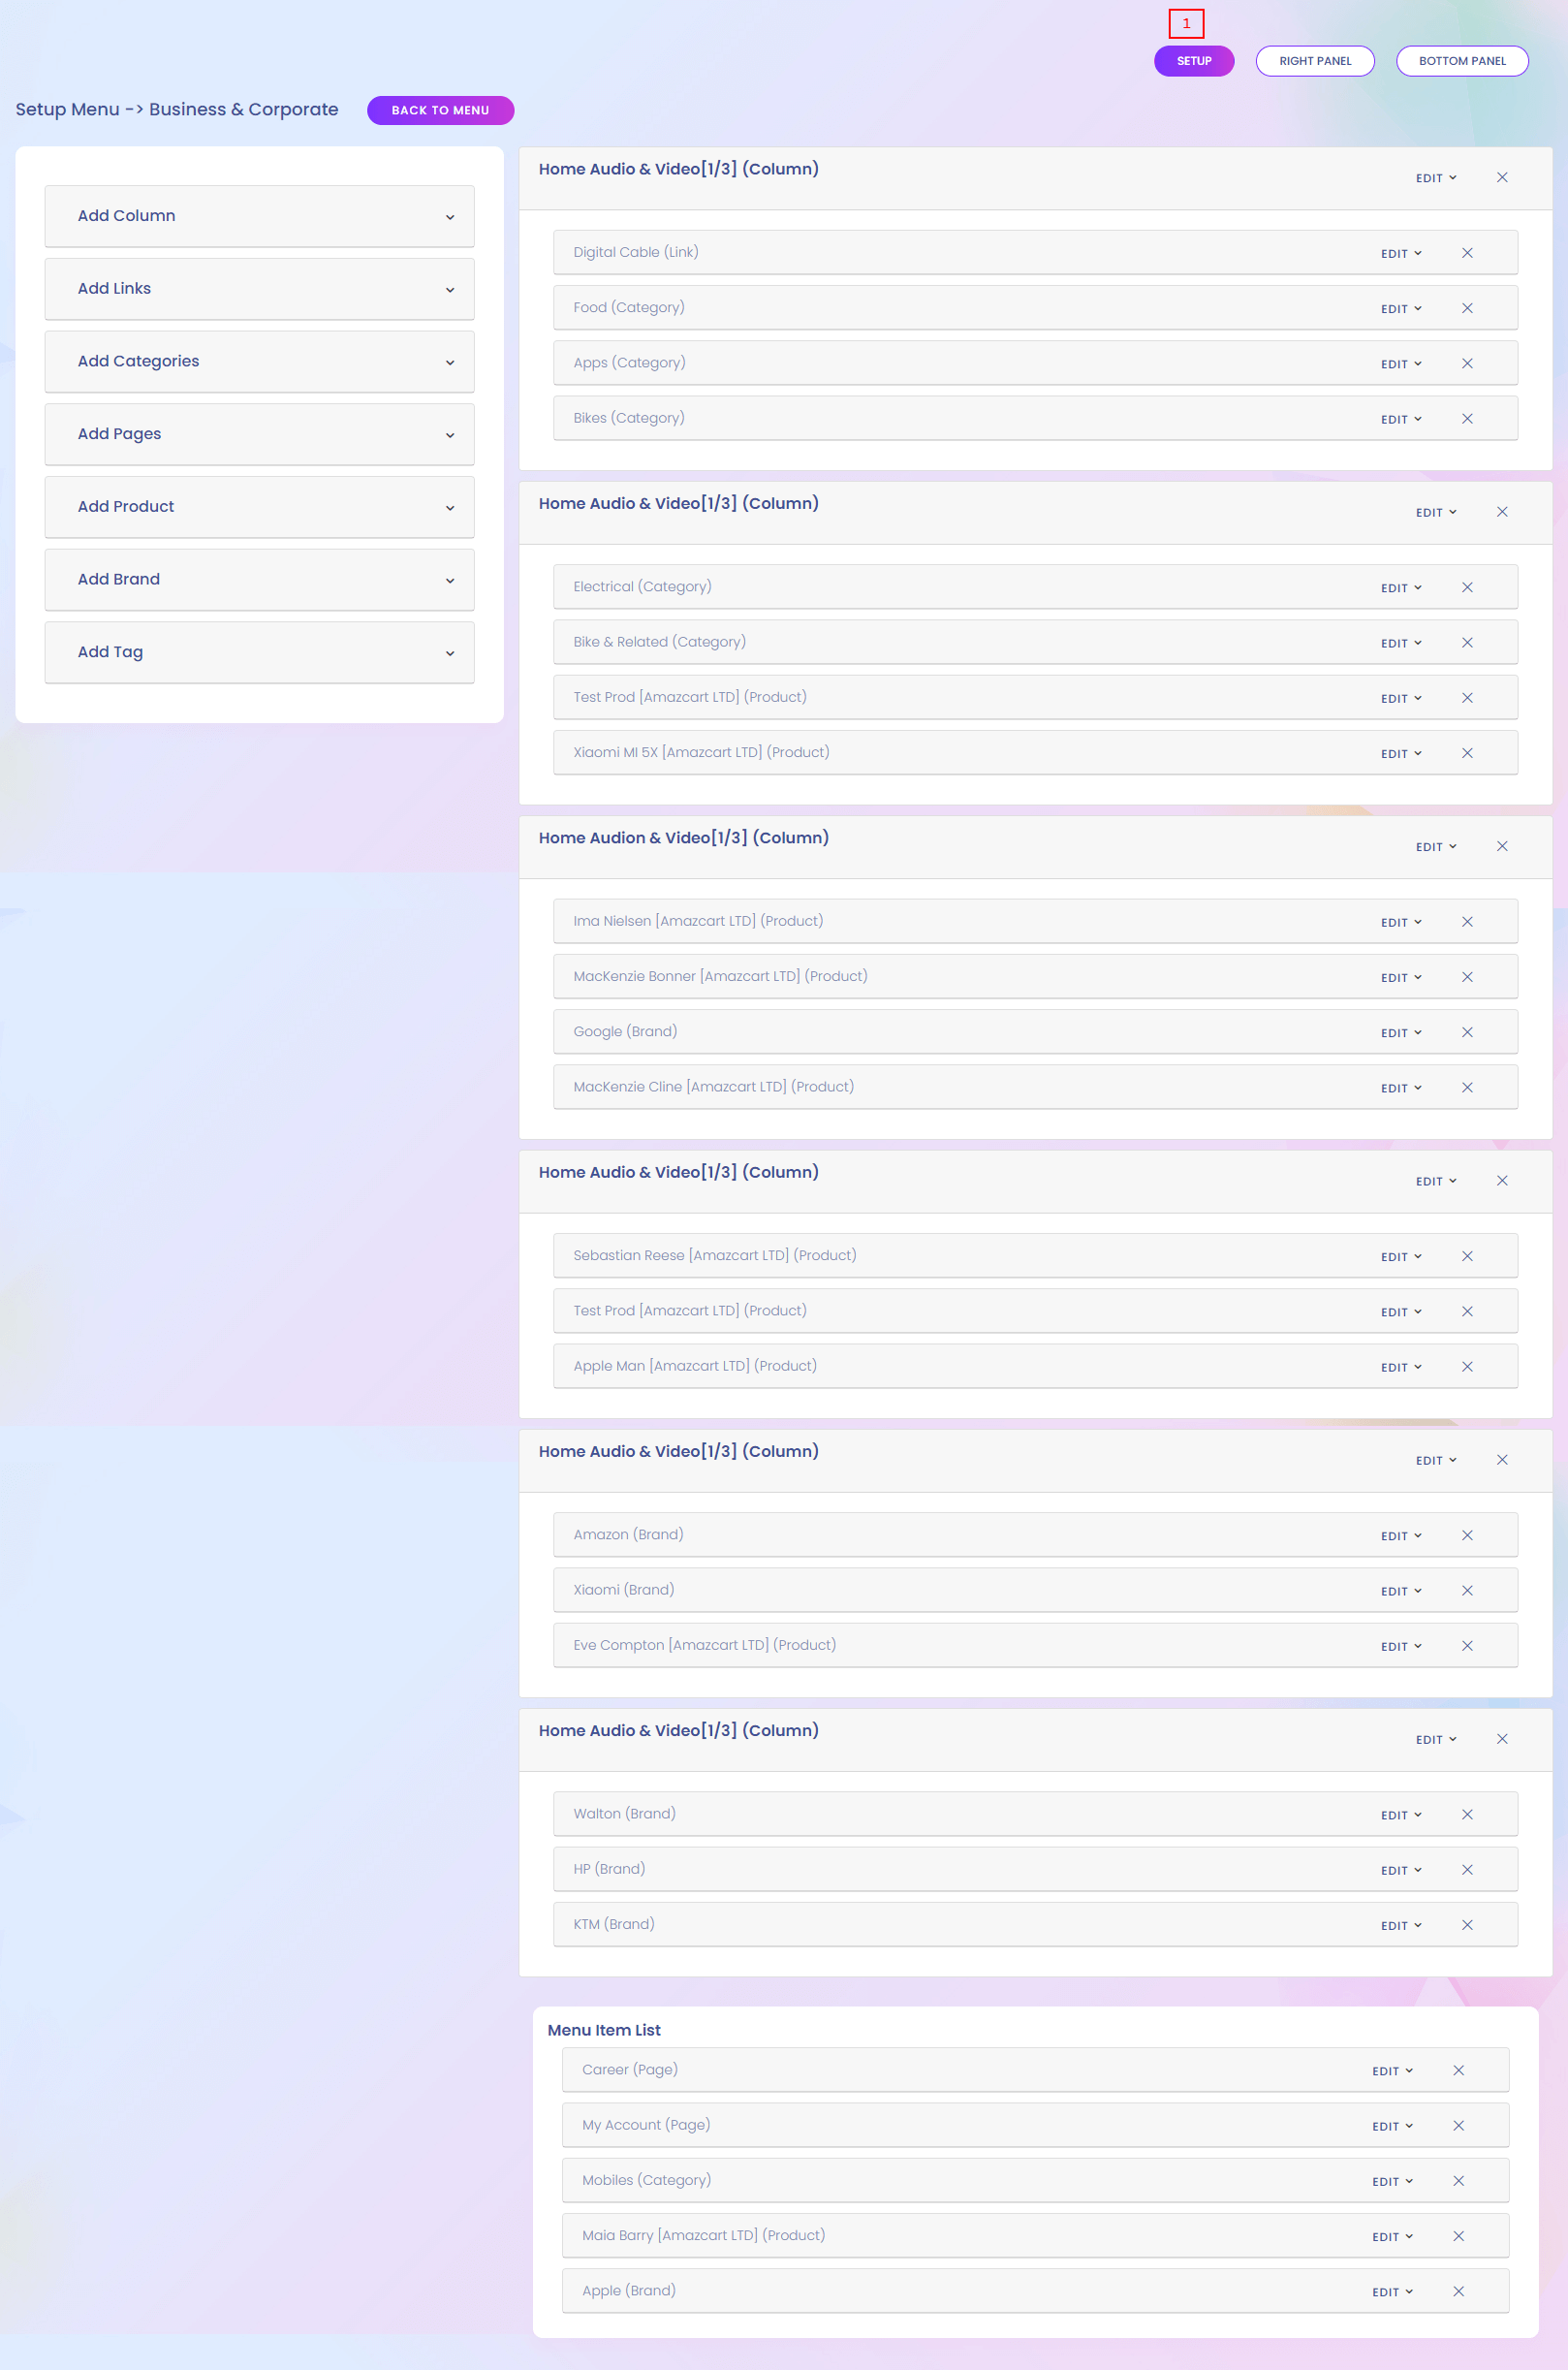
Menu Setup
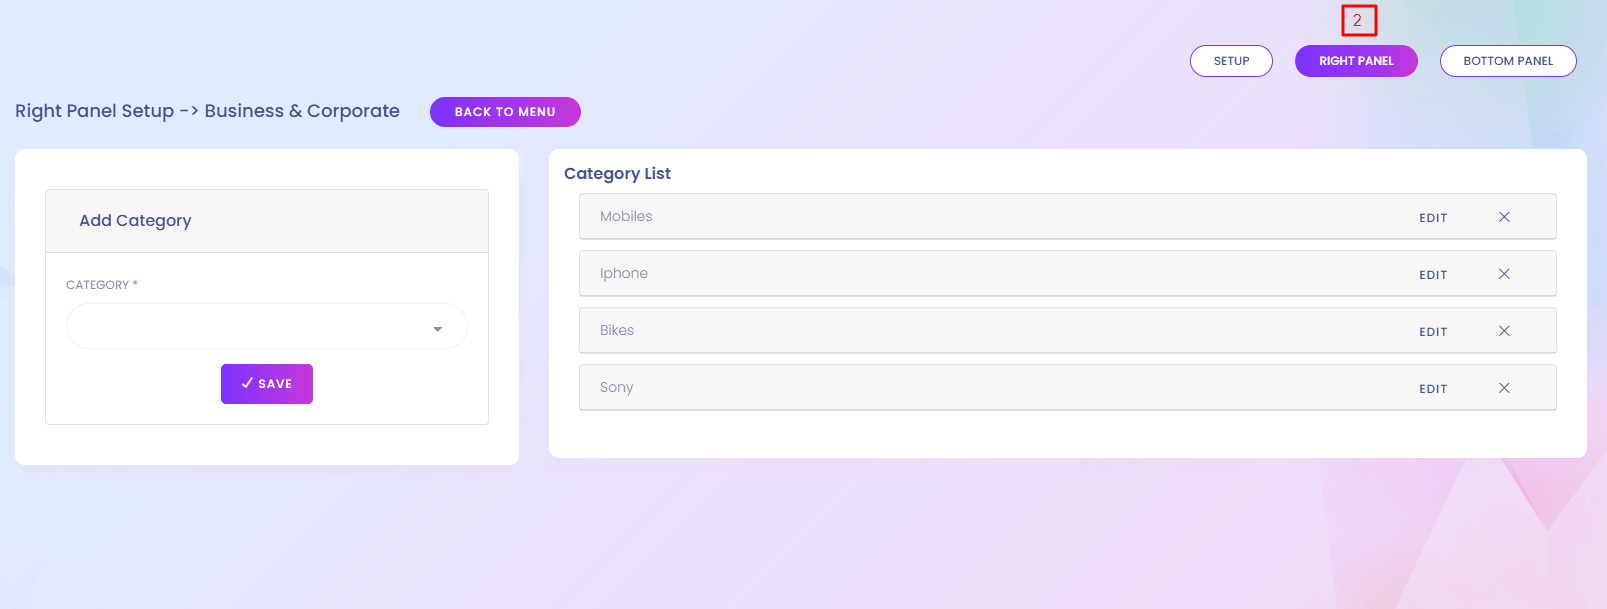
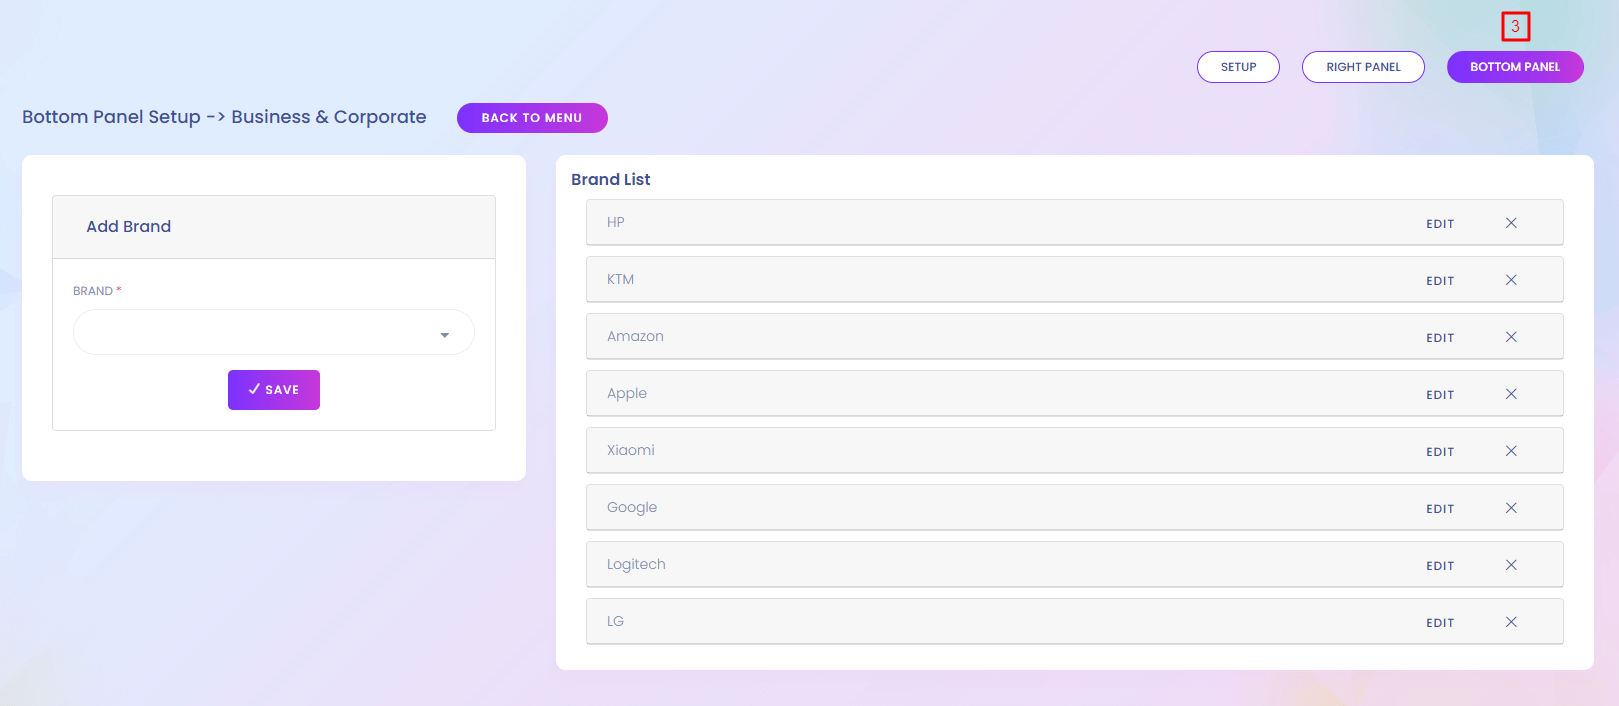
Menu setup has 3 part. Column, Right panel and Bottom Panel.Column can be added in 3 different size. These are 1/1, 1/2, 1/3. In every column Links, Categories, Pages, Products, Brands, Tags can be added. When you add any of the item it will go to the Menu Item List section. After that you can drag the item to a specific column. The item are dragable, editable and deletable.
Menu Setup (Right Panel)
Menu Setup (Bottom Panel)
Menus Website View
Header
Header Setup
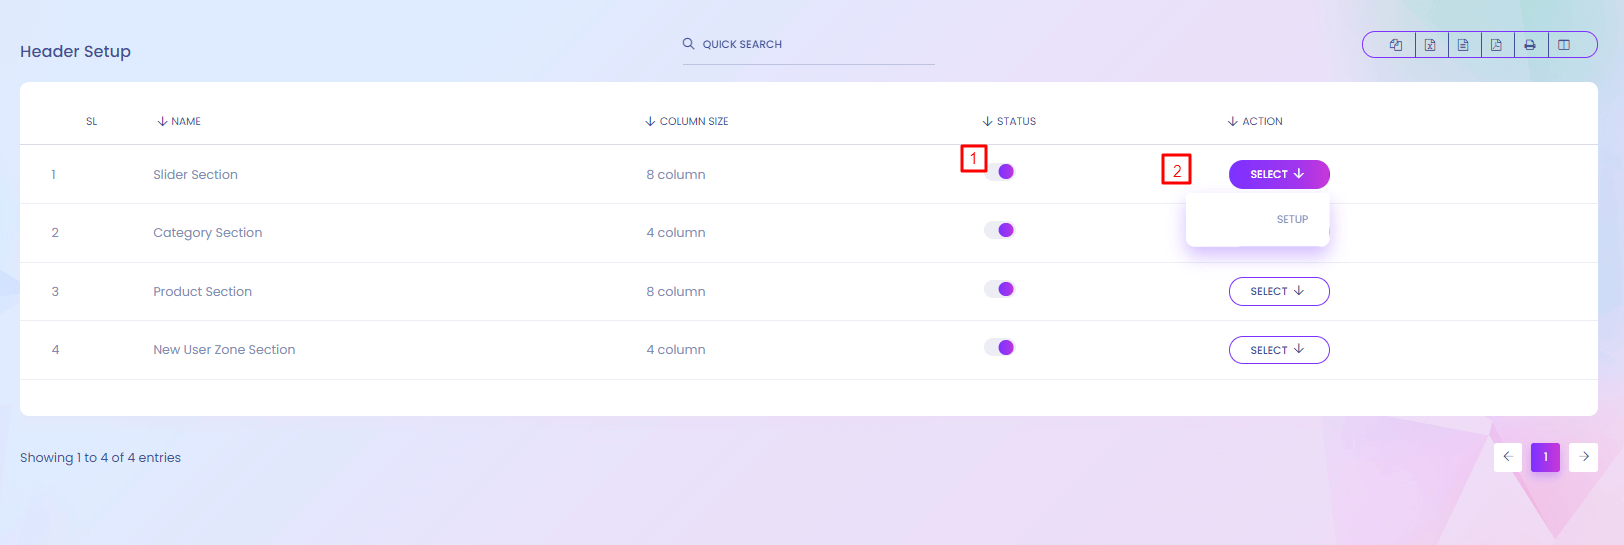
Header Setup
You can customize the header section of the landing page. You can enable or disable any section and setup according to your convenience.
1. Status
Status can be updated from here. Inactive section will not show in the website.
2. Action
A section can be setup from the action. Section update, change is possible from here.
Dashboard Setup
Dashboard Setup
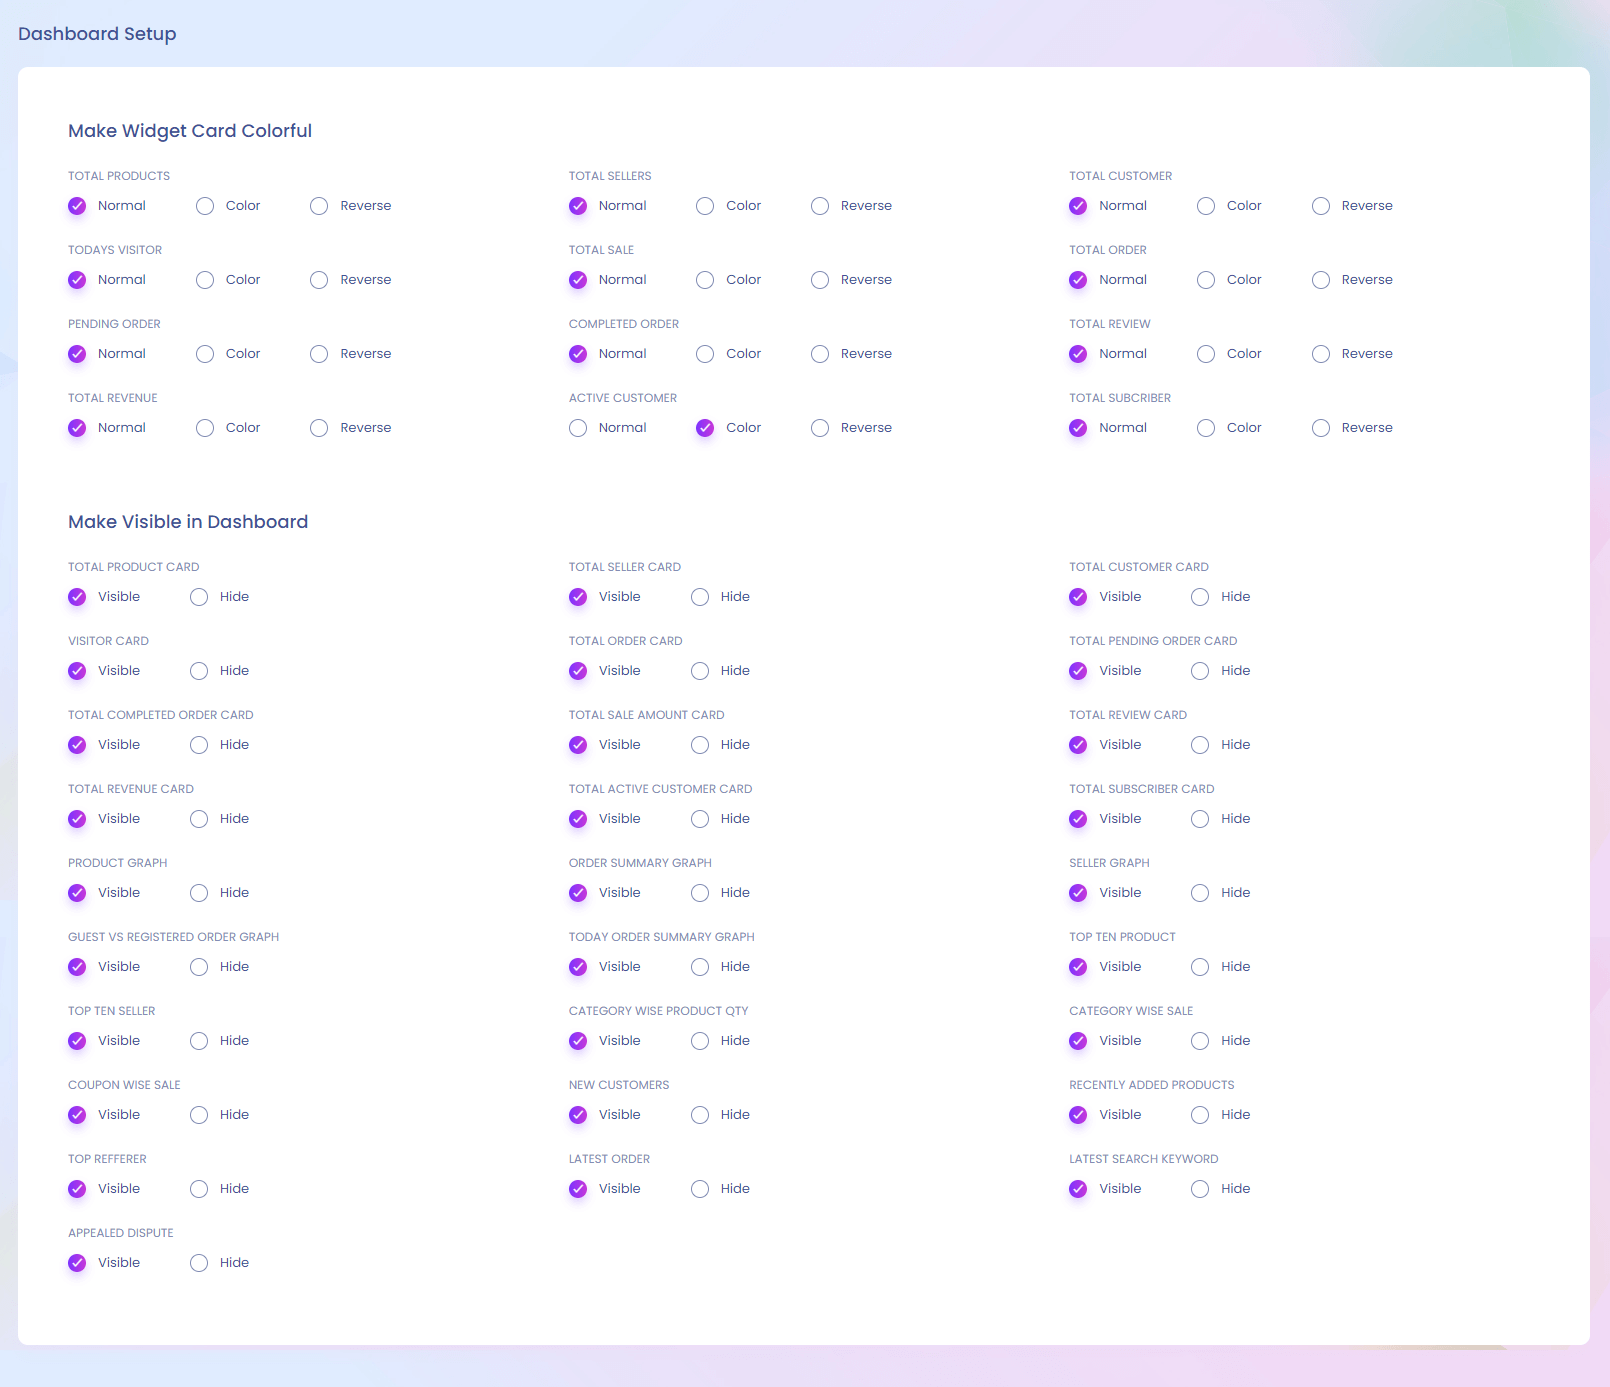
Dashboard Setup
You can customize your dashboard view from here.
Header Setup
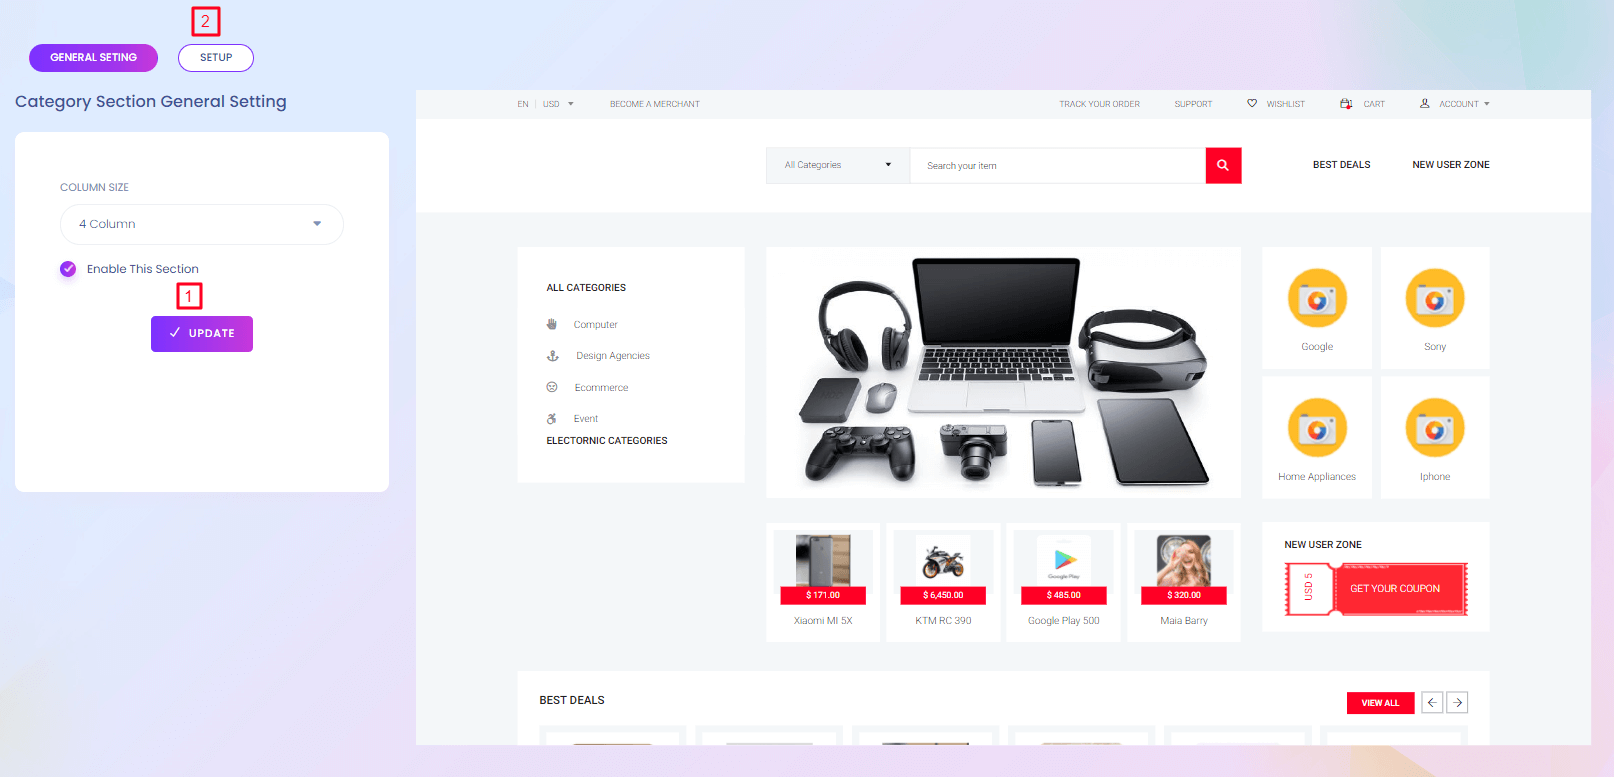
1. update
Column size can be changed from here.
2. Setup
Section setup can be done from here.
Header Setup
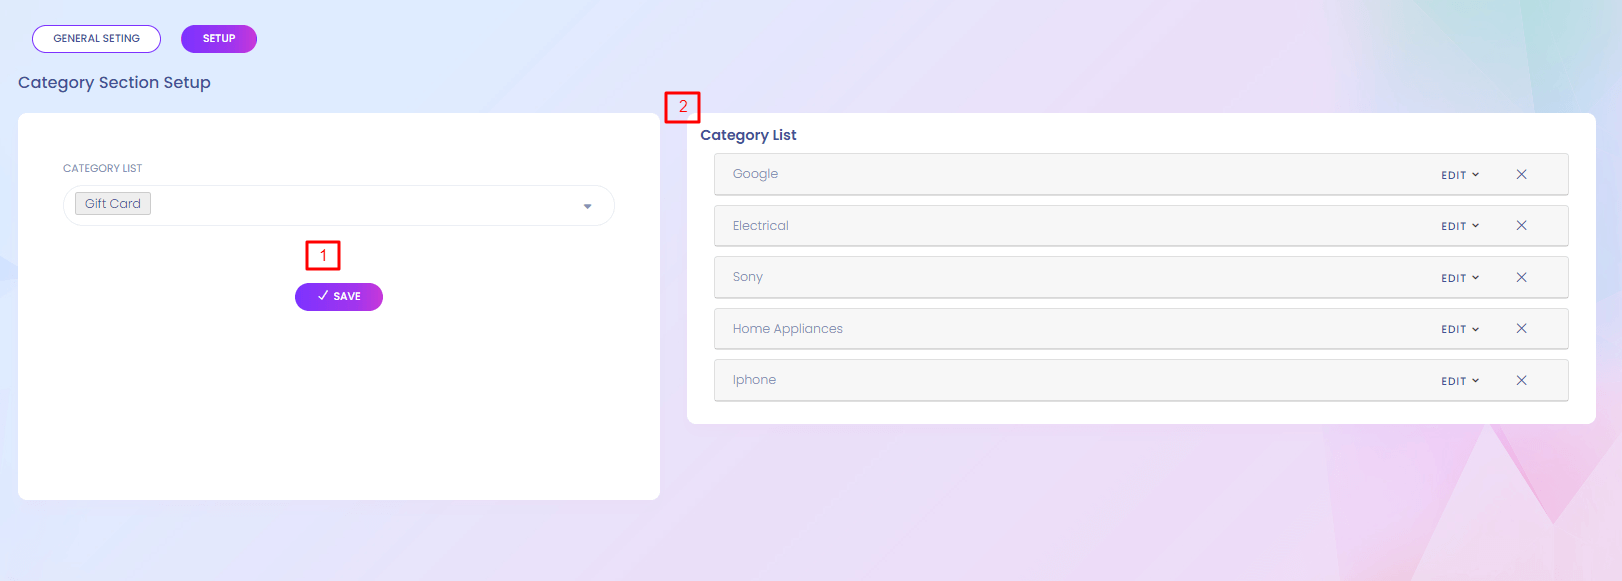
1. Save
New item can be added to the list.
2. List
The items in the list are rearrengable. Items can be rearrenged by click and drag the specific item.
Header Website view
Dashboard Color
Dashboard Color
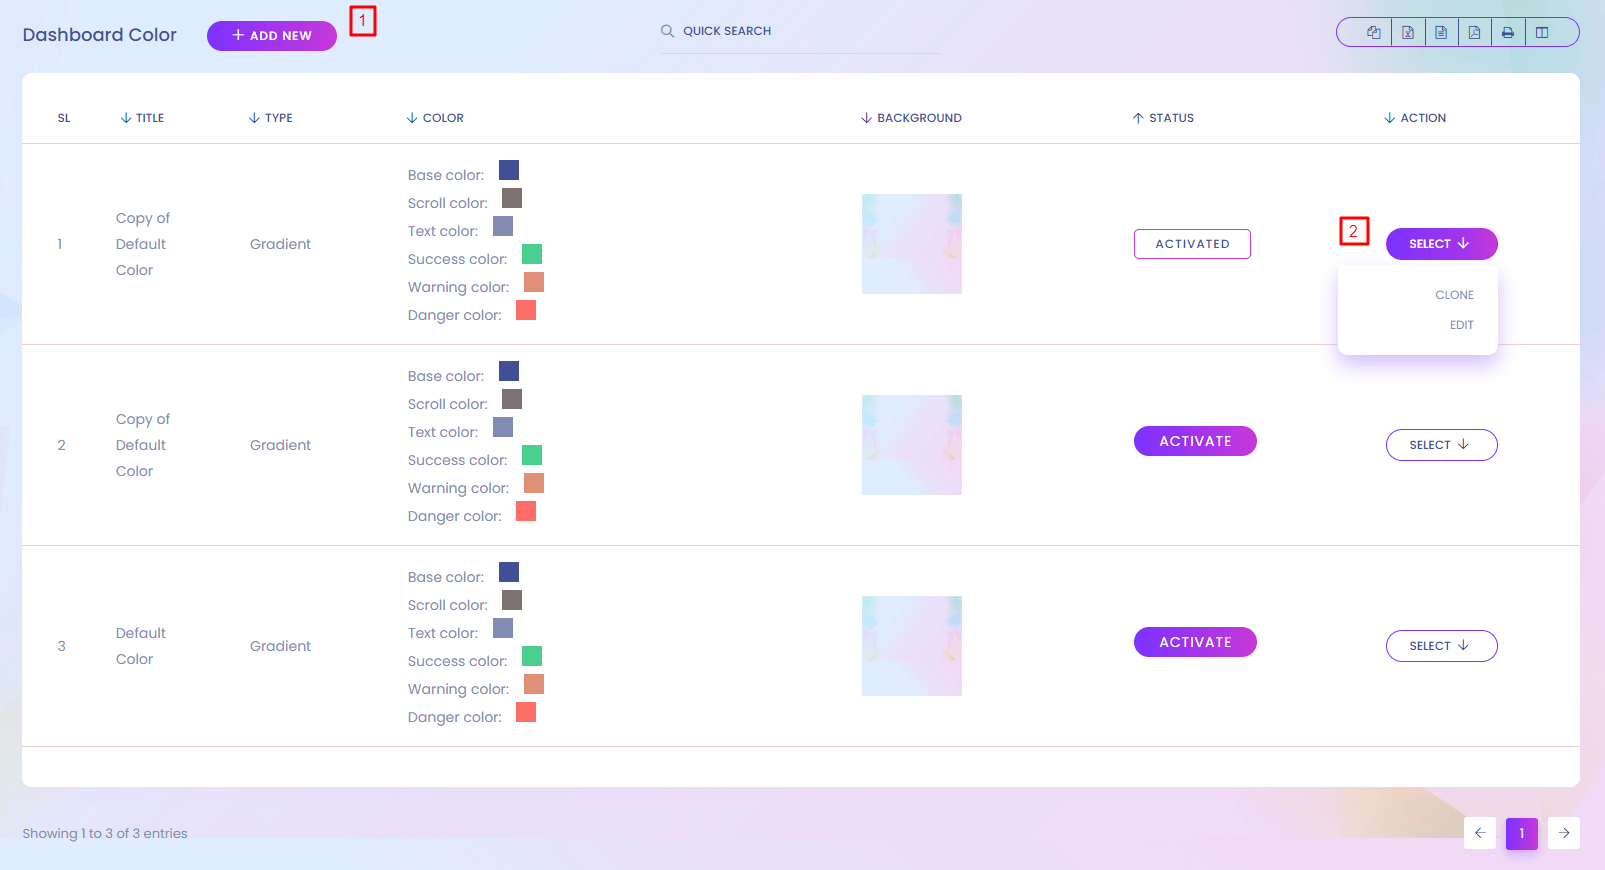
Dashboard Color
You can change the color of admin panel.
1. Add new
Add new color for your admin panel.
2. Action
You can clone the base color. Edit and delete it.
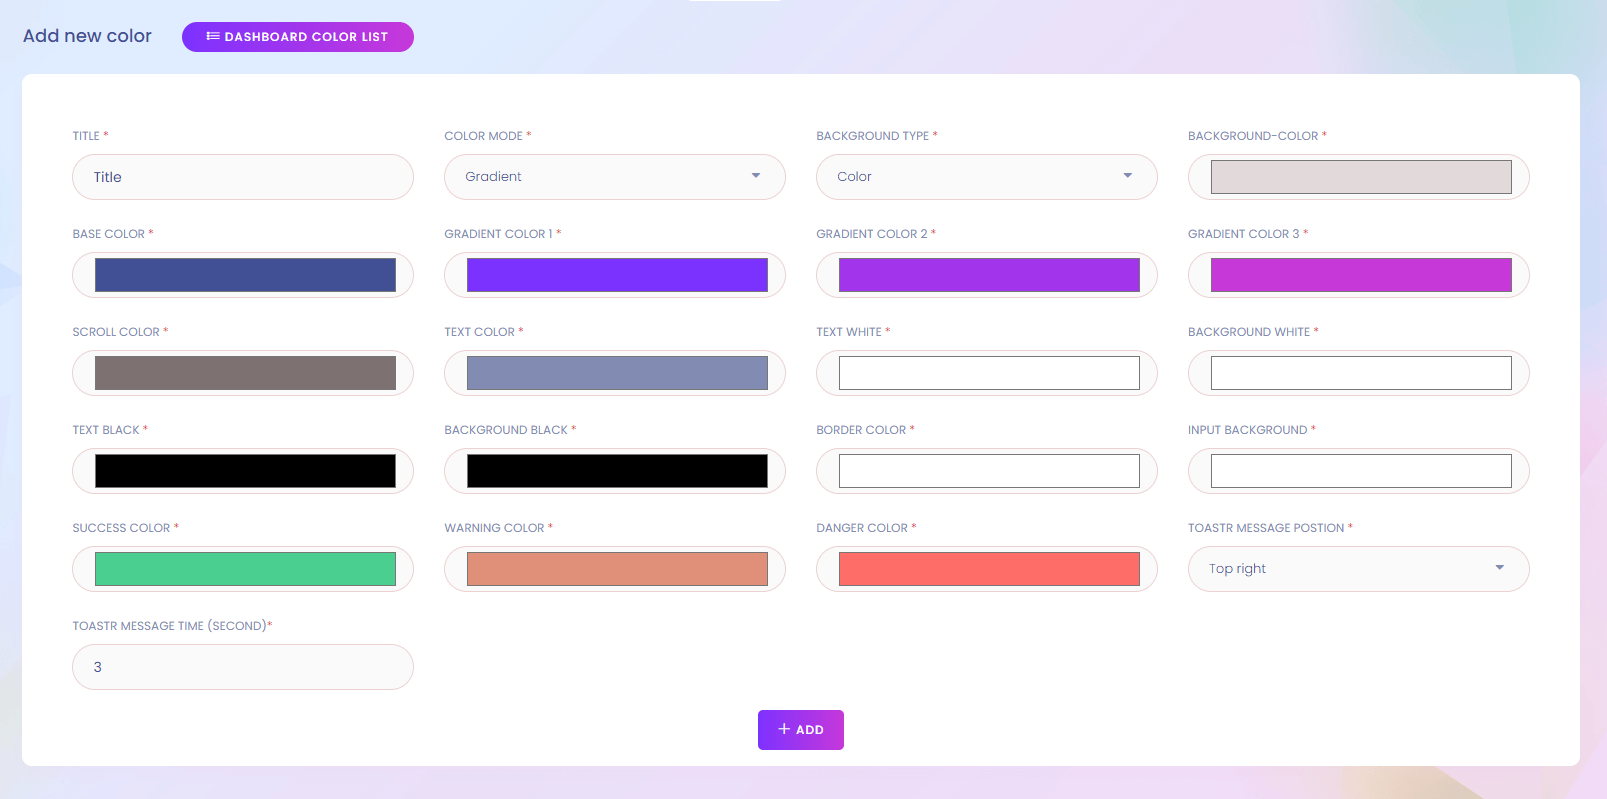
Dashboard Color (Add Dashboard Color)
Preloader Setting
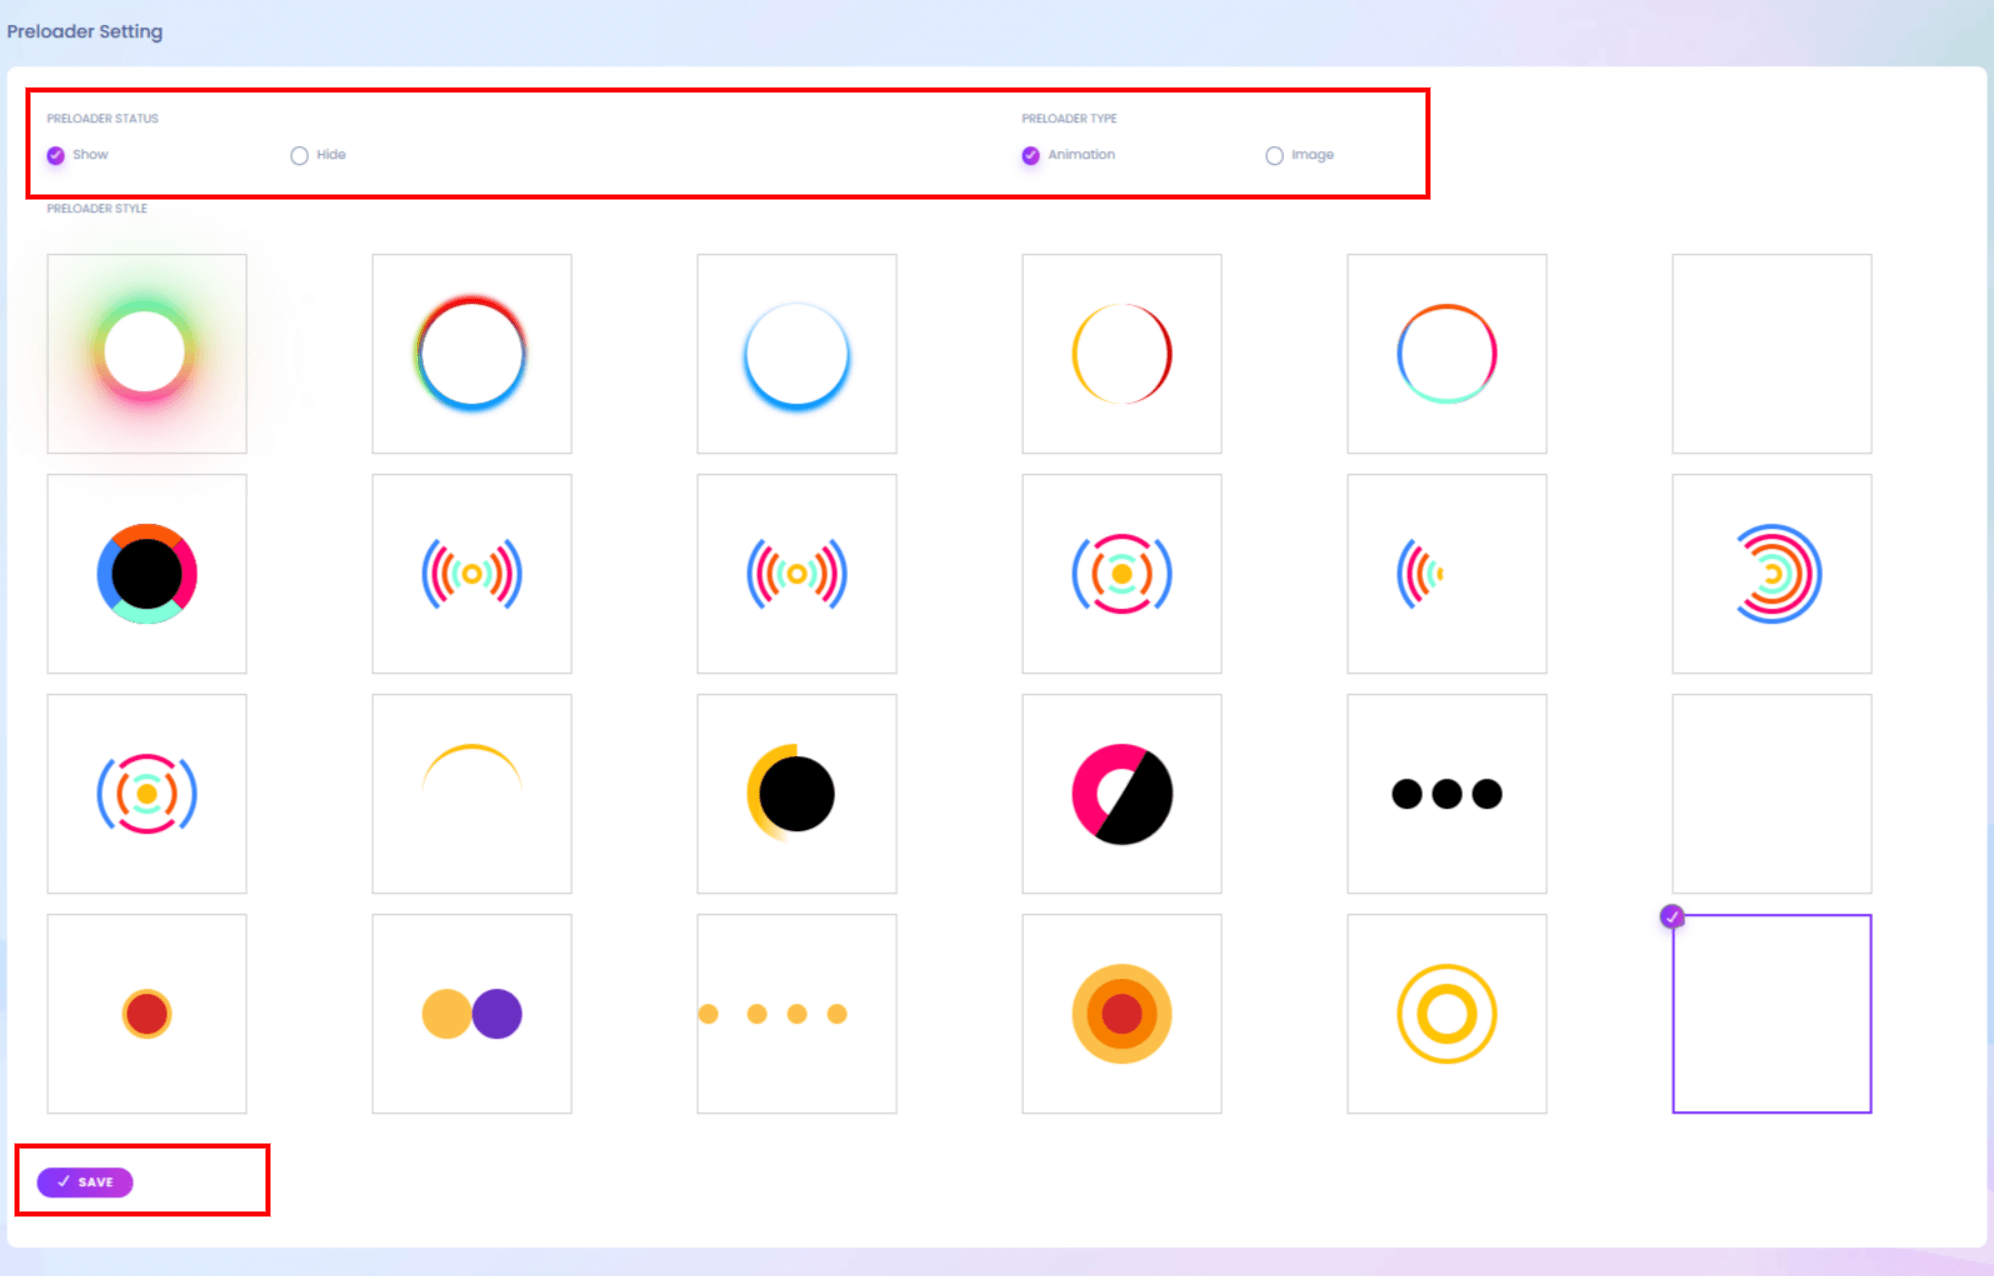
1. Change Preloader
You can cahnge preloader from list, which is show when preloader is active.
2. Add new preloader
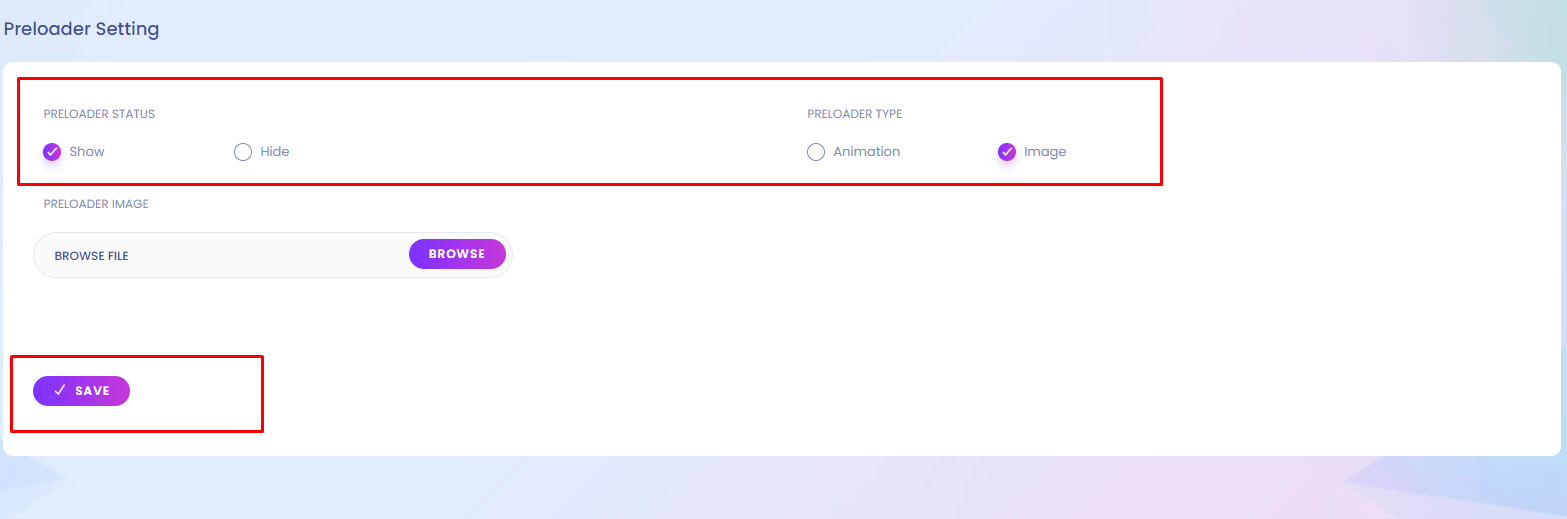
You can add new preloader as a gif file. Which is show when preloader is active.
2. Disable Preloader(Not recomanded).
You can disable preloader from setting. But not recomanded.
Blog
Blog
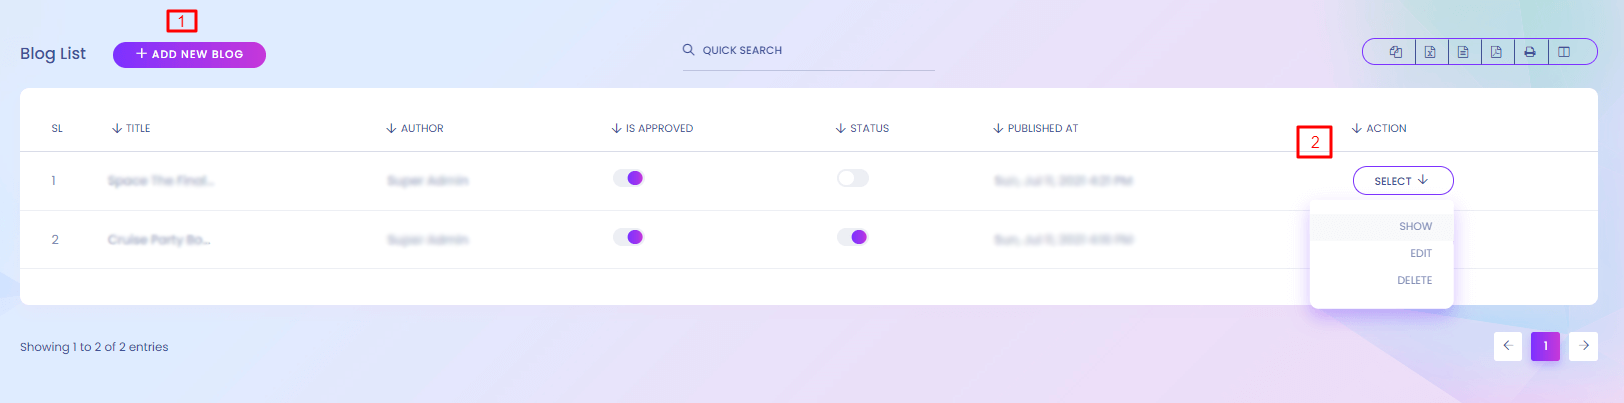
Blog
Blogs are important for SEO. You can write blog post about your products or any other topic. You can find the blog page from here https://yourdomain.com/blog .
1. Add
New blog post can be added from here. Category and tag have to create first from Blog Category and Blog Tags option.
2. Action
Blog can edit or delete by admin. Status can be toggle.
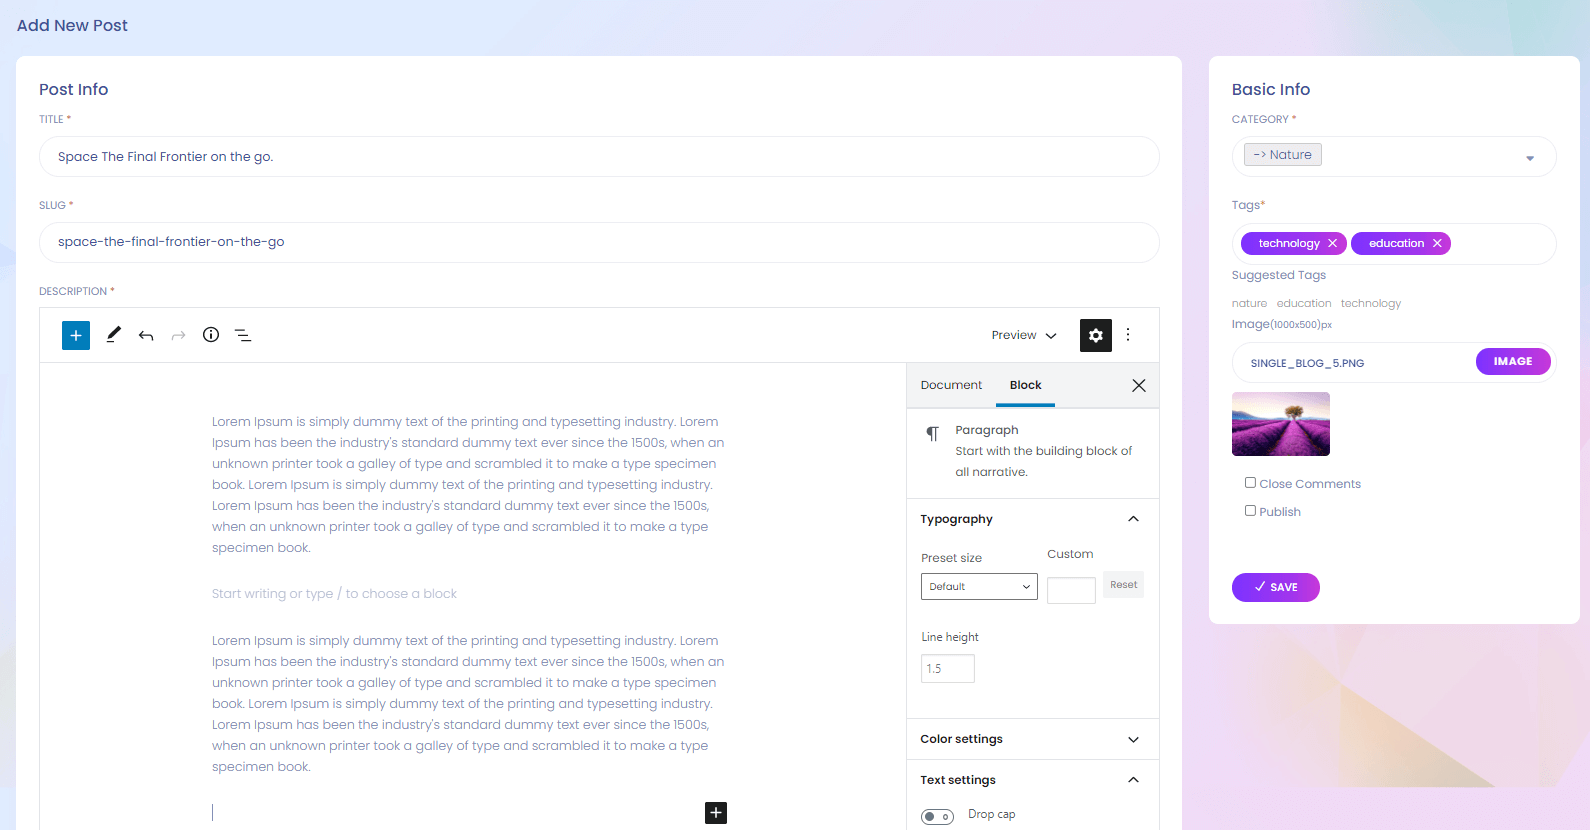
Blog (Create Blog Post)
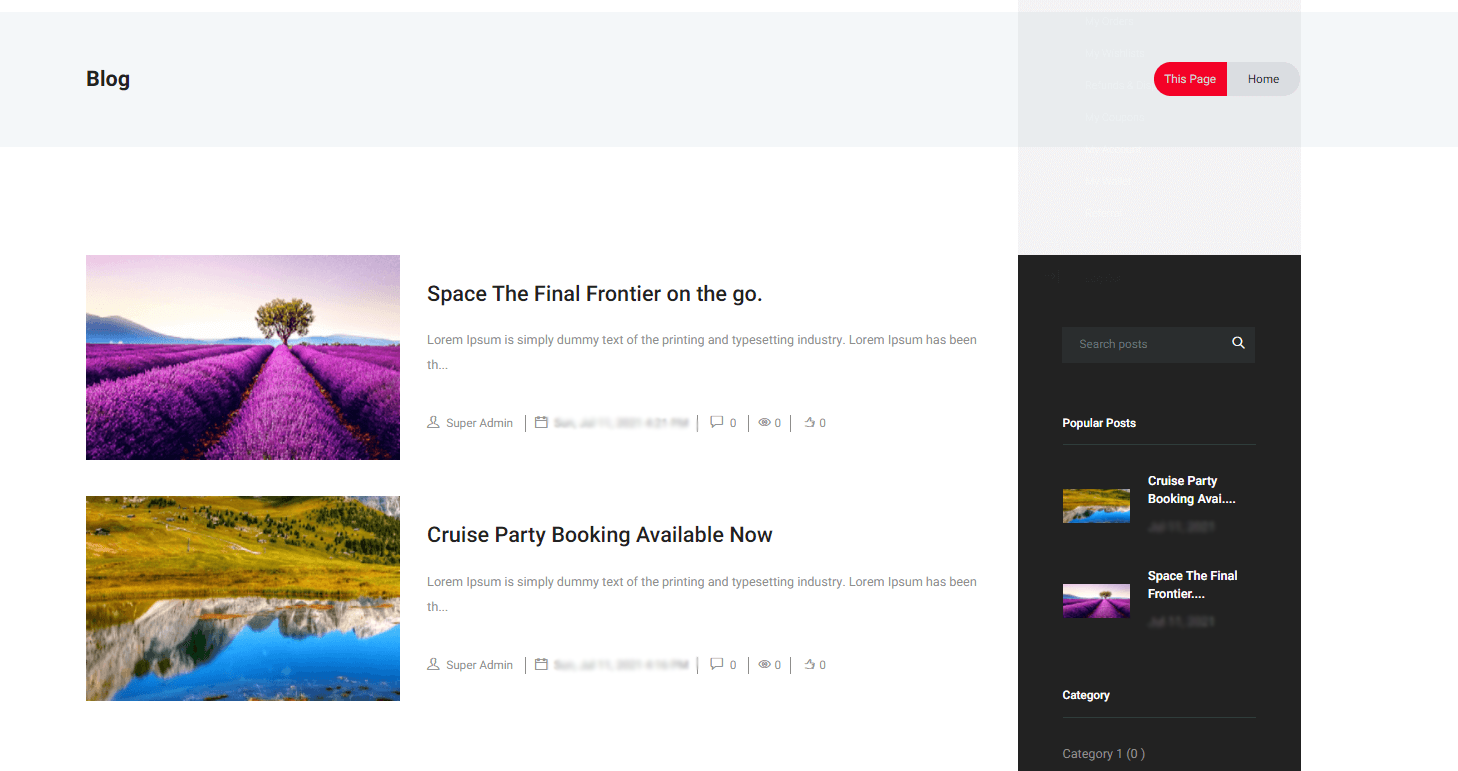
Blogs Website View
Blog Category
Blog Category
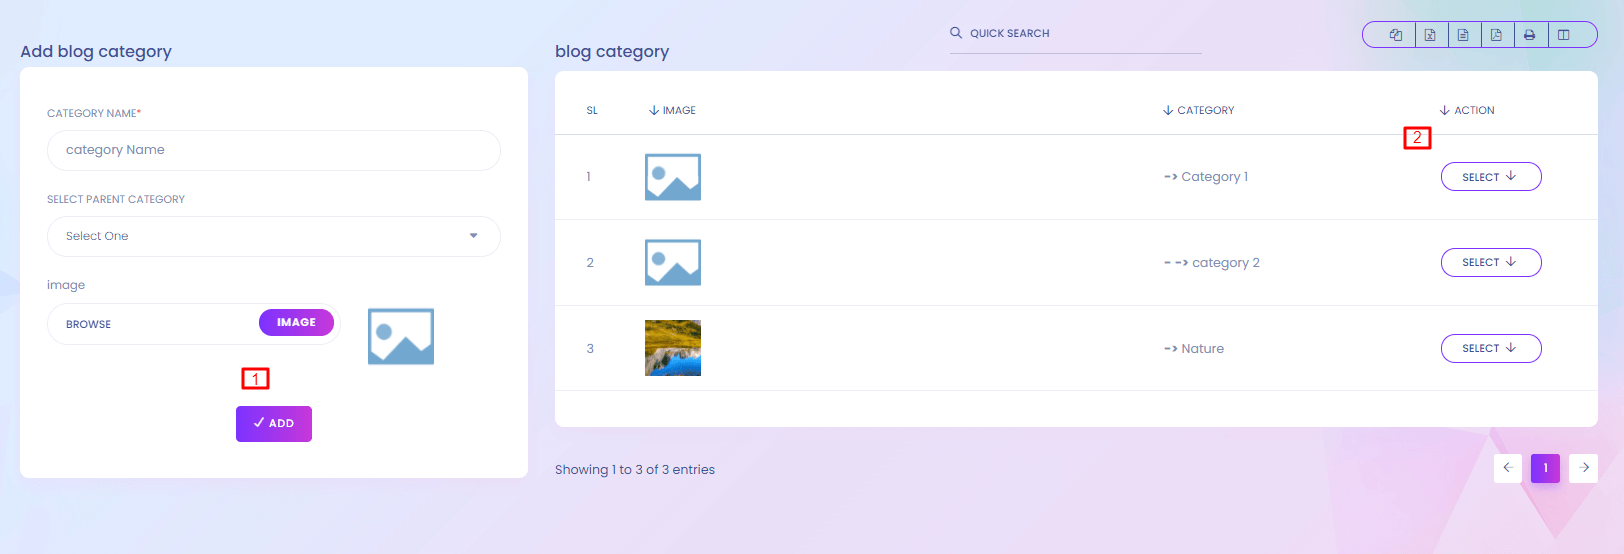
Blog Category
When you want to add a blog post you have to select a category for the post. You can manage the blog category from here.
1. Add
Add blog category here. A category can be a parent or child. Blog categories are used in creating Blog Post.
2. Action
Blog category can be edit or delete by Admin.
Customer
Customer
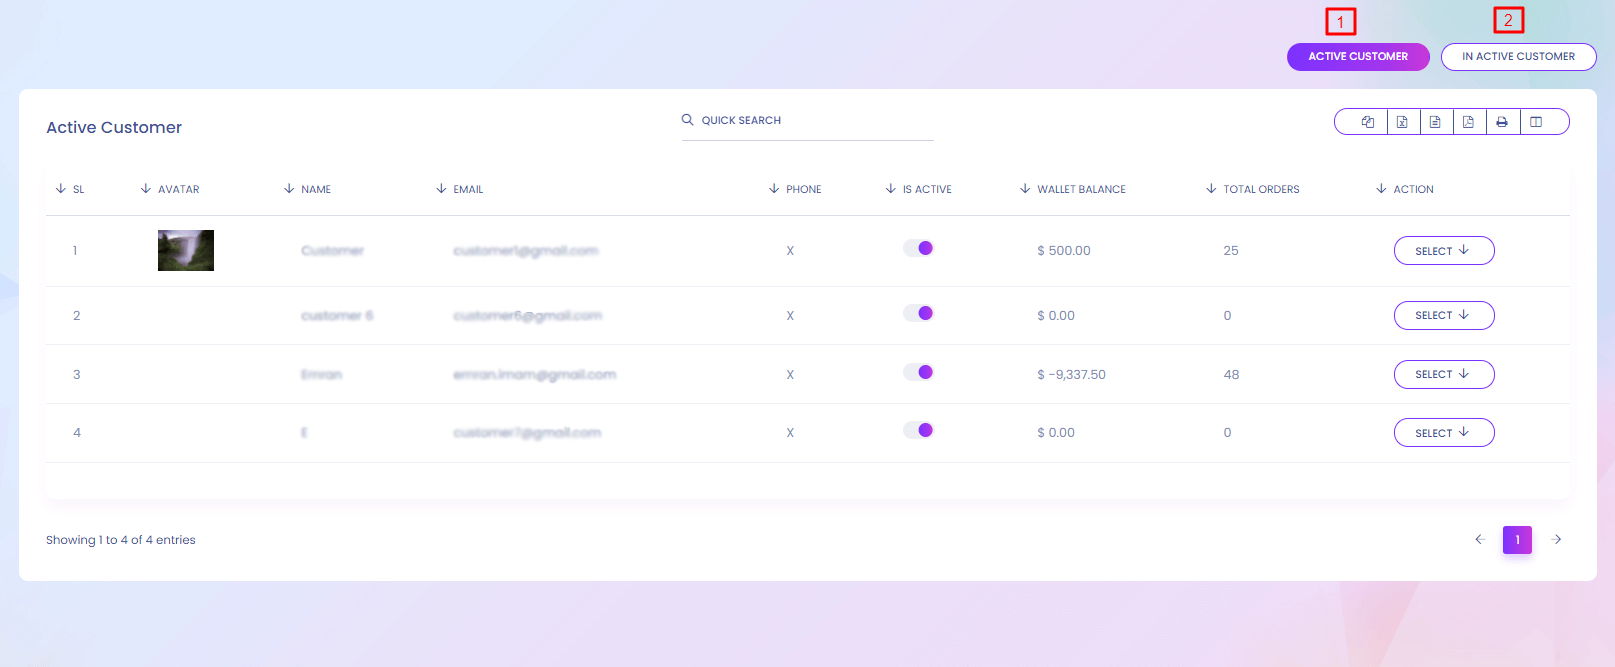
Customer
Anyone buy any product from your website is your customer. You can active and deactive them. Deactive customer cannot login to the website.
1. Active Customer
All register users are Active customers. Active customer can be make inactive customer by togging the IS ACTIVE.
Customer
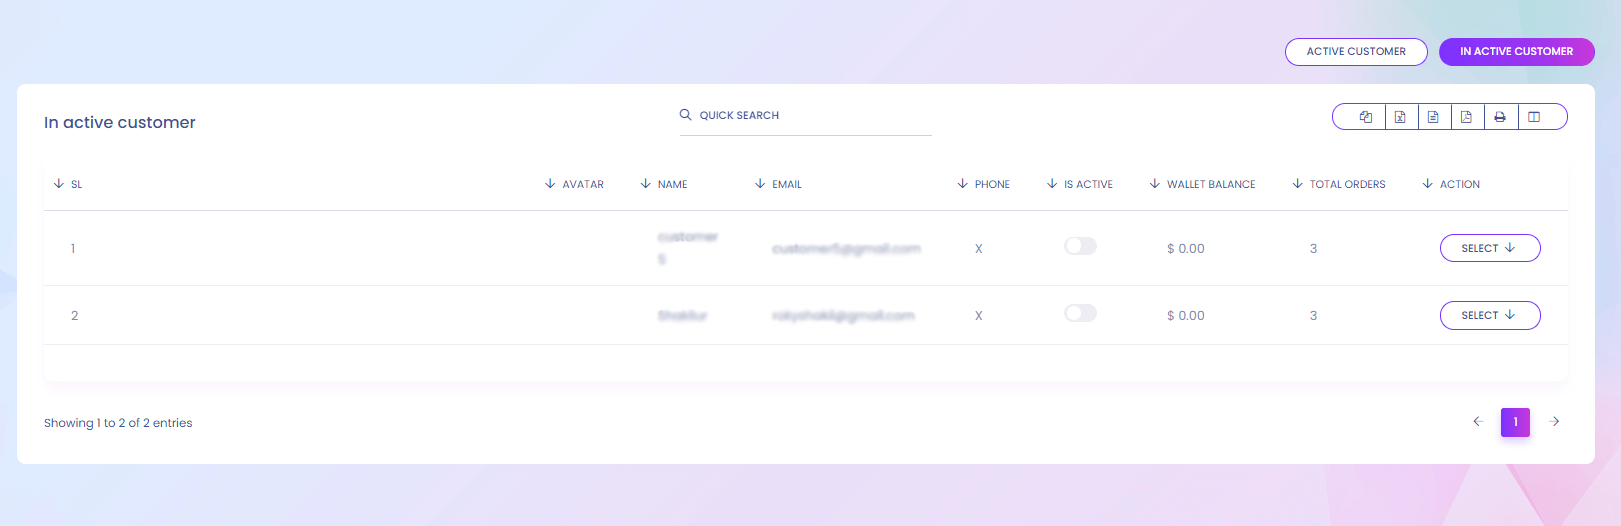
2. In Active Customer List
Active Seller List
Active Seller List
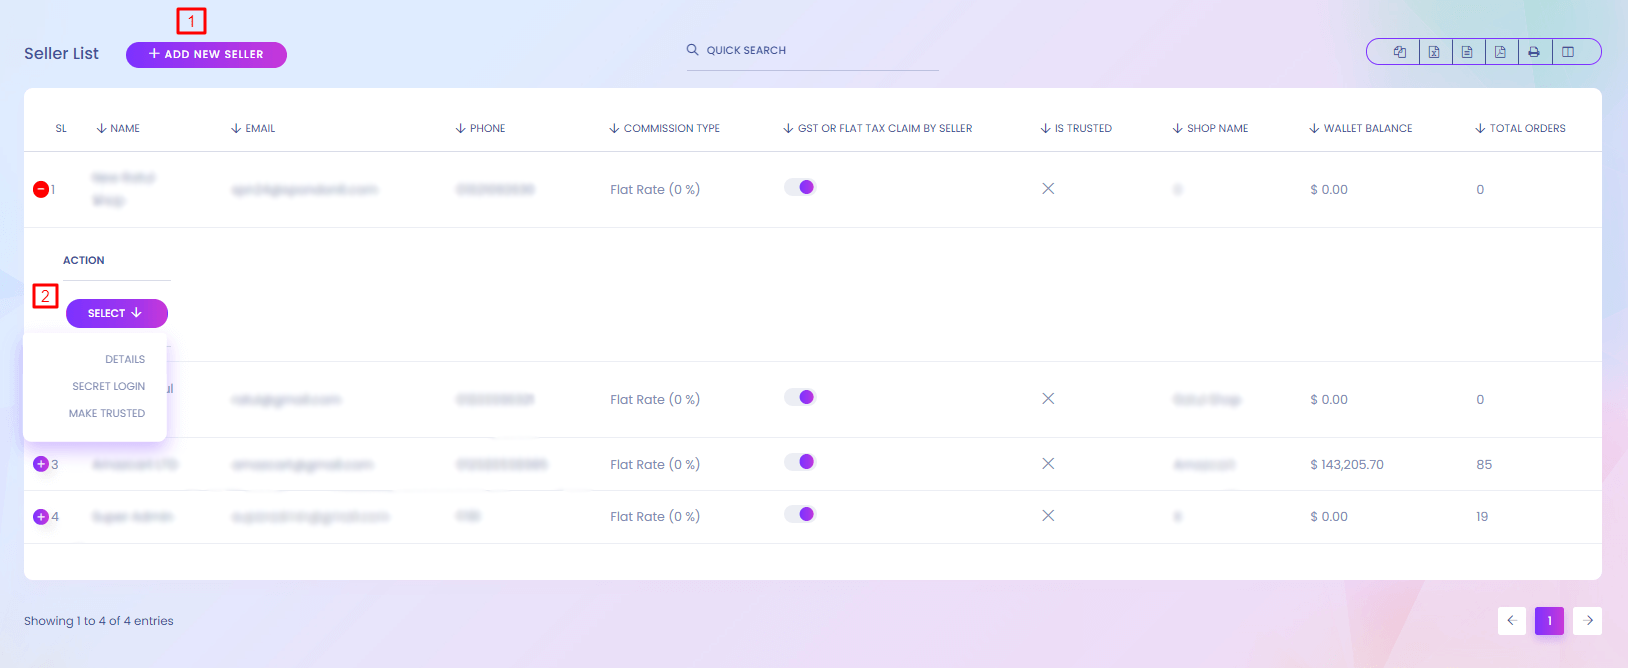
Seller List
A merchant is a seller. He/She can sell his/her product. You can see the list of all seller in your website. You can also performe multiple action.
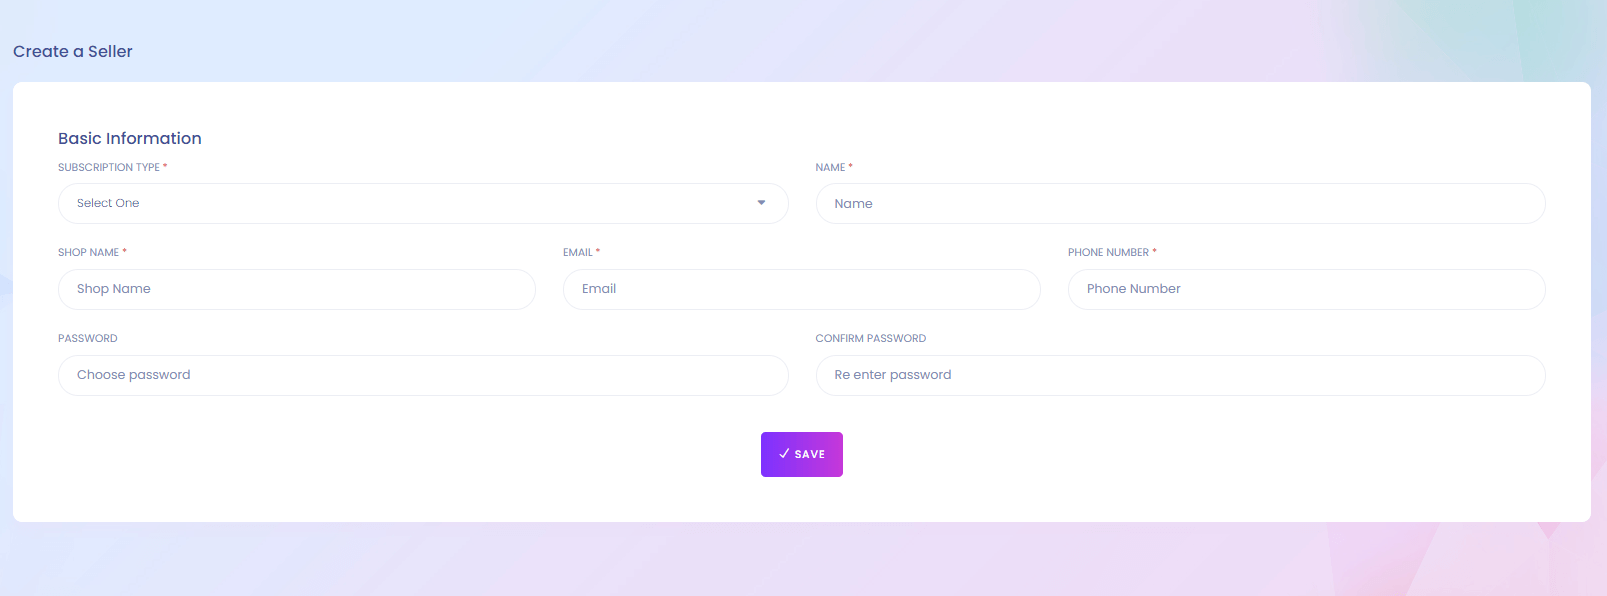
1. Add Seller
Add new seller to the system.
2. Action
Seller details can be found here. You can secretly login to this seller account and make him trusted.
Seller (Create)
Seller (Details)
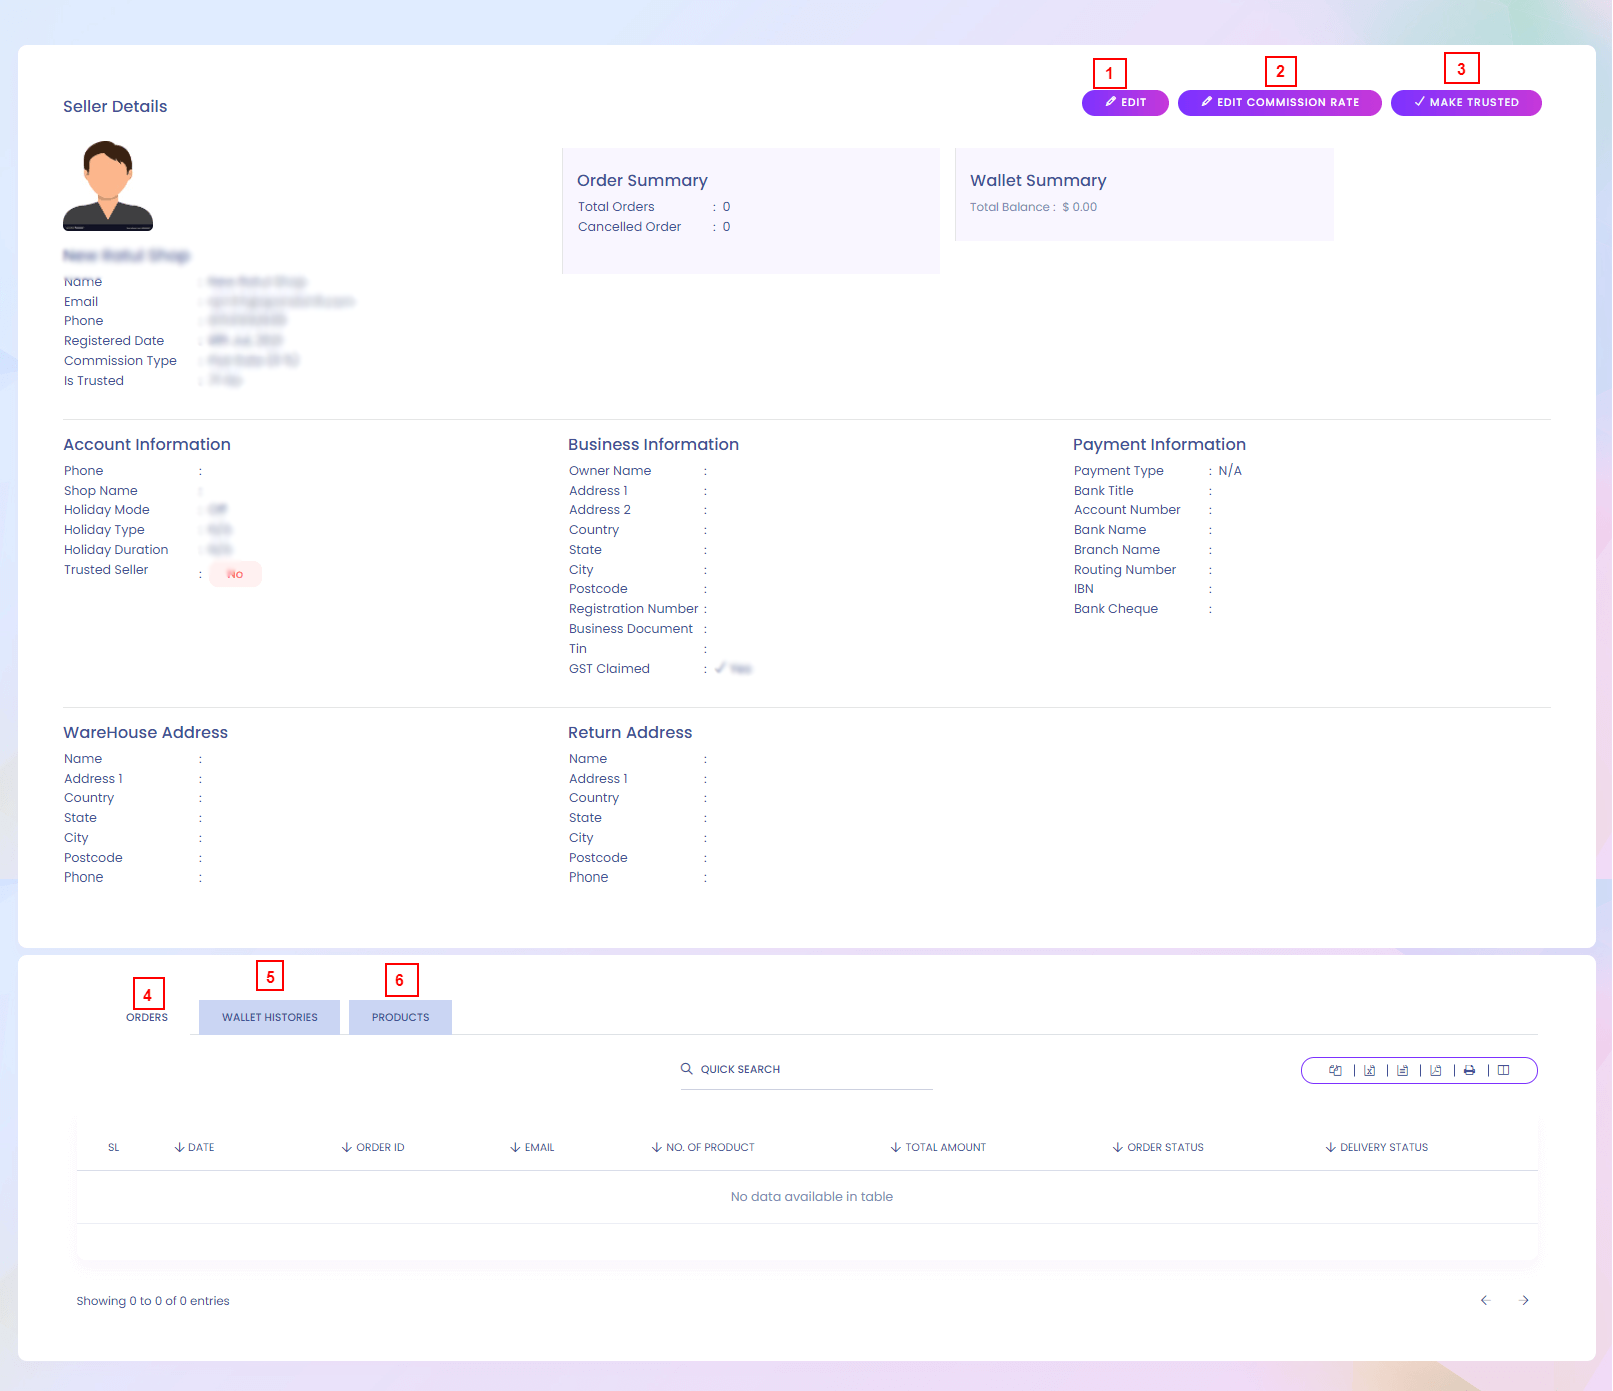
1. Edit
Seller details can be edited from here.
2. Edit Commission Rate
Commission Rate of a Seller can be edited from here.
3. Make Trusted
Seller can be maked as trusted.
4. Orders
Seller Orders list.
5. Wallet History
Seller Wallet History list.
6. Products
Seller Products list.
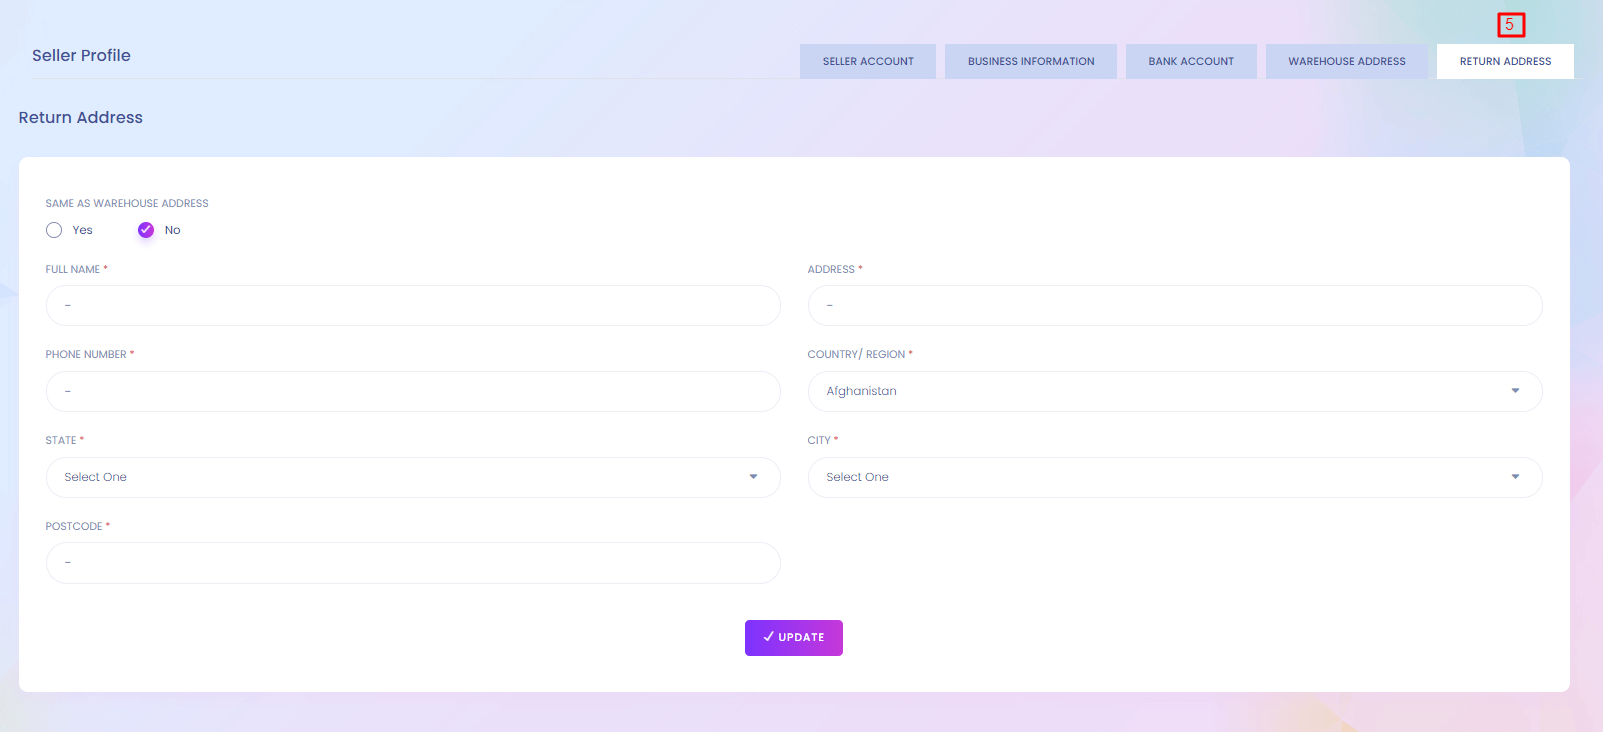
Seller (Profile)
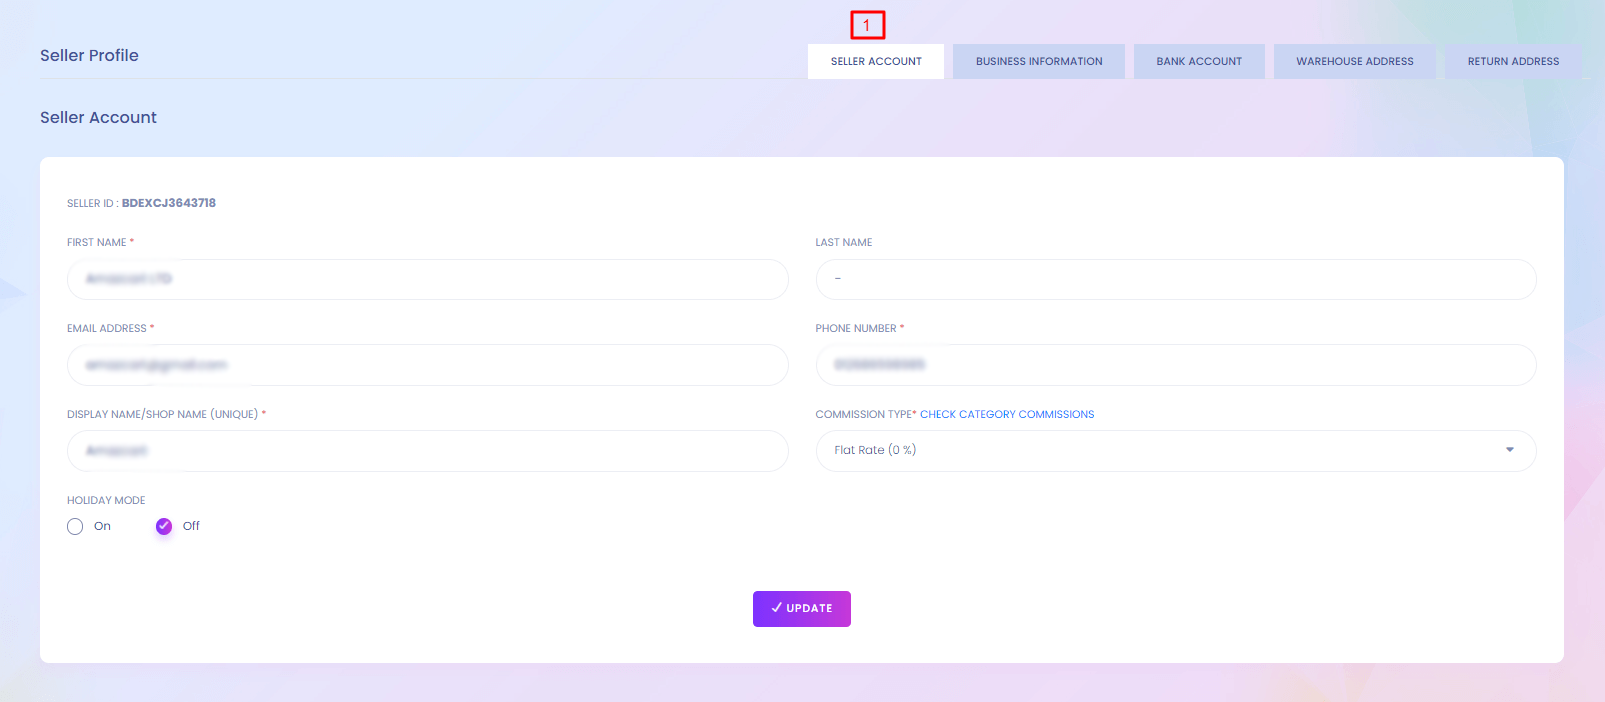
Seller (Profile)
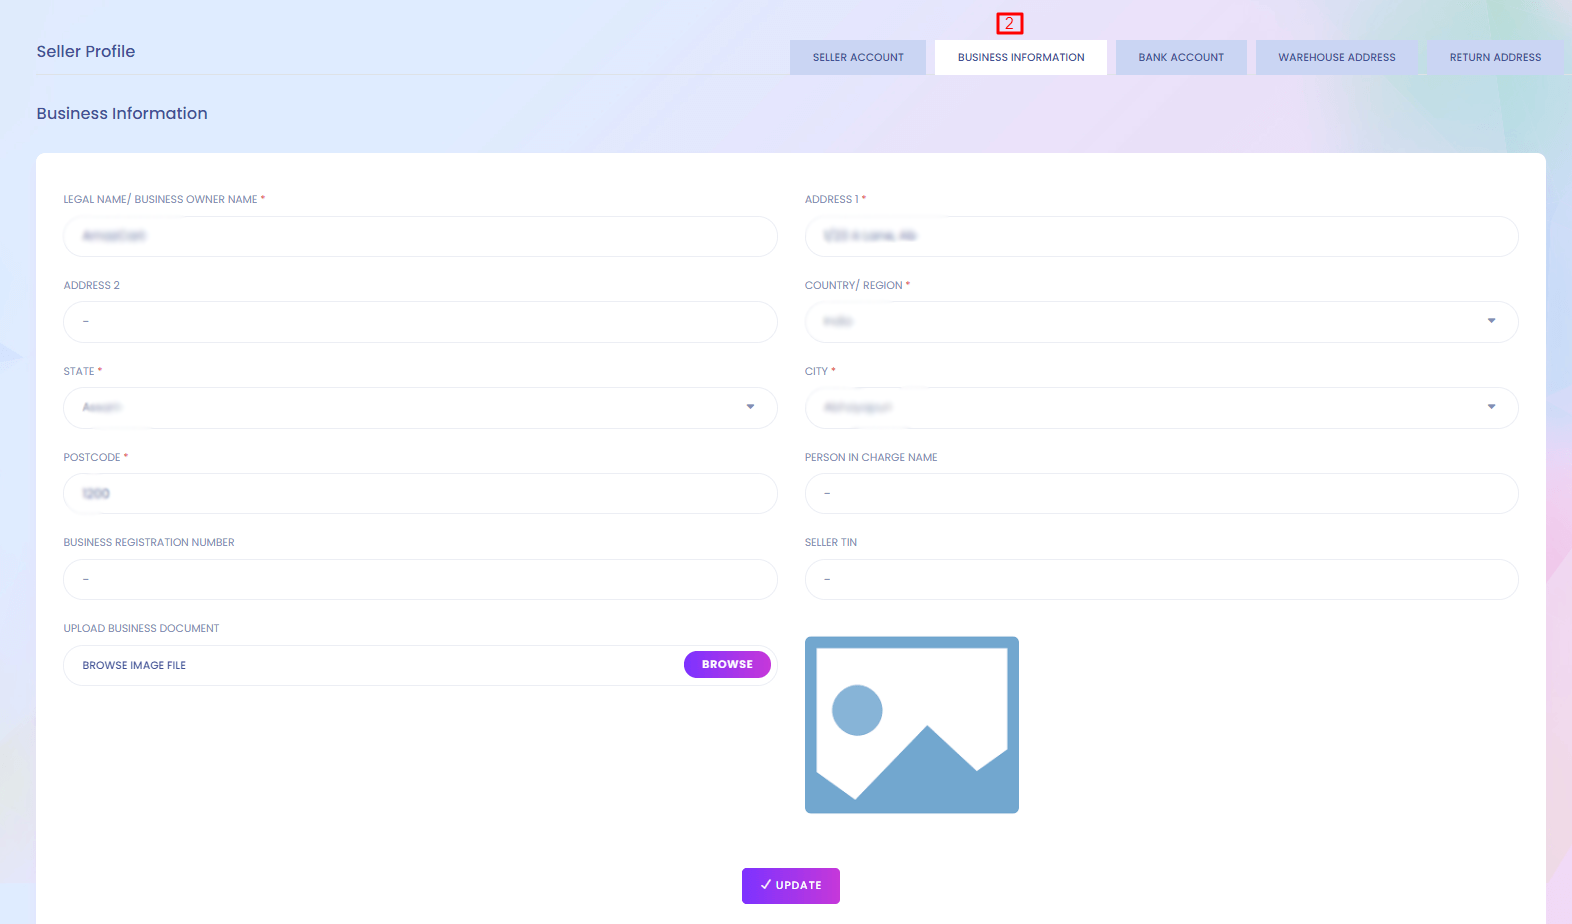
Seller (Profile)
Seller (Profile)
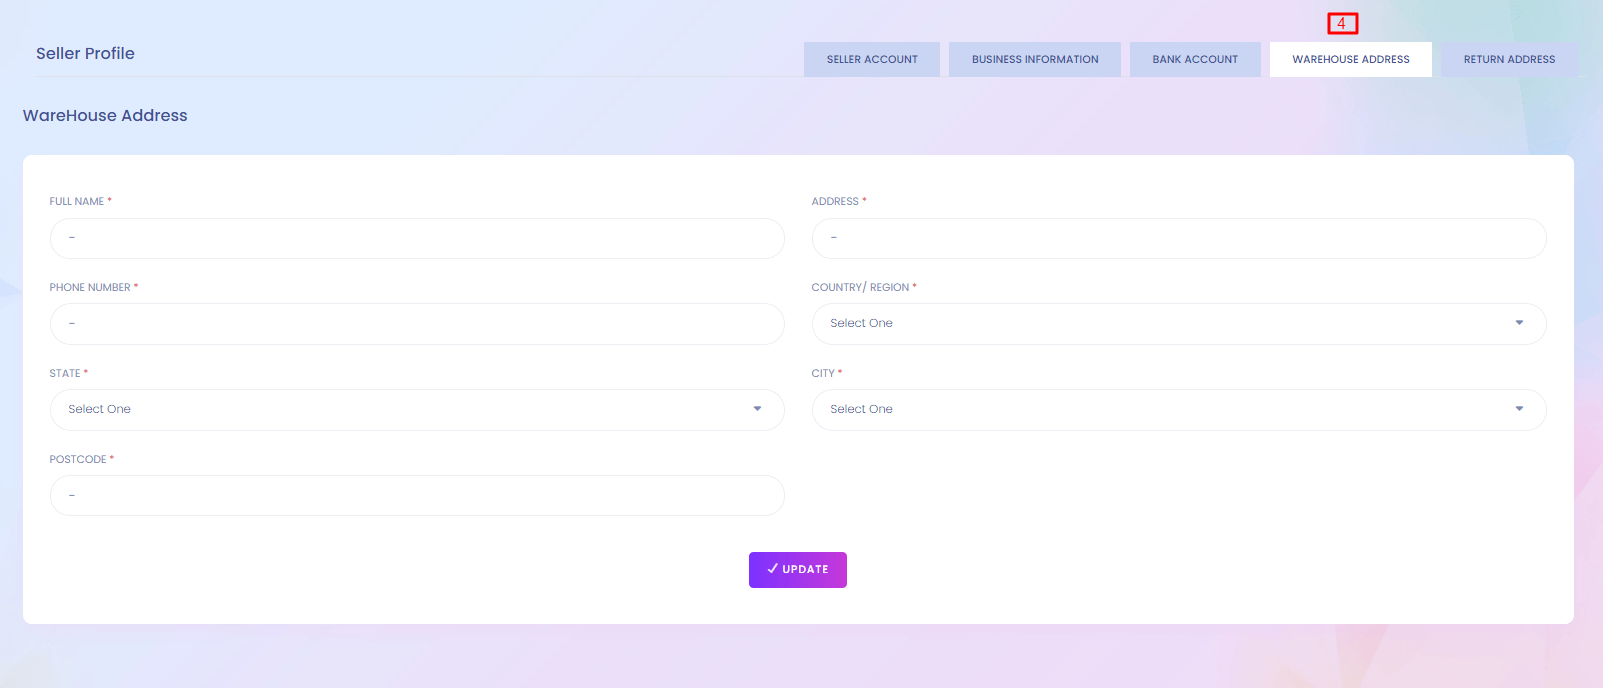
Seller (Profile)
Inactive/Request Seller List
Inactive/Request Seller List
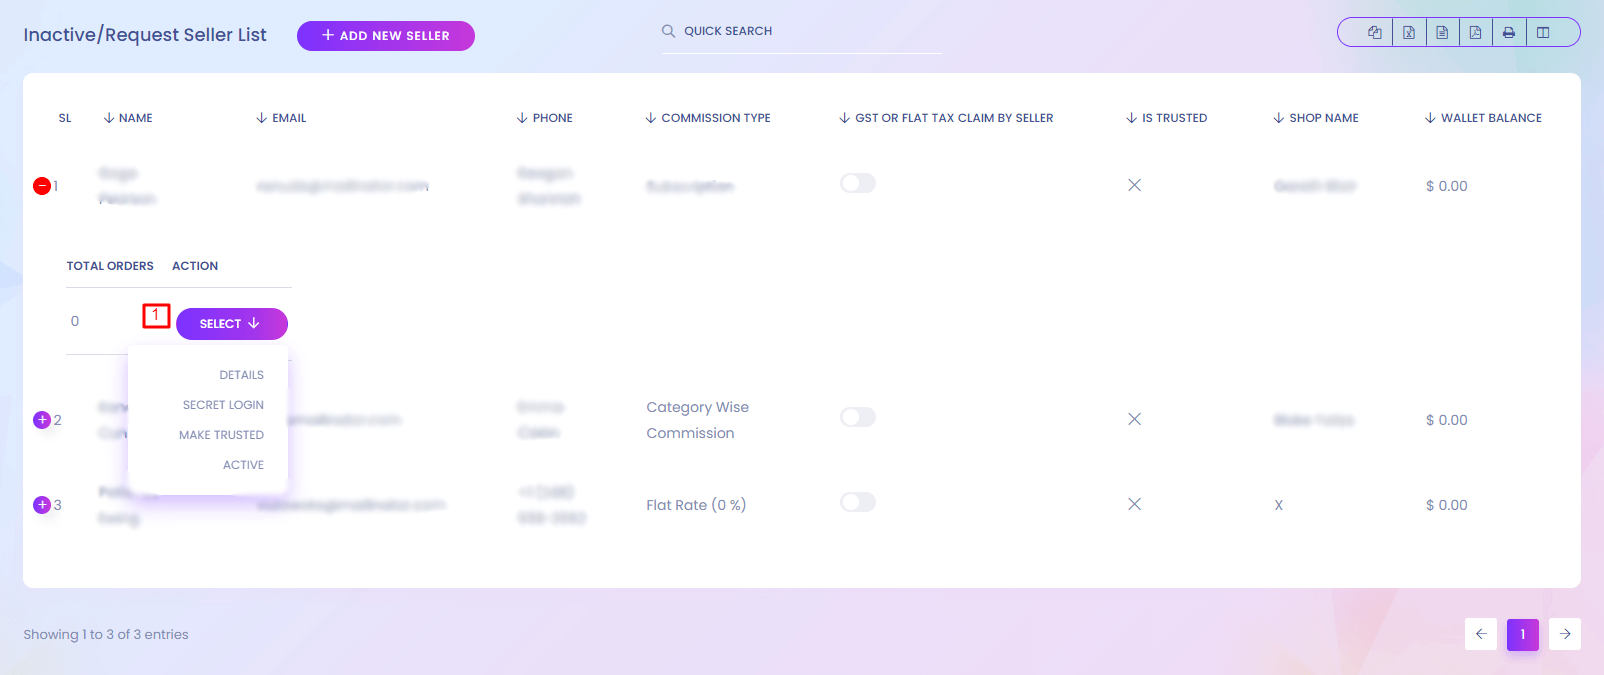
Inactive/Request Seller List
Inactive seller cannot login to the system. You can find the inactive seller here.
1. Action
Admin can performe multiple action here.
Comission Setup
Comission Setup
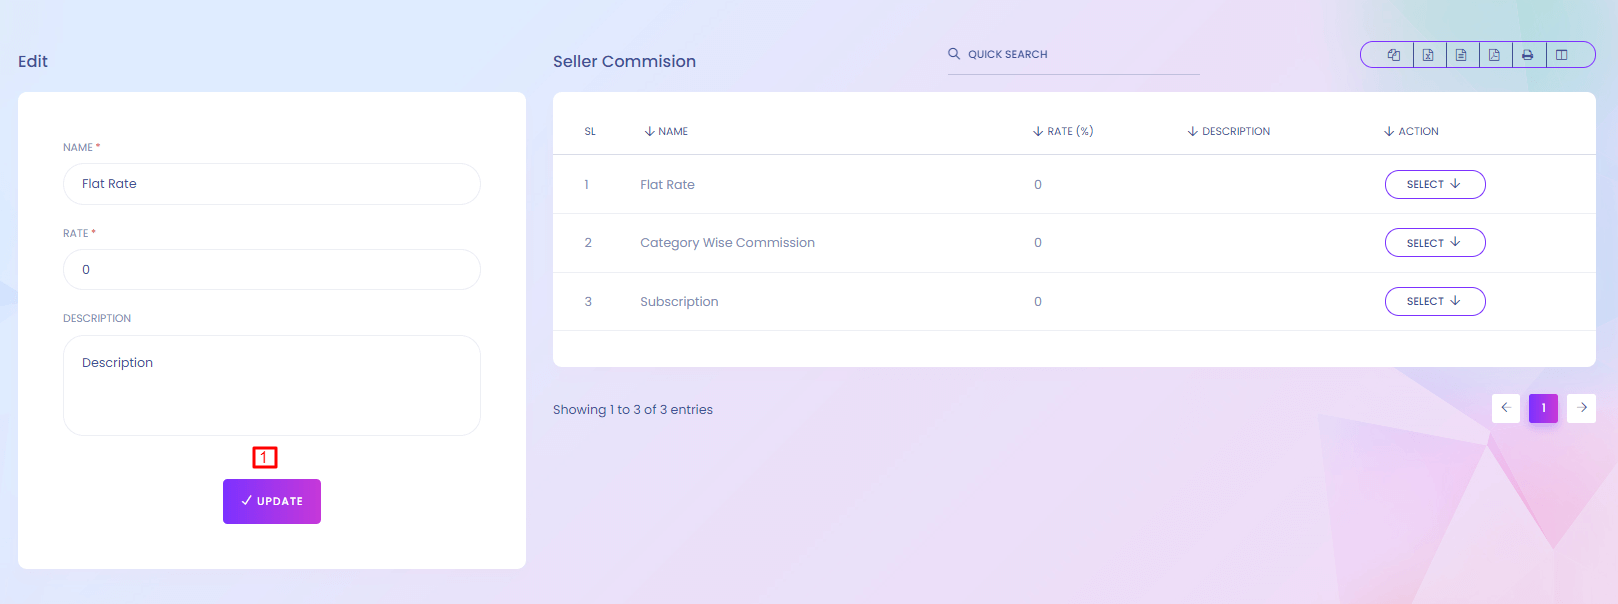
Comission Setup
When any seller sells any product or subscribe to the system you can get comission from it. You can setup the comission here.
1. Update
Admin can update comission details.
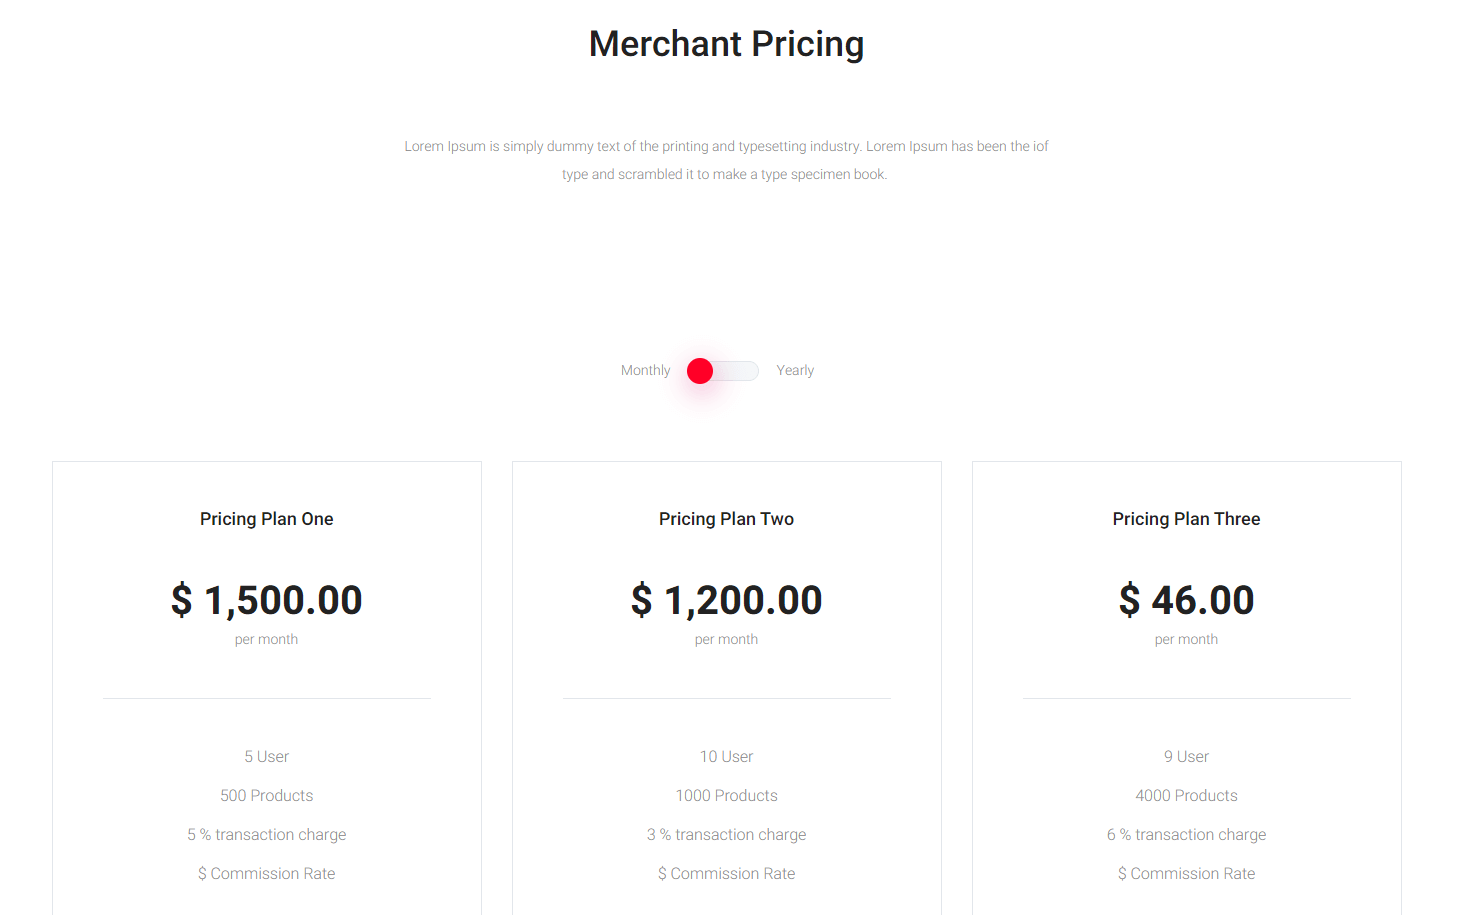
Pricing Plan
Pricing Plan

Pricing Plan
When any user want to be a merchant he/she has to choose a pricing plan. You can find the page here https://yourdomain.com/merchant .
1. Save
Admin can add new pricing plan. (*) marked fields are required. Merchant can choose any pricing plan.
2. Action
Pricing plan list can be edit and delete from here.
Pricing plan Website View
Subscription Payment
Subscription Payment
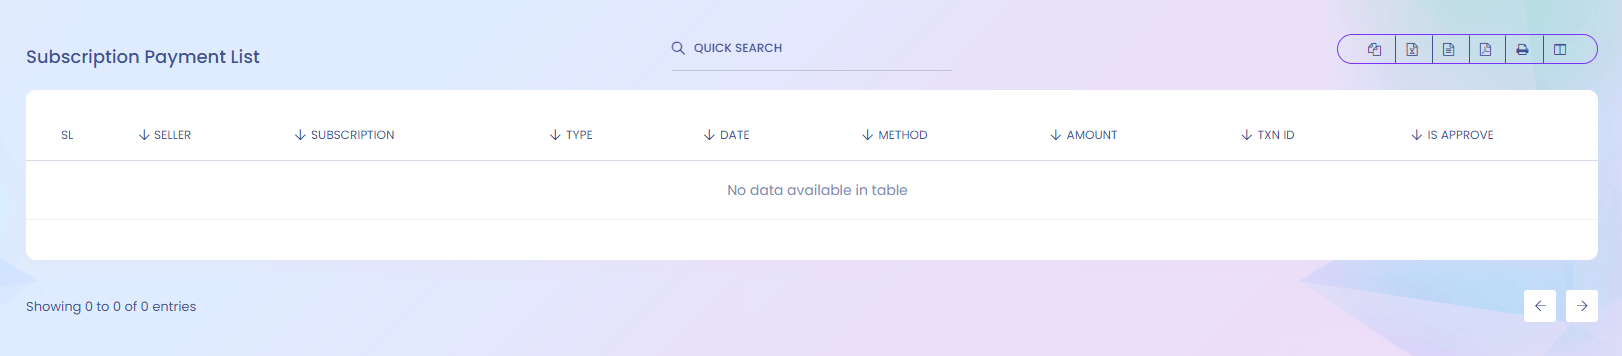
Subscription Payment
When any seller subscribe to the system he/she has to pay. Here you can see the list of that payment.
Auto Approve Seller Configuration
Auto Approve Seller Configuration

Auto Approve Seller Configuration
When auto approve seller is active, seller are automatically approved to the system and can sell the product otherwise admin will manually activate the seller from inactive/request seller list.
1. Update
Admin can update the setting..
Transaction
Transaction
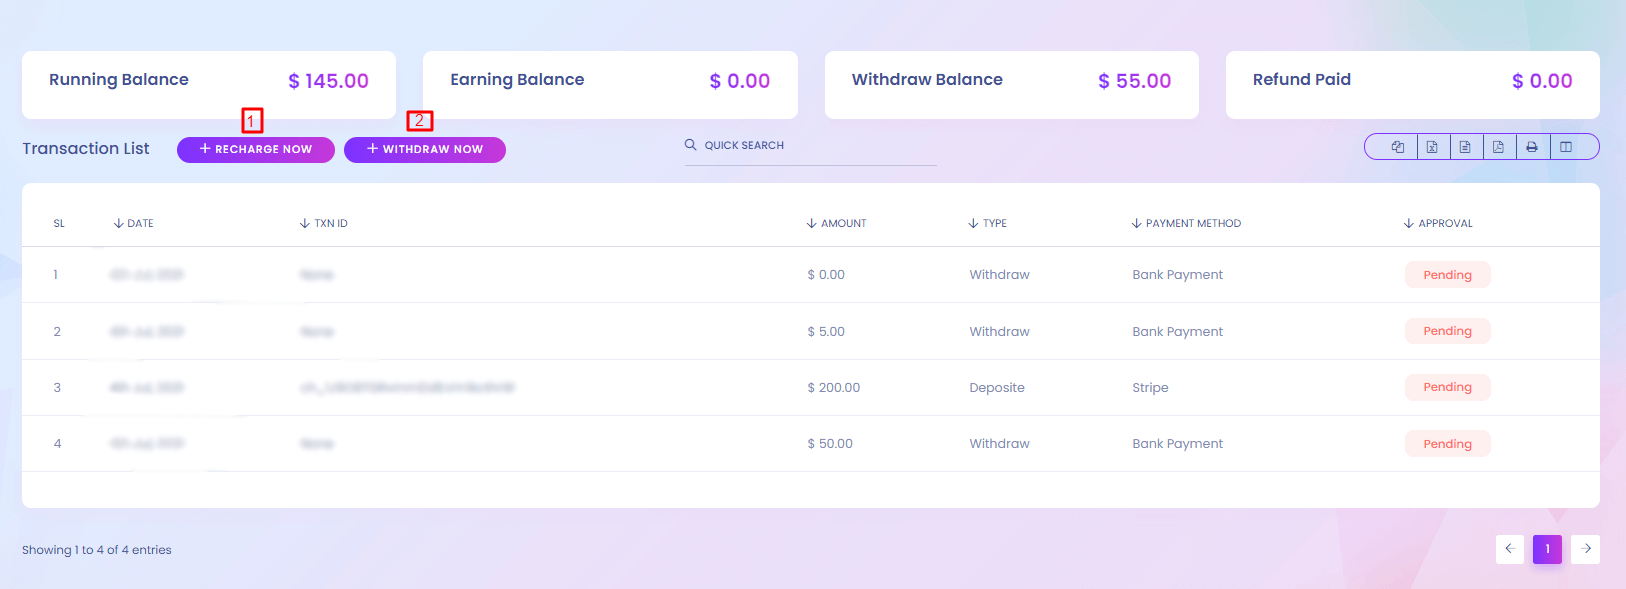
Transaction
This is your personal wallet. You can recharge to it and buy anything from the website using wallet balance.
1. Recharge
Admin can recharge from here.
2. Withdraw
Admin can withdraw from here.
My Wallet (Recharge)
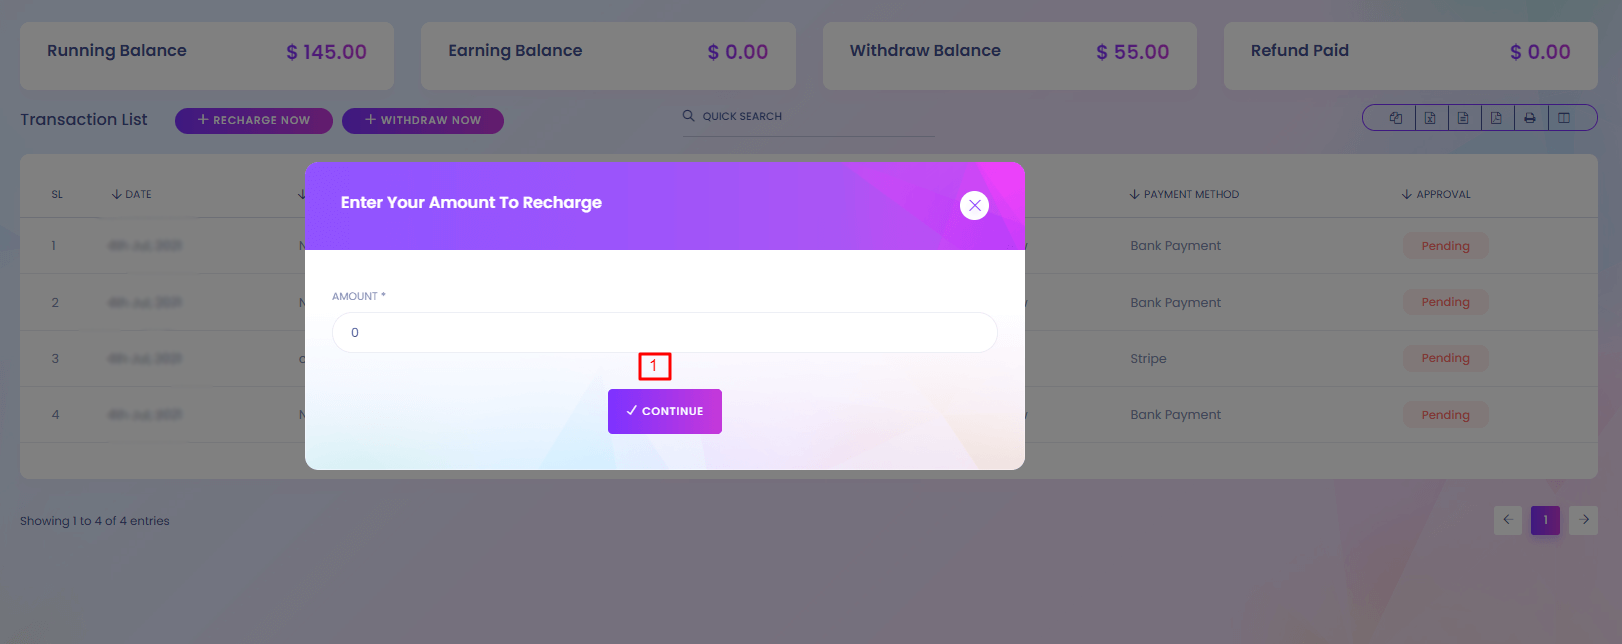
1. Continue
Recharge process will start after pressing continue button.
My Wallet (Withdraw)
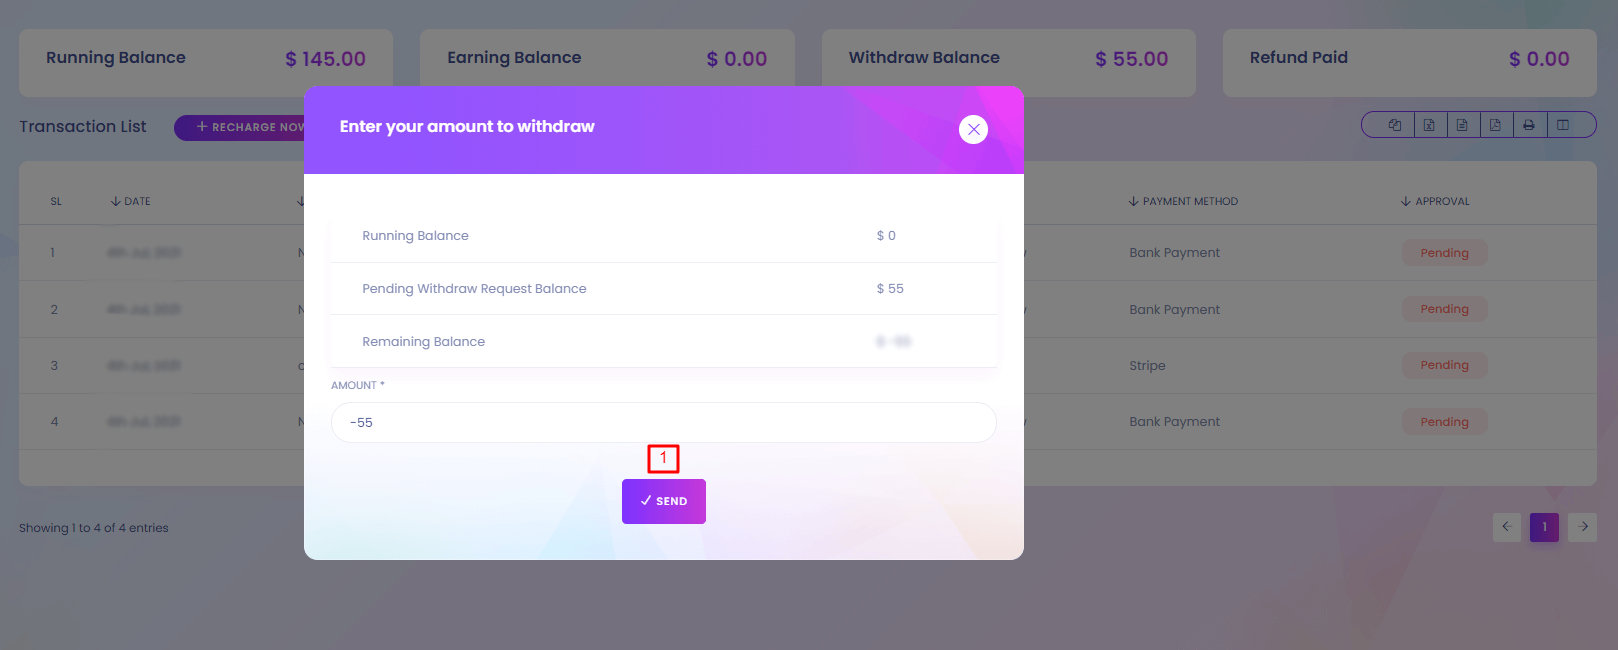
1. Send
Withdraw request will be sent.
Withdraw
Withdraw
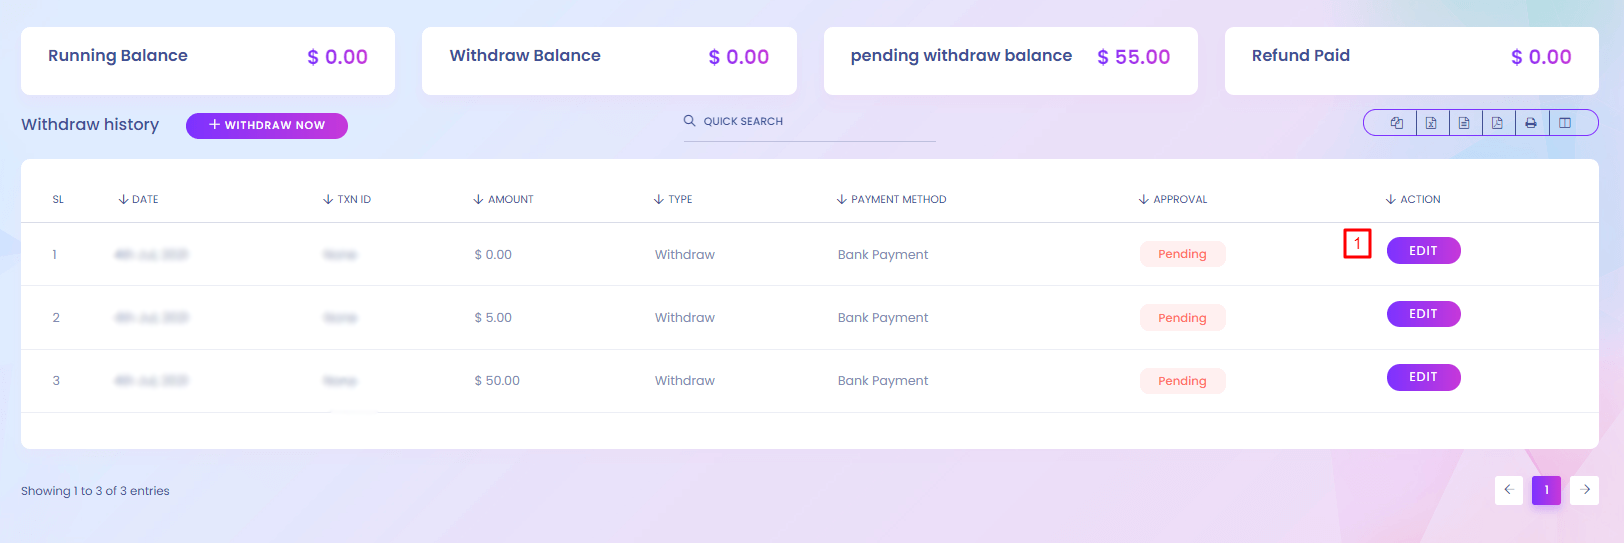
Withdraw
You can see the withdraw requests from the seller.
1. Edit
Withdraw details can be updated.
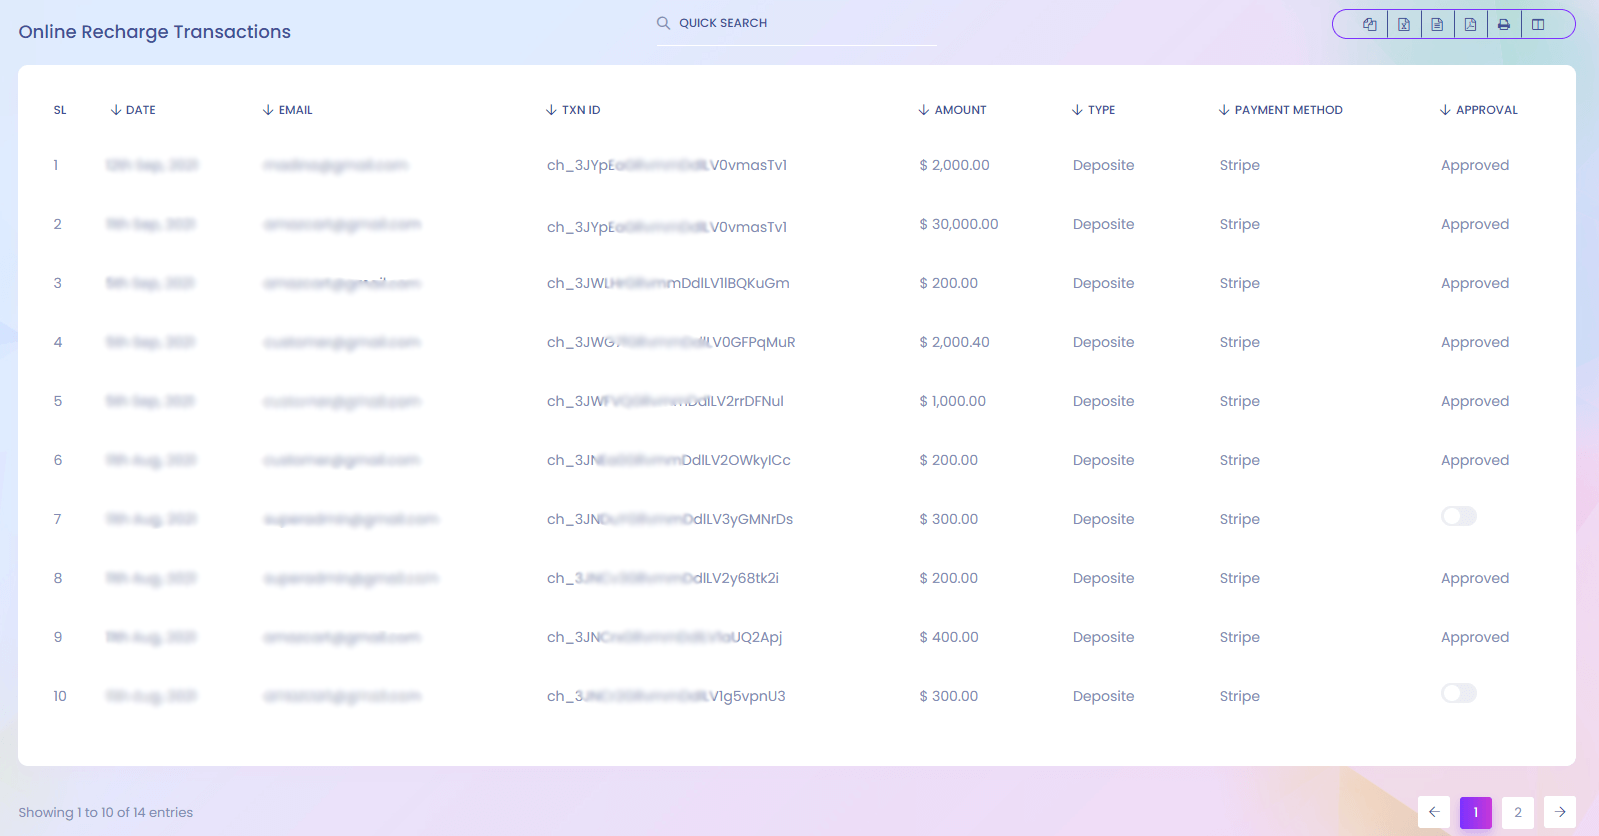
Online Recharge
Online Recharge
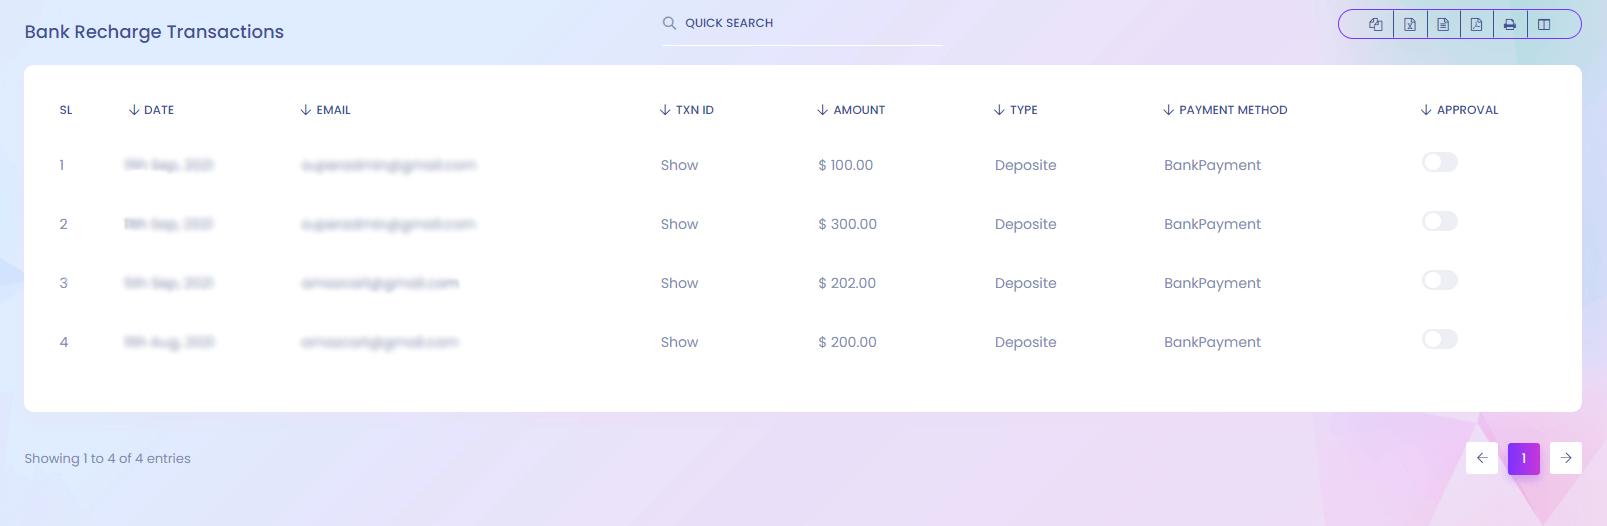
Bank Recharge
Bank Recharge
Withdraw Request
Withdraw Request
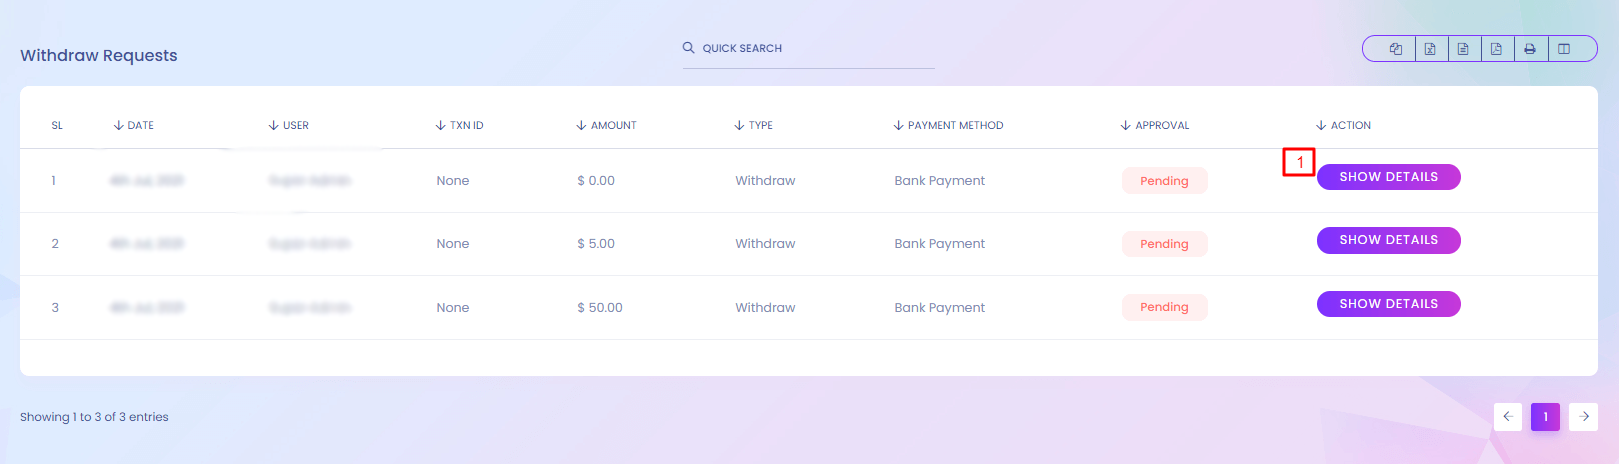
Withdraw Request
You can see the withdraw requests from the seller.
1. Show Details
Admin can show the full details.
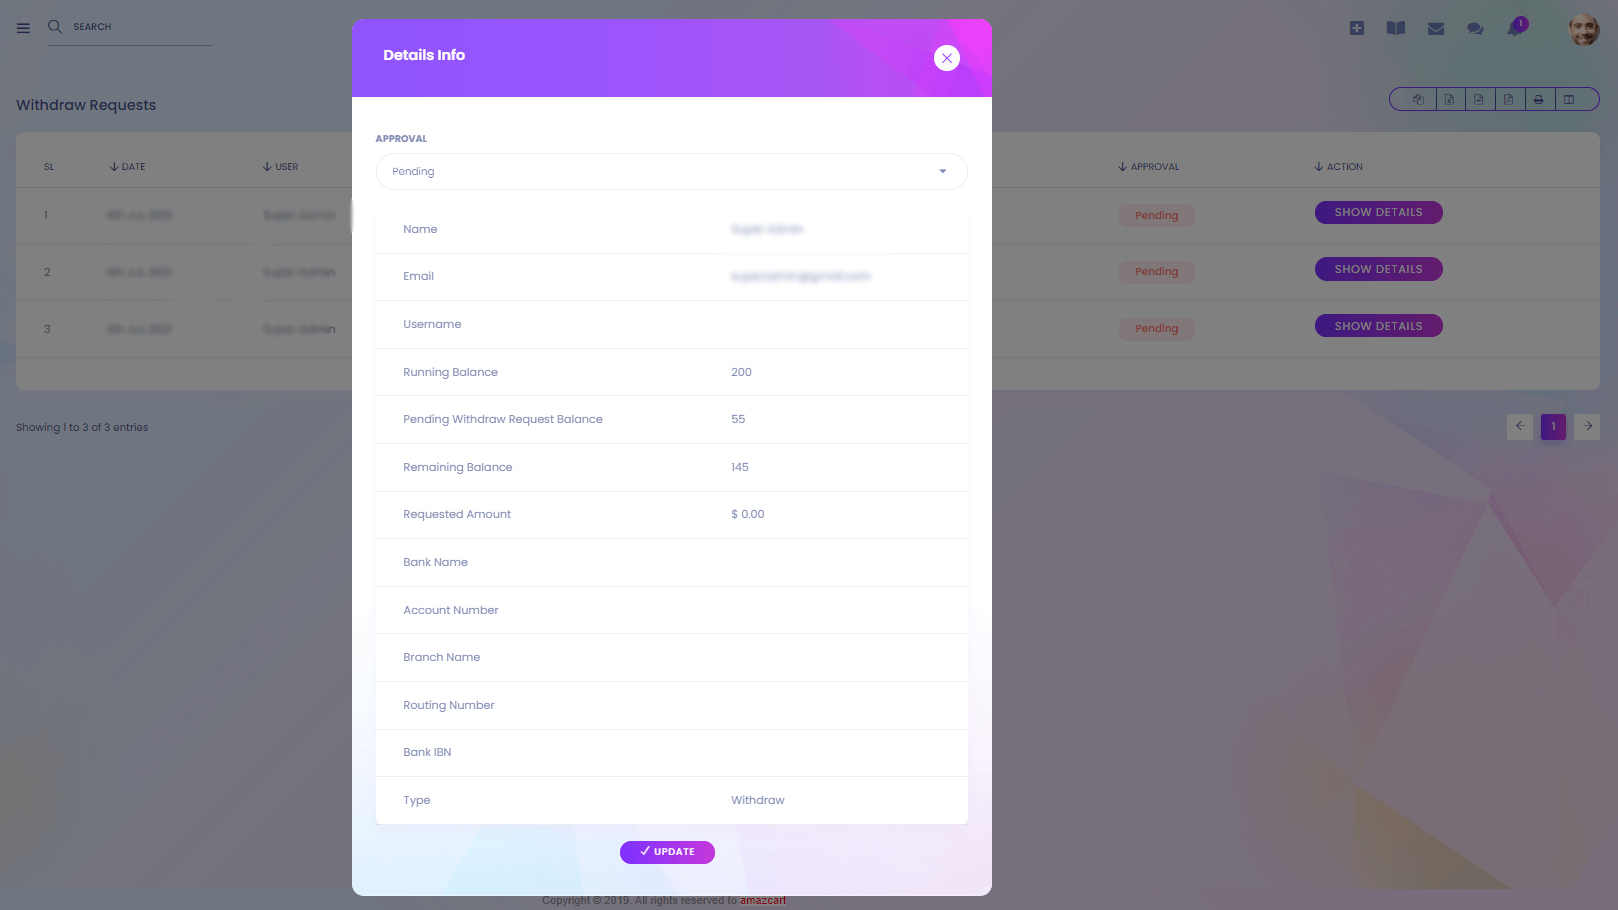
Withdraw Request Details
Offline Recharge
Offline Recharge
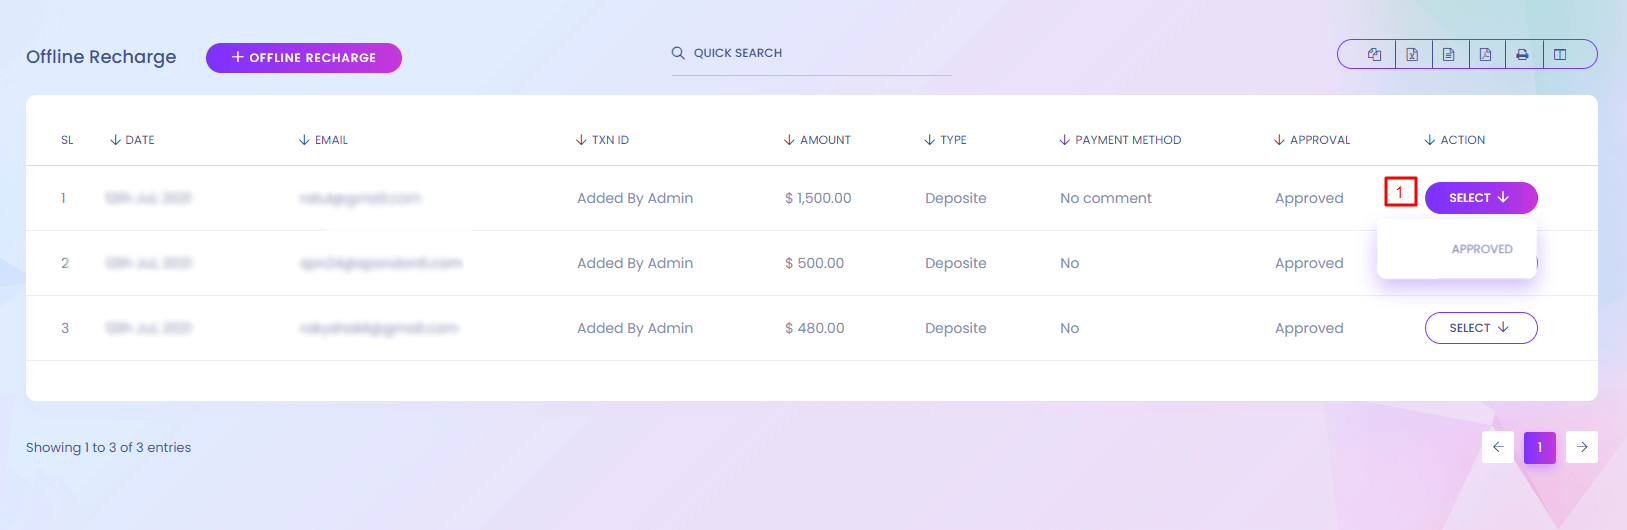
Offline Recharge
You can see the offline recharge history of the sellers.
1. Approve
Admin can approve offline recharges.
Auto Approve Wallet Configuration
Auto Approve Wallet Configuration

1. Update
Admin can update wallet configuration.
Contact Mail
Contact Mail
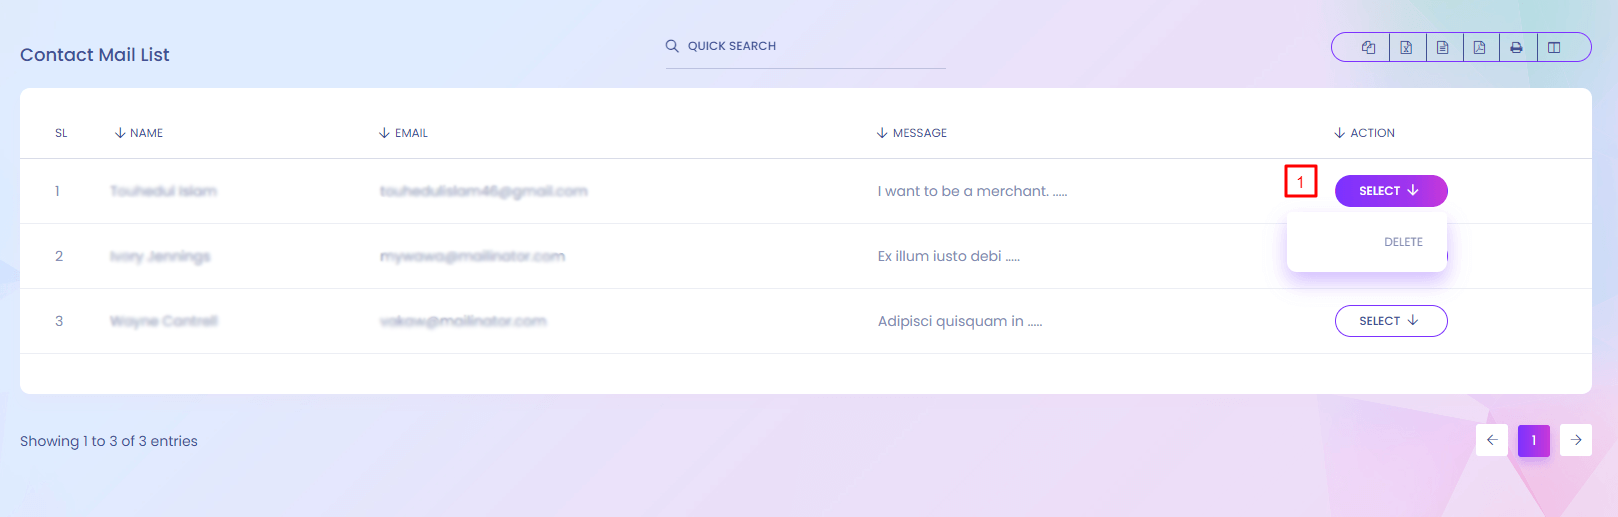
Contact Mail
Whoever sends any message to contact you, you can find it here.
1. Delete
Admin can delete contact mail.
Flash Deals
Flash Deals

Flash Deals
Flash deals are special types of offer which in a short time.Flash deal page can be found in a specific url. When you create a flash deal a page link is also created. Through this link you and other users can access to the deals. Flash deals status shold be on to access the page.
1. Add New
Admin can add new flash deals. Flash will show in the website if the status is on.
Flash Deals (Create)
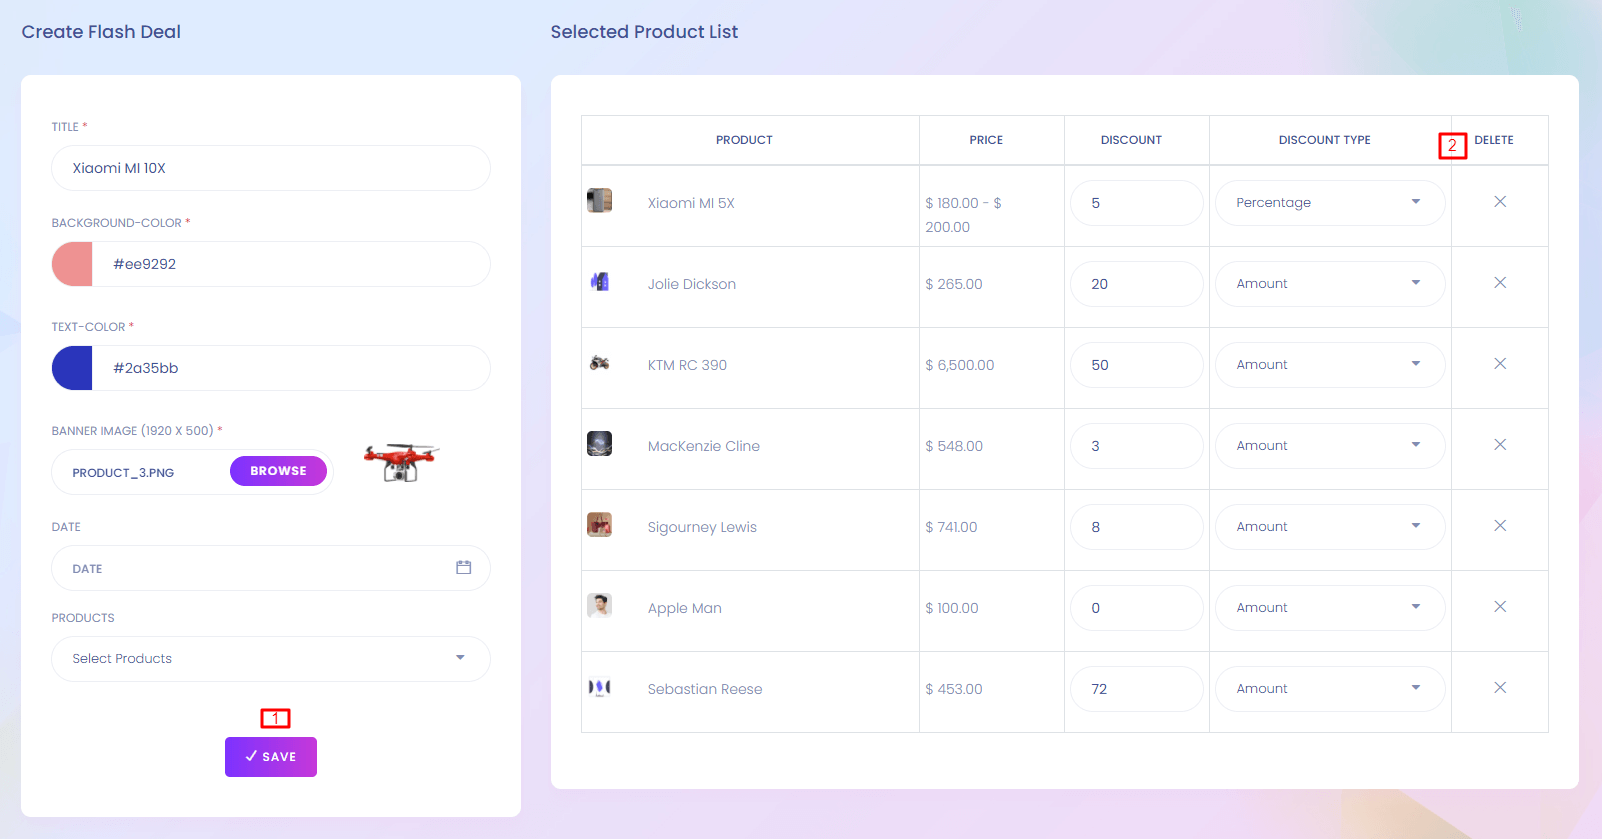
1. Save
Save flash deals.
2. Delete
Product can be removed from the list.
Flash Deals Website View

Coupons
Coupons
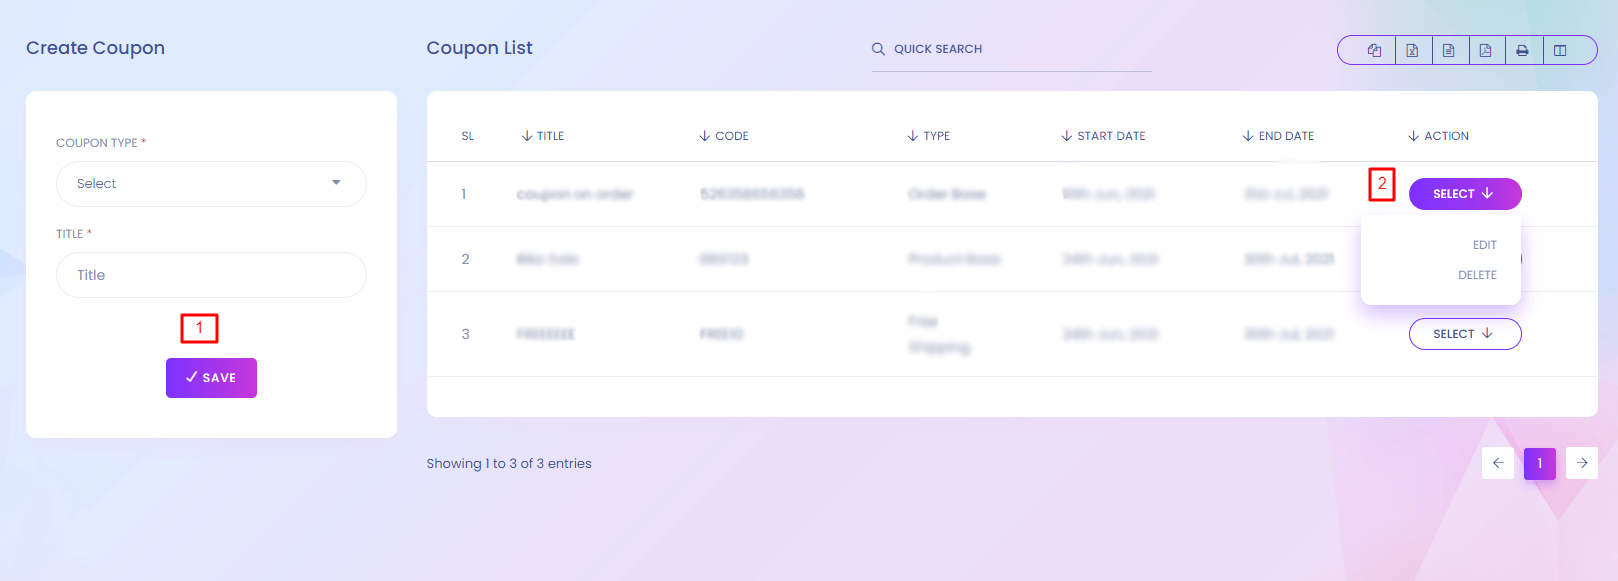
Coupons
Through coupon user can get discount when buying any product. It is a great way for selling the product more. When any user go to the checkout page for ordering any product he/she can see a field to enter a coupon. If the coupon is valid he/she get the discount which is set by you.
1. Save
Admin can add new coupons. Different types of coupon can be added.
2. Action
Coupon can edit or delete
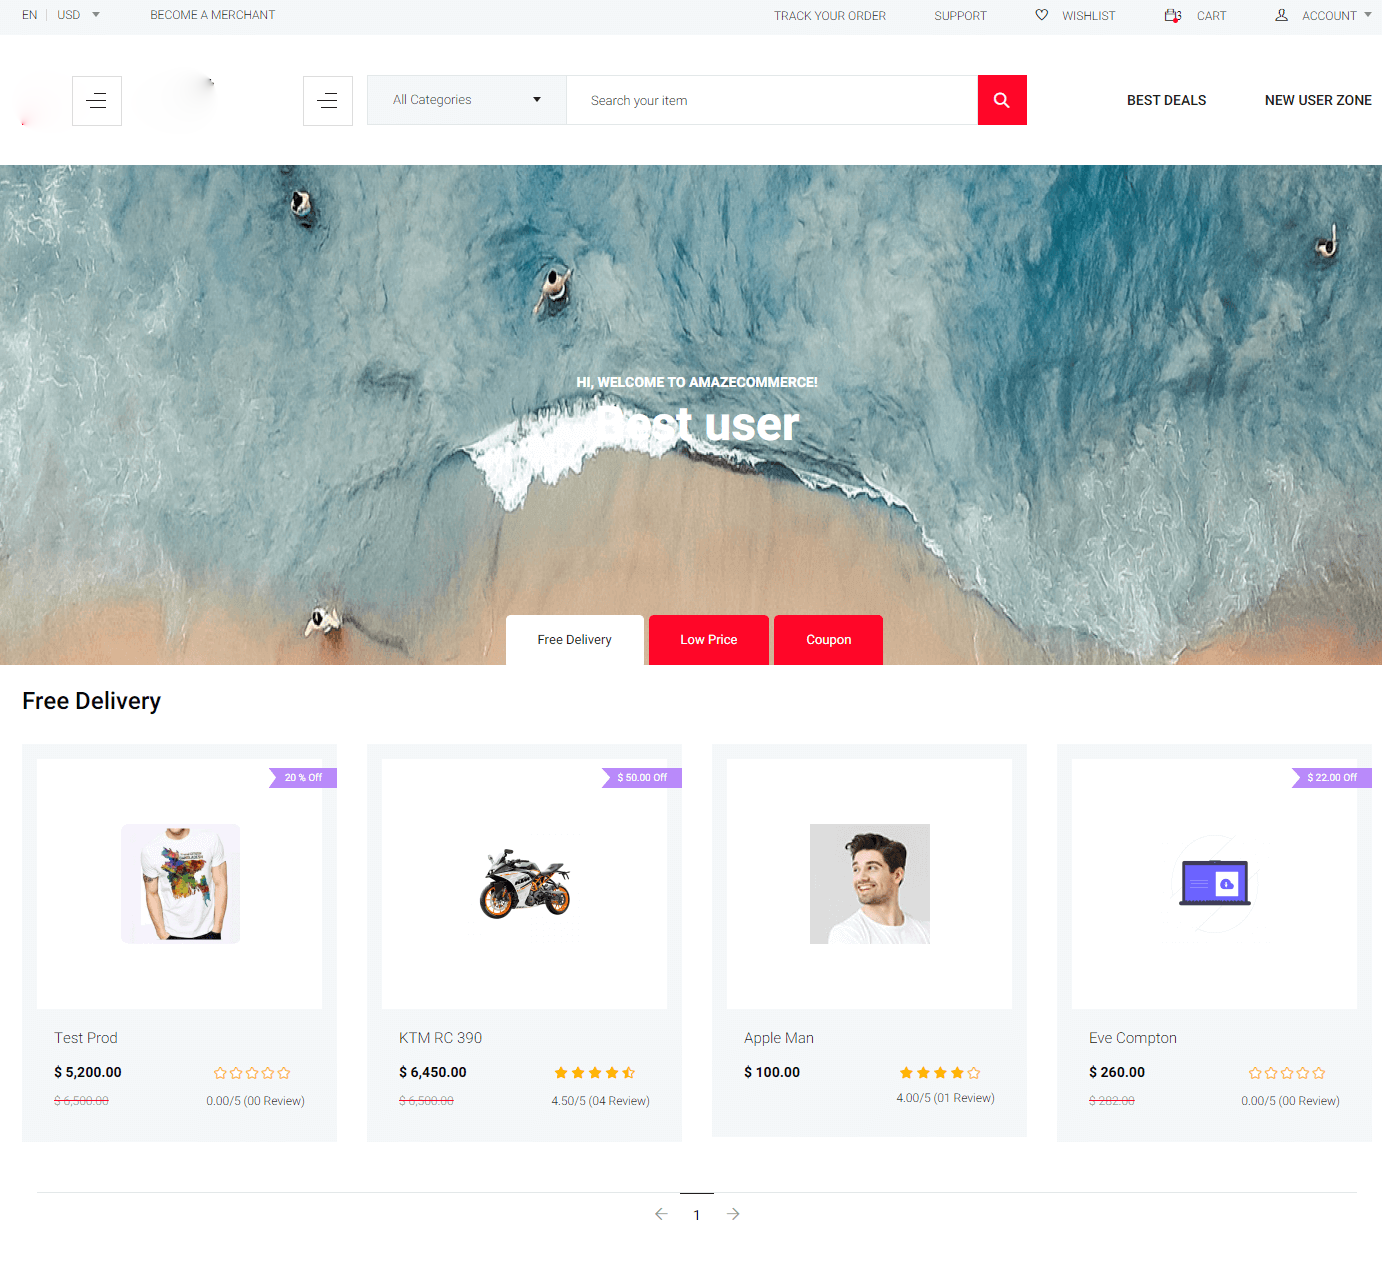
New User Zone
New User Zone
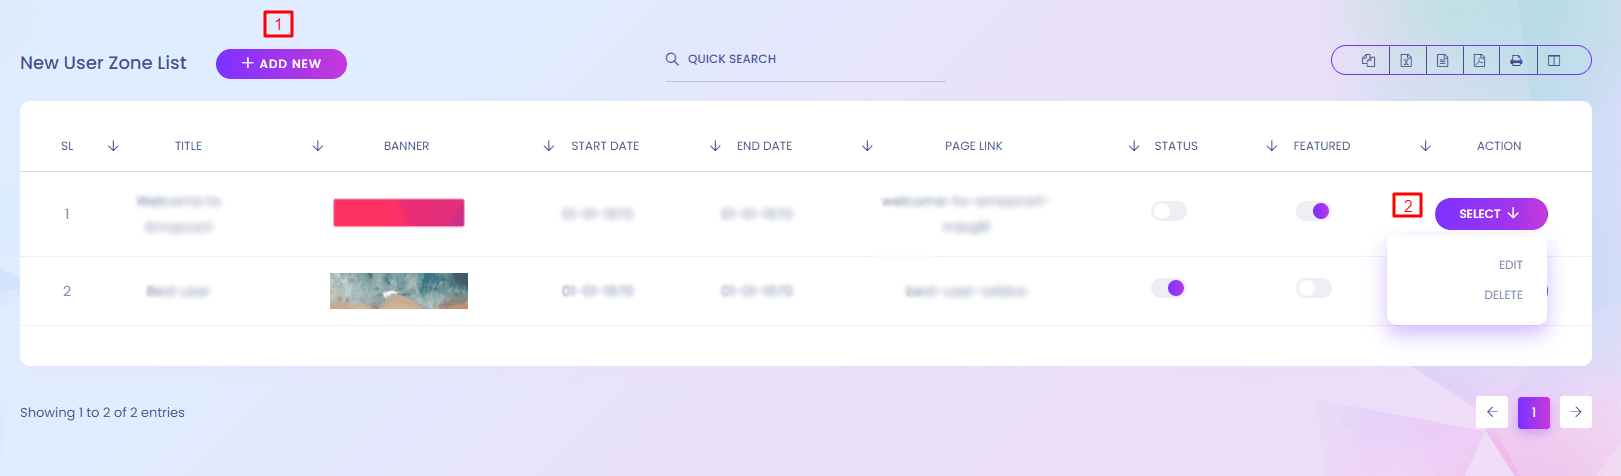
New User Zone
You can find the new user zone in the website landing page. When you click to the link you redirect to a page. You can customize this page for new user. You can add some extra benifits for the new users.
1. Add New
Admin can add new user zone. This will show in the website if the status is on.
2. Action
User zone can edit or delete
New User Zone (Create)

New User Zone (Create)
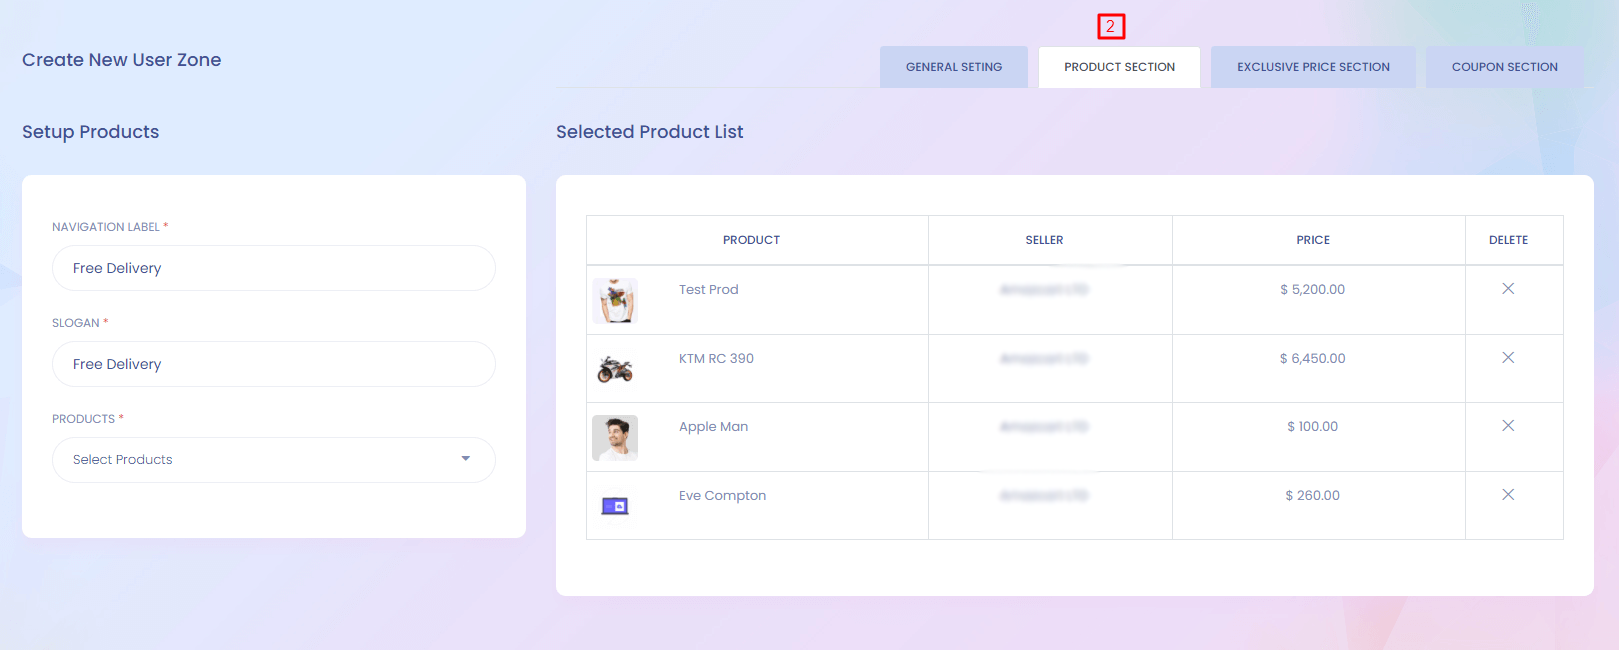
New User Zone (Create)
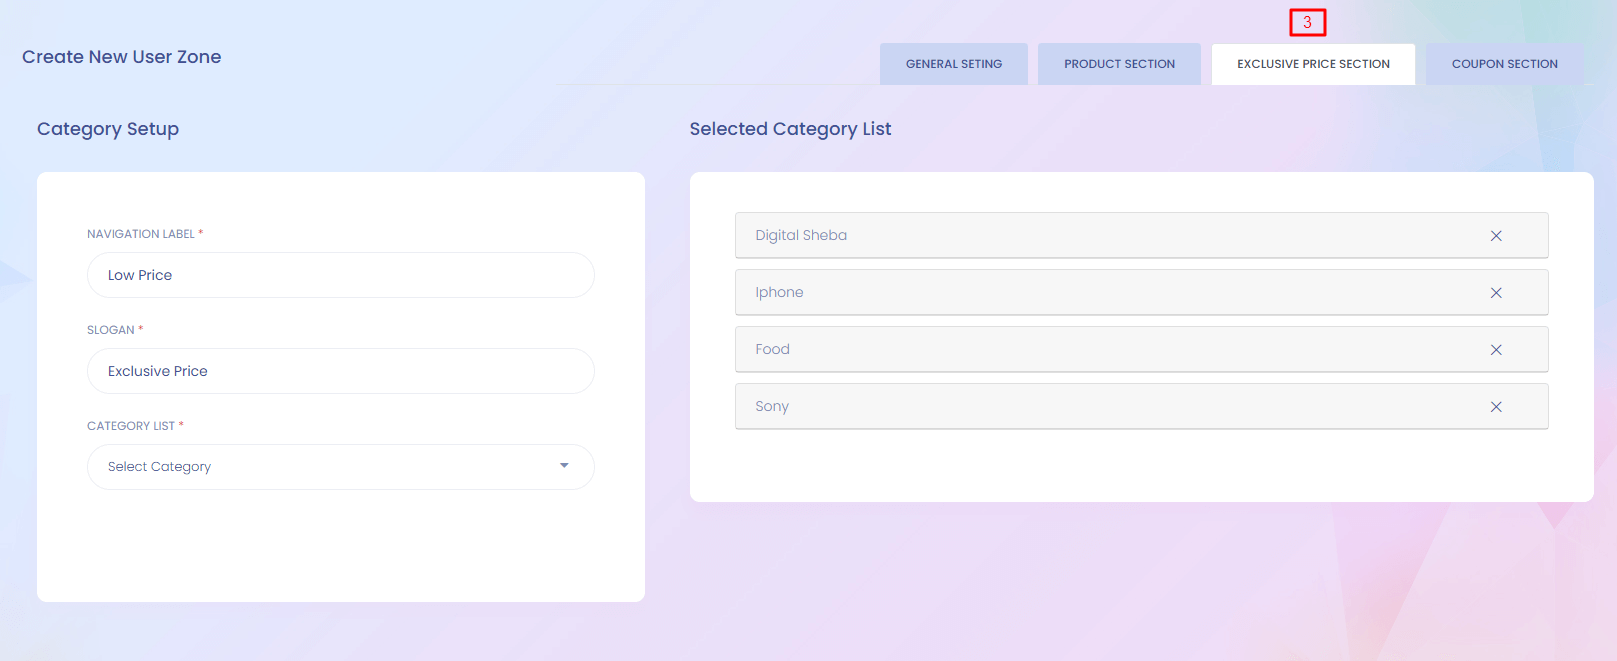
New User Zone (Create)
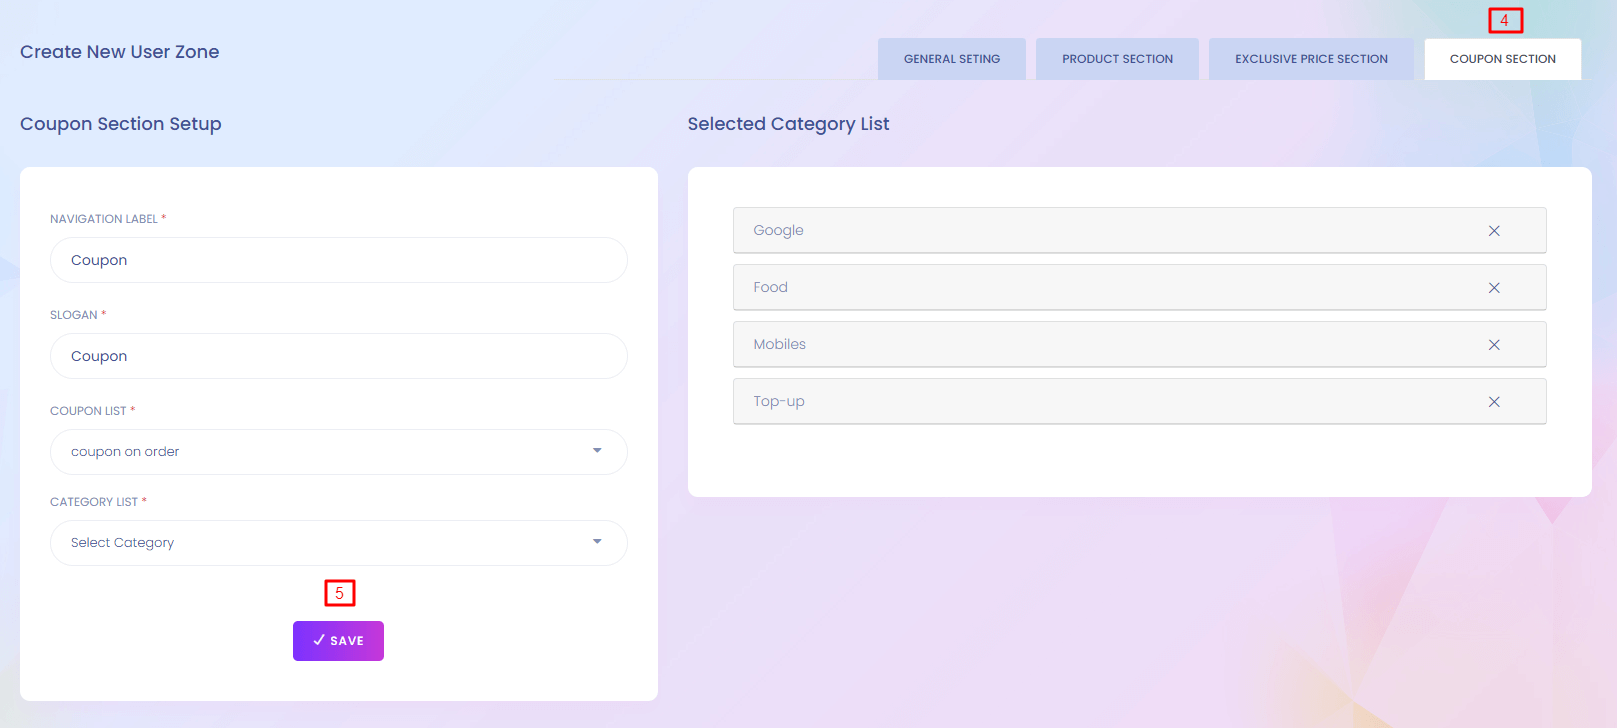
3. Save
Save the user zone.
New User Zone Website View
News Letter
News Letter
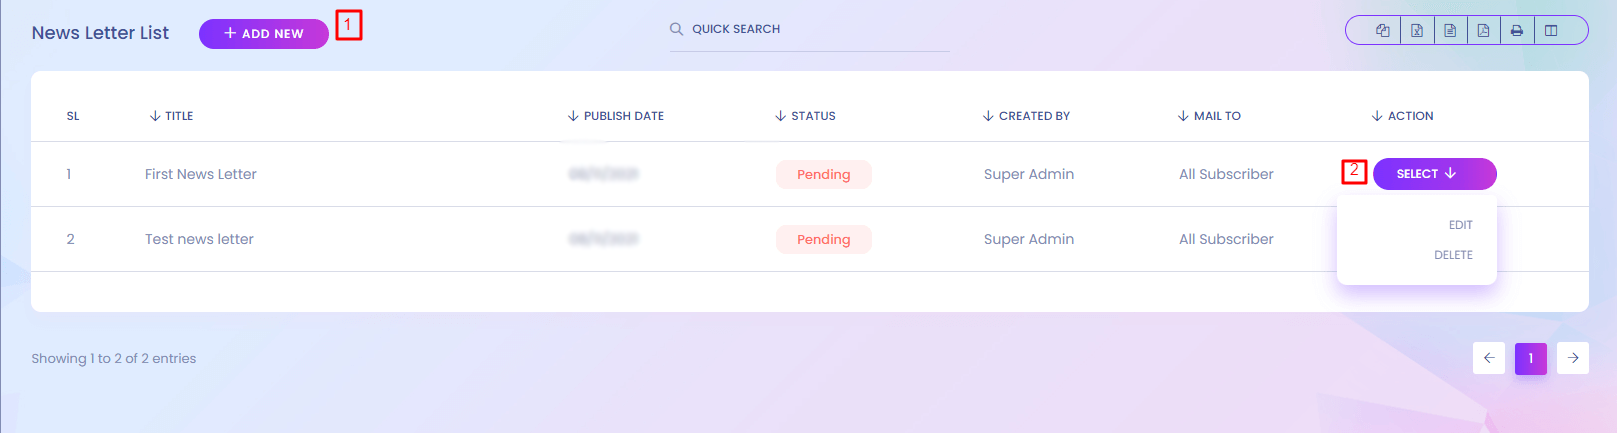
1. Add New
Add new NewsLetter
2. Action
Newsletter can edit and delete from here.
Bulk Sms
Bulk Sms

Bulk SMS
You can send sms to the customer or seller.
1. Save
Create bulk sms from here. Admin can select multiple user to send sms
2. Action
Create bulk can edit and delete from here.
Subscription
Subscription
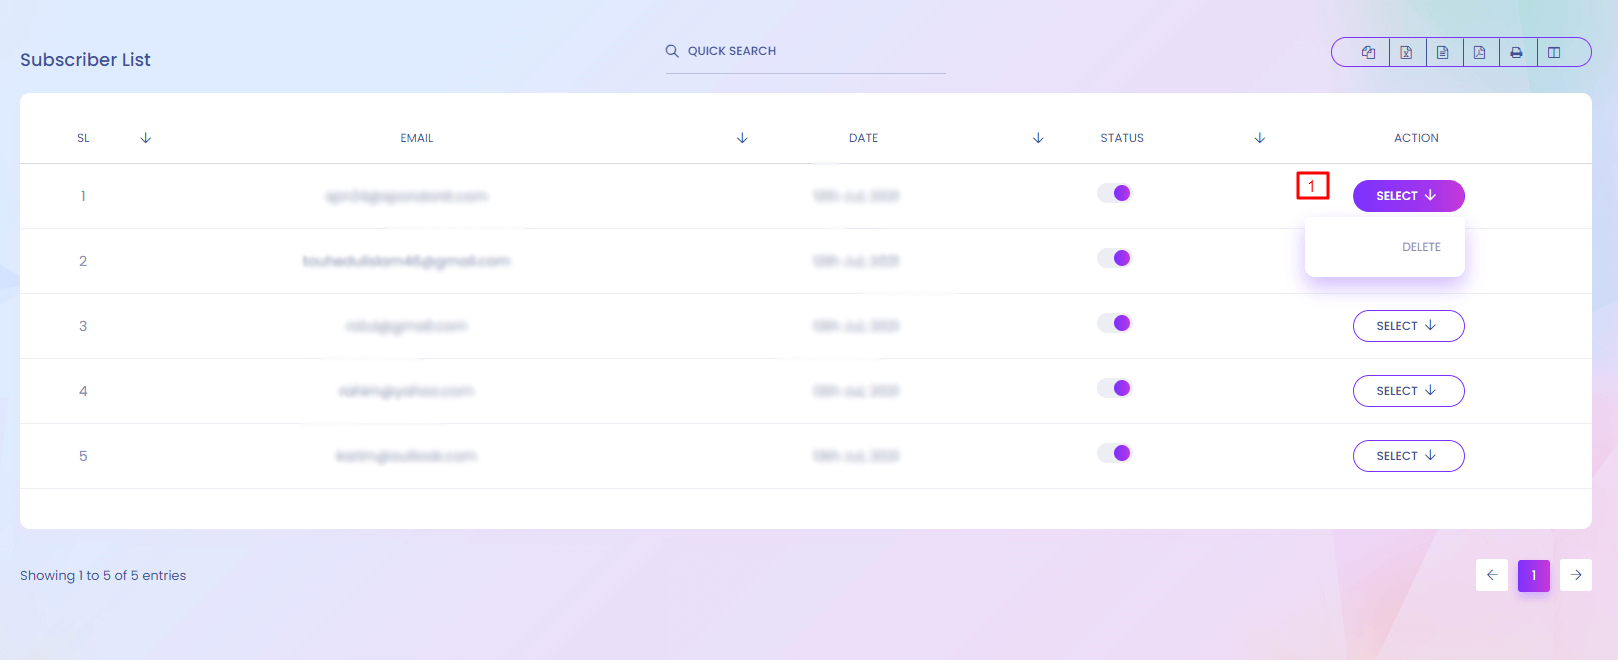
Subscription
You can see the subscriber list who are subscribed to the news letter.
1. Action
Subscriber can delete from here.
Referral Code Setup
Referral Code Setup
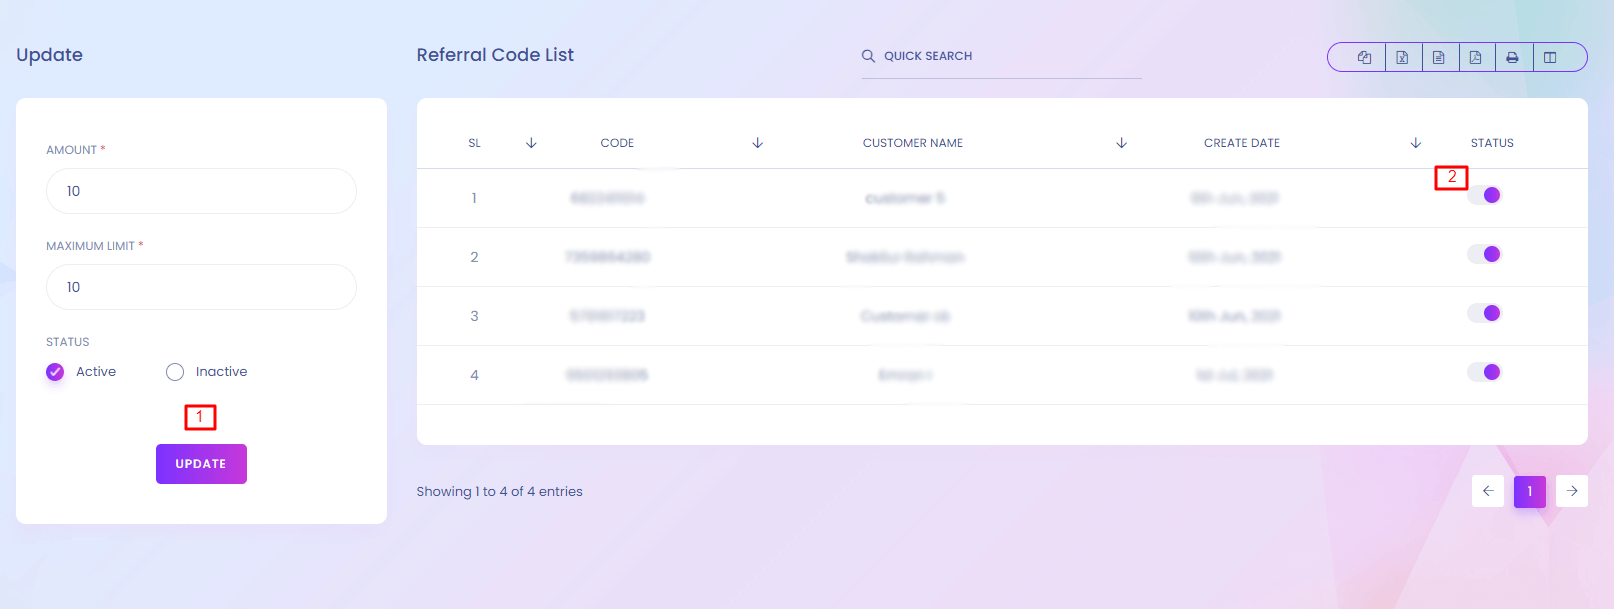
Referral Code Setup
User can refer to other user through referral code. User can use referral code while regestration. When any user uses any referral code, referer user get some benifits. You can customze the benifits and codes from here.
1. Update
Referral code can update from here.
2. Status
Referral code status can be changed.
Marketing Configuration
Marketing Configuration.
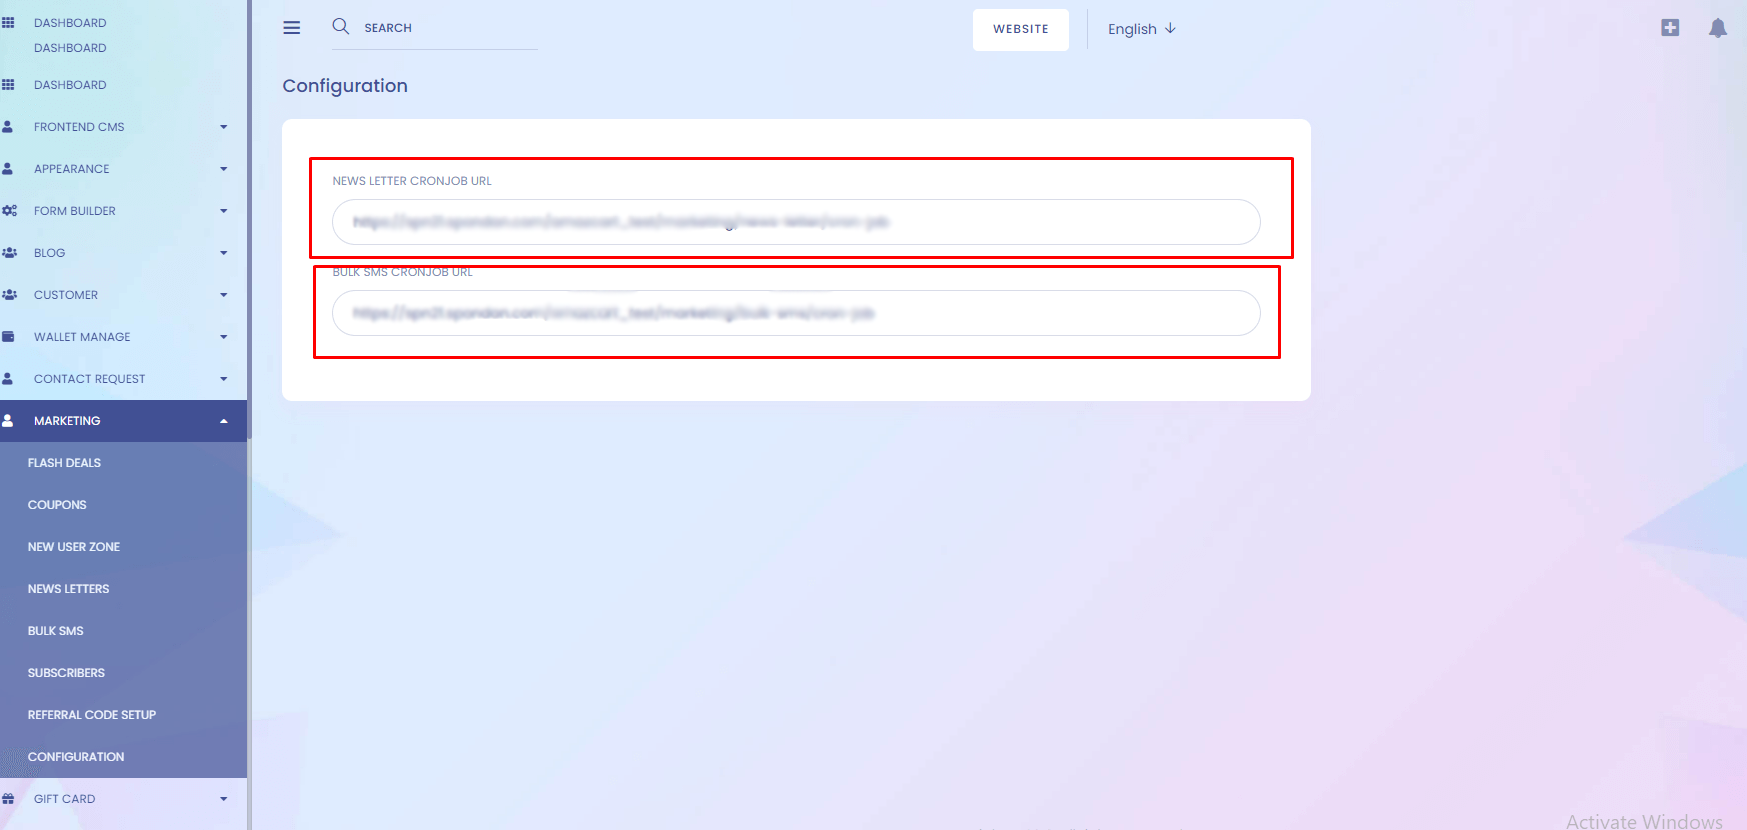
Referral Code Setup
To send news letter & bulk sms, you need to setup cronjob to your server. Please copy cronjob url & setup to your server cron job.
Gift Card List
Gift Card List
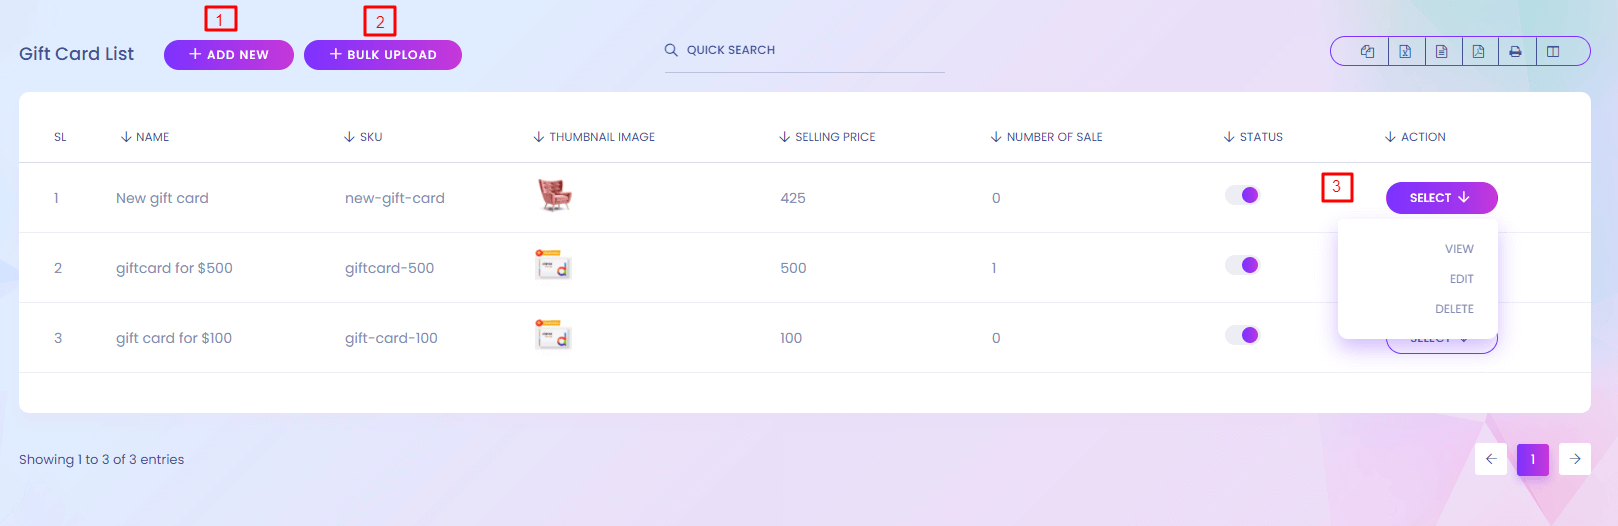
Gift Card
User can buy gift card as product. Using the gift card user can recharge their wallet. You can find the gift card from here https://yourdomain.com/gift-cards .
1. Add New
Add new gift card from here.
2. Bulk Upload
Bulk upload the gift cards.
3. Action
Gift card can view, edit and delete.
Gift Card (Create)
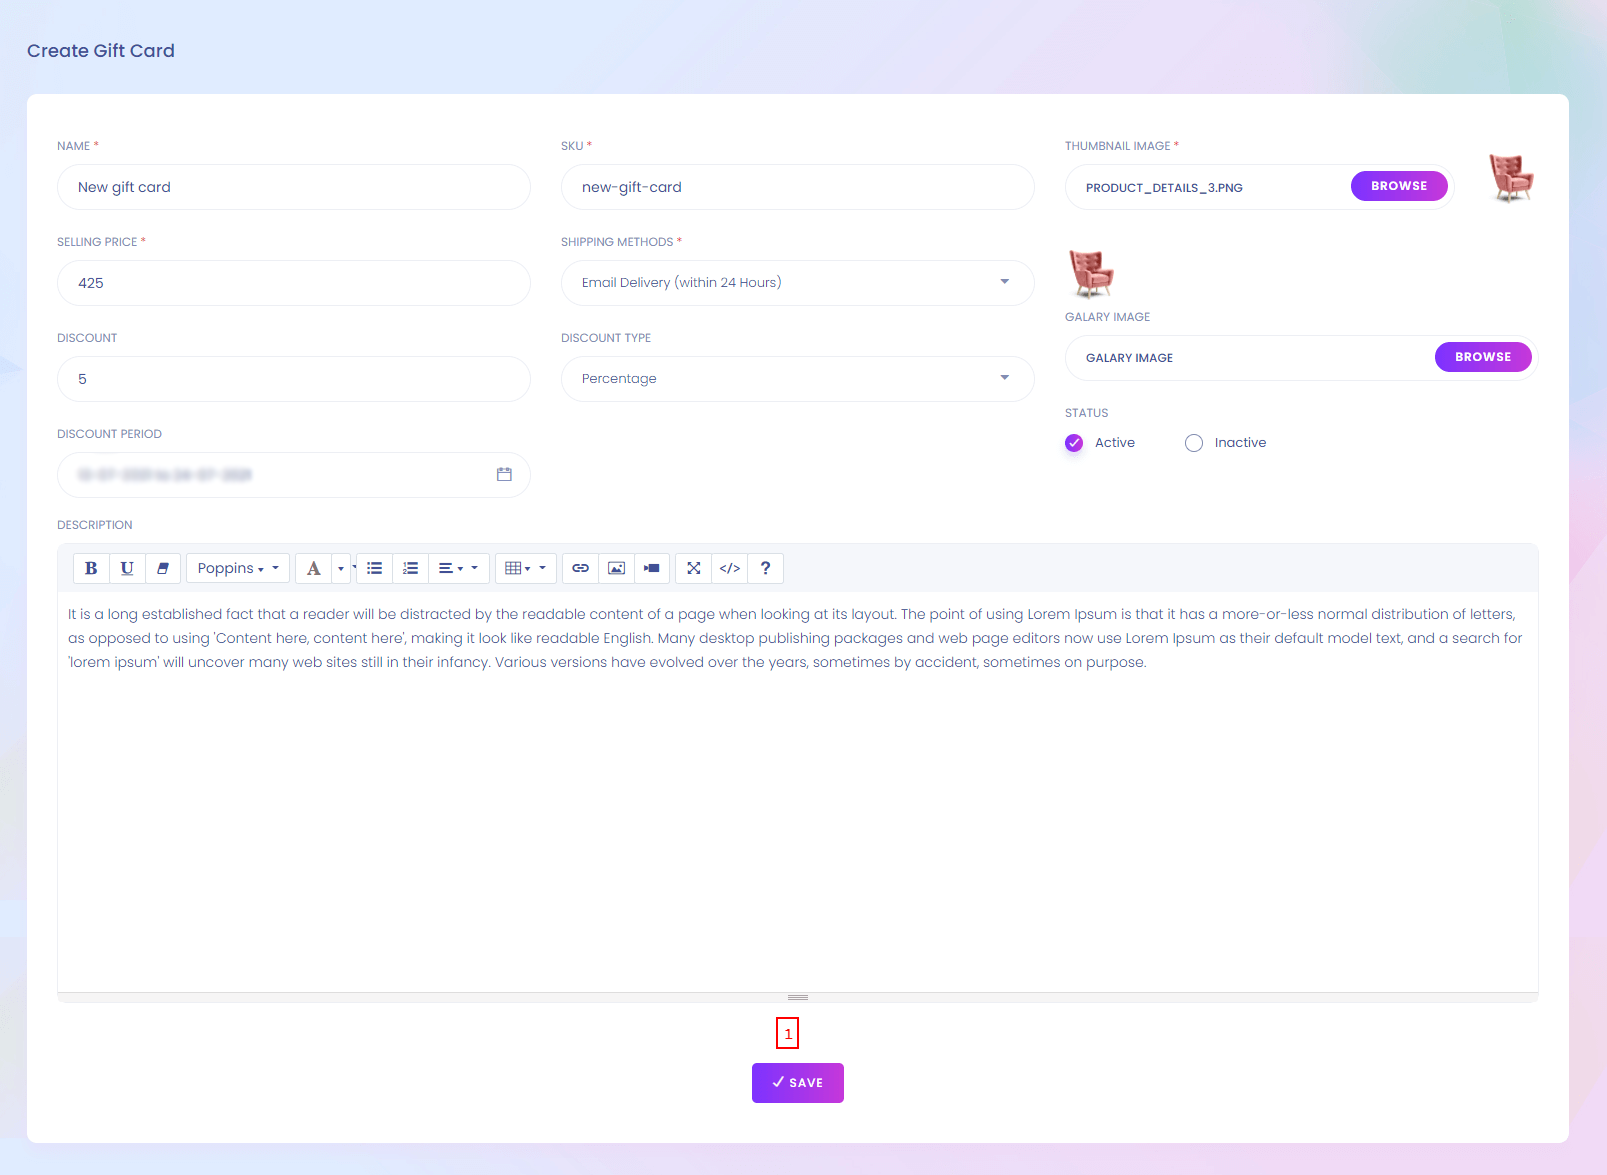
1. Save
Save the gift card.
Gift Card (Bulk Upload)
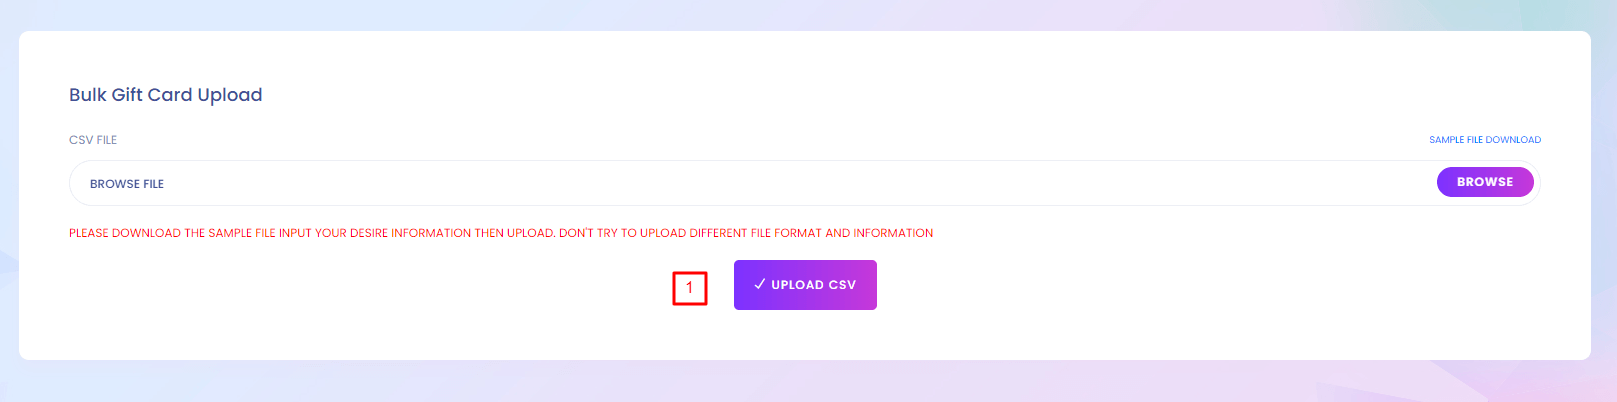
1. Upload
Upload the csv file.
Category
Category
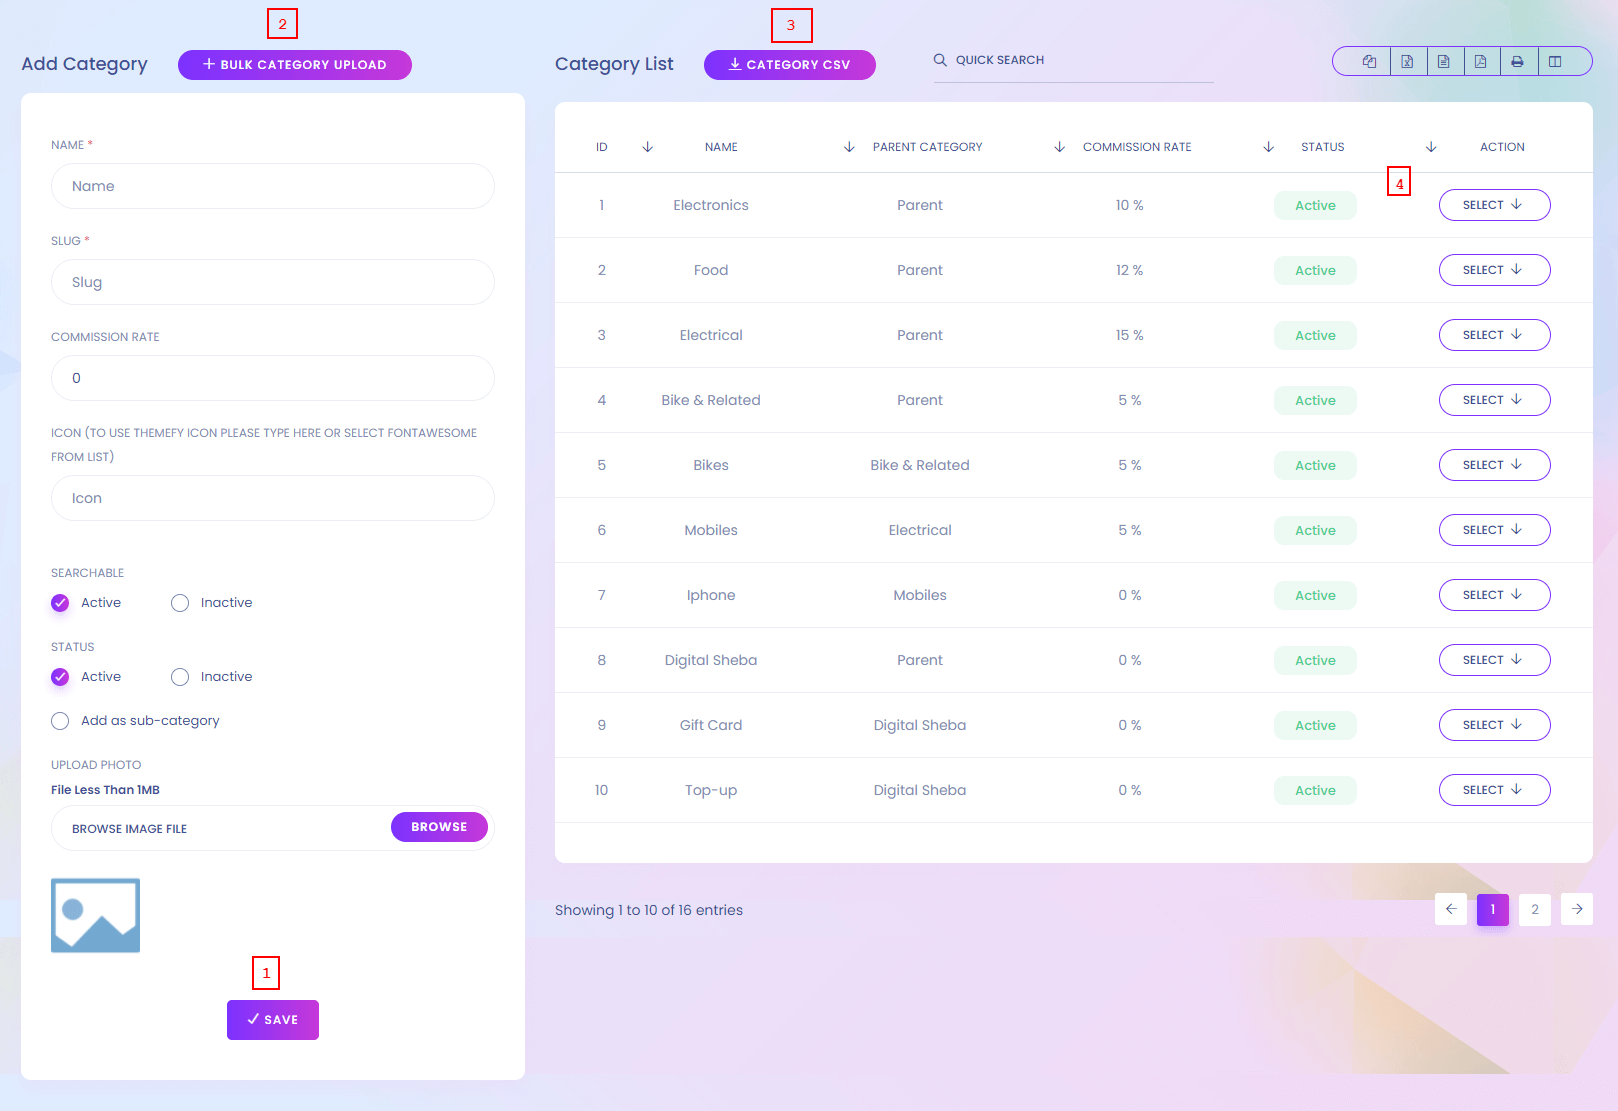
Category
When you add a prodcut you have to select a category and in menu setup you have to select category. You can manage category here. You can find the added categories in many section of this panel.
1. Save
Add new category from here.
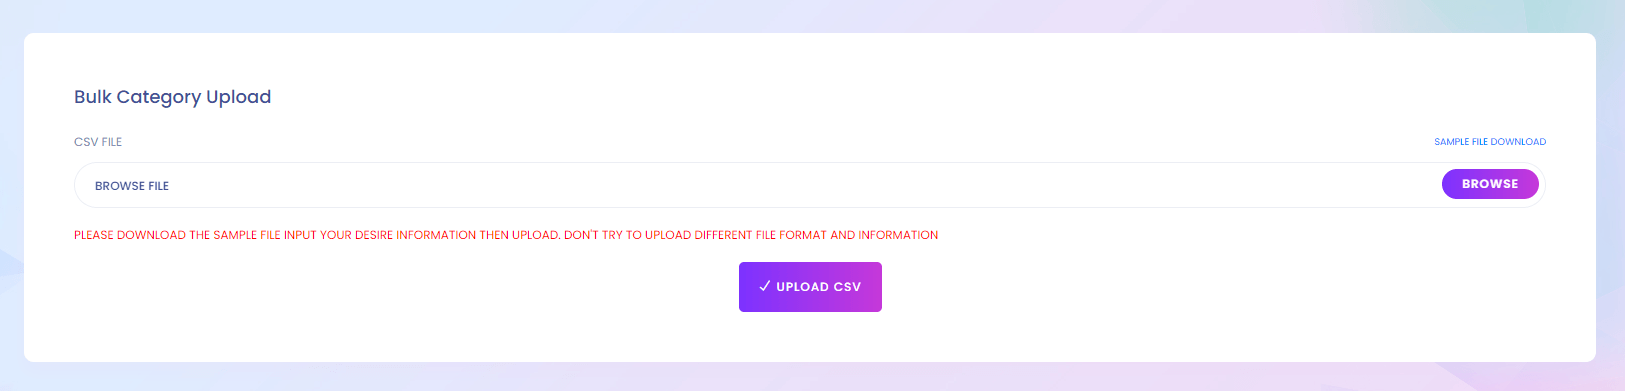
2. Bulk Category Upload
Admin can add many categories at a time.
3. Category CSV
Admin can download the categories in csv file.
Category Bulk Upload
Brand
Brand
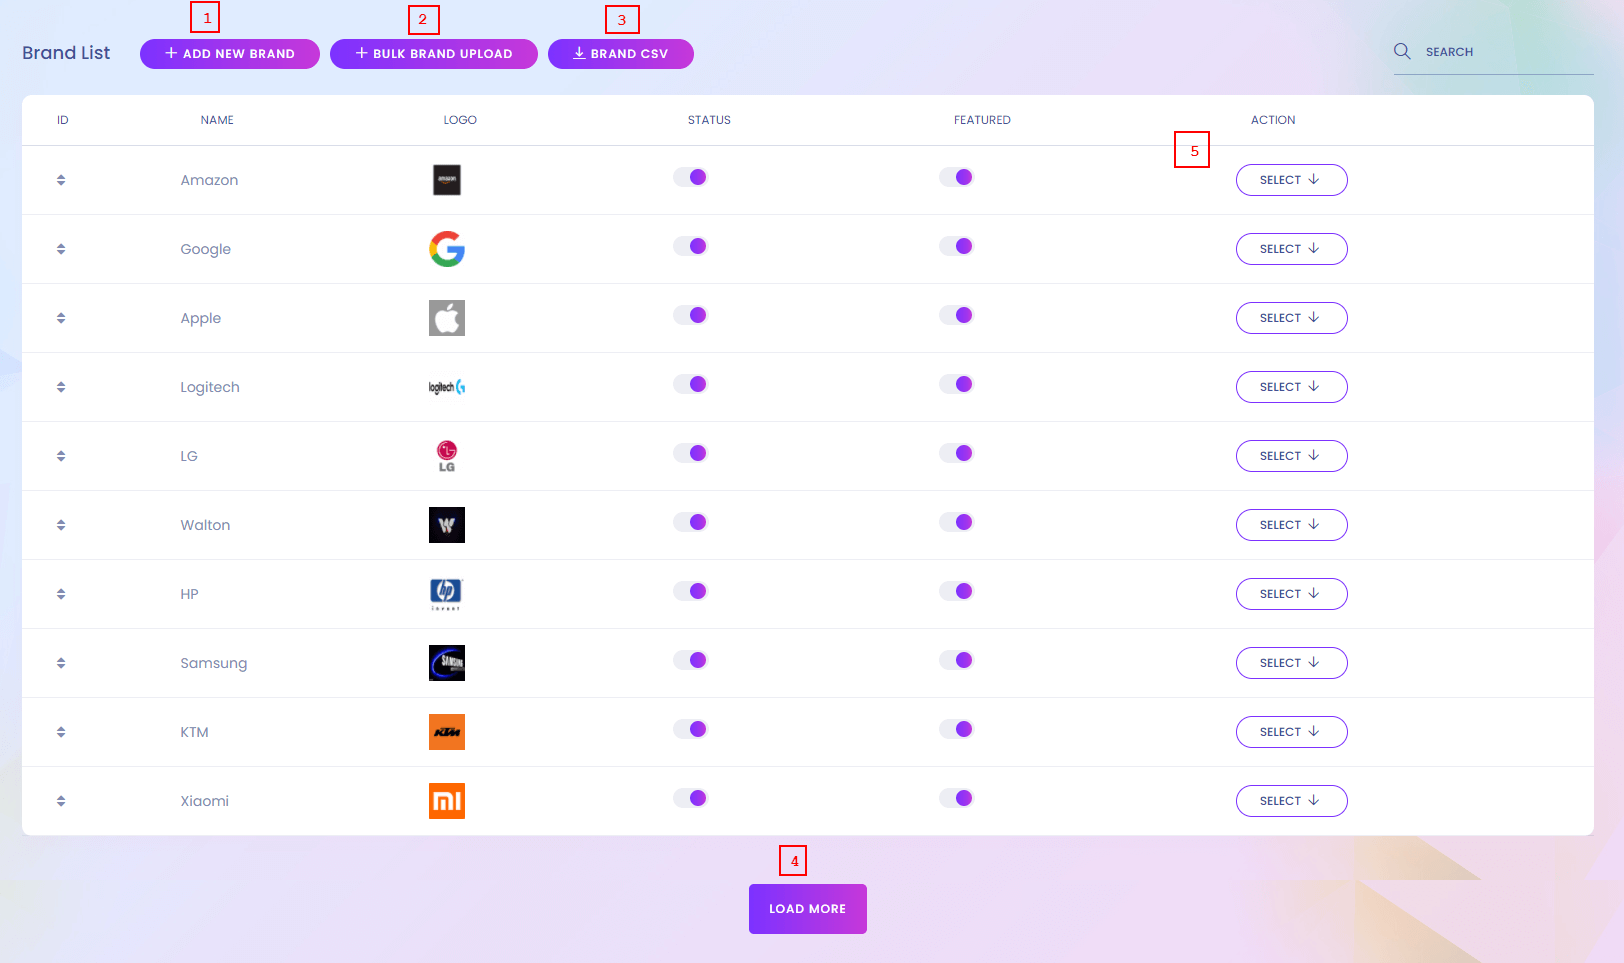
Brand
You can manage the brands here. Brands are shown in the website in different sections.
1. Add
Add new brand from here.
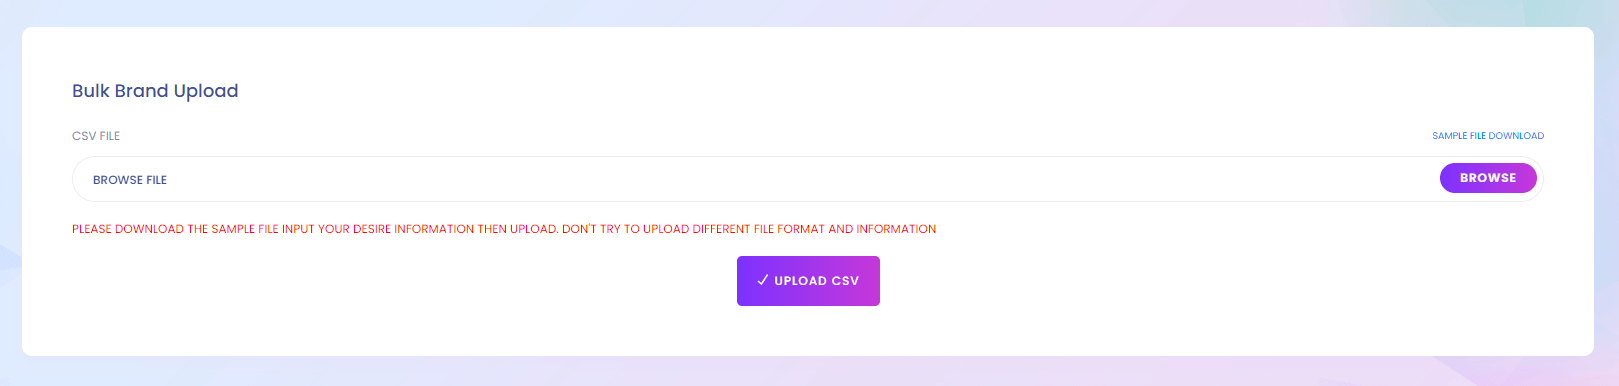
2. Bulk
Bulk upload the brands.
3. Brand CSV
Admin can download the brands in csv file.
4. Load More
Load more brand to view.
5. Action
Admin can edit and delete brand.
Brand (Create)
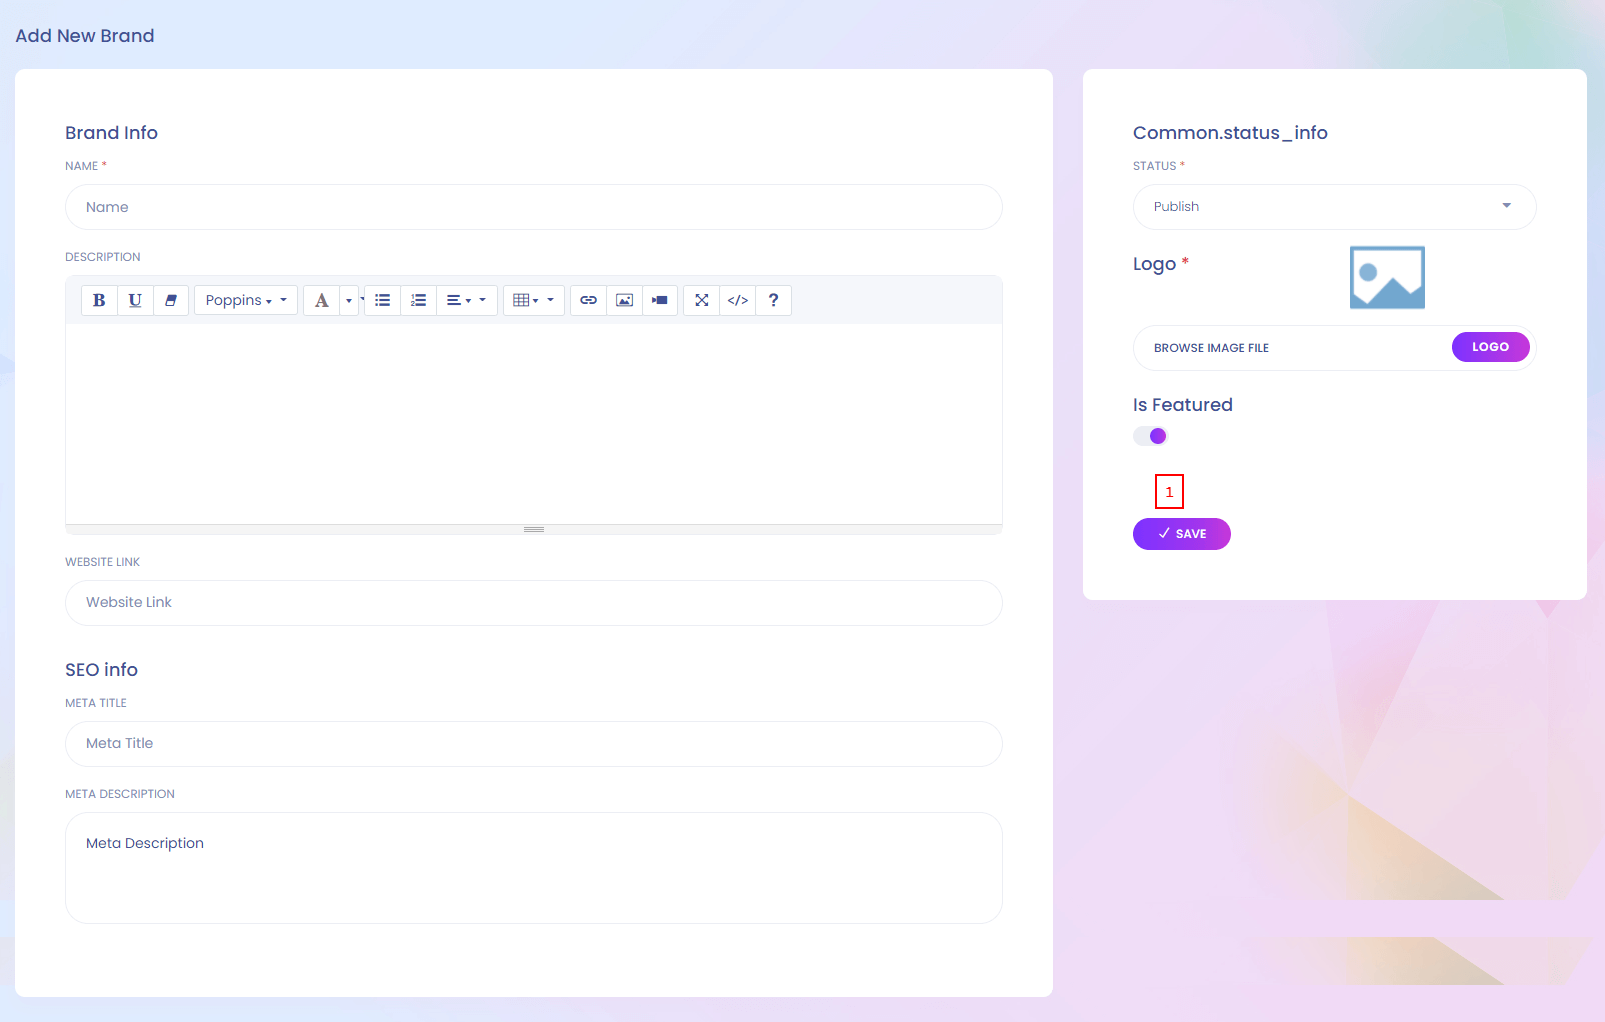
1. Save
Save the brand.
Brand Bulk Upload
Attribute
Attribute
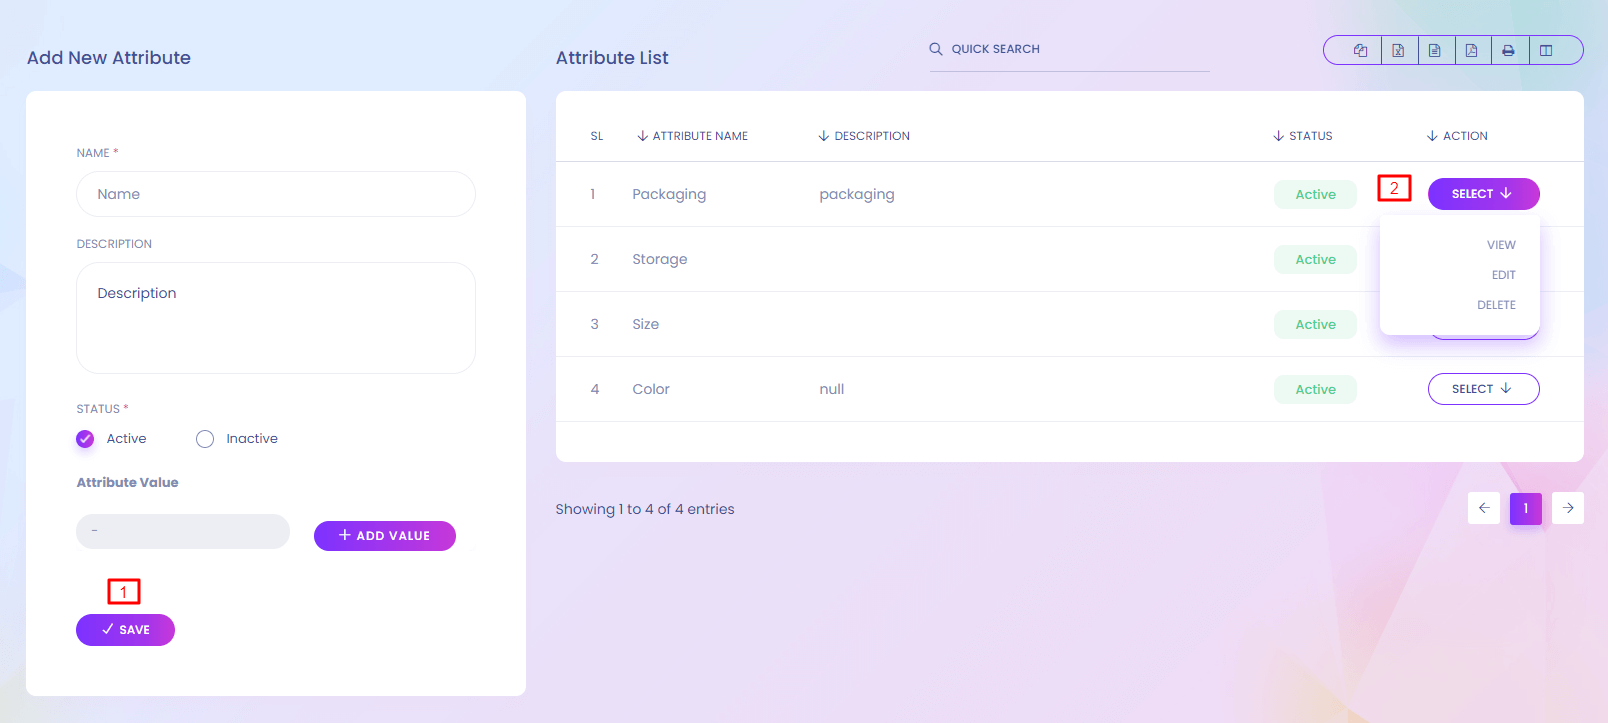
1. Save
Add new attribute from here.
2. Action
Admin can edit and delete attribute.
Units
Units
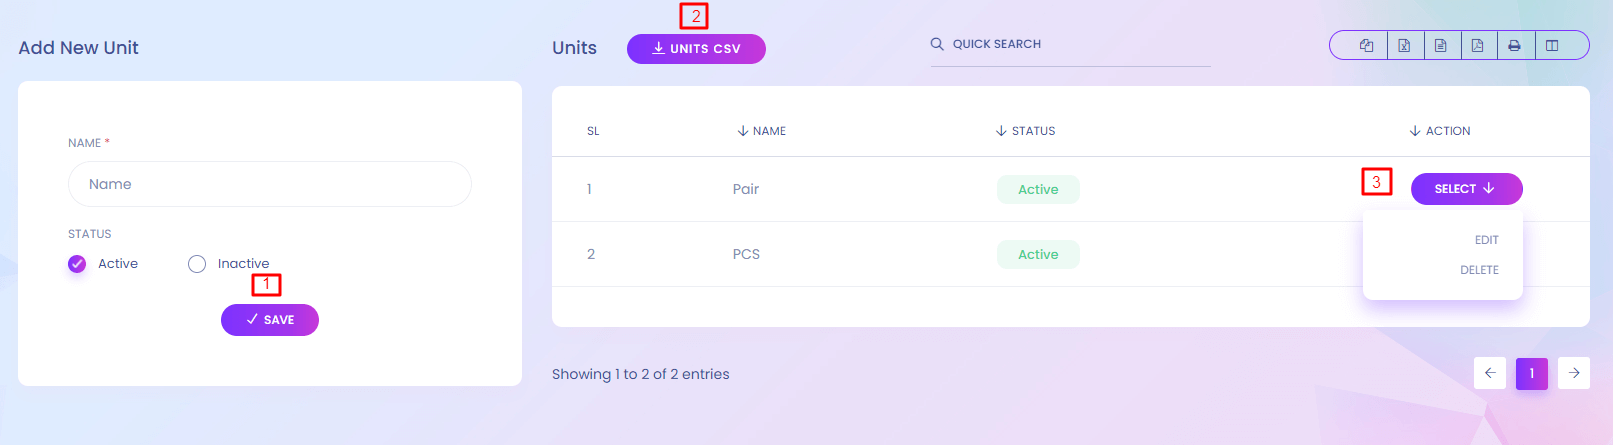
Units
Product has different types of units. You can manage it from here.
1. Save
Add new unit from here.
2. Units CSV
Download the units in csv file.
3. Action
Admin can edit and delete the units.
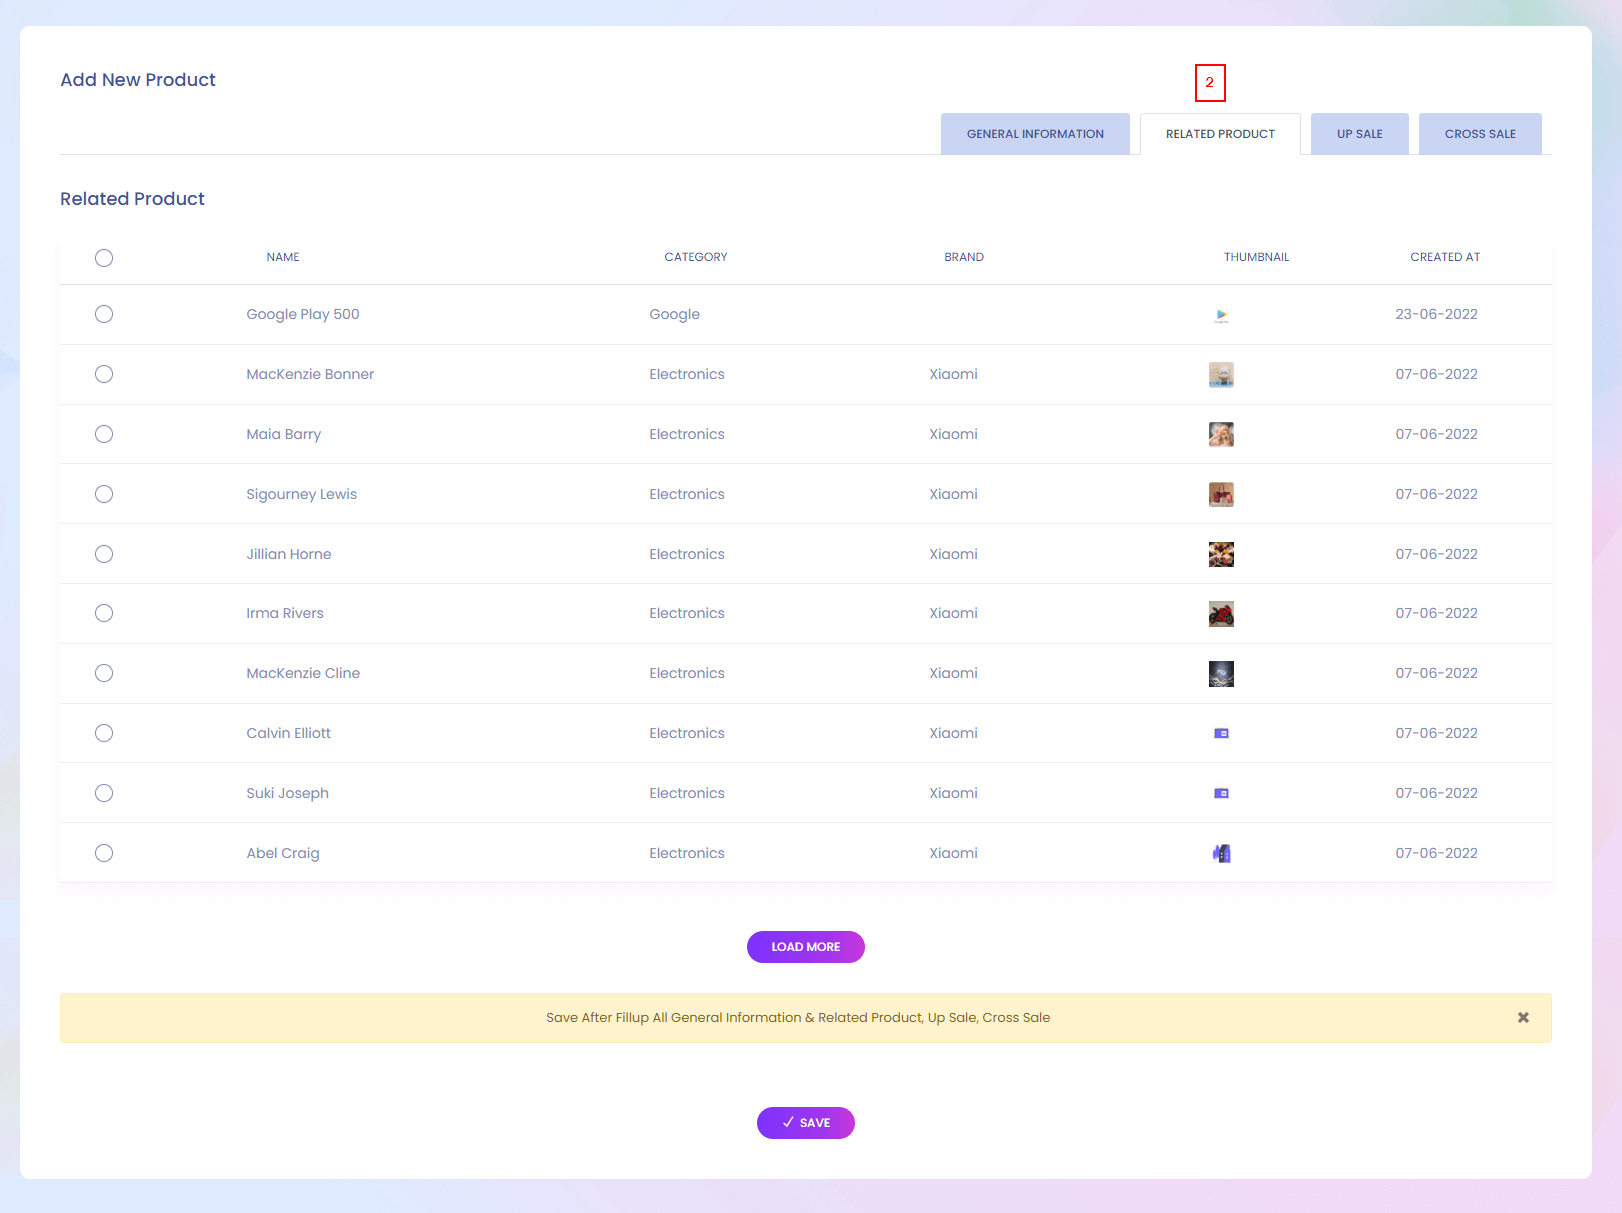
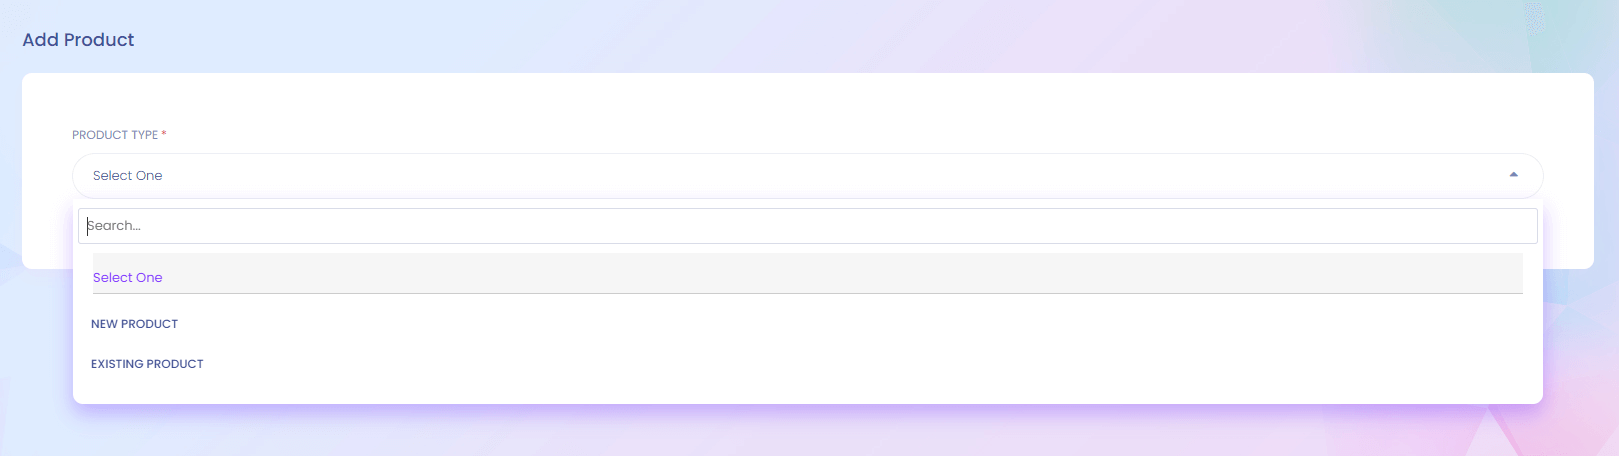
Add New Product
Add New Product
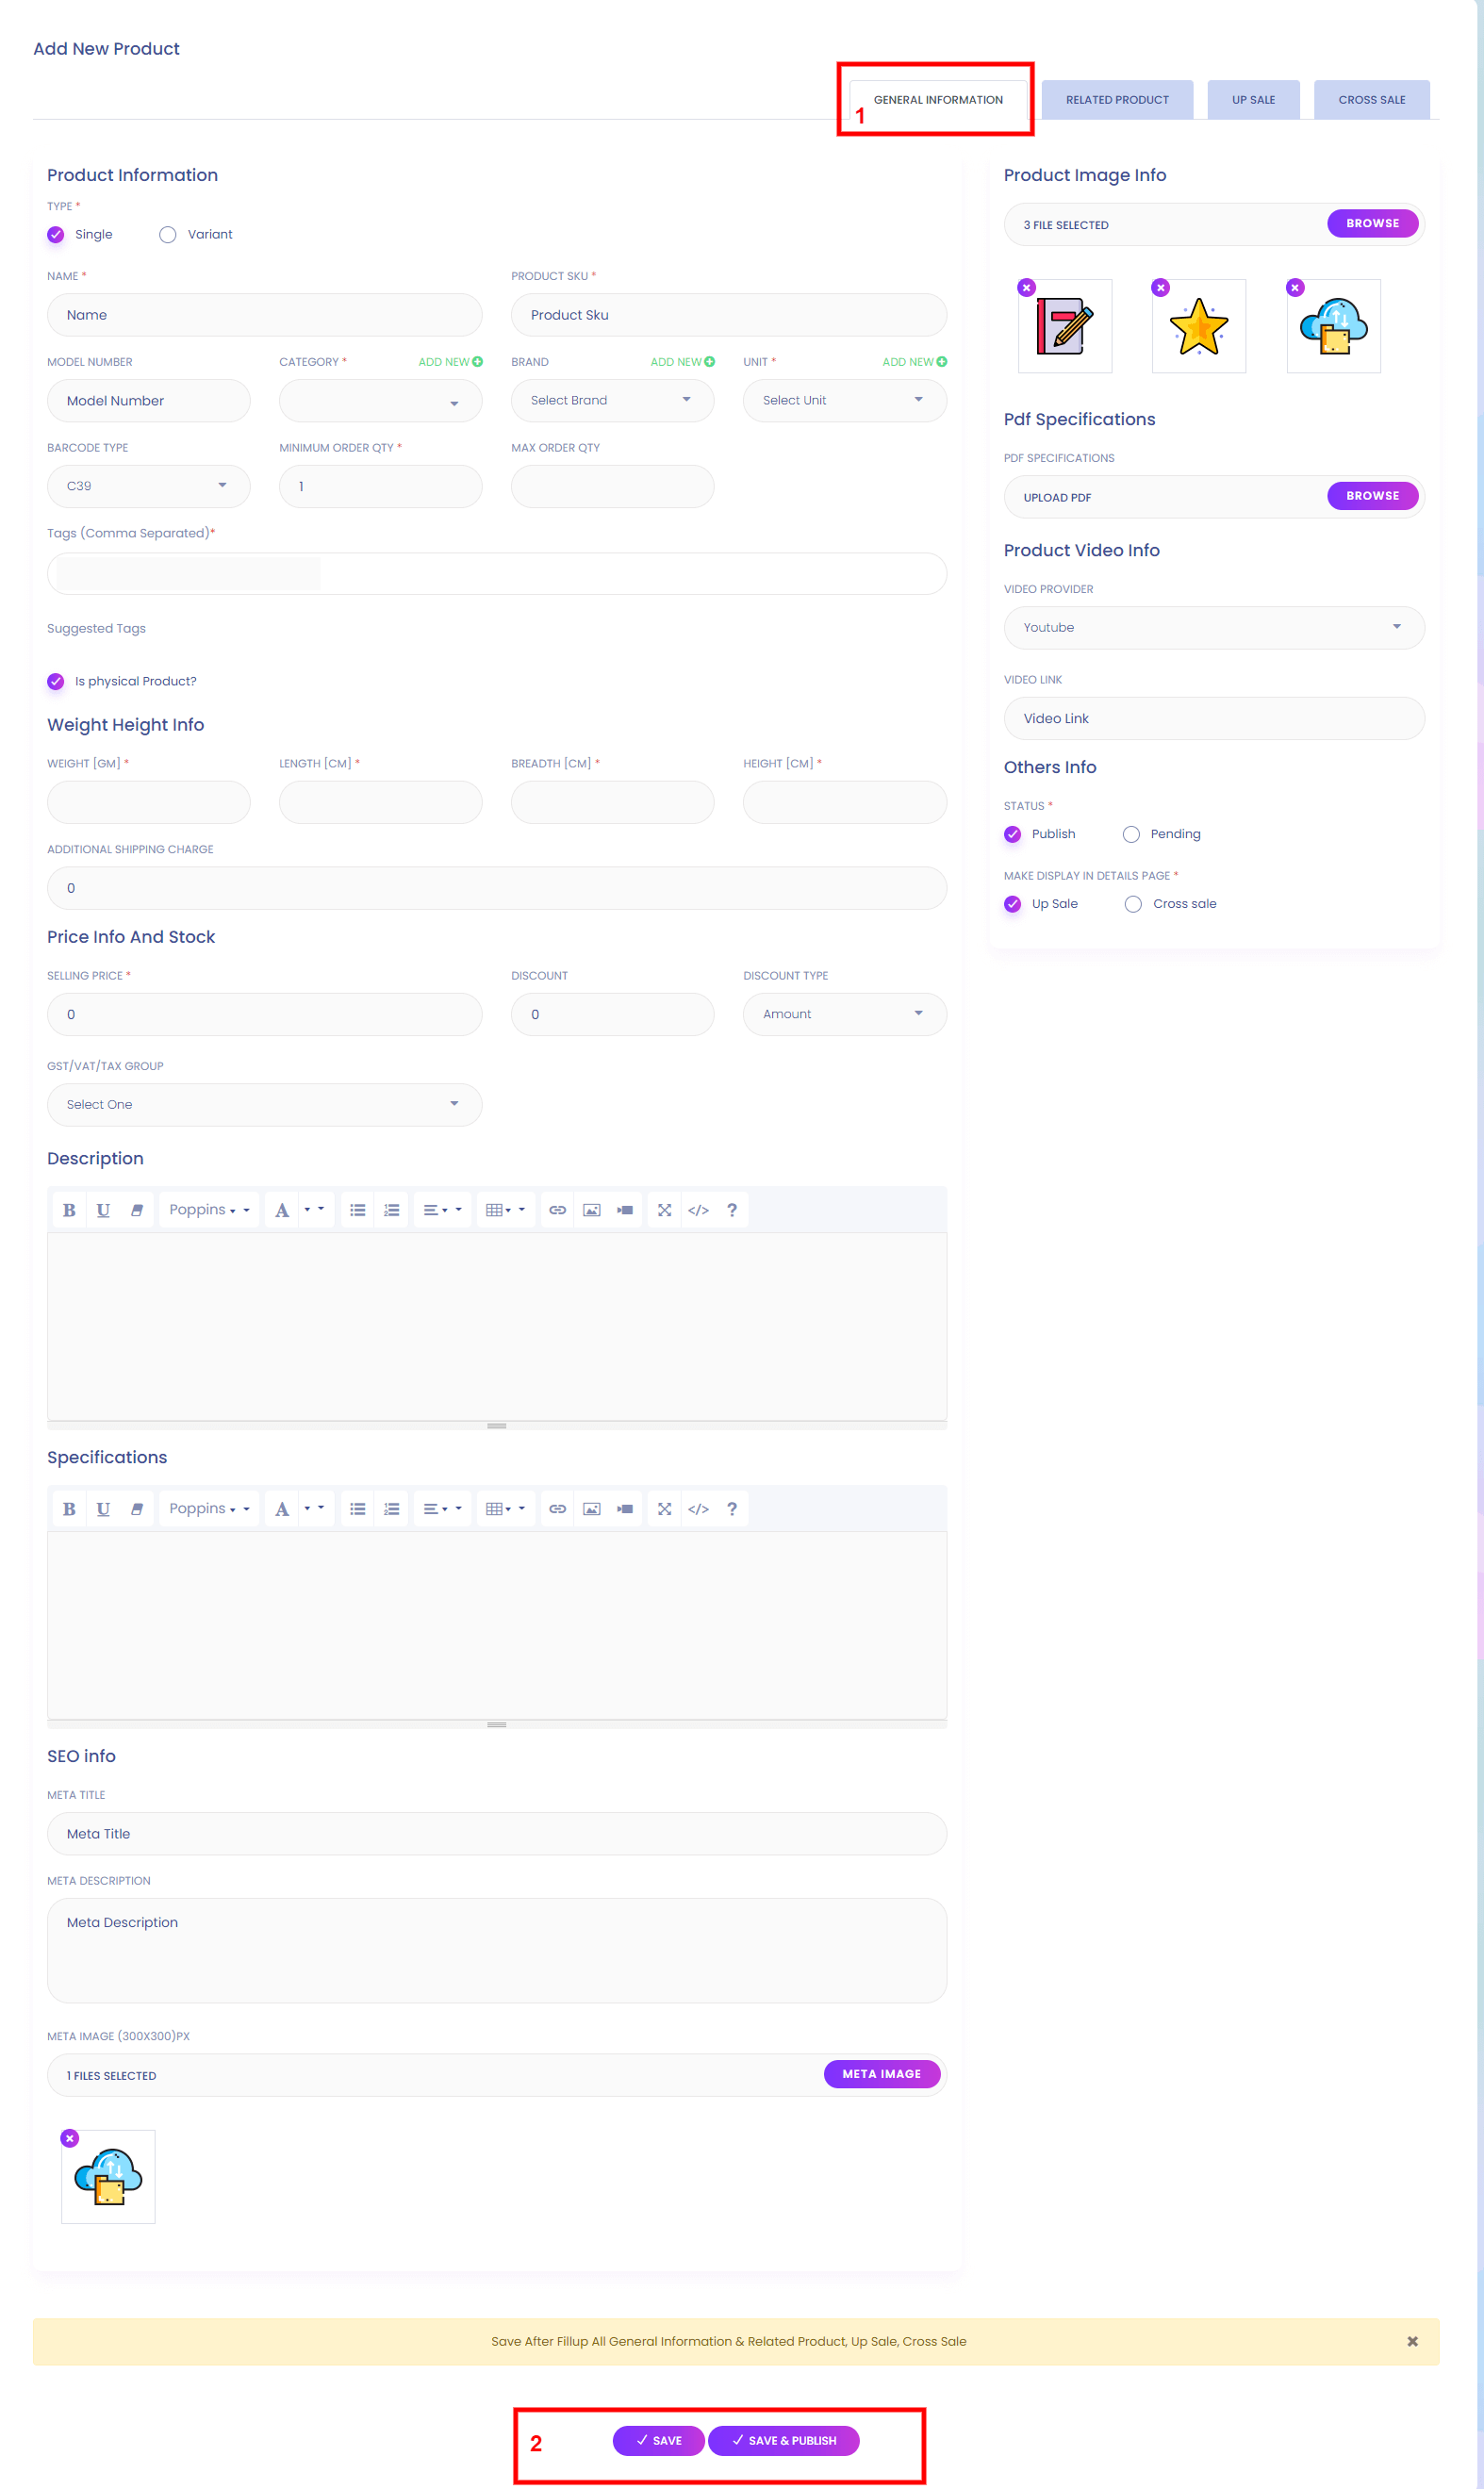
Add New Product
When you add any new product , this product does not show in the website directly. The product should be under a seller. Seller can add this product for sale in their panel.
1. General Info
General information of the product.
2. Save
Admin can add product from here. Admin has to give all the necessary information.
Add New Product
Add New Product
Add New Product
Bulk Product Upload
Bulk Product Upload

Bulk Product Upload
You can upload many product at a time. For that you have to download the csv file and prepare your product list according to the csv file.
1. Upload CSV
Upload product csv file.
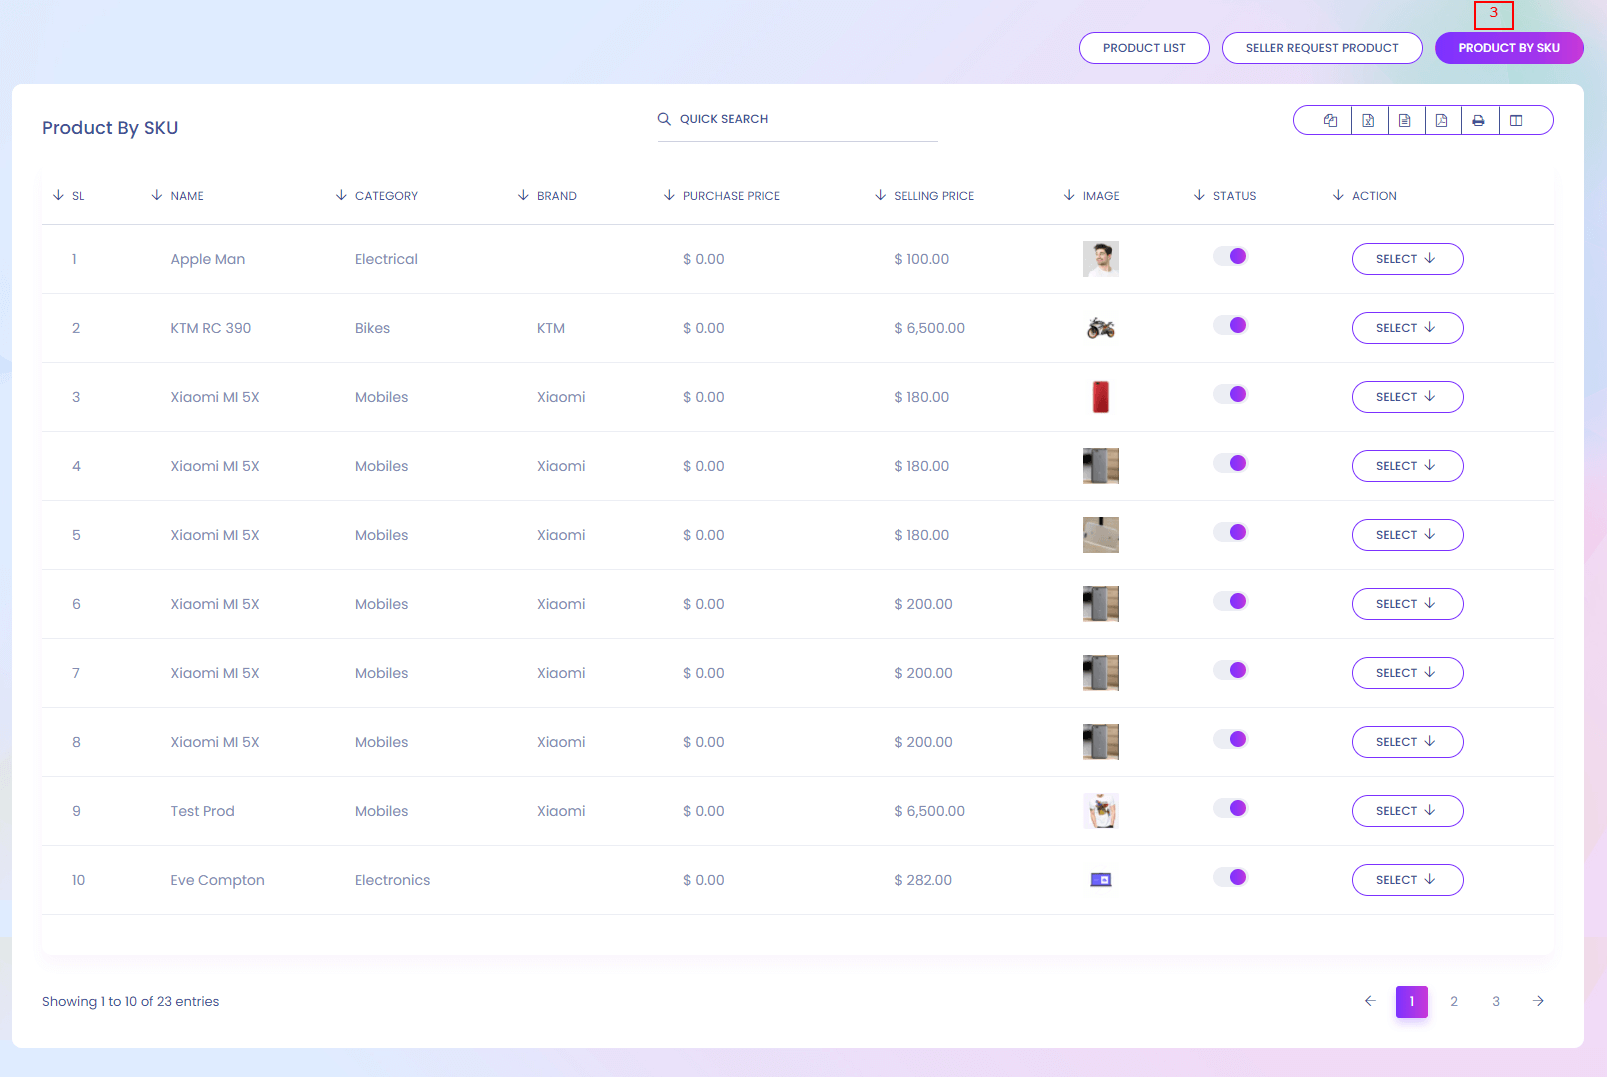
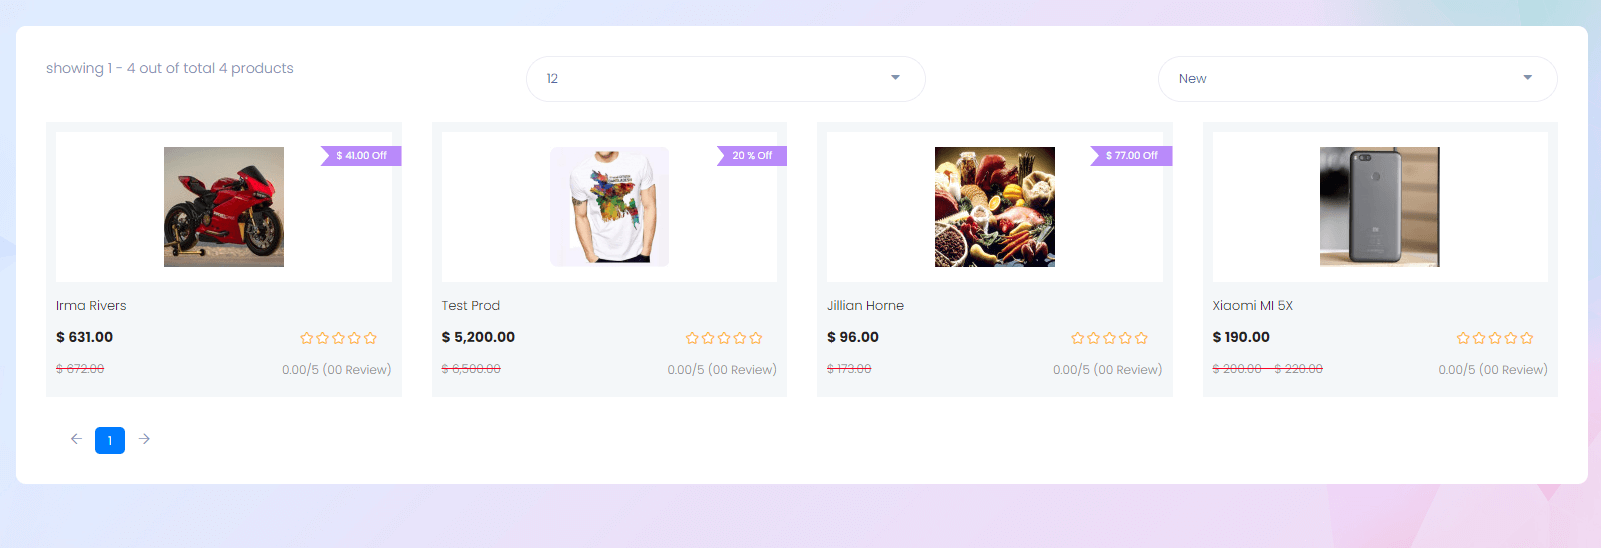
Product List
Product List
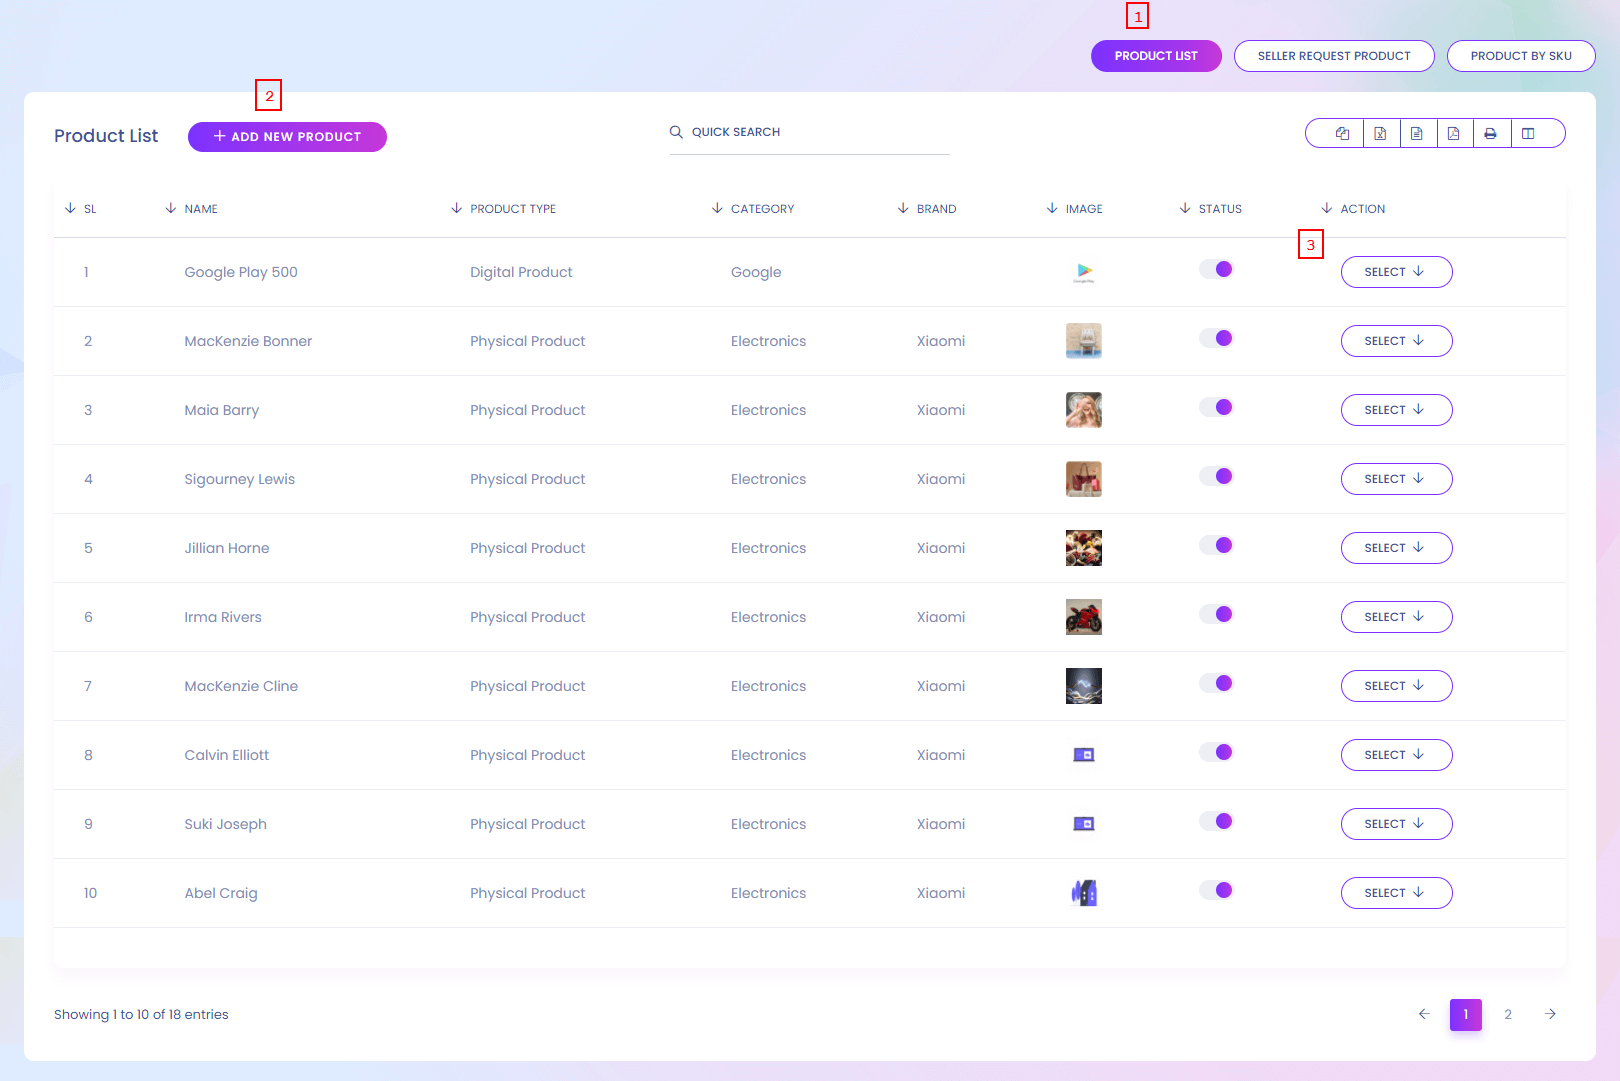
Product List
You can find all the product list here.
1. Product List
Product list is shown here.
2. Add New Product
Admin can add new product.
3. Action
Admin can view, edit and delete the product.
Product List
Product List
Inhouse Product List
Inhouse Product List
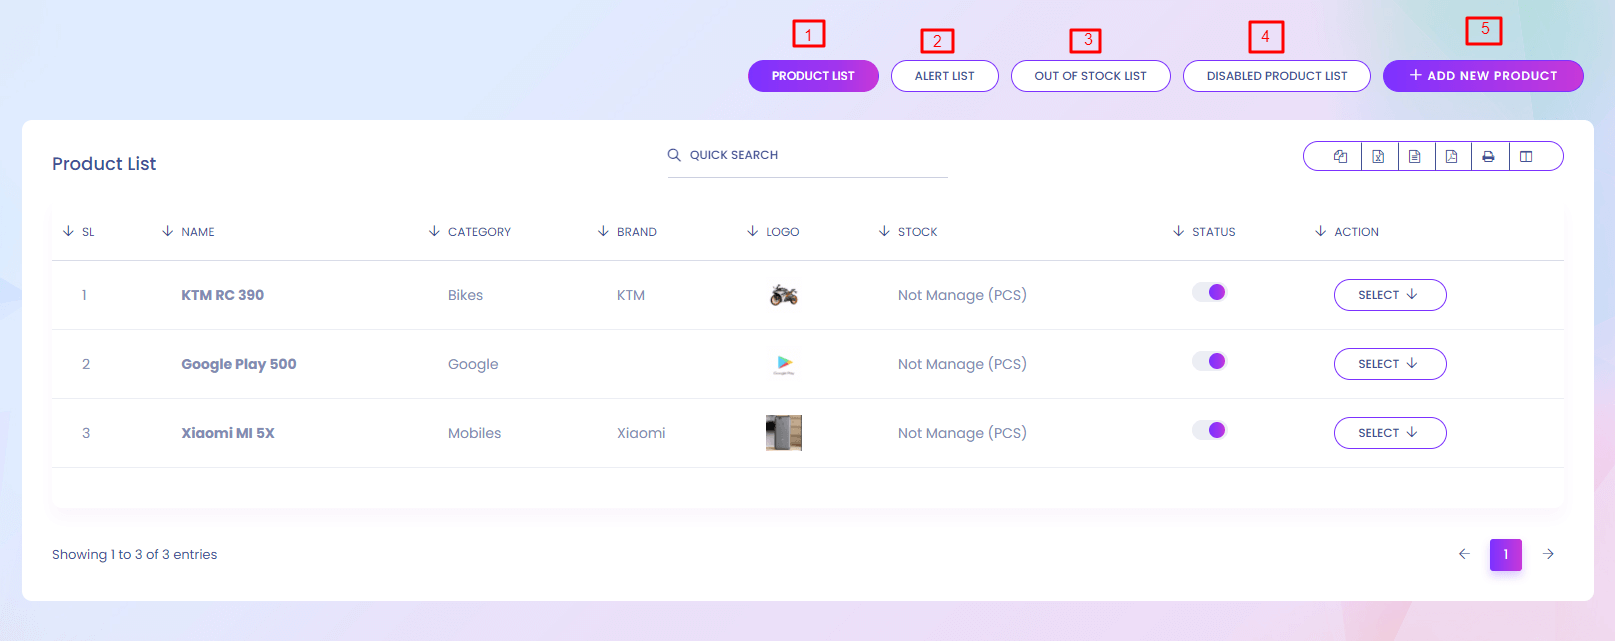
Inhouse Product List
This is your personal product list. You can add, edit, delete your inhouse products. These prodcuts are shown in the website.
1. Product List
Inhouse product list is shown here
2. Alert List
Alert list is shown here
3. Out of stock List
Out of stock list is shown here
4. Disabled Product List
Disabled product list is shown here
5. Add New Product
Admin can add new product in inhouse product list.
Inhouse Product (Create)
Inhouse Product (Create)

1. Save
Save the product.
Recent View Config
Recent View Config
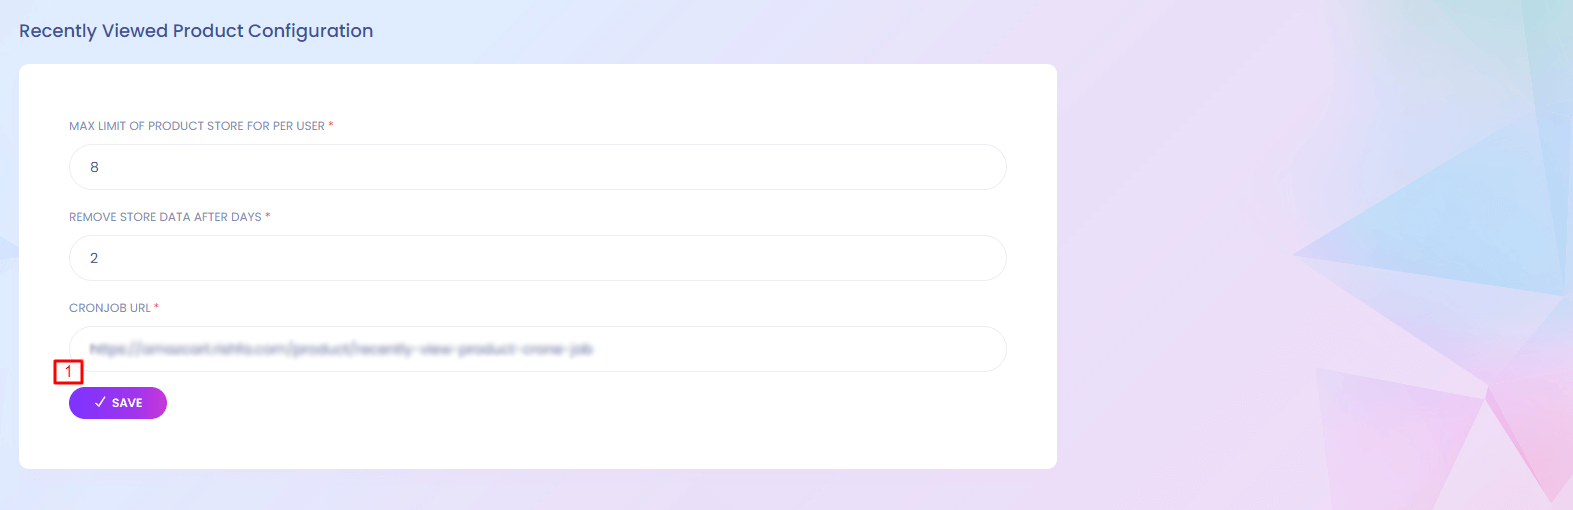
Recent View Config
The system store the recent view details for any user. You can customize the recent view settings from here.
1. Save
Save the recently viewed product configuration.
Product Review
Product Review
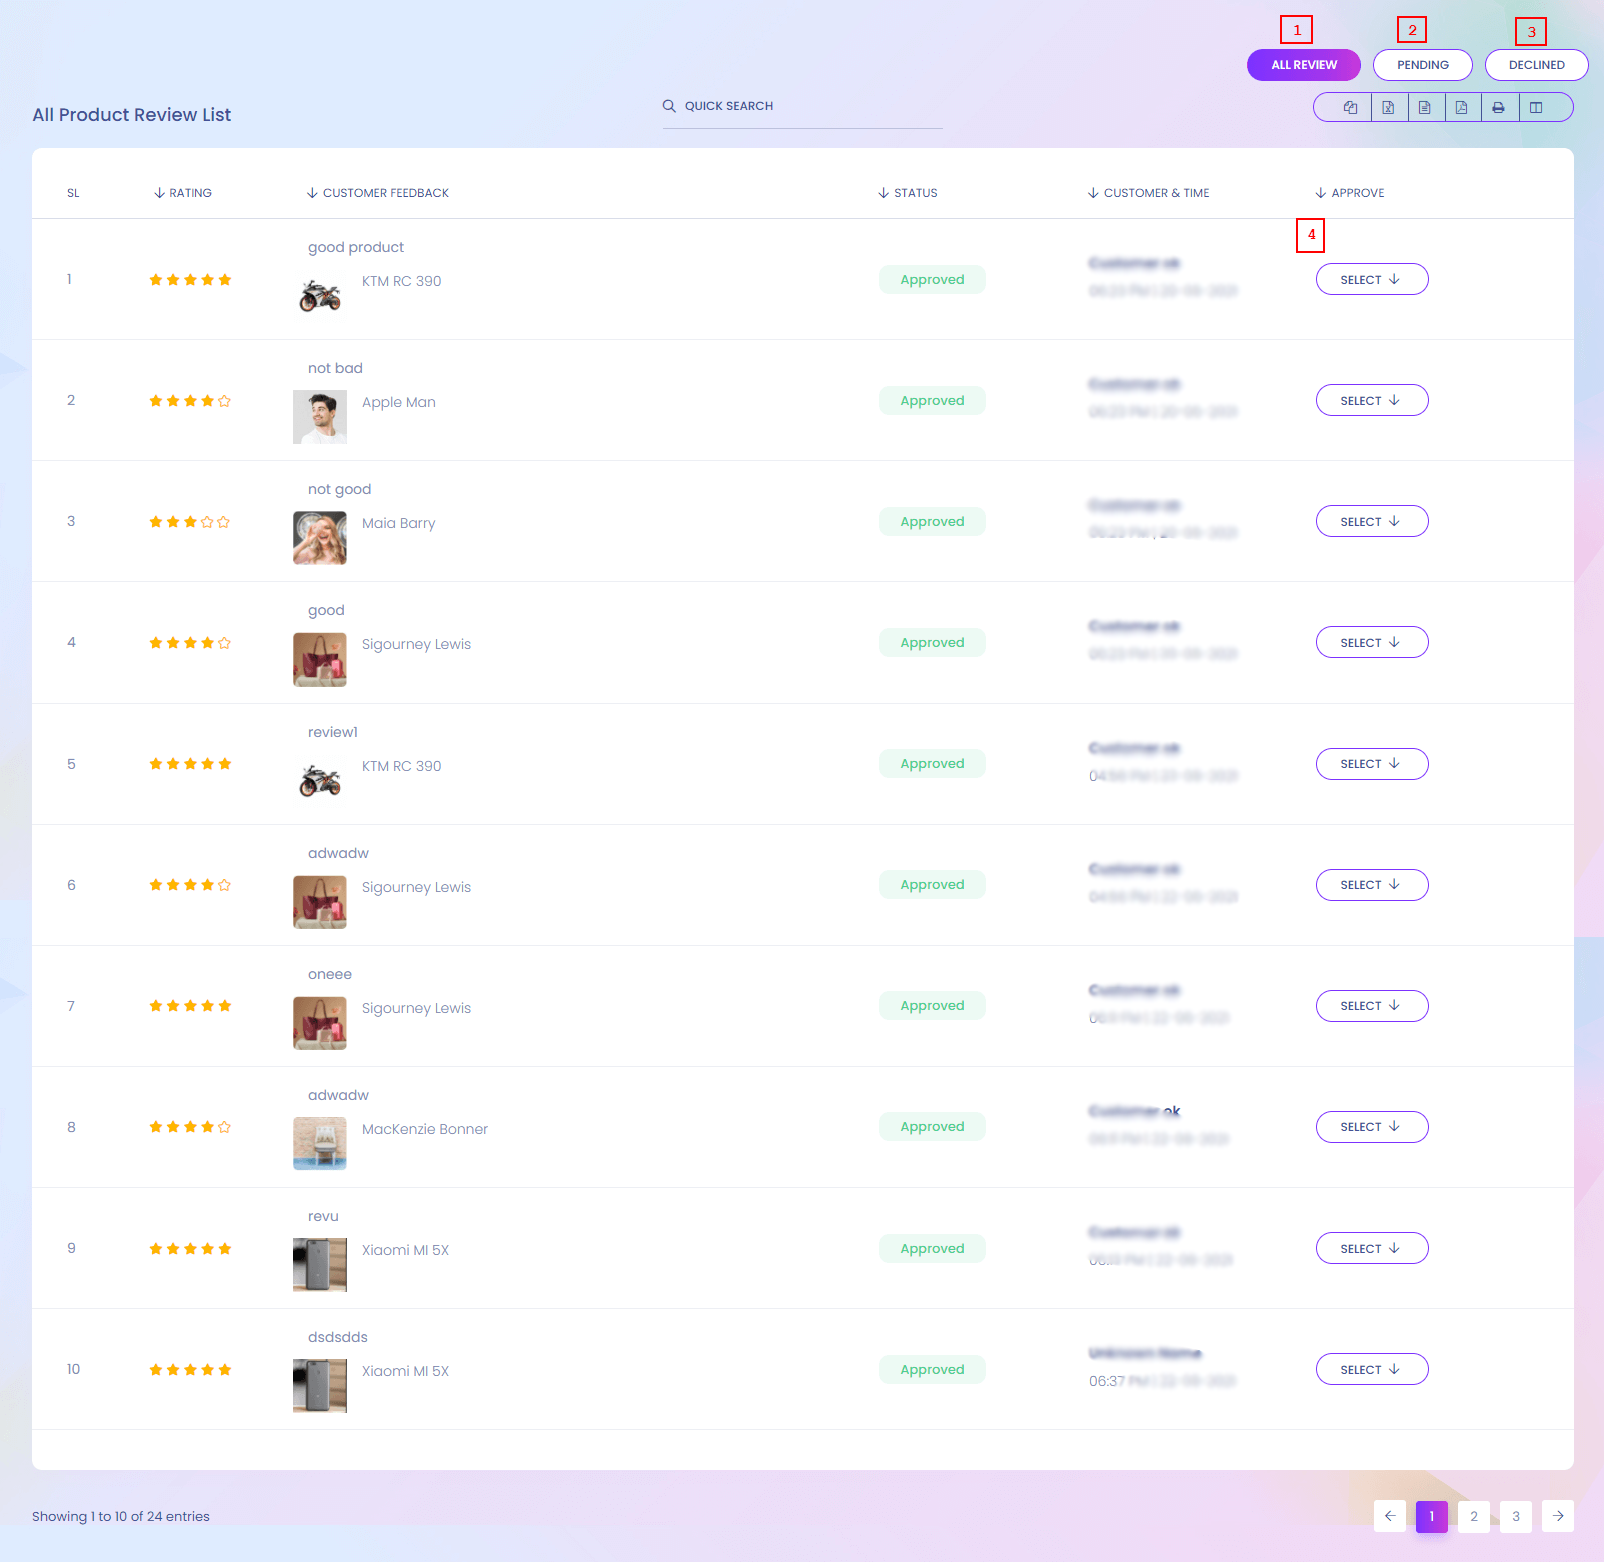
Product Review
User who buy the product can review it. After reviewing a product you can accept or declined it.
1. All Review
All review list is shown here.
2. Pending
Pending review list is shown here.
3. Declined
Declined review list is shown here.
4. Action
Review can be denied.
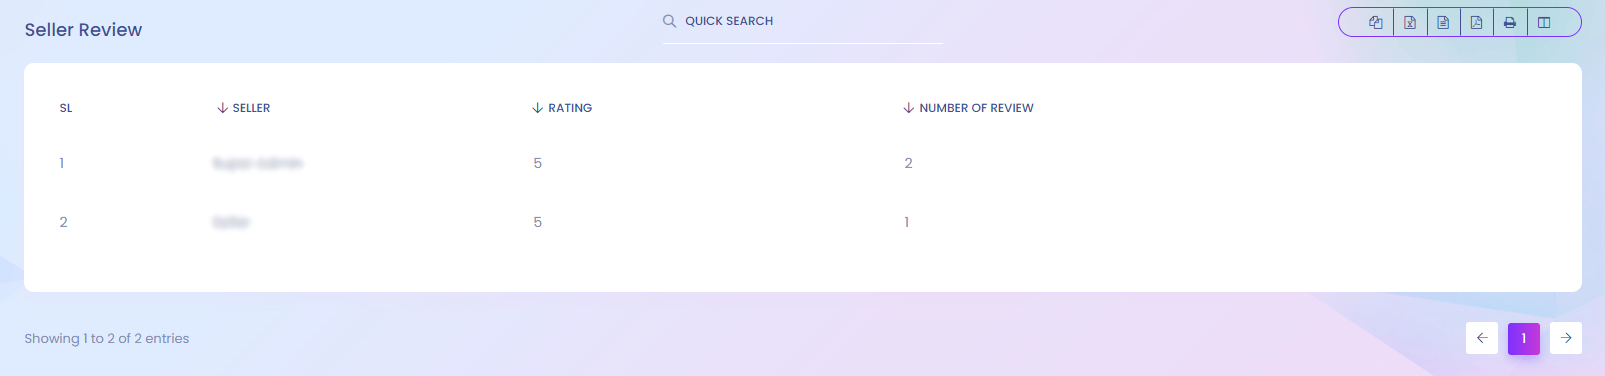
Seller Review
Seller Review
Seller Review
User can also review a seller.
1. All Review
All review list is shown here.
2. Pending
Pending review list is shown here.
3. Declined
Declined review list is shown here.
4. Action
Review can be denied.
Auto Approve Review Configuration
Auto Approve Review Configuration

Auto Approve Review Configuration
Review will automatically approve if active otherwise admin has to manually approve the review.
My Order
My Confirmed Order
My Order
Here you can find the order of your product. In different tabs you can find different order list.
My Completed Order
My Pending Payment Order

My Refused Order
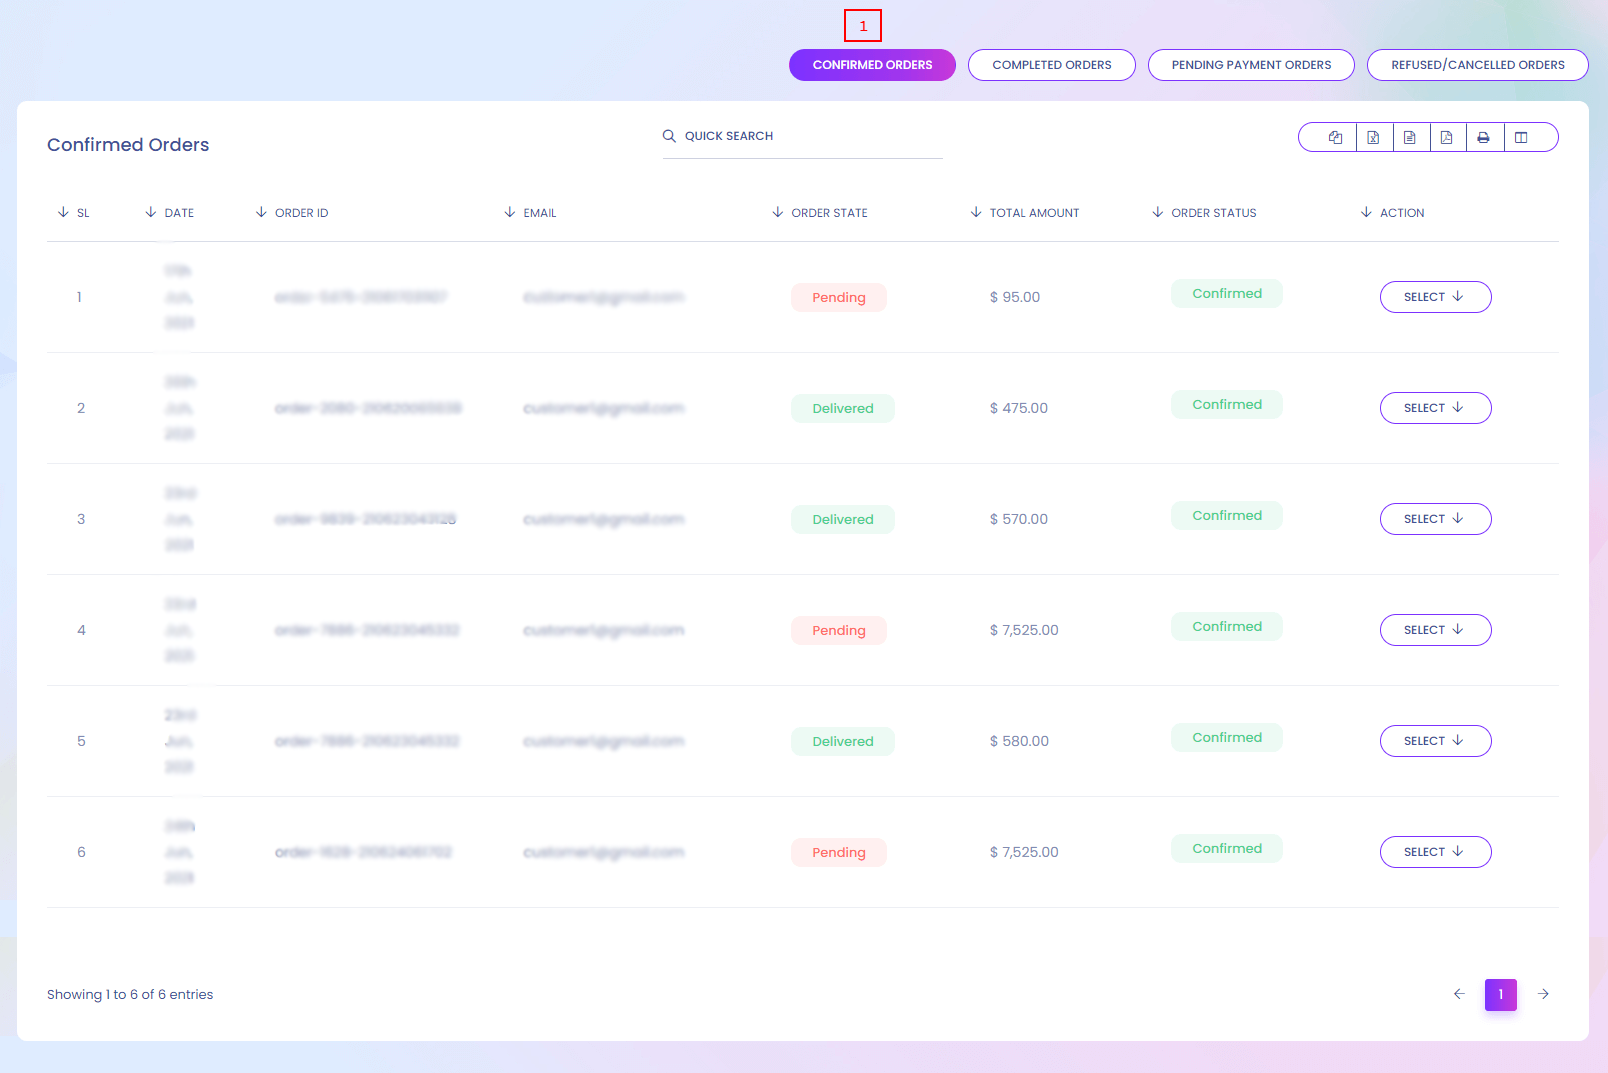
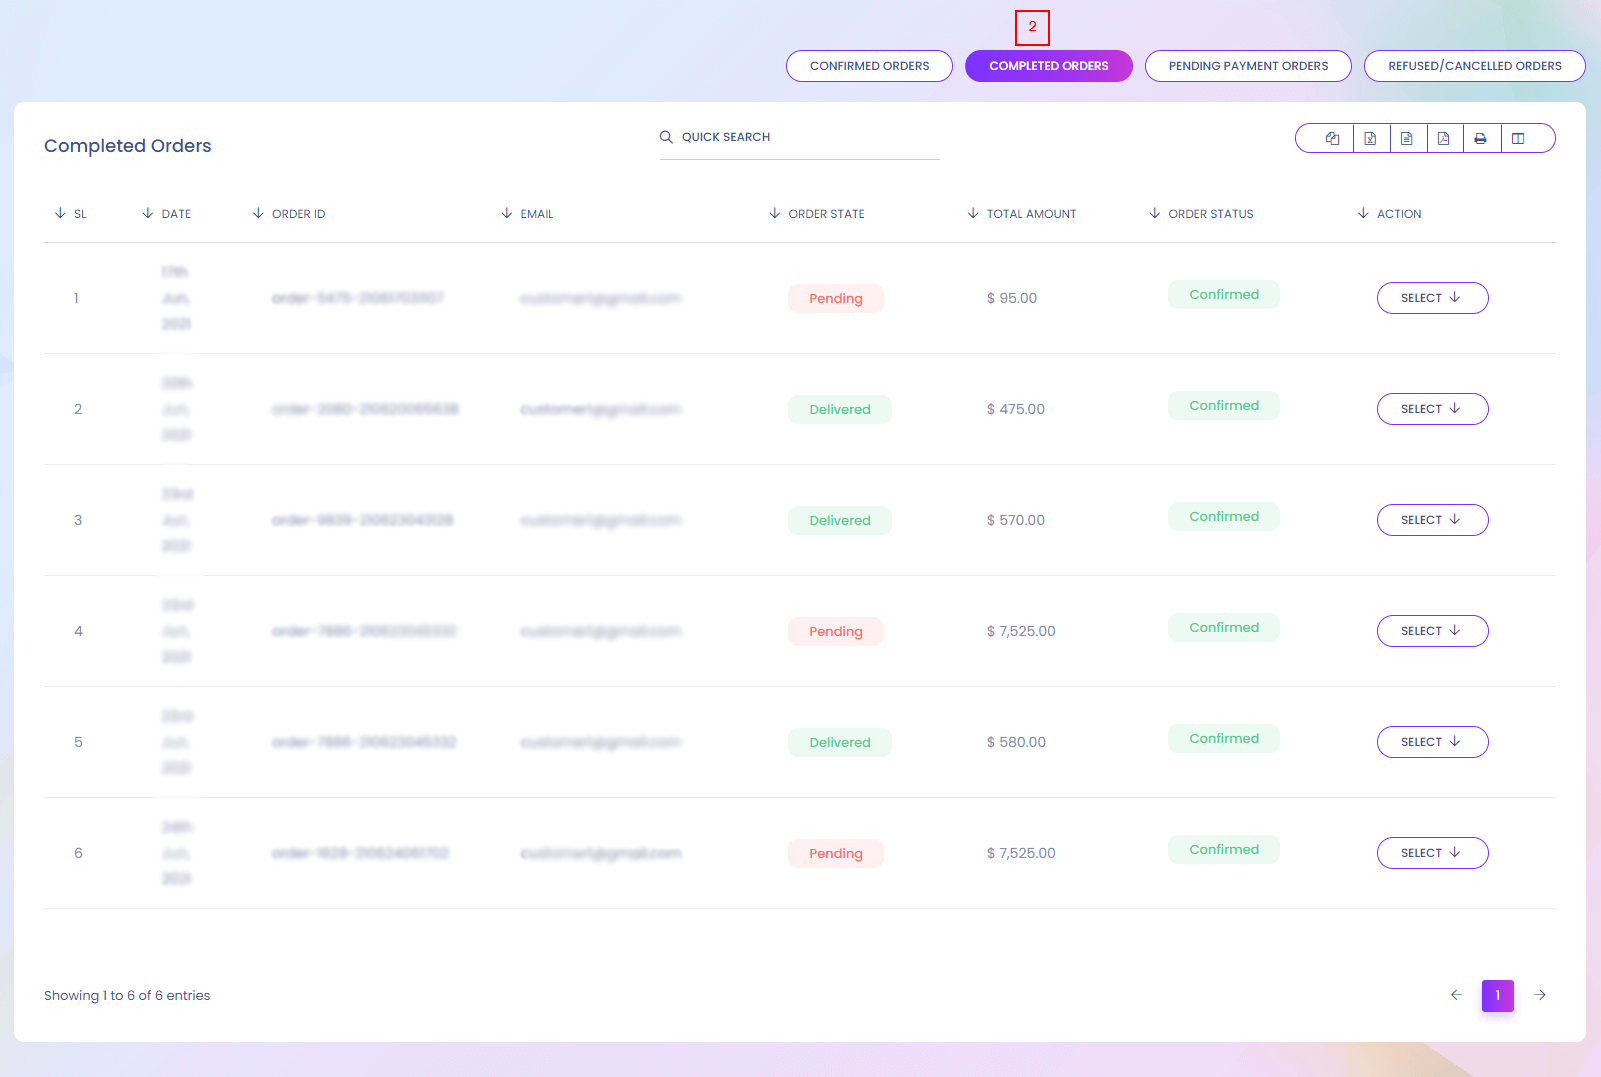
Total Order
Total Order
Total Order
You can find all order of all customer and seller. In different tabs you find different order list.
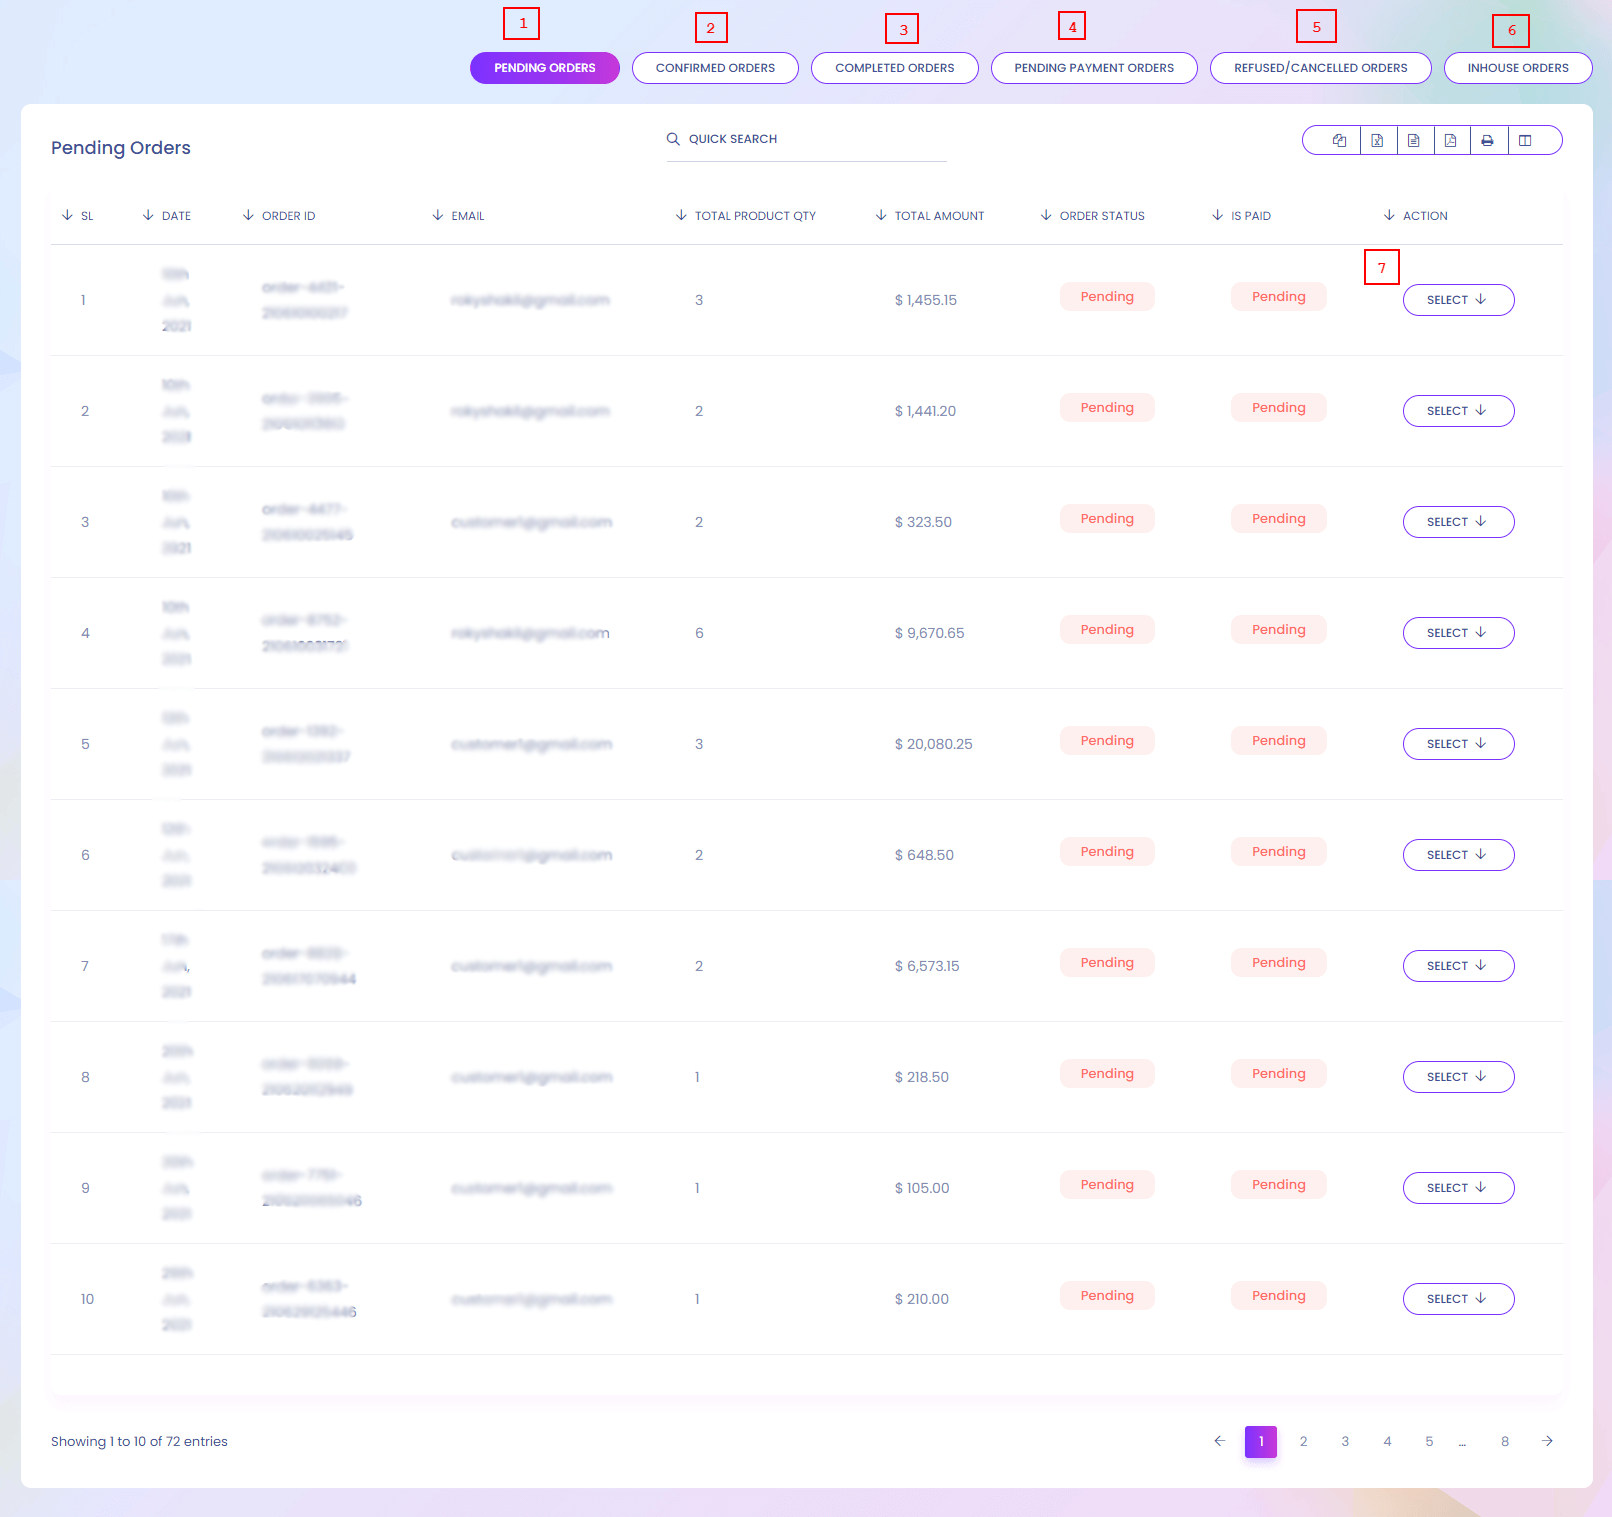
1. Pending Orders
Pending orders list is shown here.
2. Confirmed Orders
Confirmed orders list is shown here.
3. Completed Orders
Completed orders list is shown here.
4. Pending Payment Orders
Pending payment orders list is shown here.
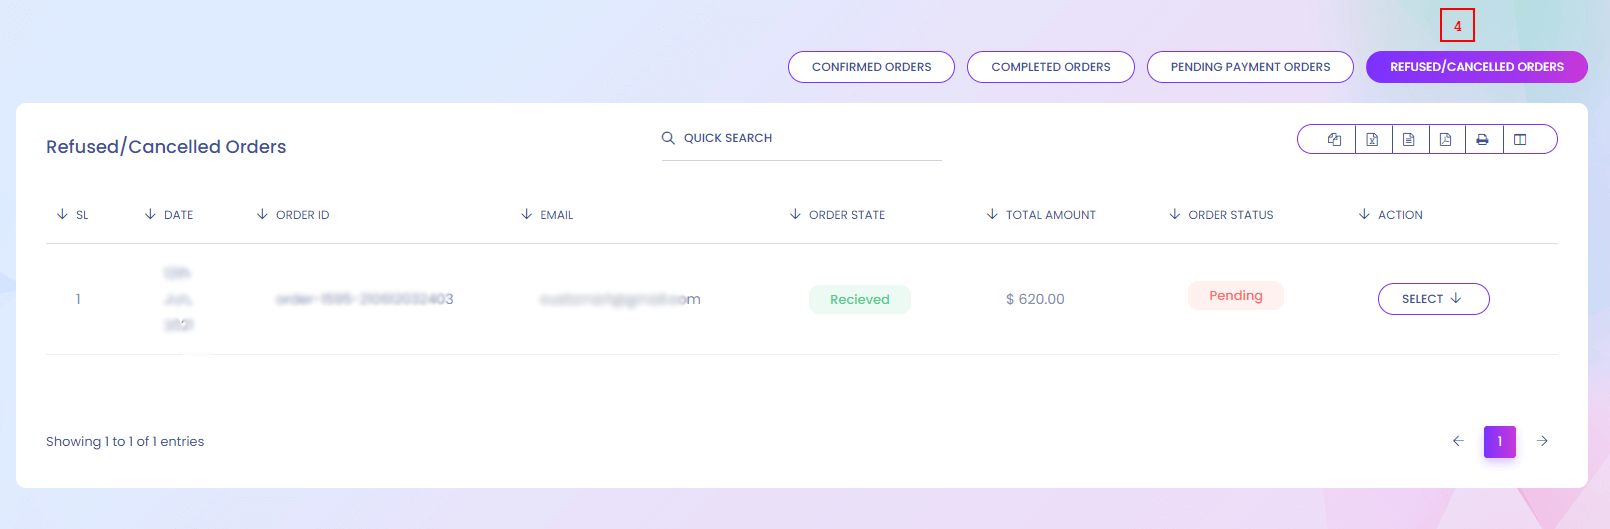
5. Refused/Cancelled Orders
Refused/Cancelled orders list is shown here.
6. Inhouse Orders
Inhouse orders list is shown here.
7. Action
Orders details can be shown here.
Order Details
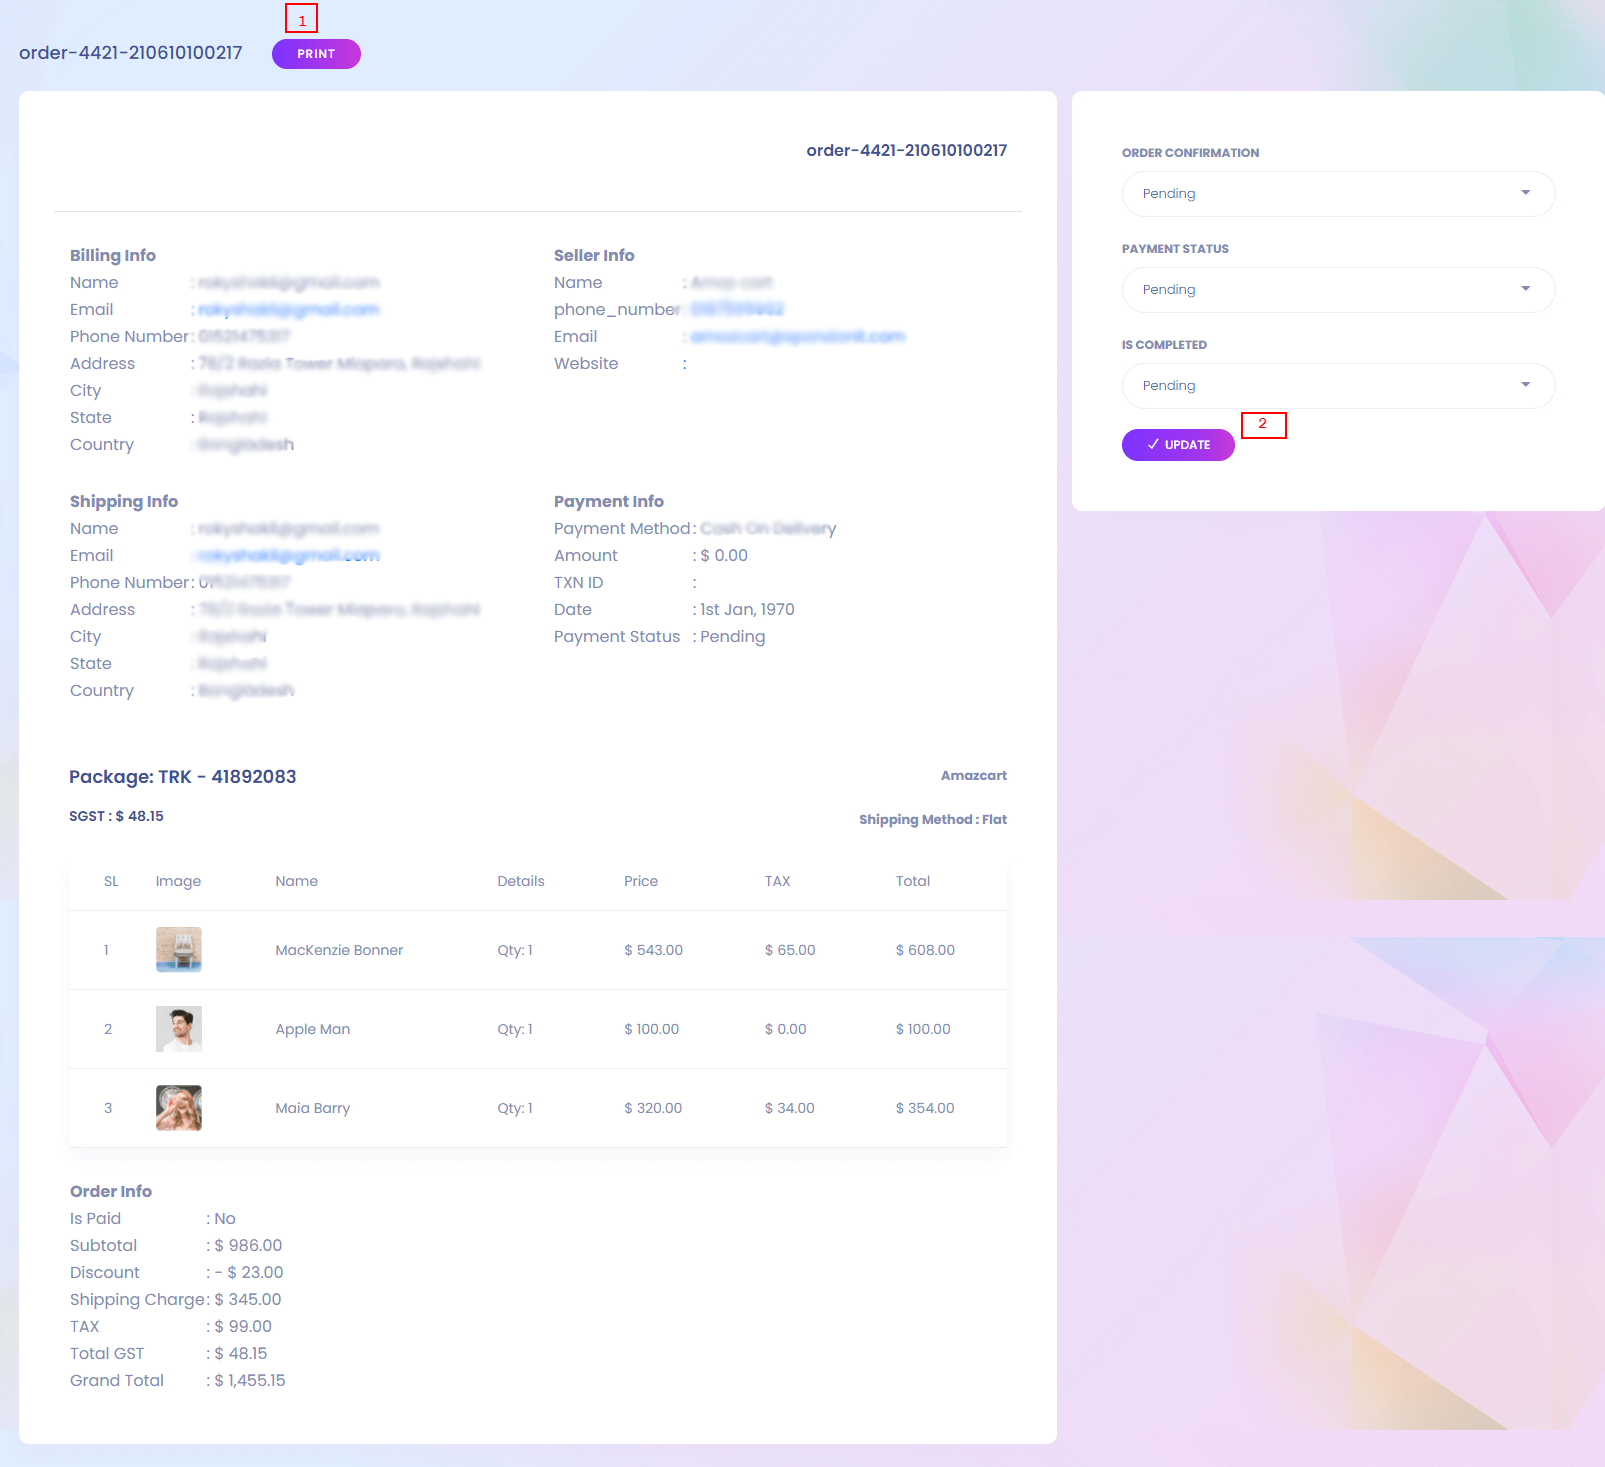
1. Print
Admin can print this page.
2. Update
Admin can update the order information.
Inhouse Order
Inhouse Order
Inhouse Order
You can find your inshouse product order list.
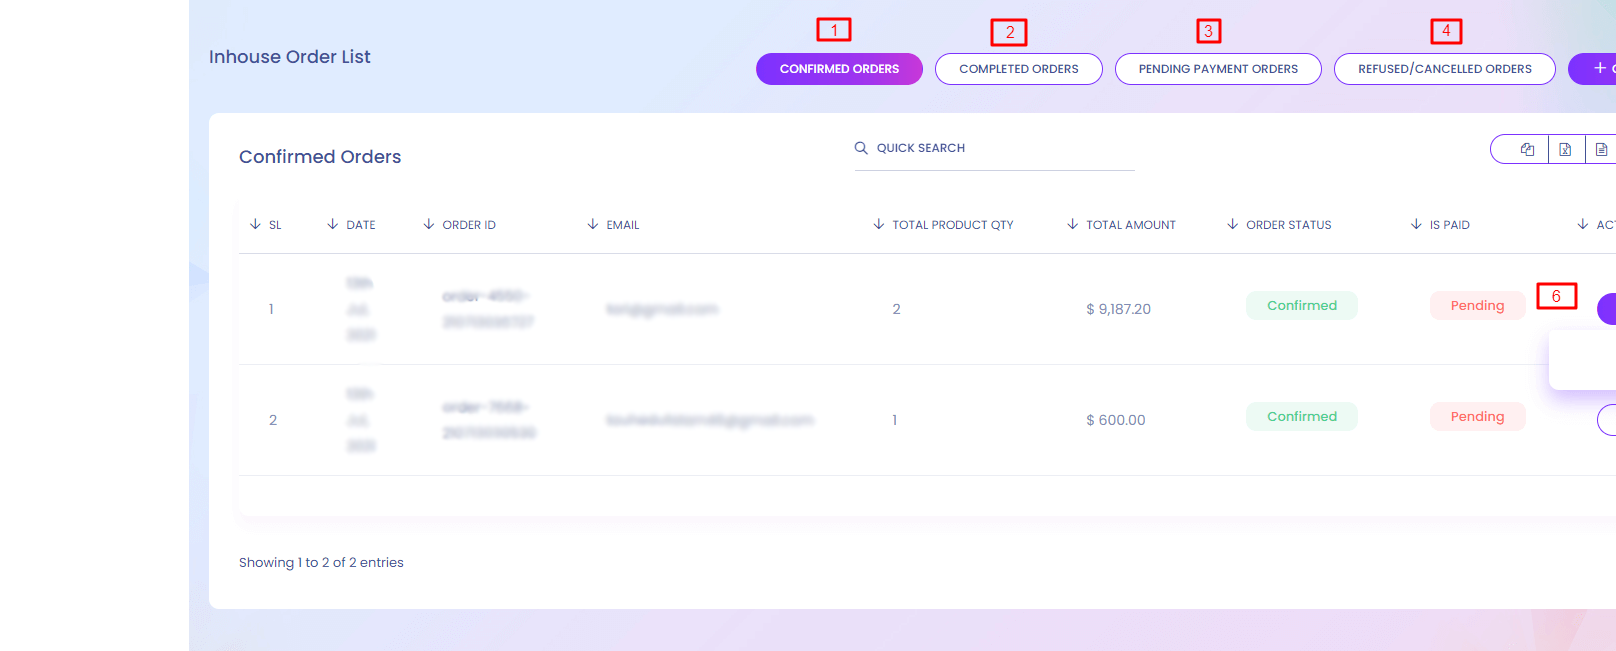
1. Confirmed Orders
Confirmed orders list is shown here.
2. Completed Orders
Completed orders list is shown here.
3. Pending Payment Orders
Pending payment orders list is shown here.
4. Refused/Cancelled Orders
Refused/Cancelled orders list is shown here.
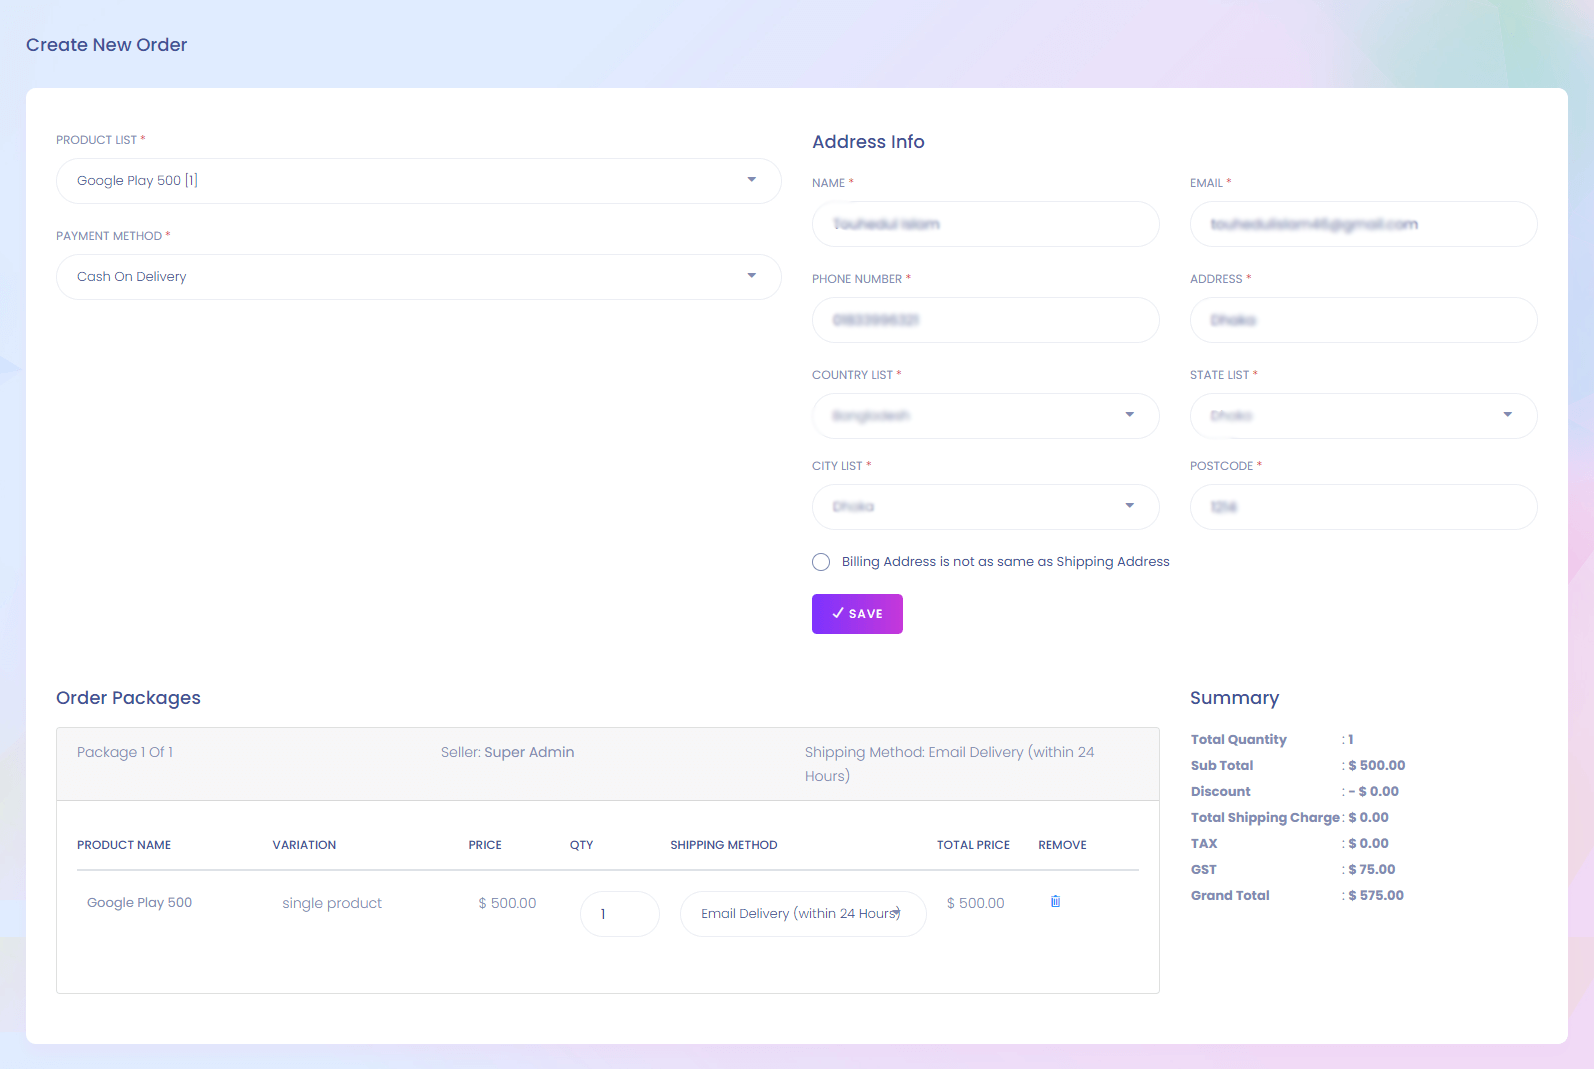
6. Create New Order
Admin can create new order from here.
6. Action
Orders details can be shown here.
Inhouse Order (Create)
Delivery Process
Delivery Process
Delivery Process
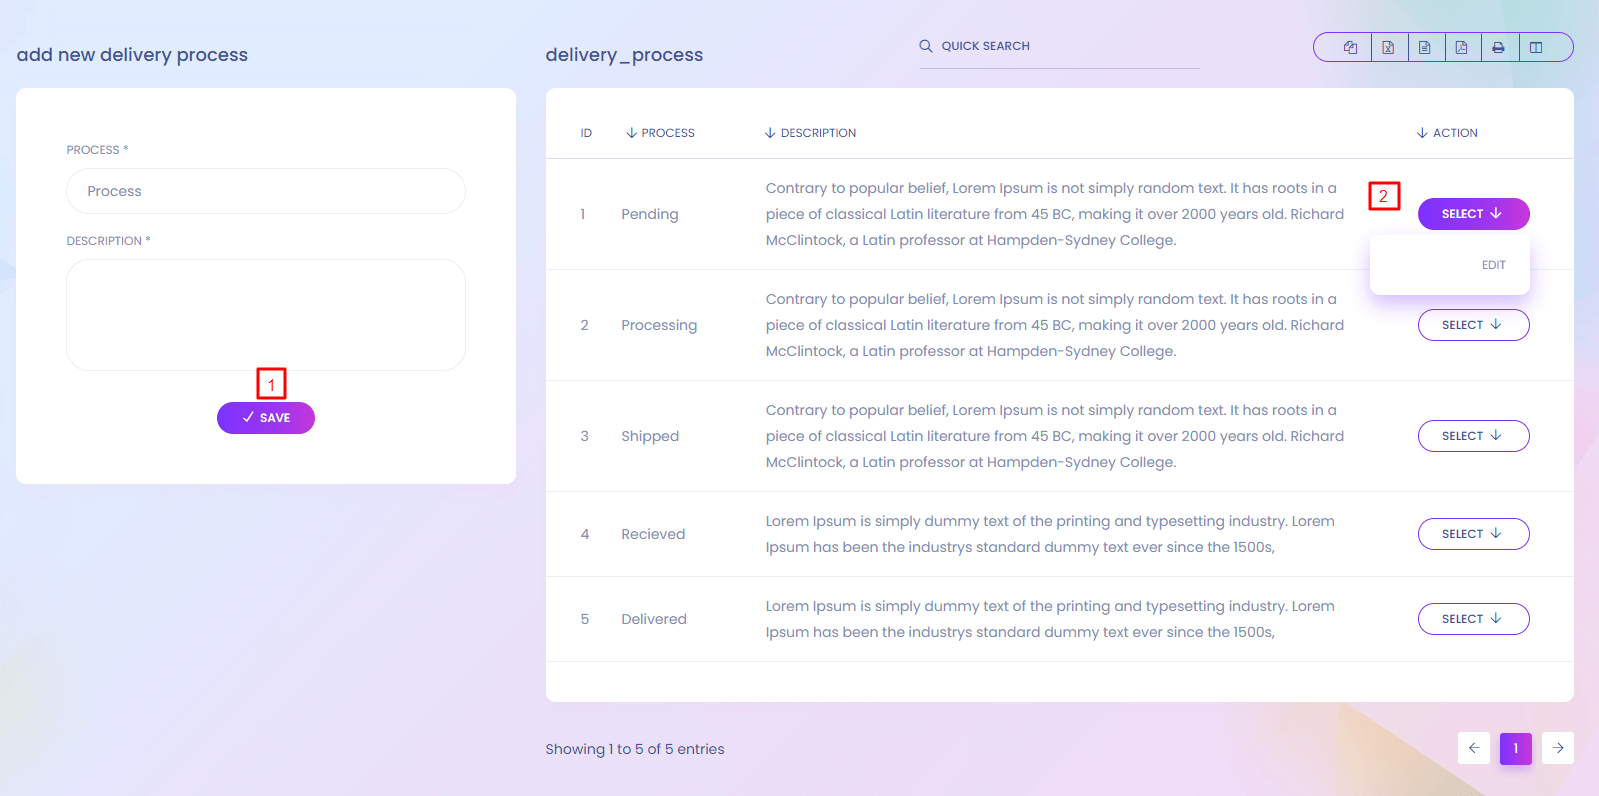
There are different delivery process in the system. You can add more process. When any user order a product he/she can see the product delivery status. Seller can update delivery status time to time.
1. Save
Add new delivery process from here.
2. Action
Admin can edit the delivery process details.
Cancel Reason
Cancel Reason
Cancel Reason
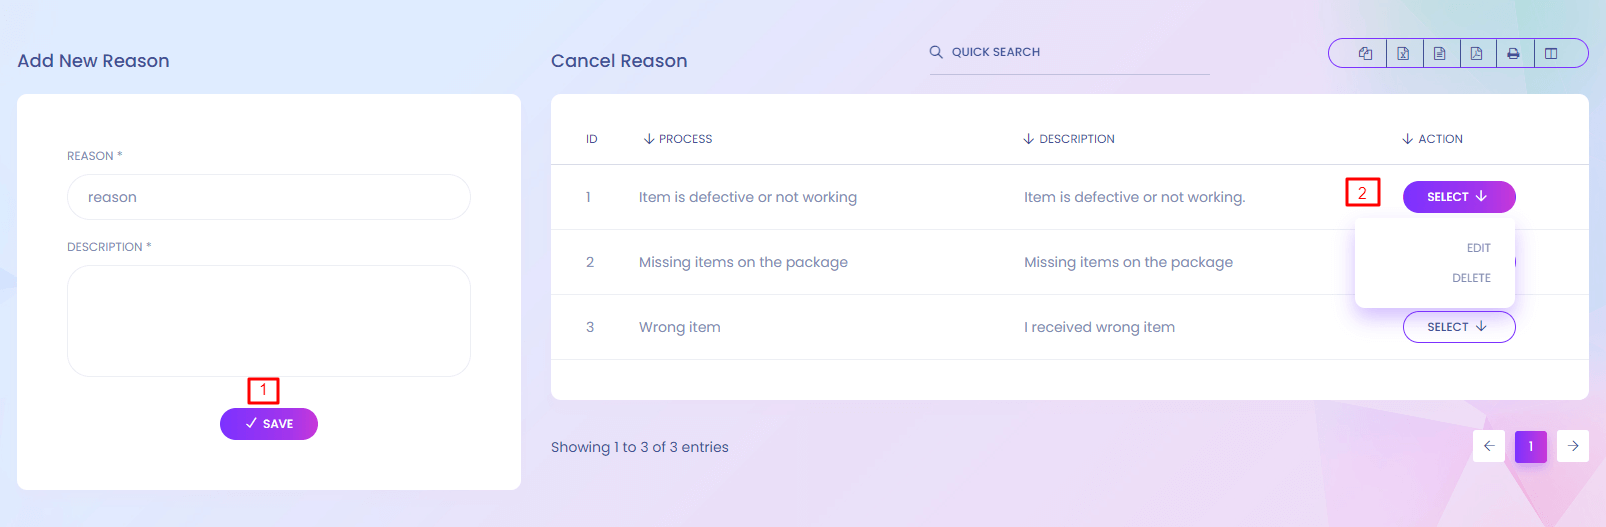
User can cancel any product. For cancelling any product he/she has to choose a reason. From here you can defined the reason.
1. Save
Add new cancel reason from here.
2. Action
Admin can edit and delete the reasons.
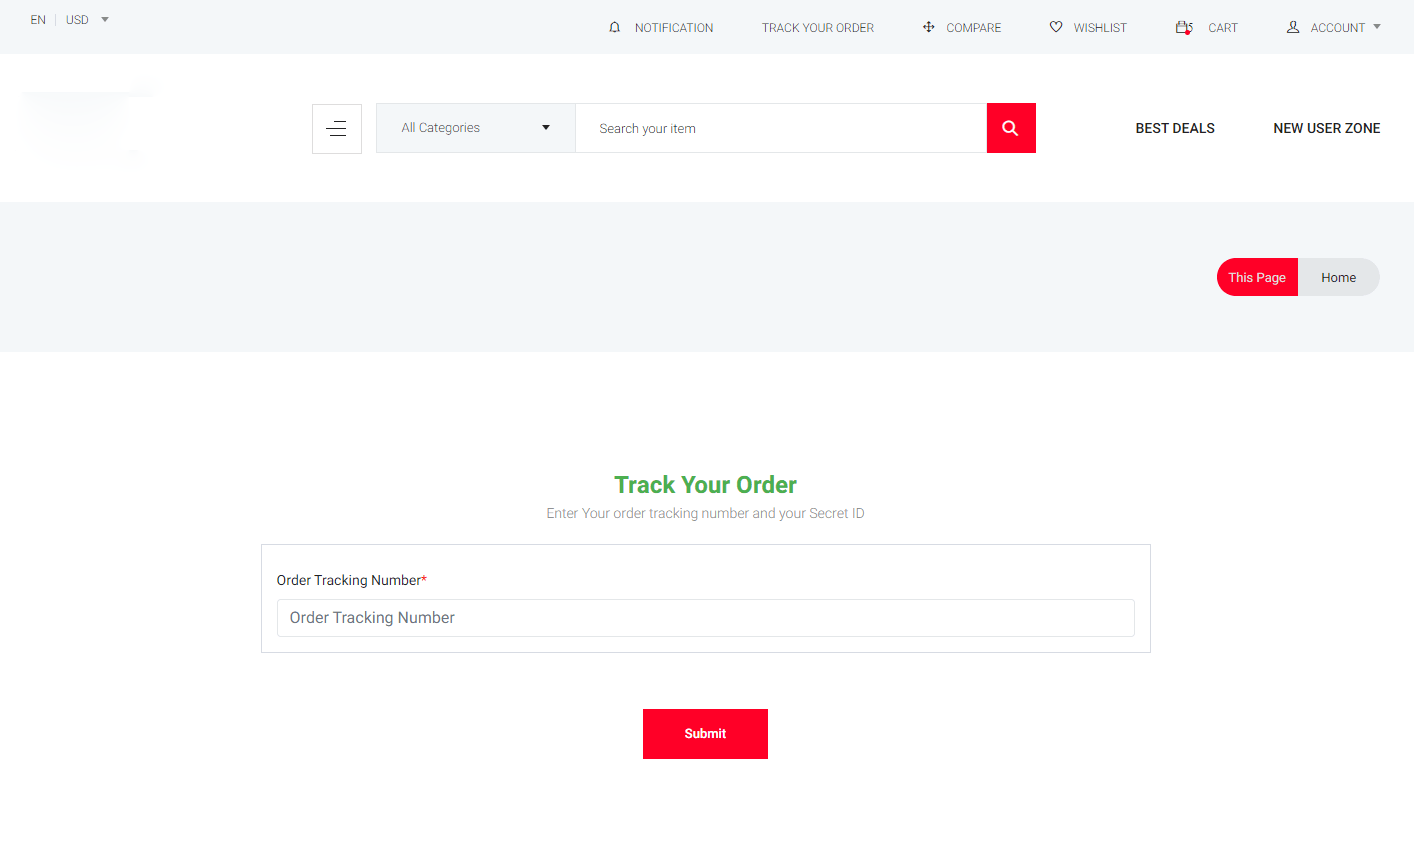
Track Order Configuration
Track Order Configuration

Track Order Configuration Website View
Shipping Carrier
Shipping Carrier
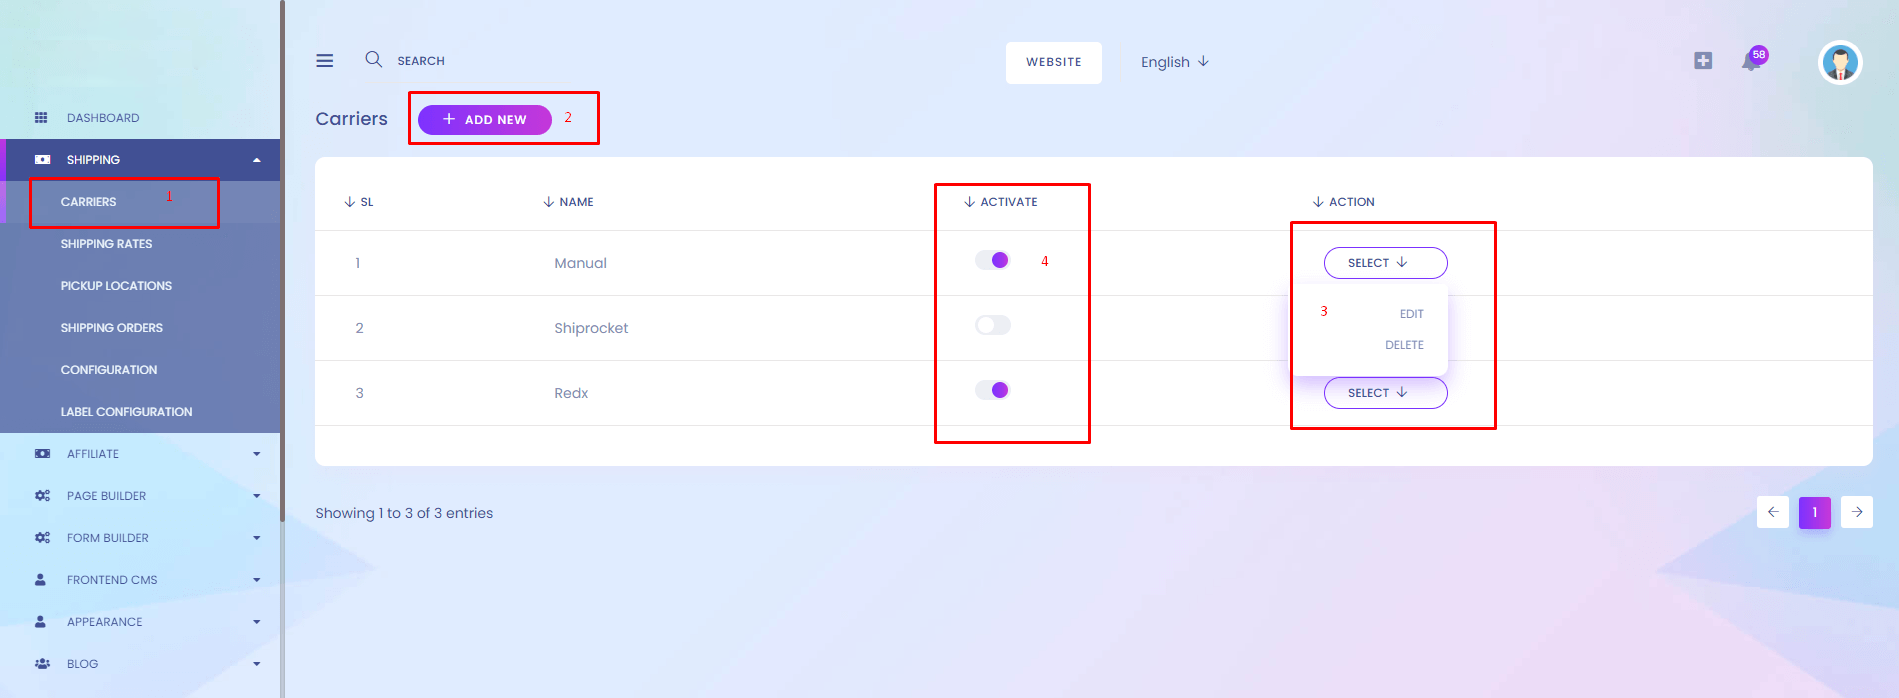
1.Carrier
You can find all shipping carrier list.
2.Add New Carrier
Add new carrier shown here.
3.Action
Update & Delete carrier shown here.
4.Activation
You can active / inactive carrier.
Shipping Rates
Shipping Rates
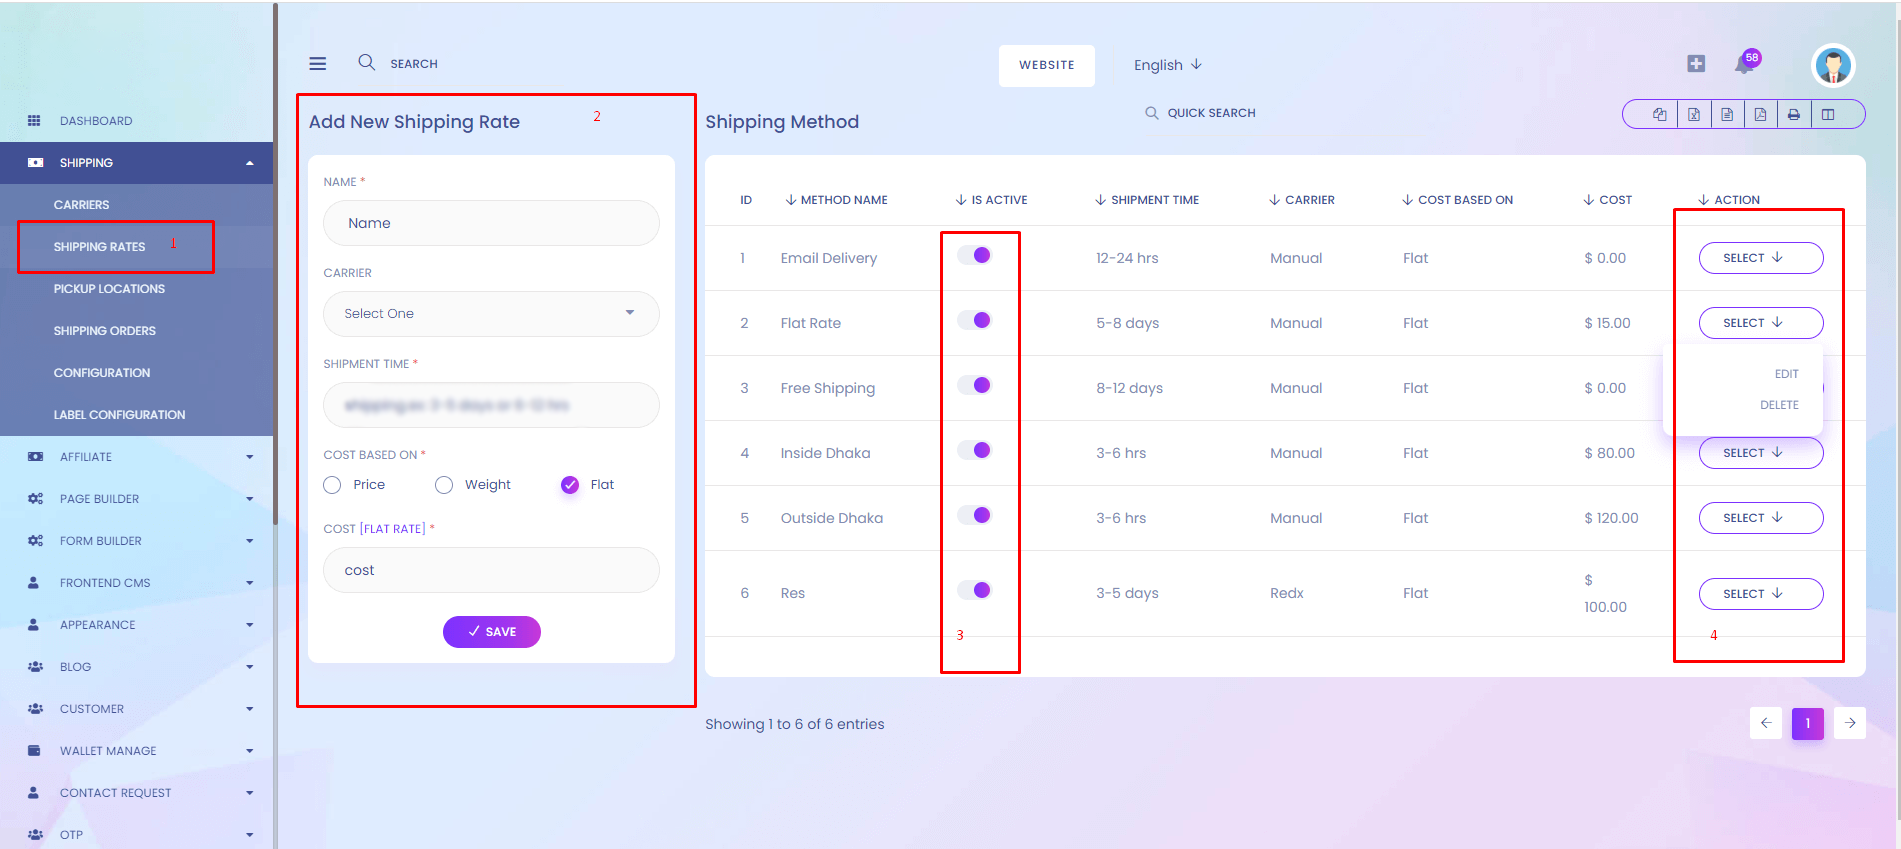
1.Shipping Rates
You can find all shipping rates list.
2.Add New Rates
Add new shipping rates shown here.
3.Activation
You can active / inactive shipping rates.
4.Action
Update & Delete shipping rates shown here.
Pickup Locations
Pickup Locations
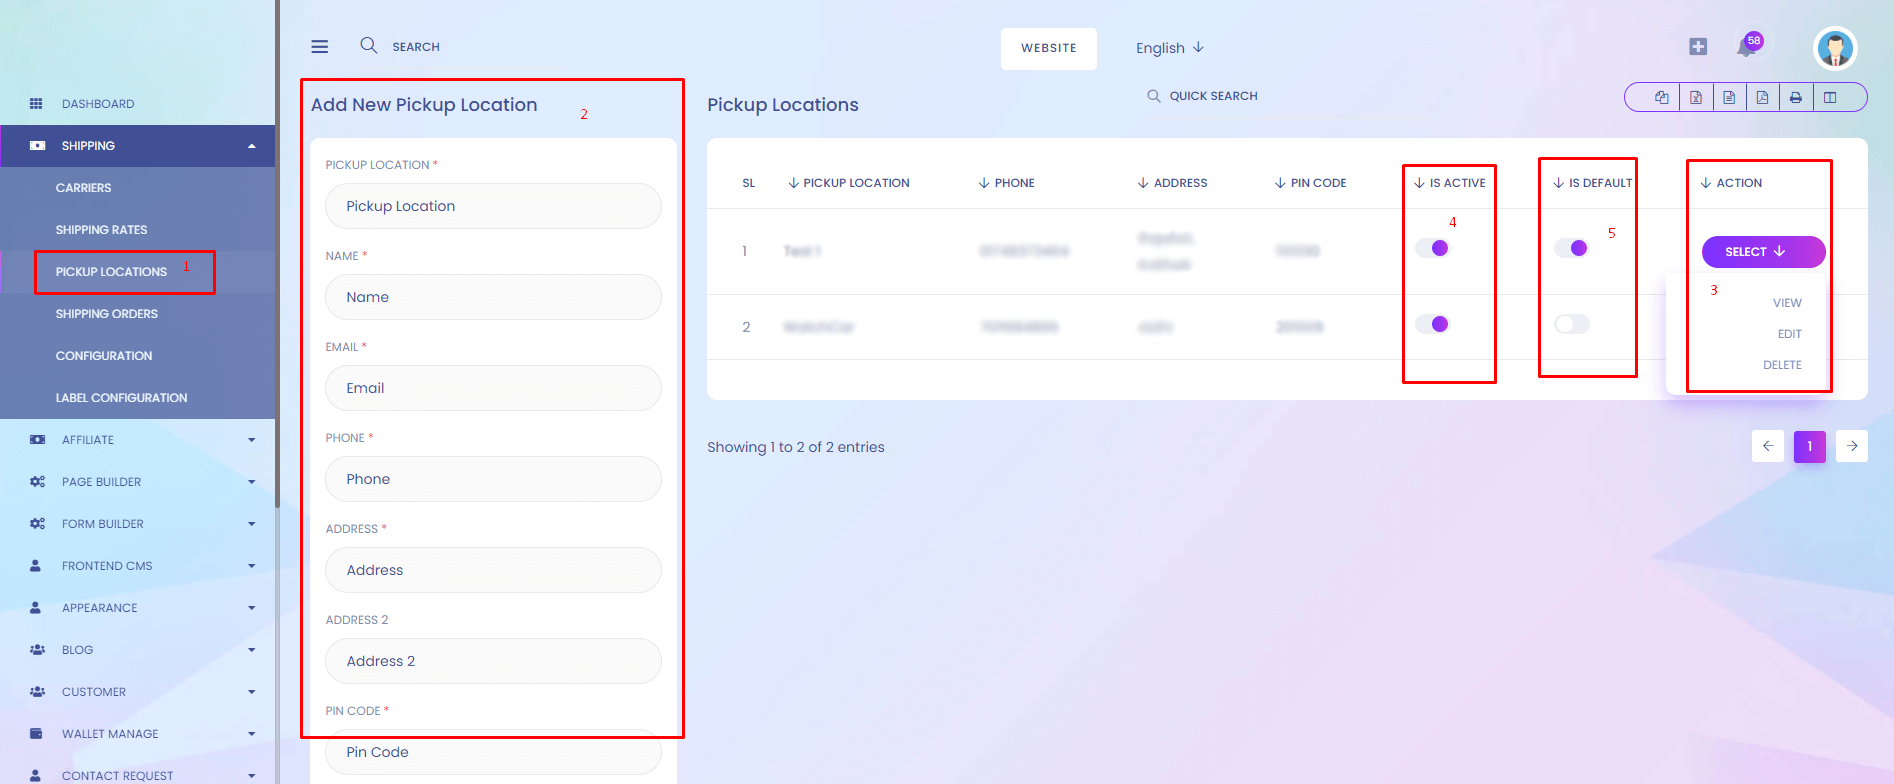
1.Pickup Locations
You can find all pickup location list.
2.Add New Pickup Location
Add new pickup location shown here.
3.Action
Update, Details & Delete Pickup Location shown here.
4.Activation
You can active / inactive pickup locations.
5.Set Pickup Location
You can set default pickup locations.
Shipping Orders
Shipping Orders
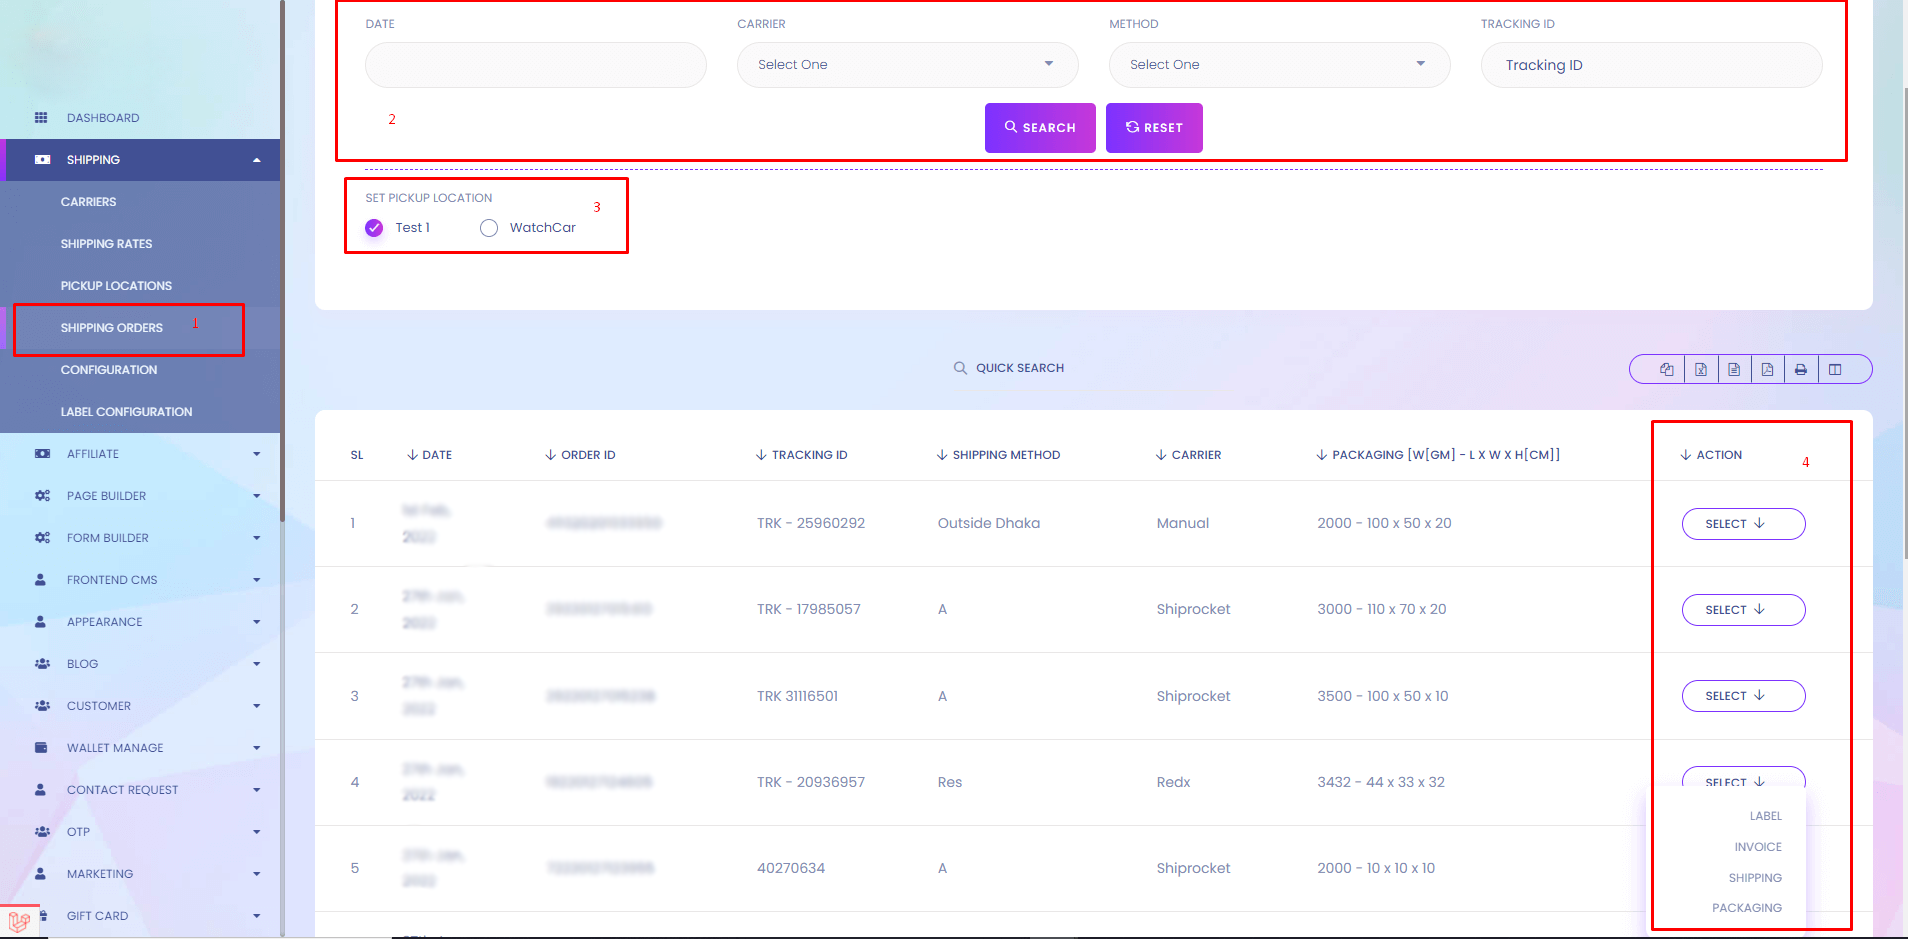
1.Shipping Orders
You can find order list for shipping.
2.Order Filter
You can order filter by date, carrier, shipping method, tracking ID.
3.Change Pickup Point
You can change pickup point when shipping.
4.Action
You can generate label, invoice ,packaging & shipping.
Shipping Configuration
Shipping Configuration
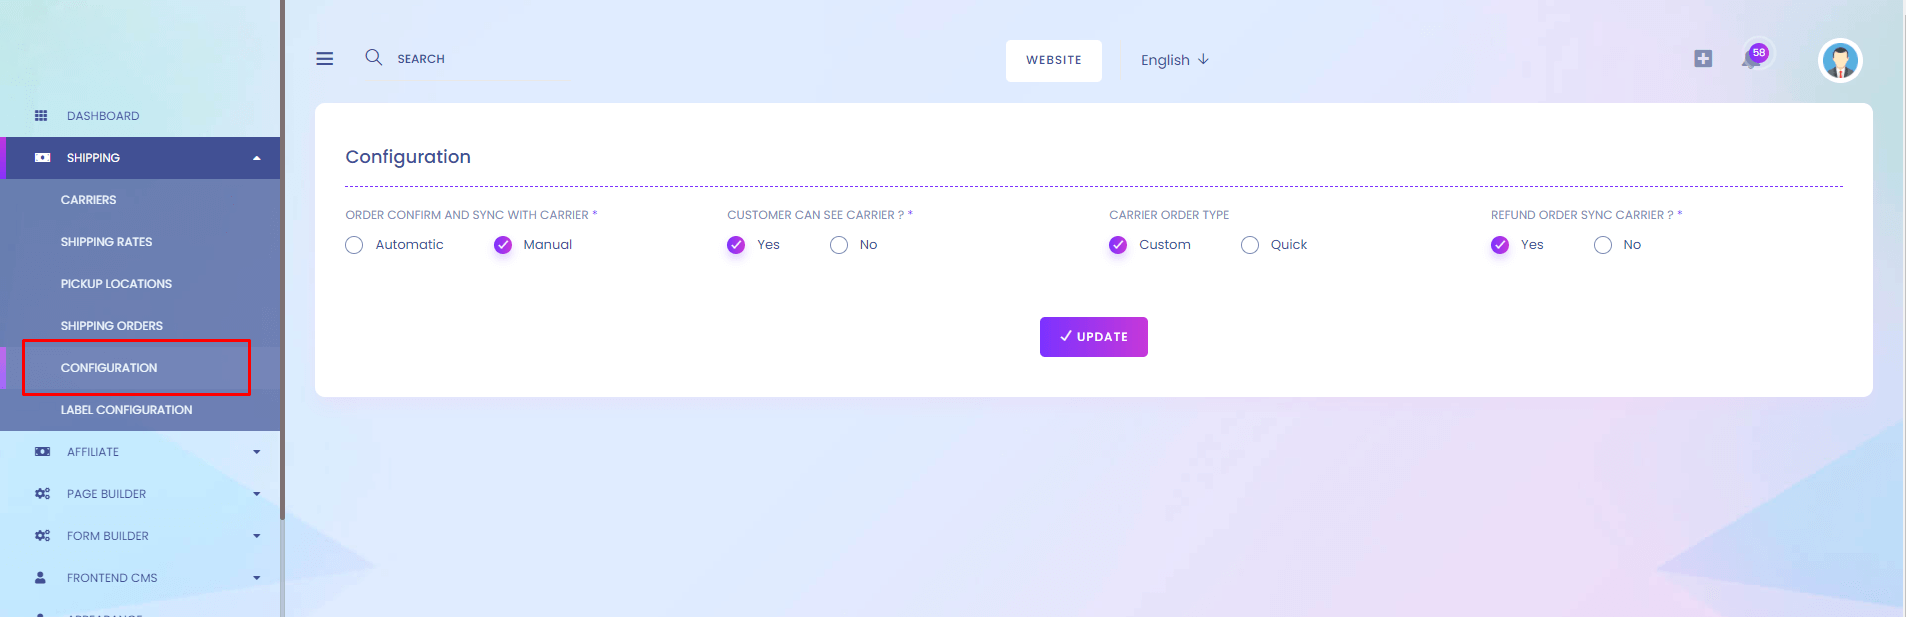
Configuration
You can set shipping configuration.
Label Configuration
Label Configuration
Label Configuration
You can set label configuration.
Pending Refund Requests
Pending Refund Requests
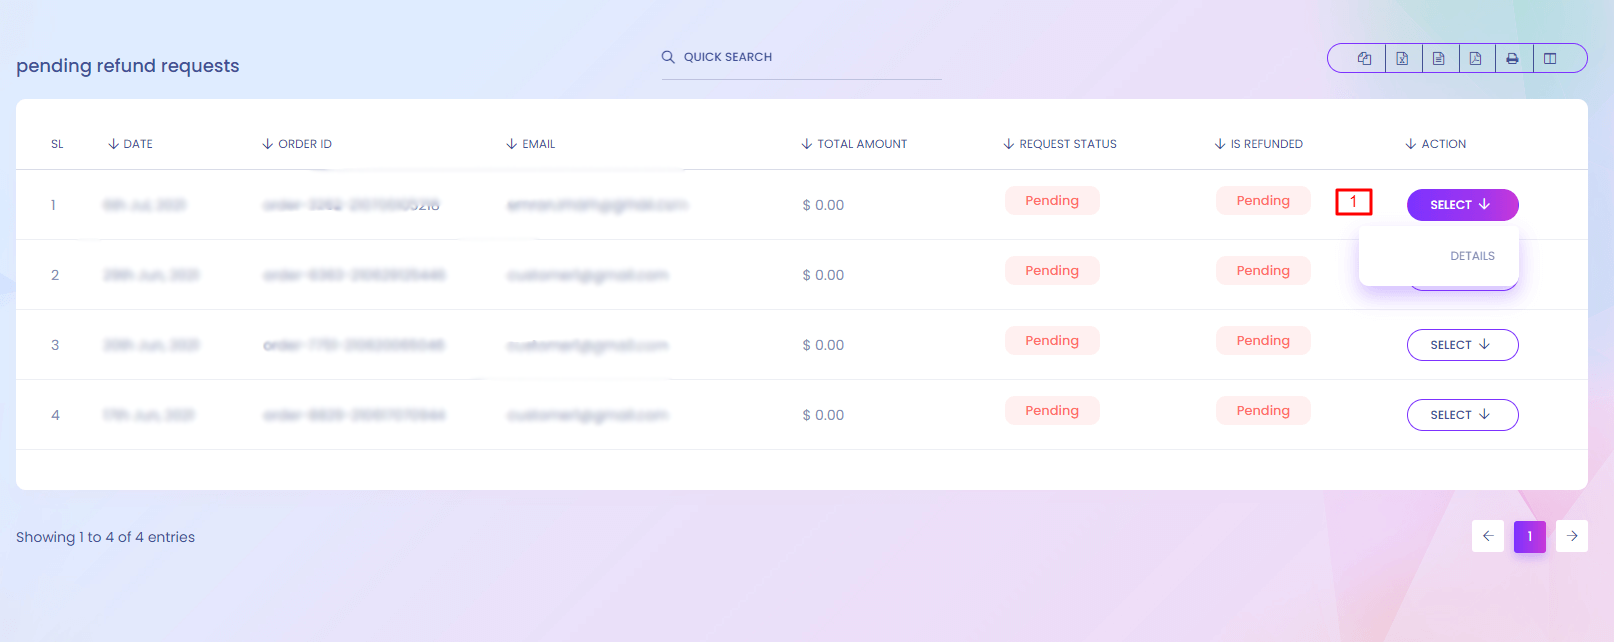
Pending Refund Requests
User can request for refund a product. You can find the refund pending list here.
1. Action
View refund details.
Refund Details
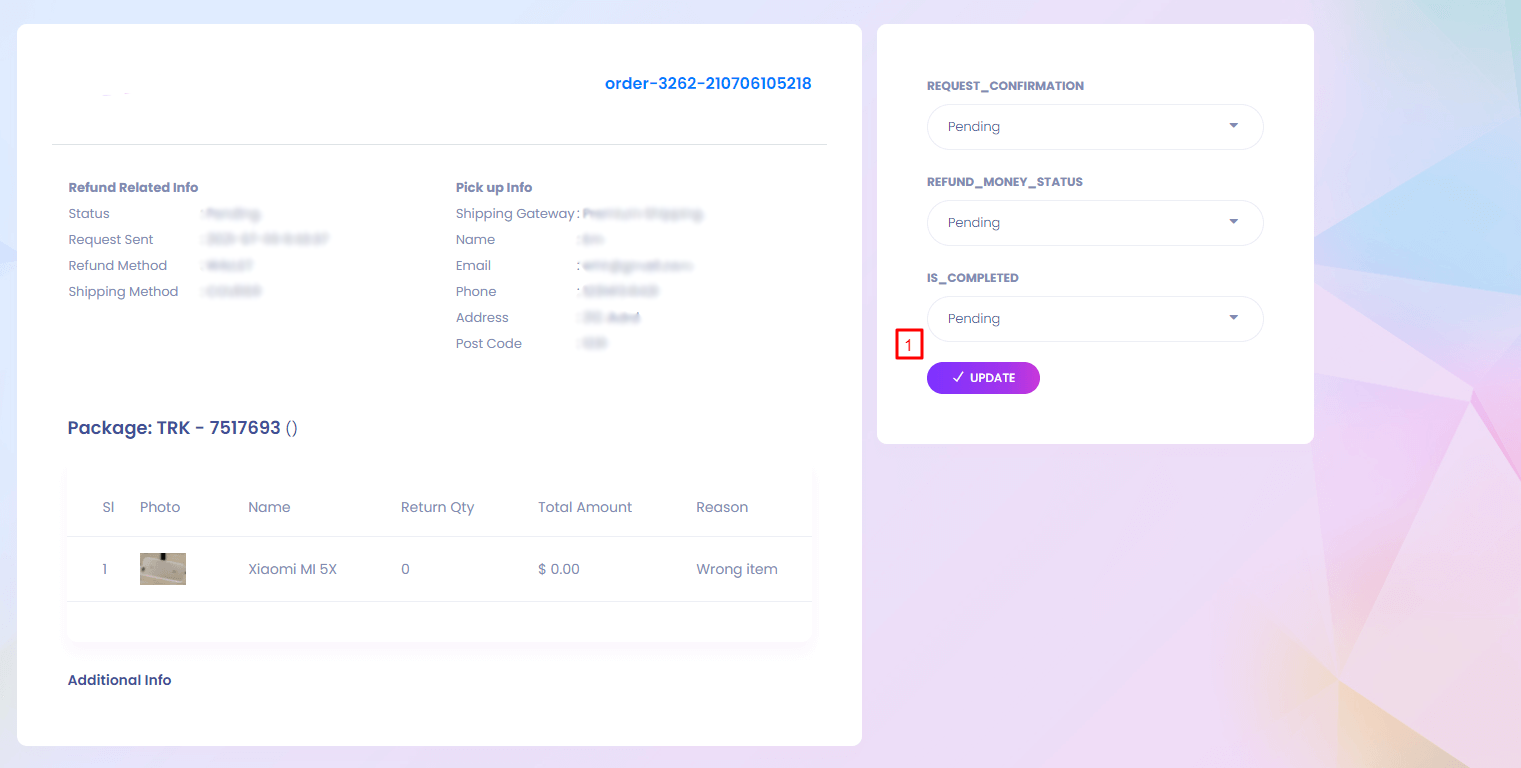
1. Update
Update refund statuses.
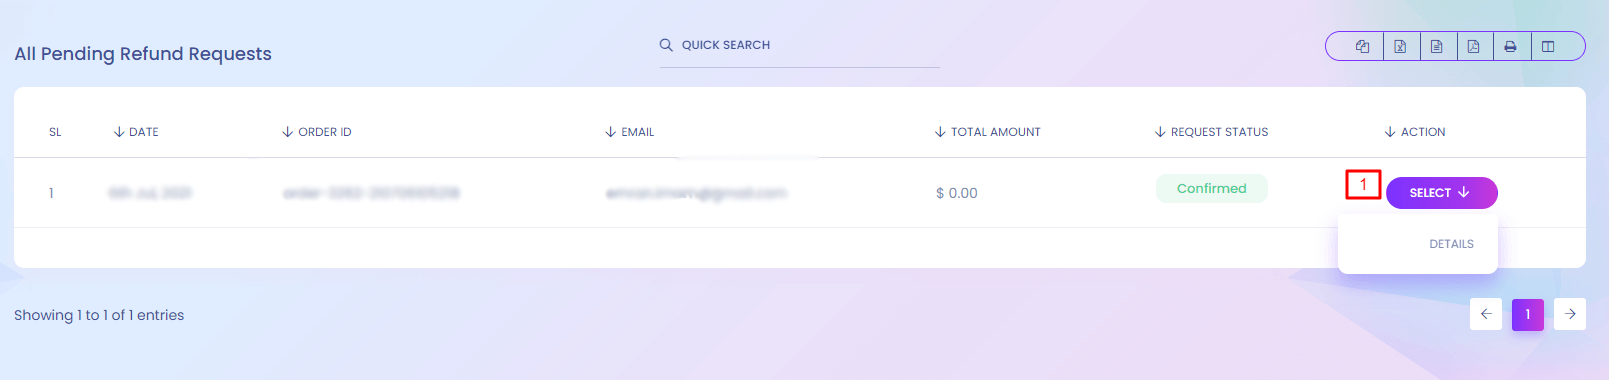
Confirmed Refund Requests
Confirmed Refund Requests

Confirmed Refund Requests
When you update a pending refund request to confirmed , it will visiable here.
1. Action
View refund details.
My Refund Requests
My Refund Requests
My Refund Requests
As you are also a seller you will find your own product refund requests here.
1. Action
View refund details.
Refund Reasons
Refund Reasons
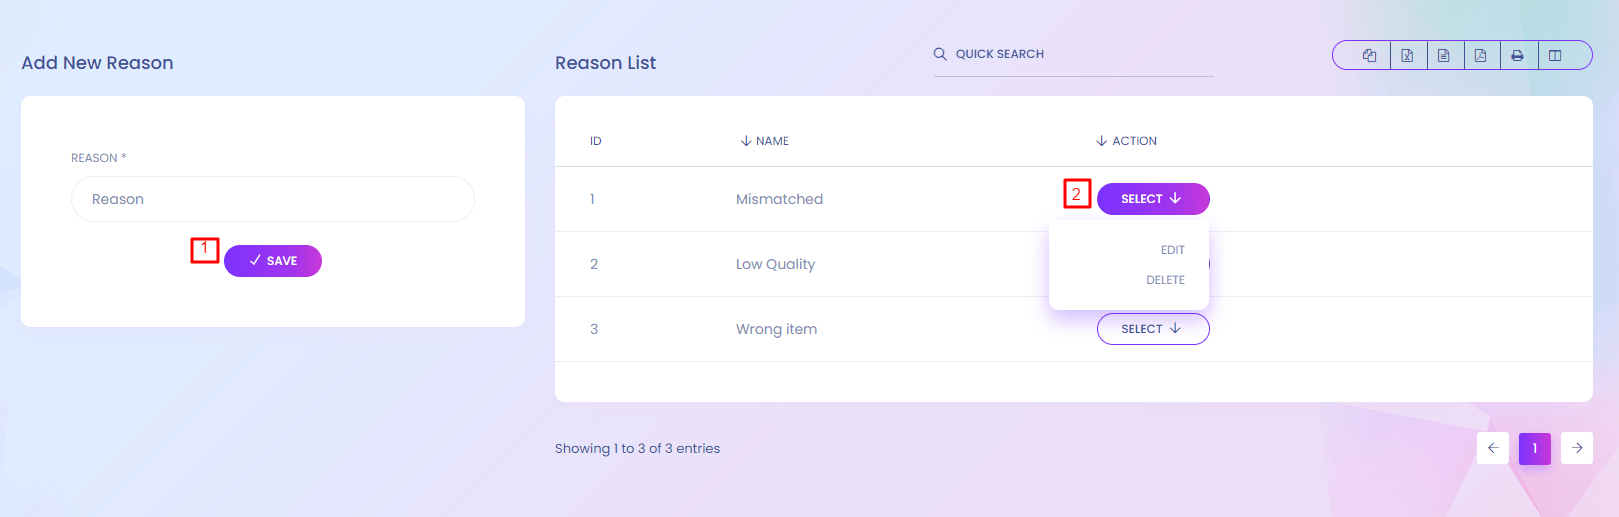
Refund Reasons
To refund a product user has to choose a reason. You can manage the reasons here.
1. Save
Add new reason from here.
2. Action
Admin can edit and delete refund reasons.
Refund Process
Refund Process
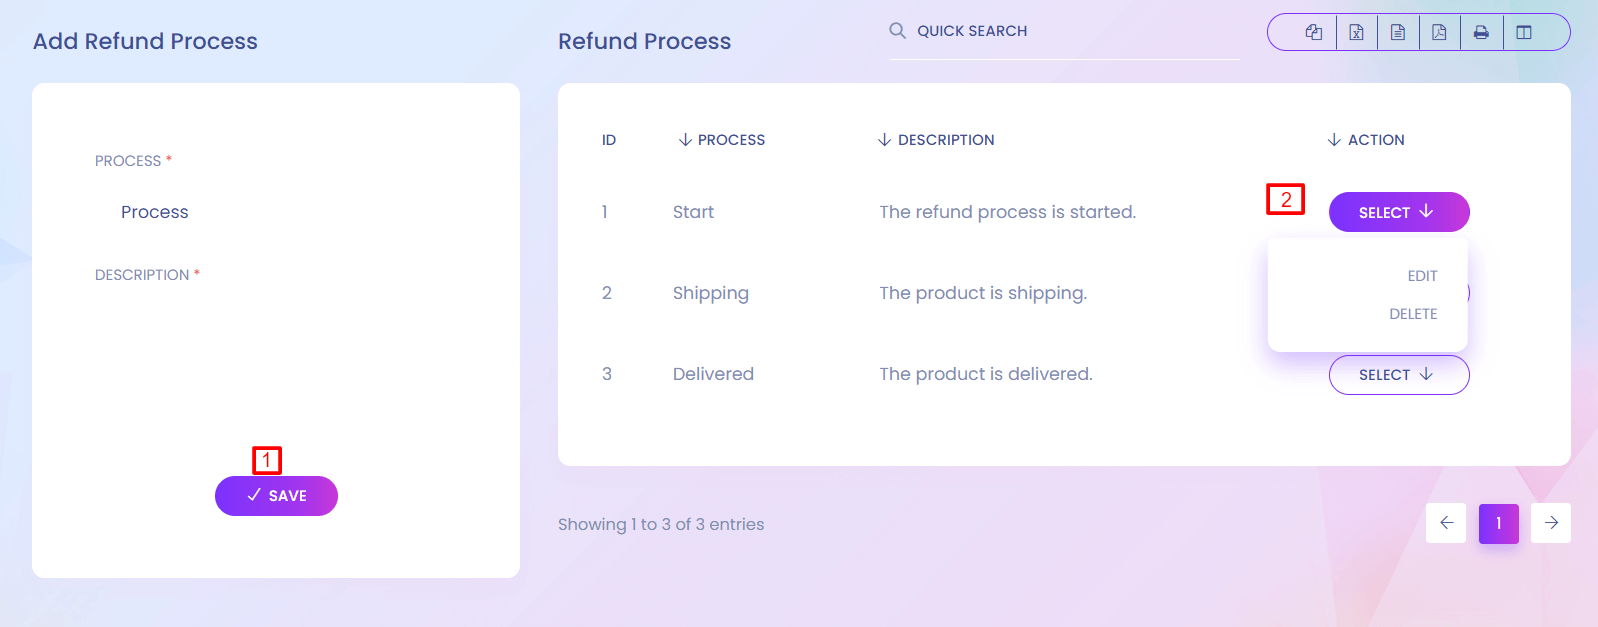
1. Save
Add new process from here.
2. Action
Precess can edit and delete.
Refund Configuration
Refund Configuration

Refund Configuration
You can configur refund setting here. You can enable and disable refund process and set the time for accepting refund request.
1. Save
Save the configuration.
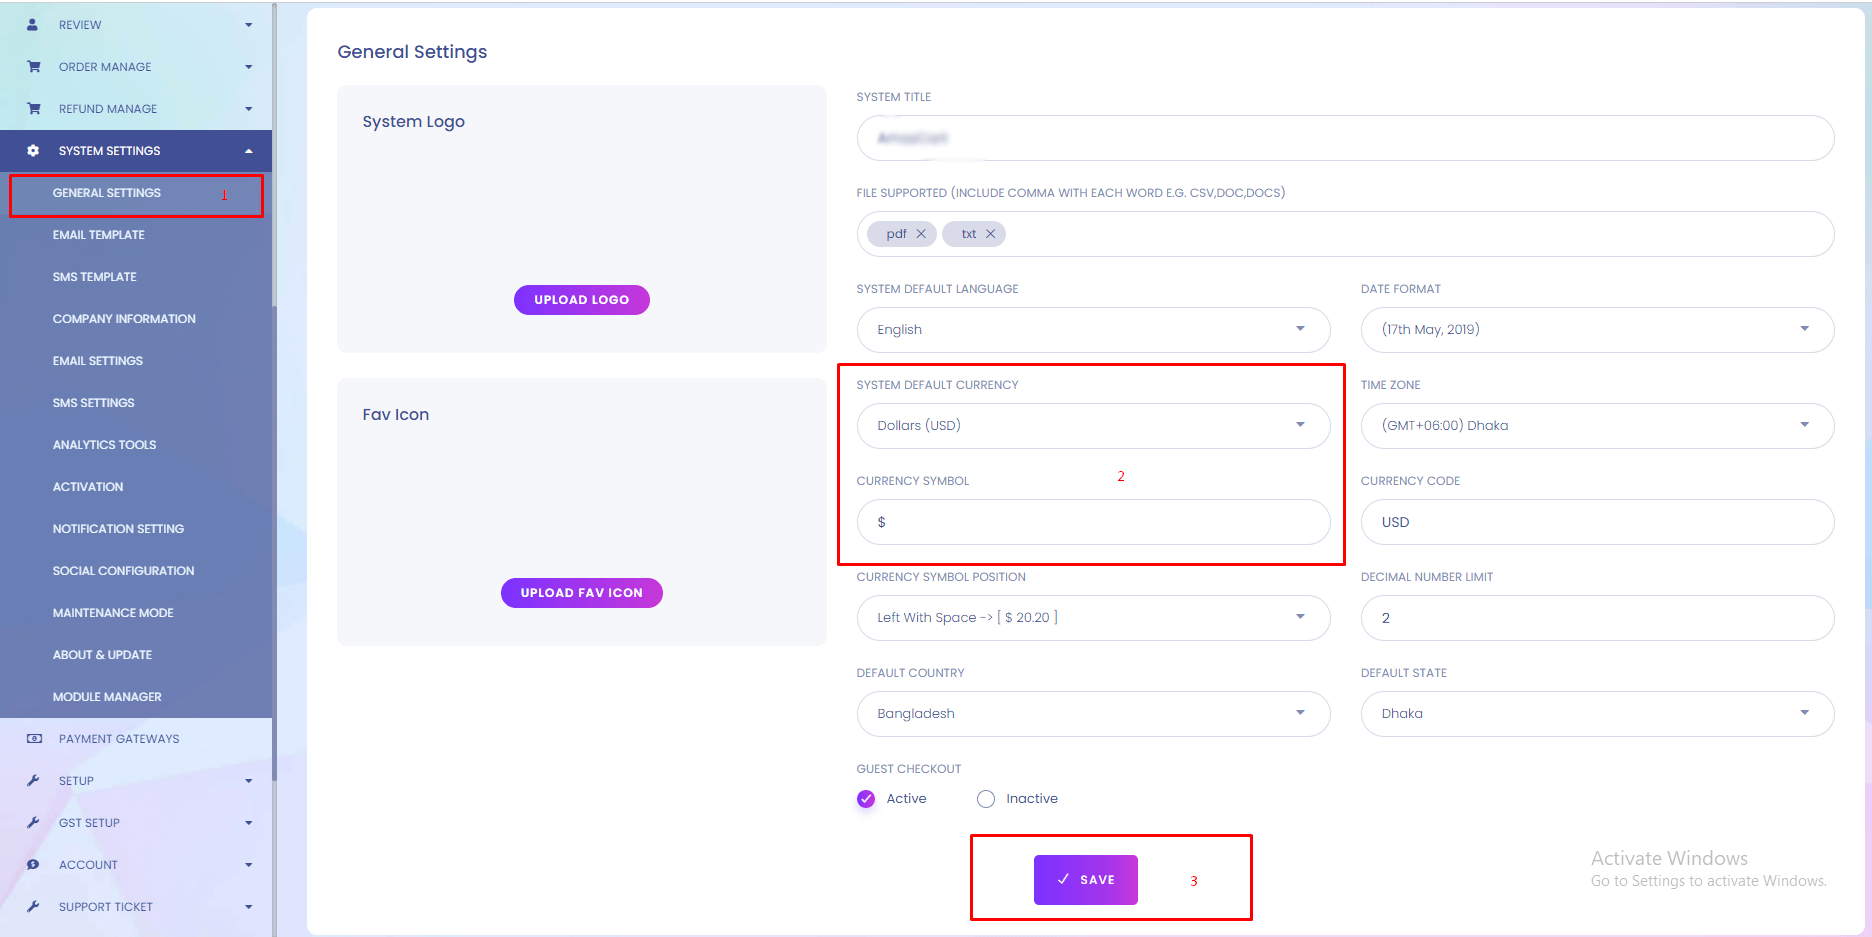
General Settings
General Settings
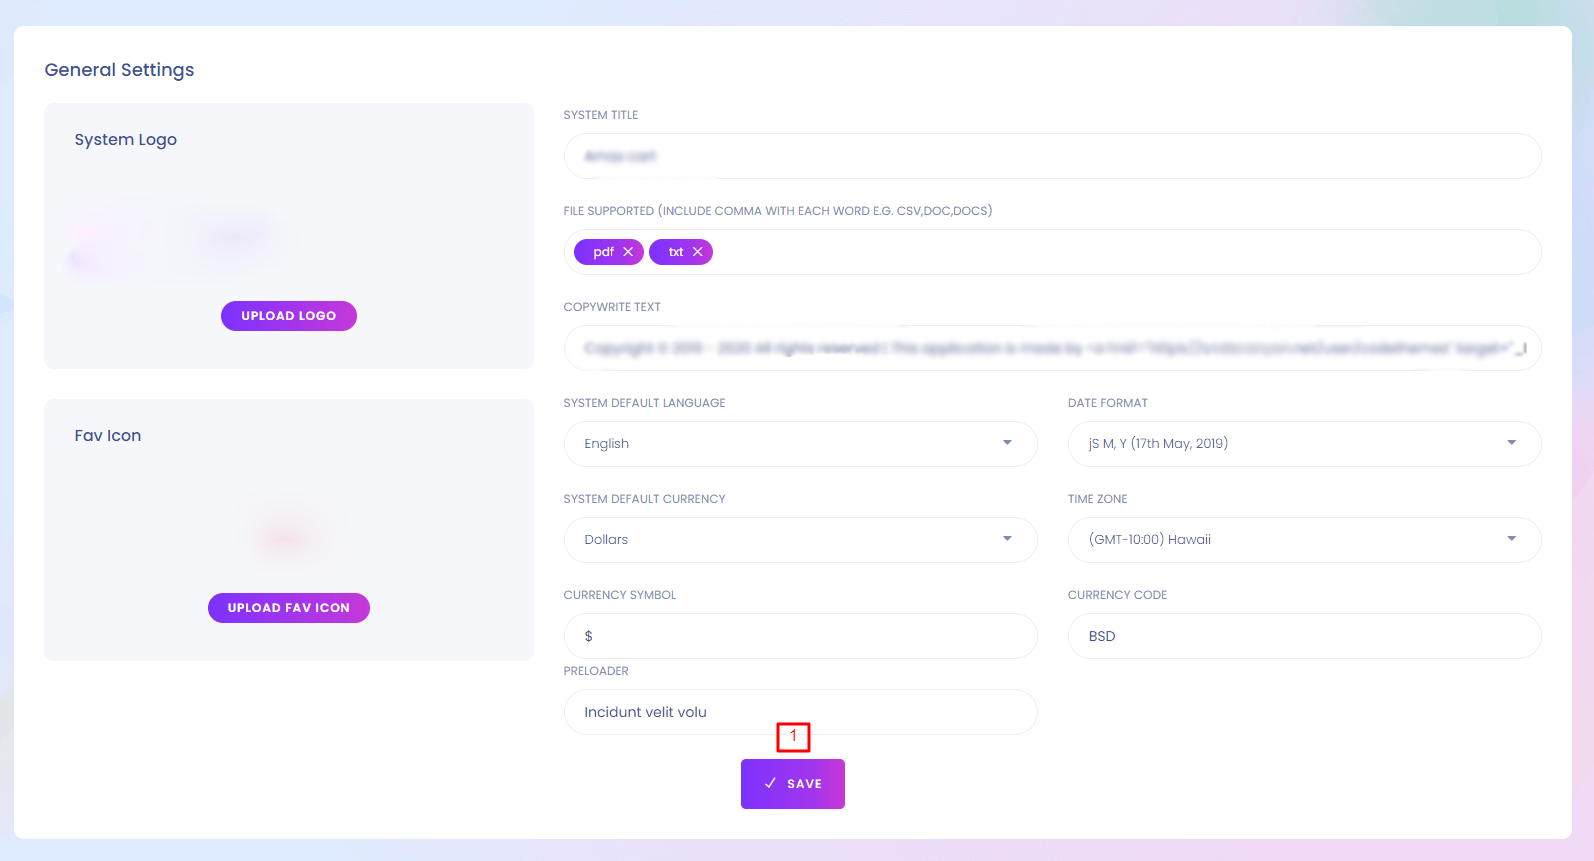
General Setting
You can setup many things from here.
1. Save
Save the settings.
Email Templete
Email Templete
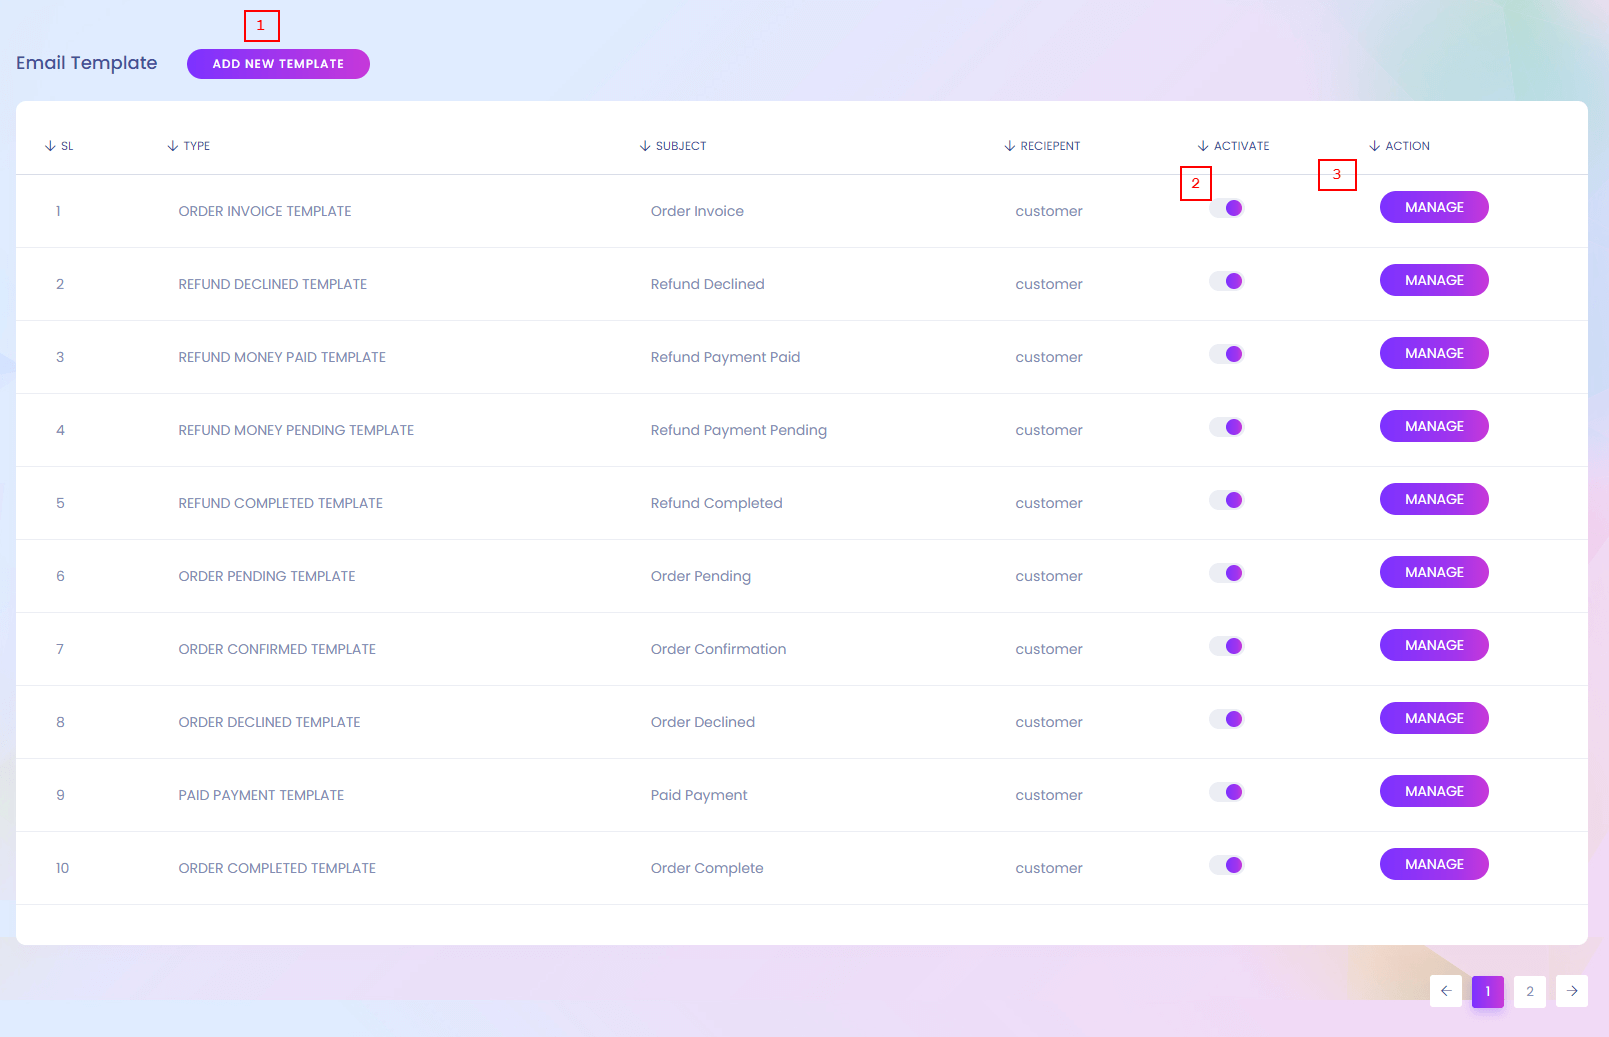
Email Templete
The system sends different type of email. You can setup email templete here.
1. Add New Templete
Admin can add new email templete from here.
2. Activate
Email templete can be activated and deactivated from here.
3. Manage
Admin can manage and edit the templete.
Email Templete (Create)
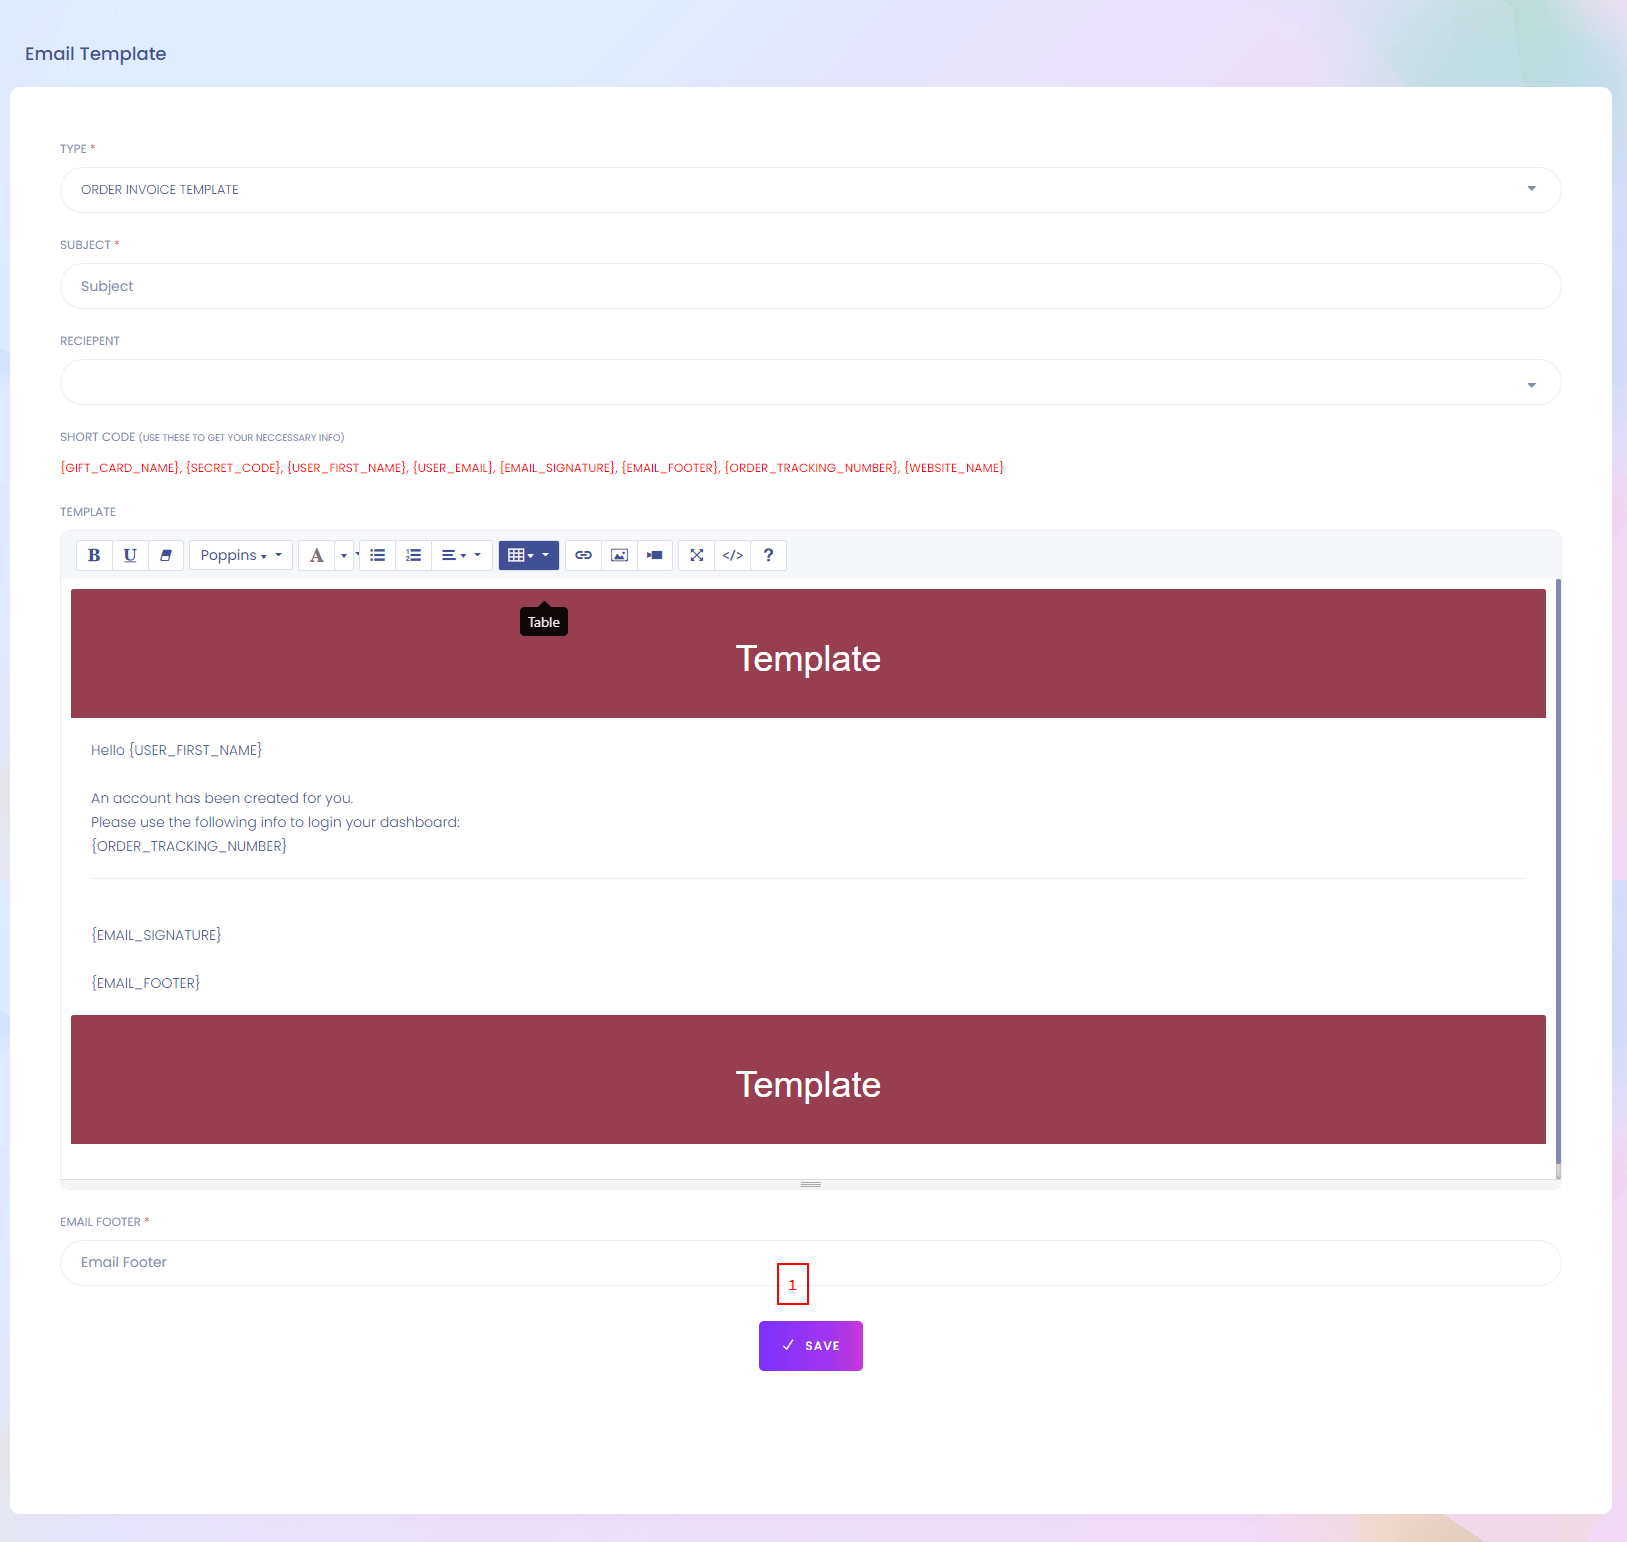
1. Save
Save the templete.
Company Information
Company Information
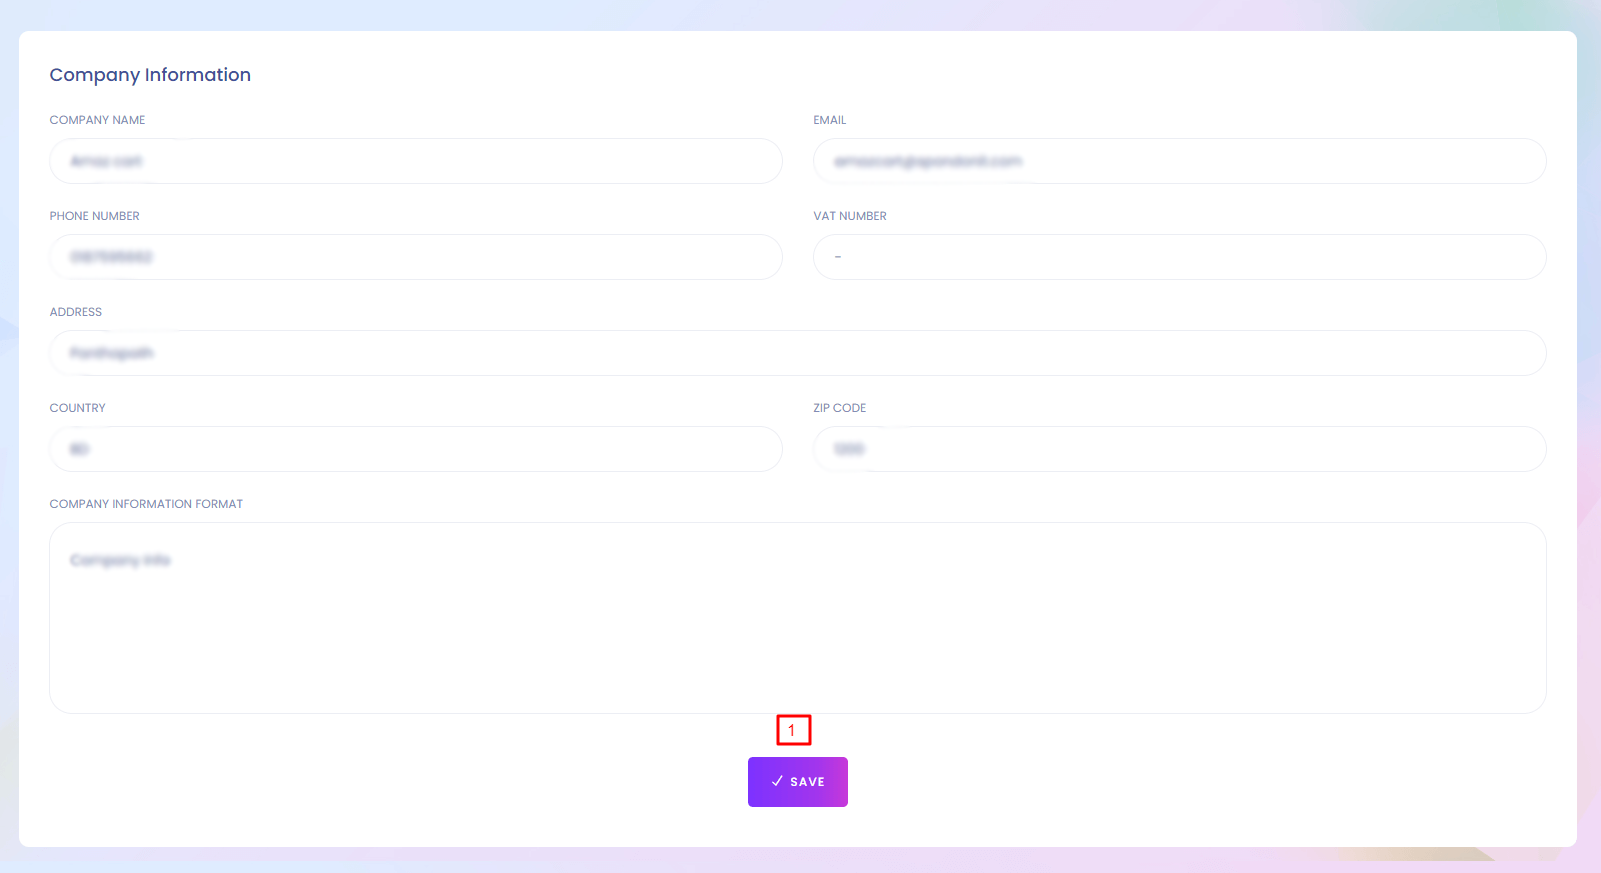
Company Information
As you are also a seller you can setup your company information. This information will seen by user as a seller.
1. Save
Save the company information settings.
SMTP Settings
SMTP Settings
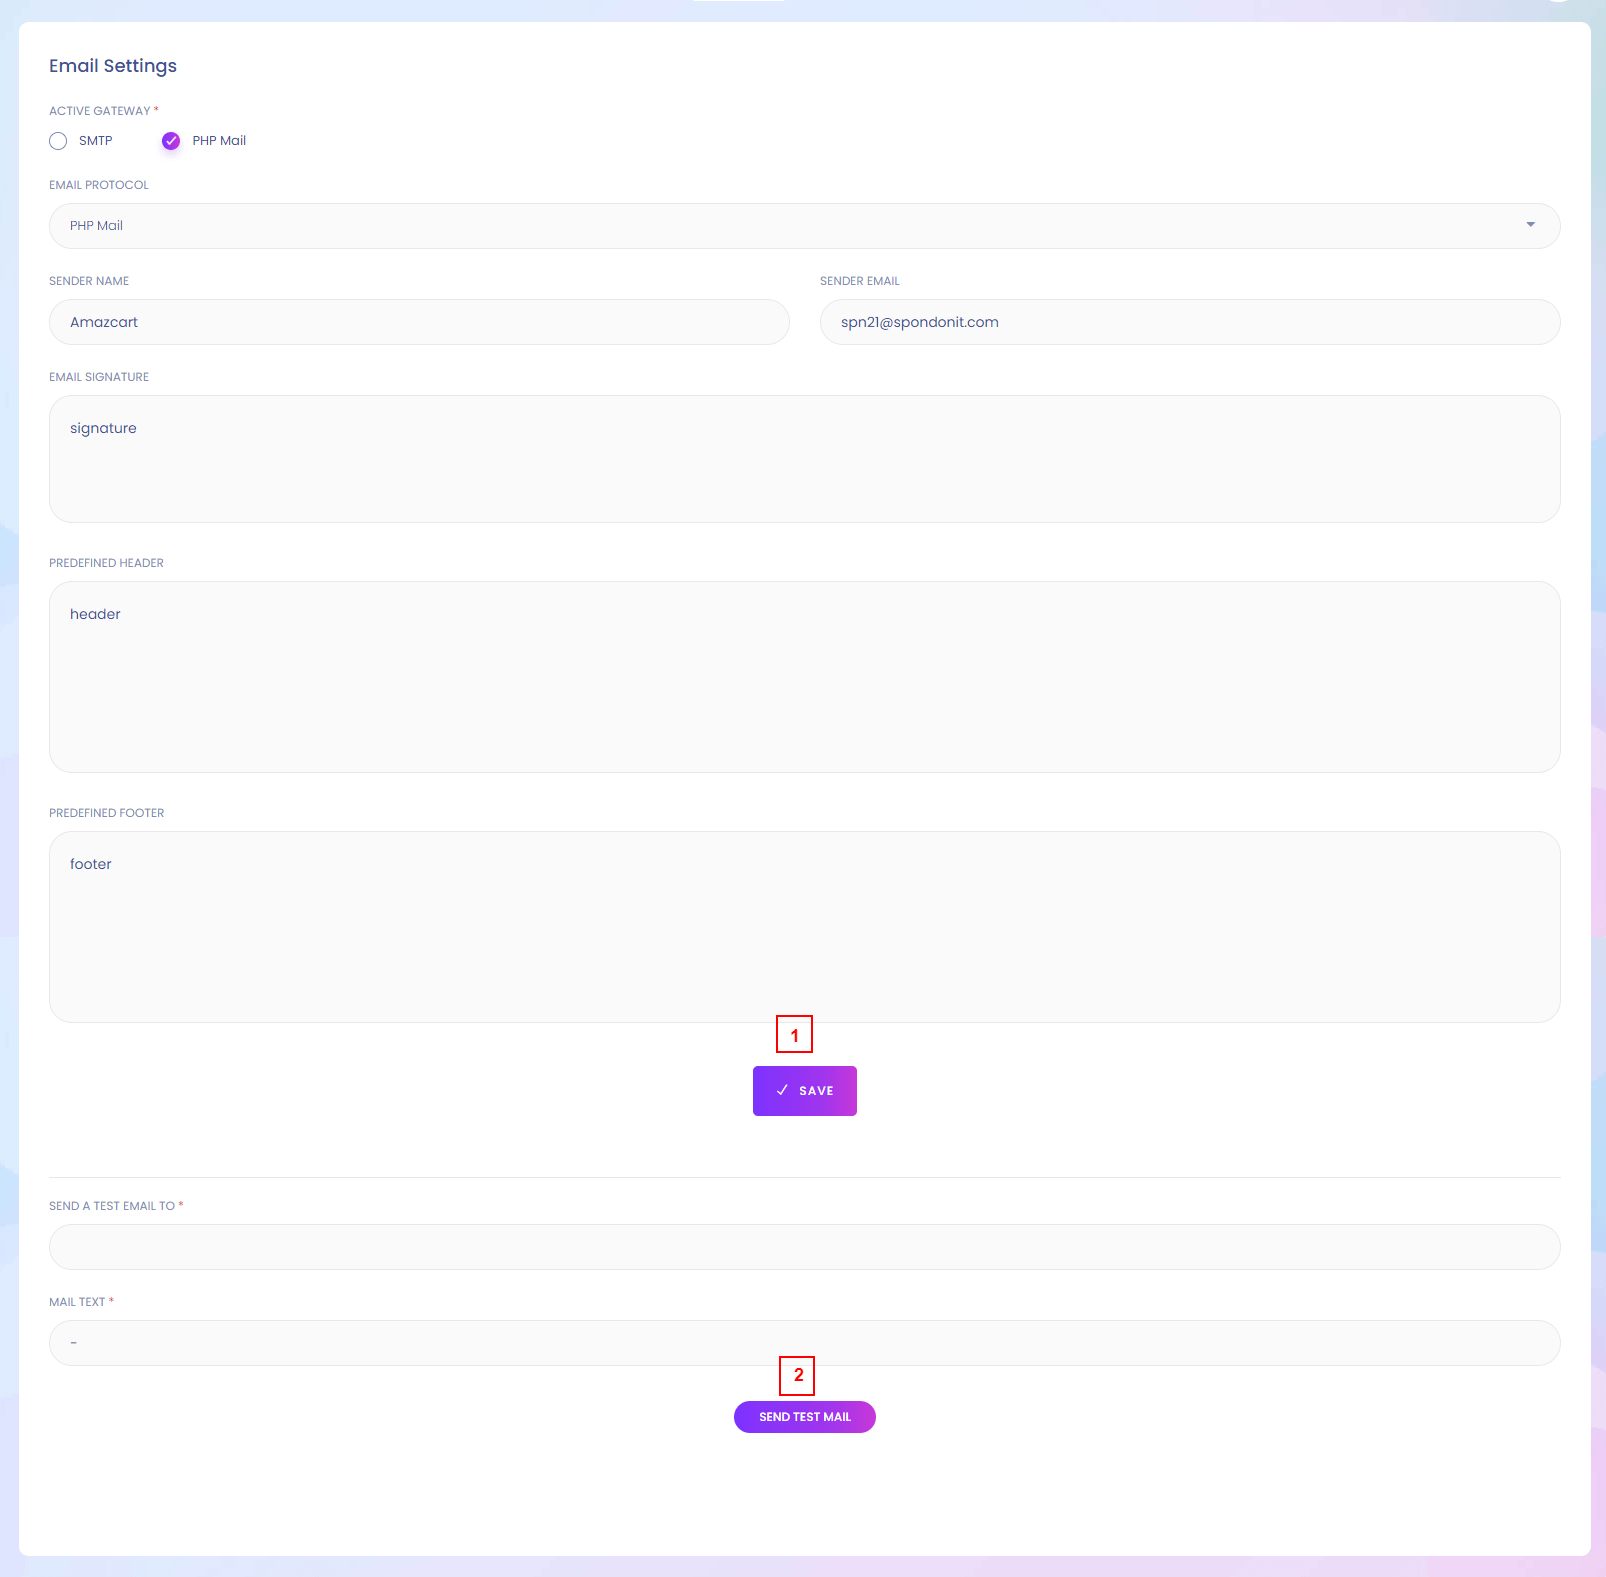
SMTP Setting
For sending email you need to setup smtp setting.
1. Save
Save the smtp settings.
2. Send Test Mail
After saving the setting test mail can be sent.
SMS Settings
SMS Settings
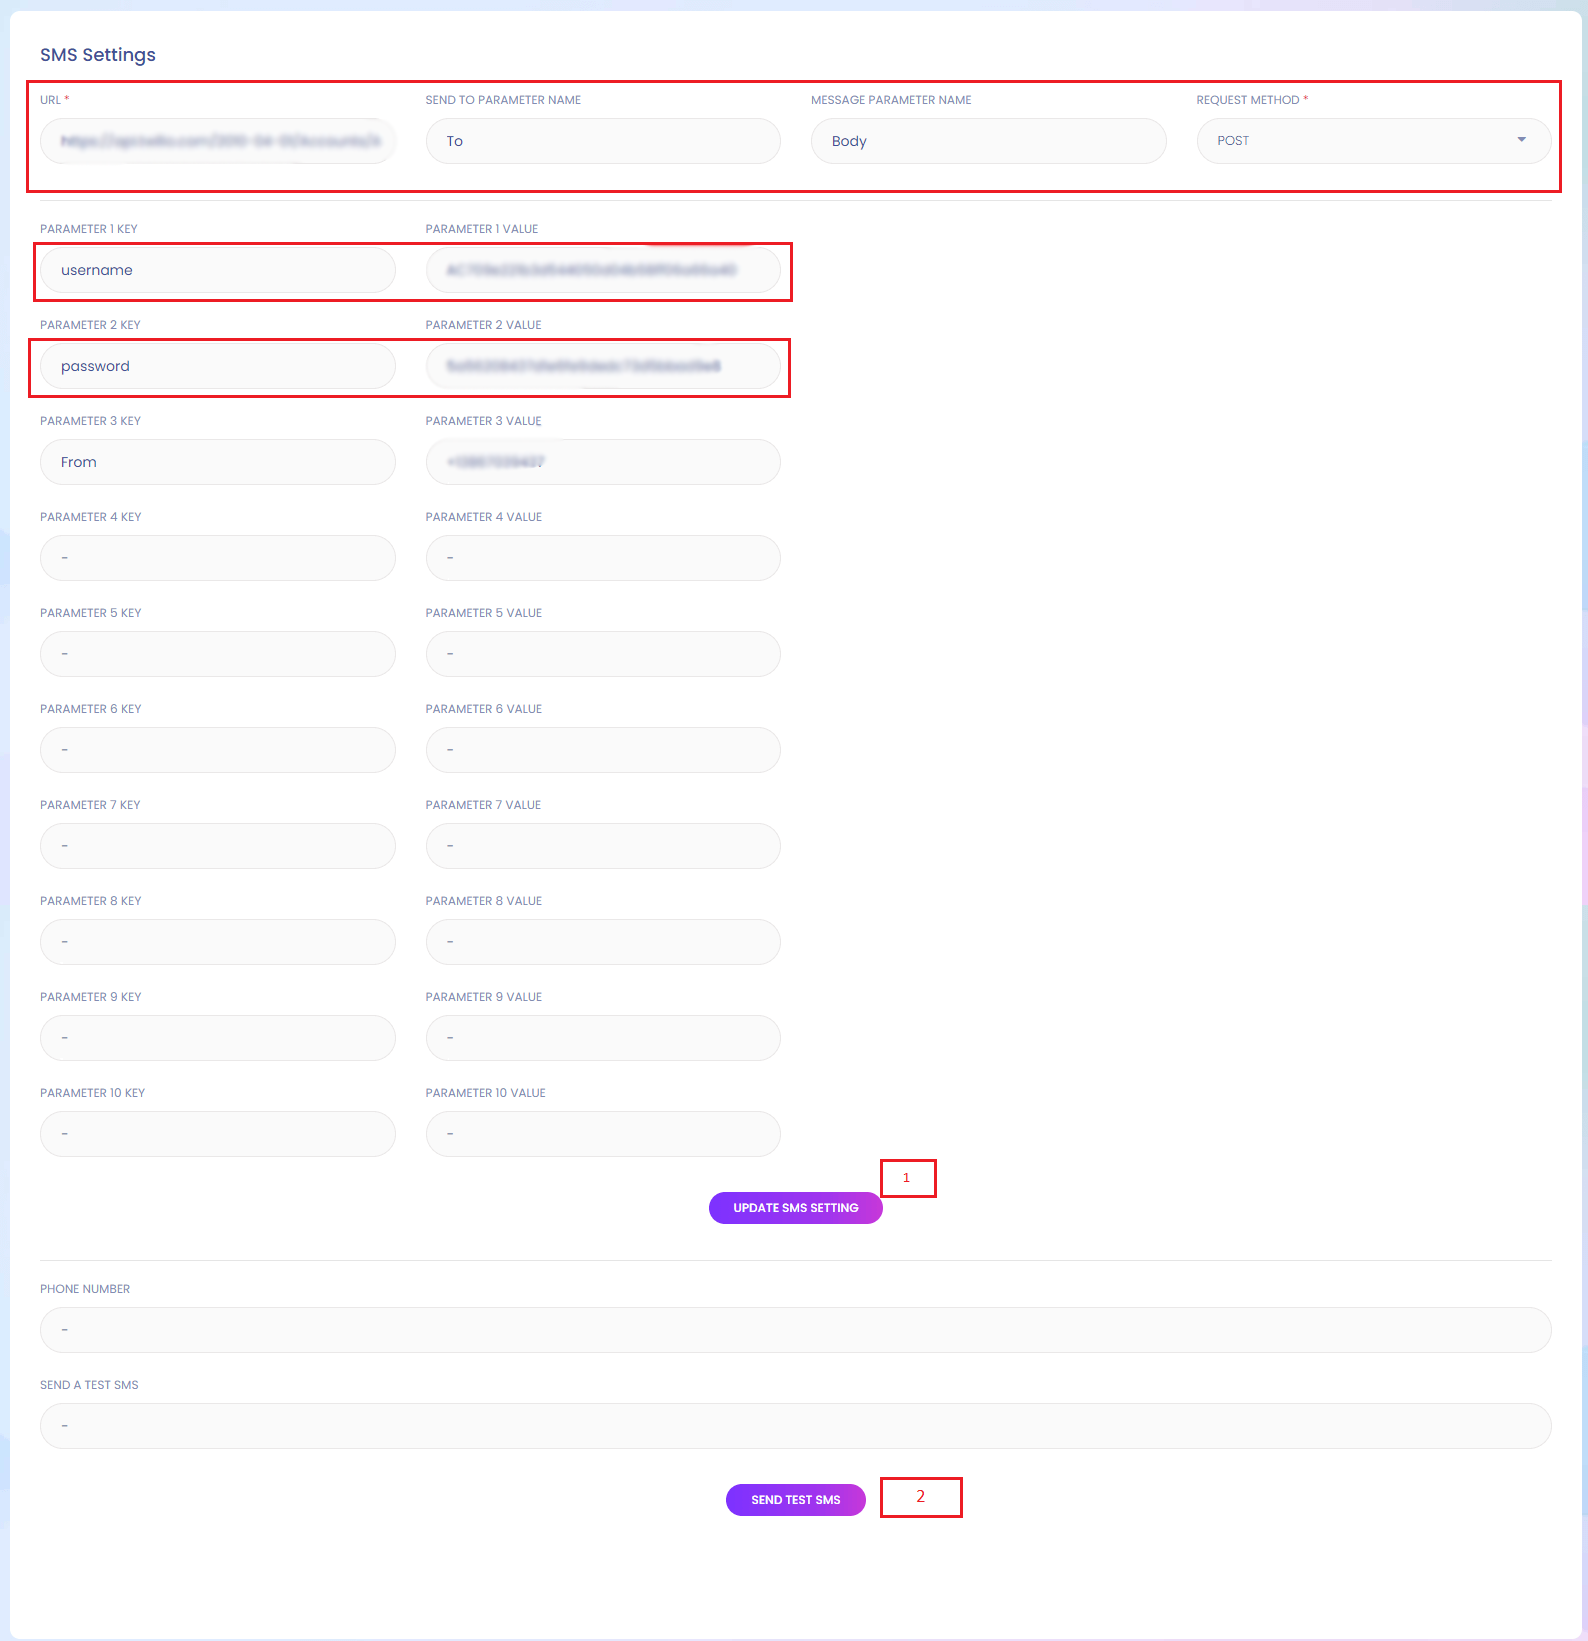
SMS Setting
For sending sms you need to setup sms setting.
In url filed set api url which is get from api.
Then set SEND TO PARAMETER NAME, MESSAGE PARAMETER NAME, REQUEST METHOD according to api.
And set other parameter according to api.
1. Save
Save the sms settings.
2. Send Test Sms
After saving the setting sms can be sent.
For Twillo:
- URL: https://api.twilio.com/2010-04-01/Accounts/{AccountSid}/Messages
- SEND TO PARAMETER NAME: To
- MESSAGE PARAMETER NAME: Body
- REQUEST METHOD: Select post method from dropdown.
- username: your AccountSid
- password: your api token
- From : your twillo number
For Nexmo:
- URL: https://rest.nexmo.com/sms/json
- from: Company Name
- SEND TO PARAMETER NAME: to
- MESSAGE PARAMETER NAME: text
- REQUEST METHOD: Select post method from dropdown.
- api_key: api key provied by nexmo
- api_secret: api secret provied by nexmo
Analytic Tools
Analytic Tools
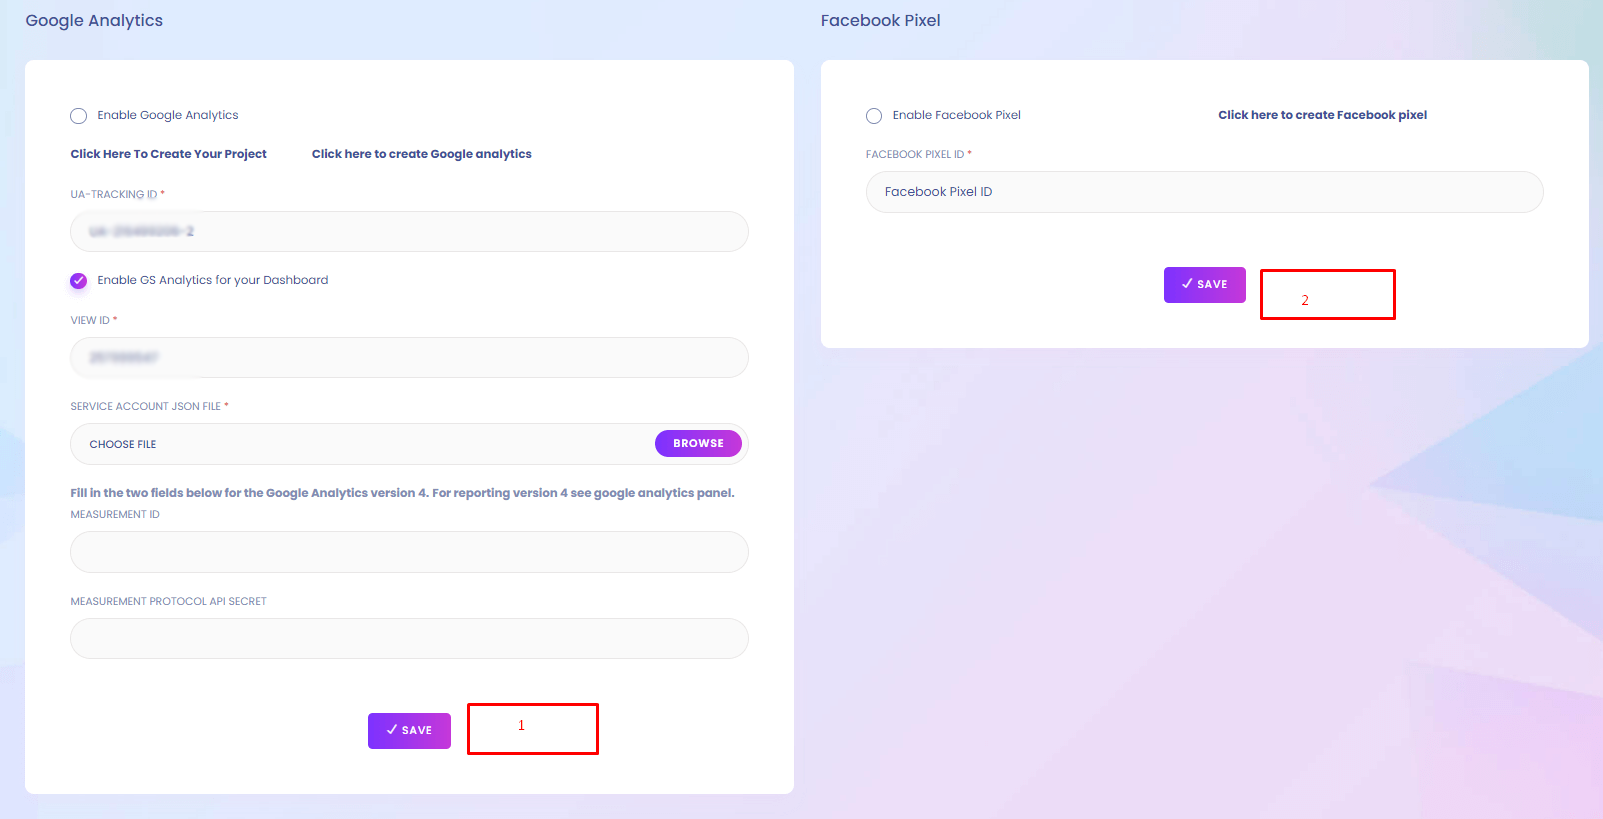
Analytic Tools
You can setup different analytic tools for the website.
1. Save
Save the analytic tools settings.
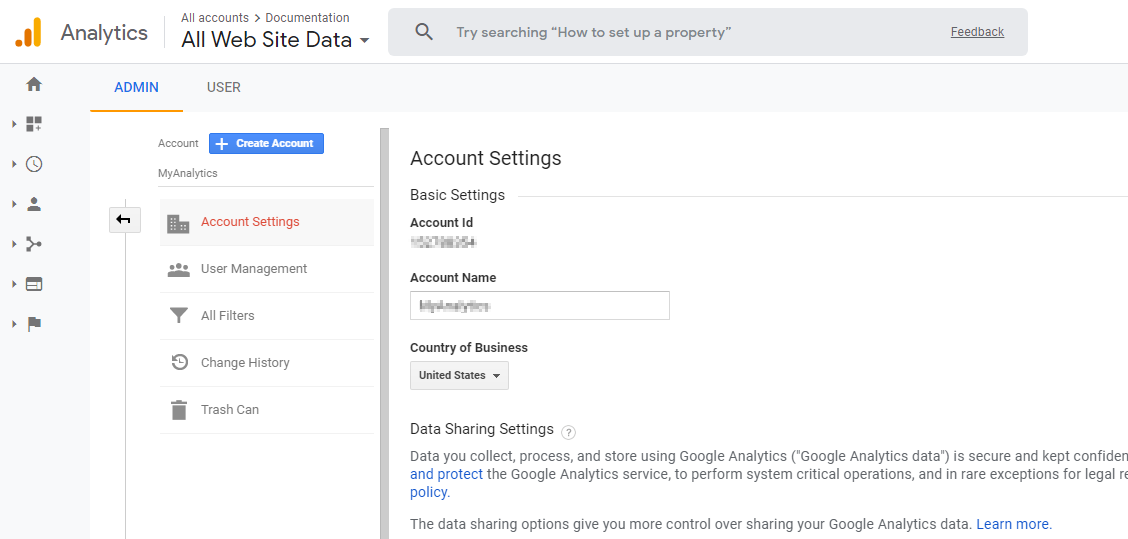
How to obtain the credentials to communicate with Google Analytics
1. You must have a Google Analytics account. To sign up, go to: http://www.google.com/analytics/
Get credential follow the steps
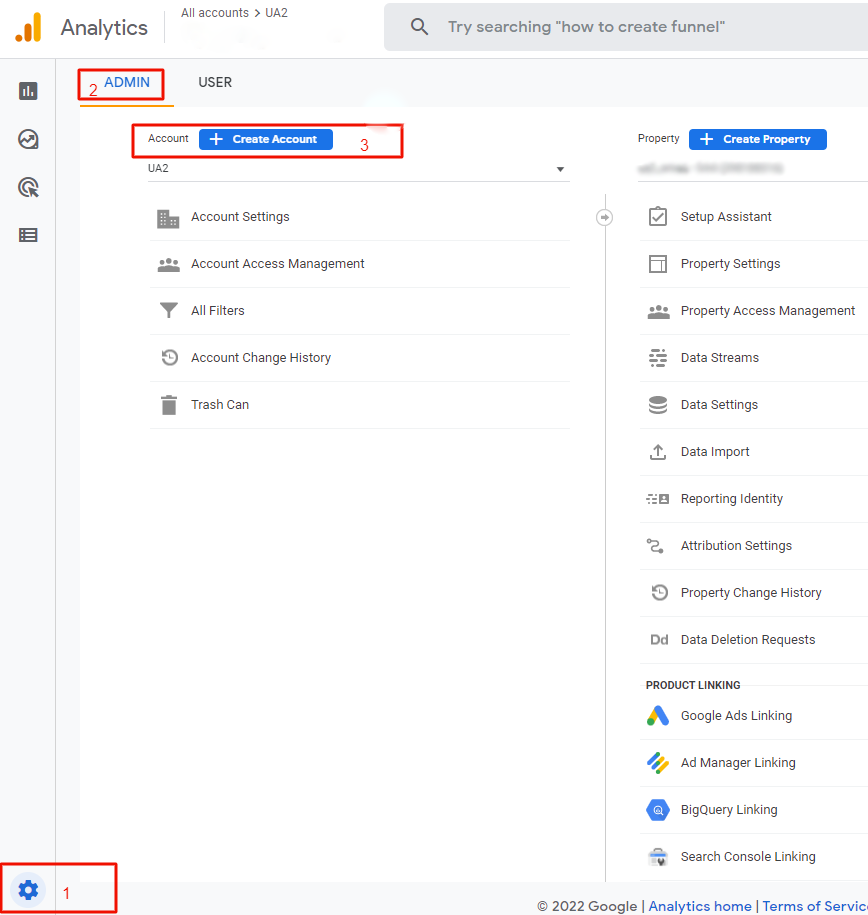
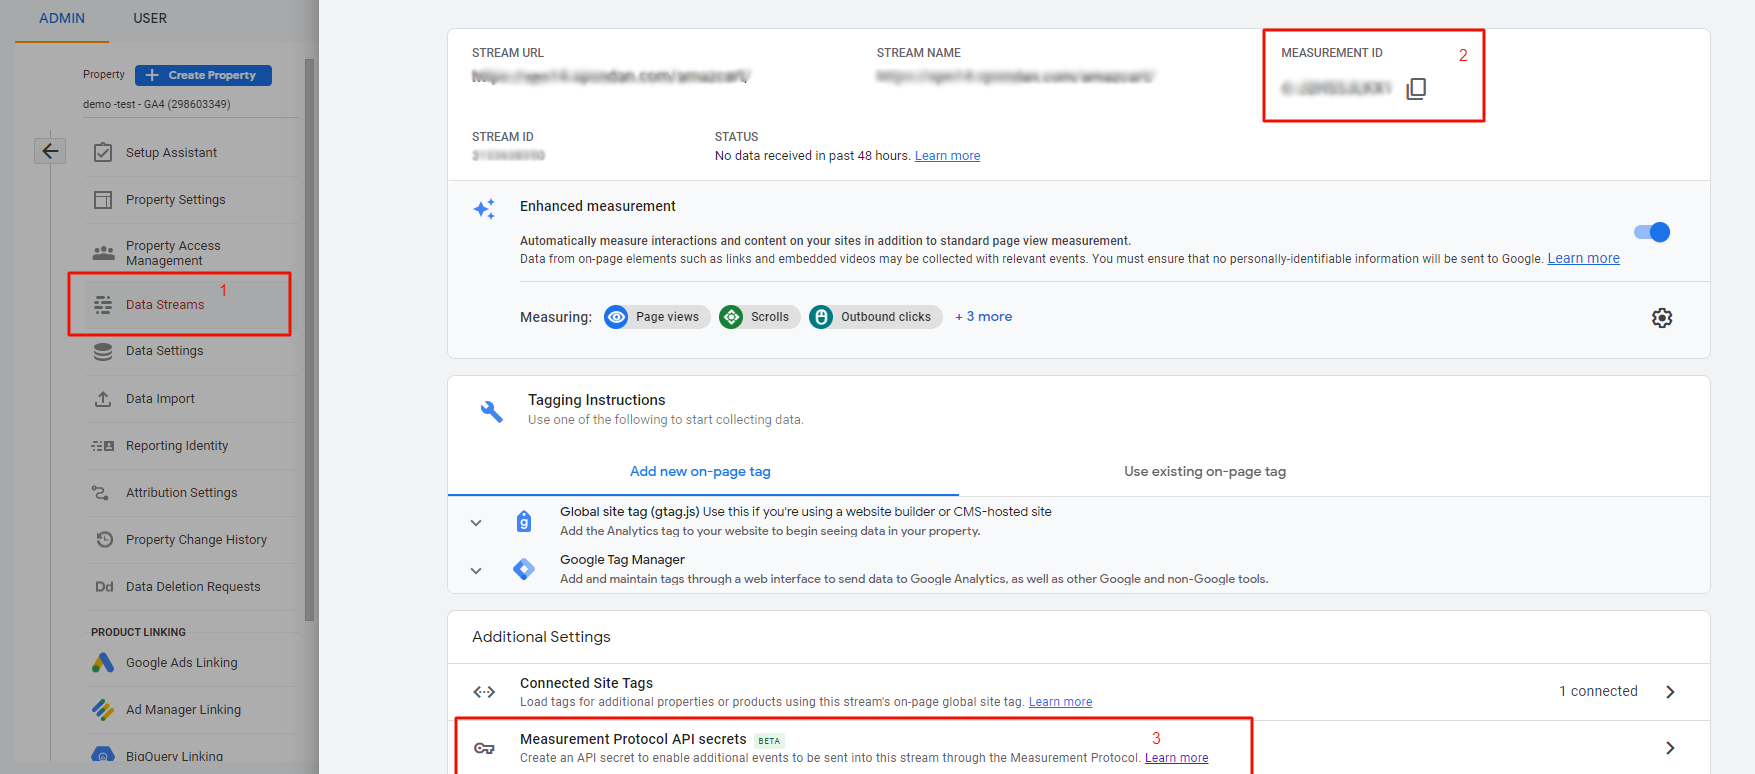
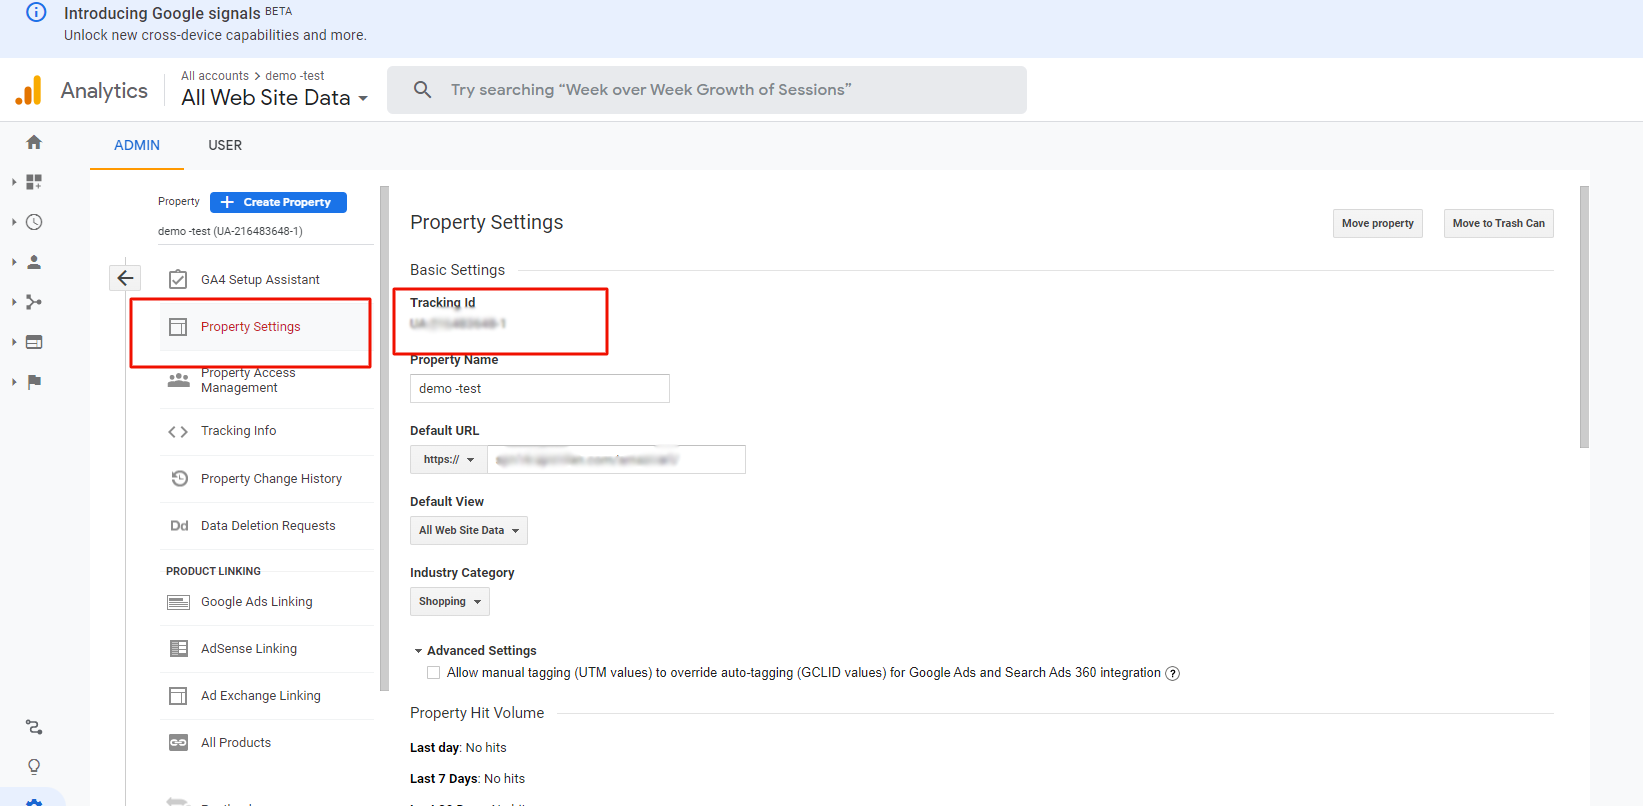
2. Setup
2.1. Developers Console project
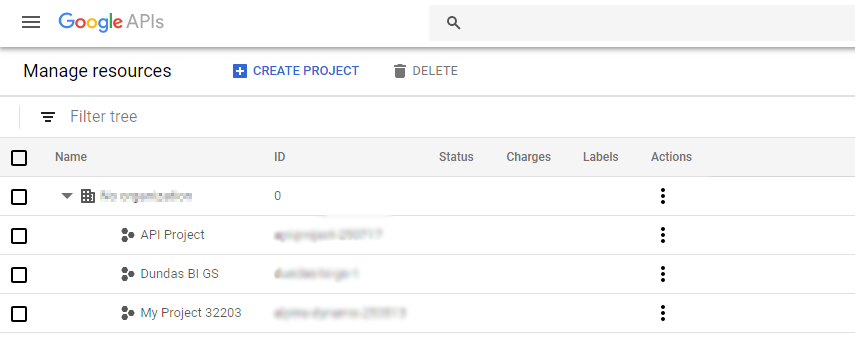
You need to create or use an existing project in the Google Developers Console as a first step.
Go to https://console.developers.google.com/project and sign into your Google/Gmail account.
Once signed in, you'll see a list of existing projects (if there are any) or you can click Create project to create a new one.
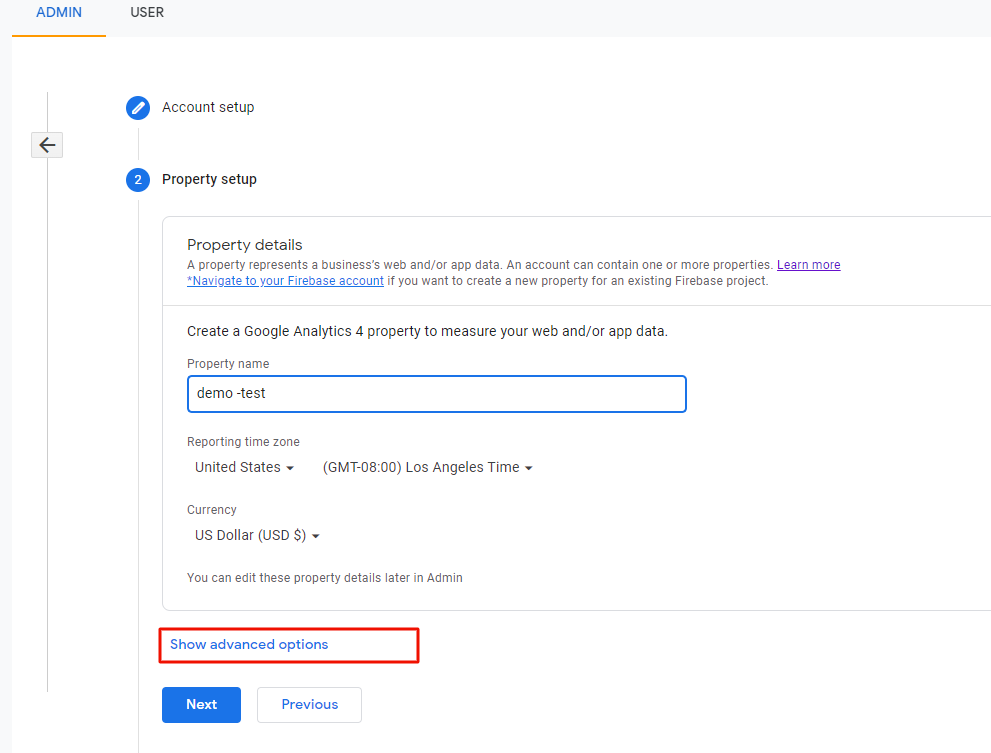
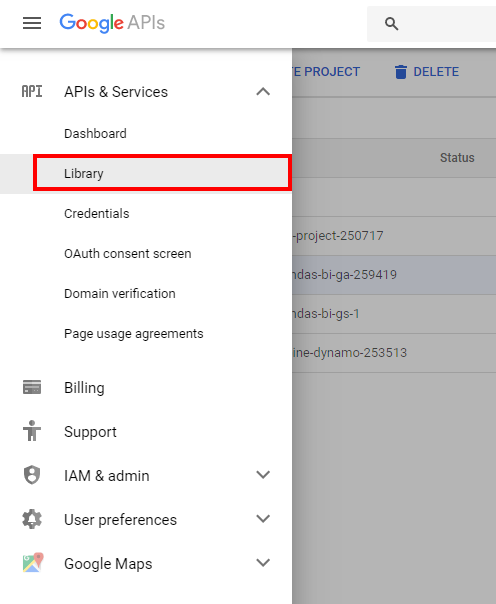
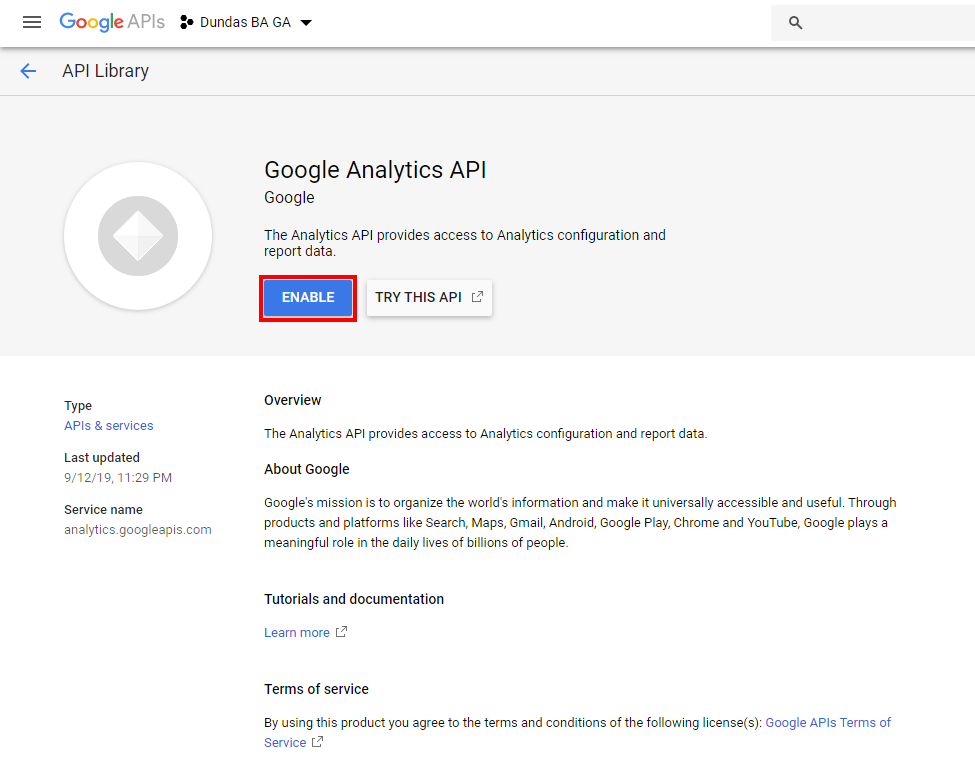
2.2. Enable the Analytics API
Then click the menu button in the top-left corner of the Developers Console, expand APIs & Services and click Library.
Ensure the correct project is selected at the top-left of the screen. Scroll down and click the Google Analytics API tile.
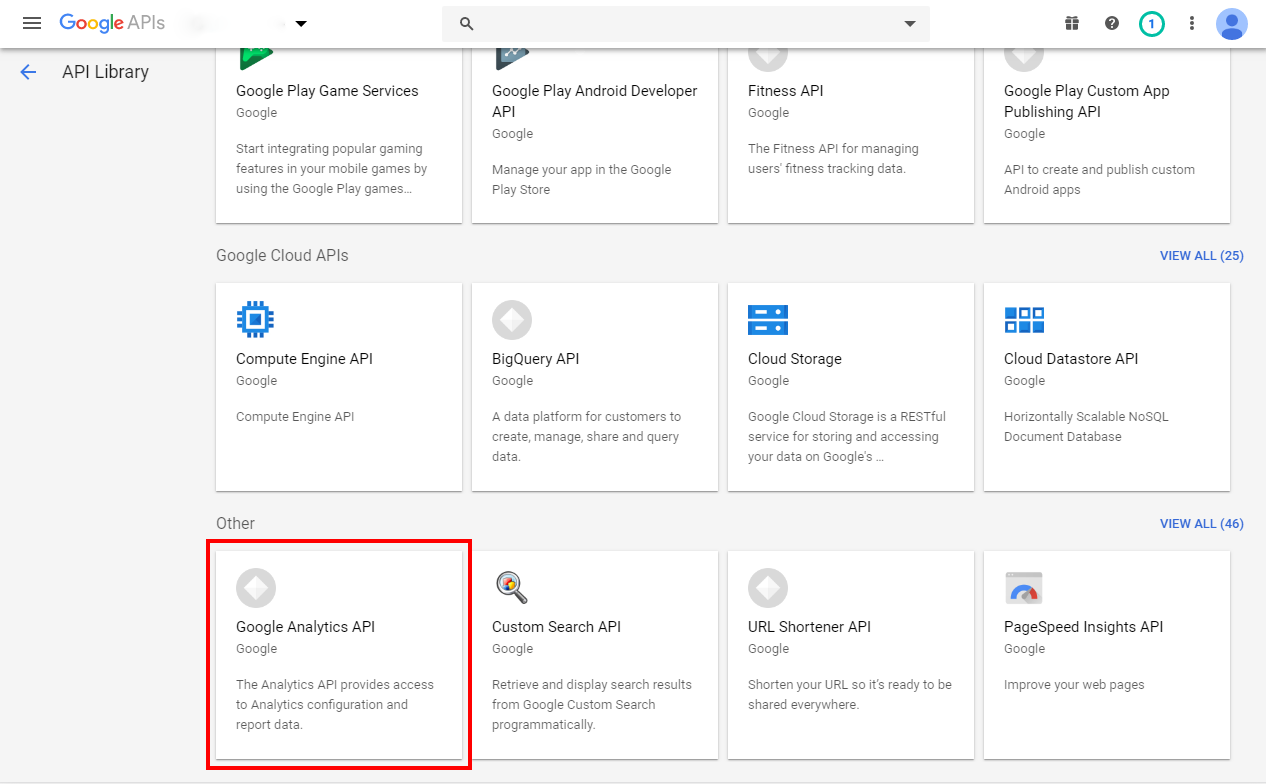
Click Enable to enable the Google Analytics API.
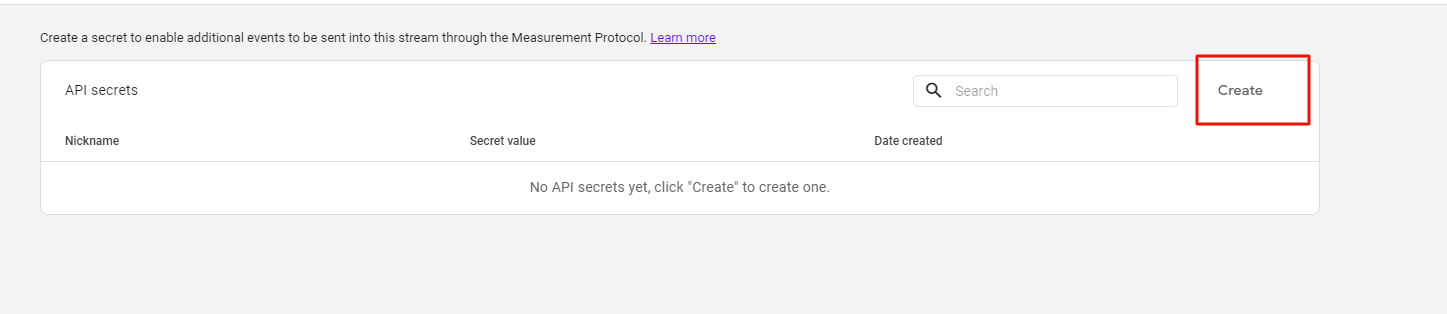
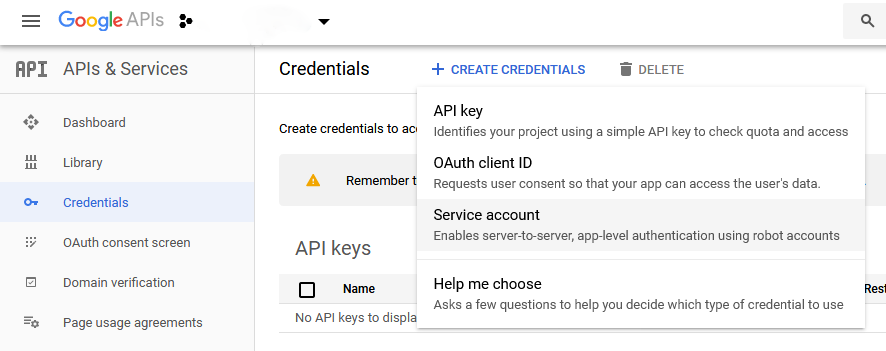
2.3. Service account credentials
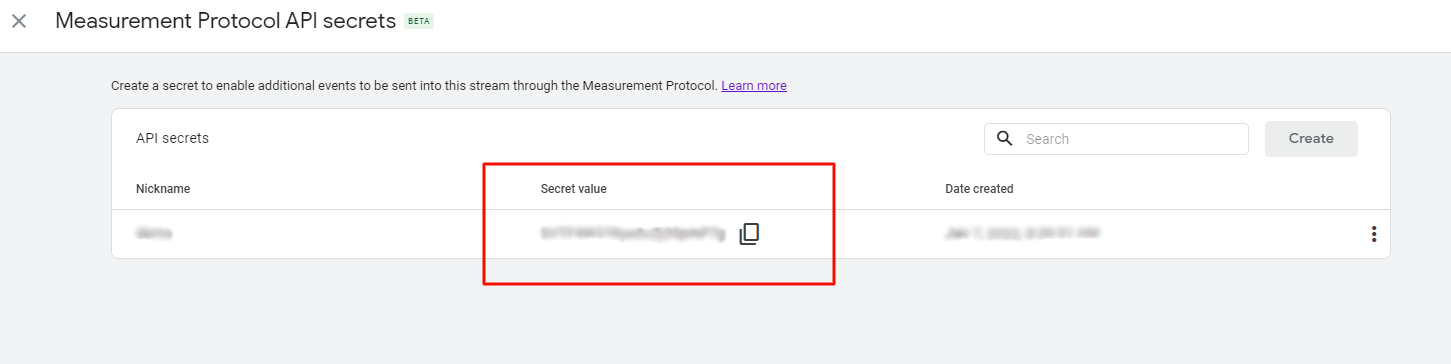
This section shows you how to generate Service account credentials which will allow to access your Google Analytics data.
From the left navigation, click Credentials. Click Create credentials and select the Service account option.
Enter a name and a role for the account.
Enter a name and a role for the account.
When done, record the service account email address. Copy this from the account details and paste it somewhere to refer to later such as a Notepad app on your computer.
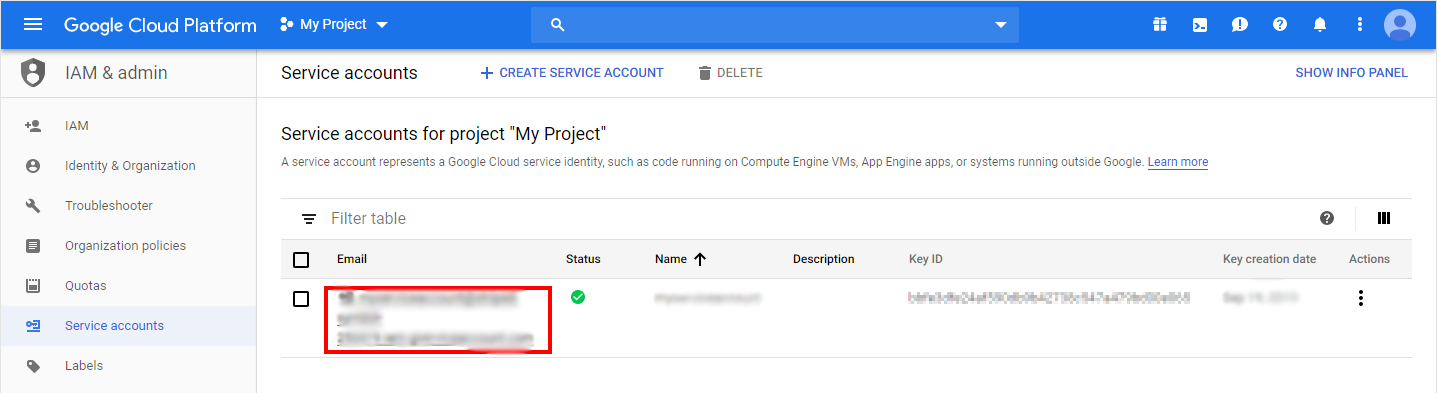
Next, add a new key for the service account. For example, click to edit the service account and click Add Key. Choose a JSON key type.
When finished, a certificate file should be downloaded.
2.4. Authorization
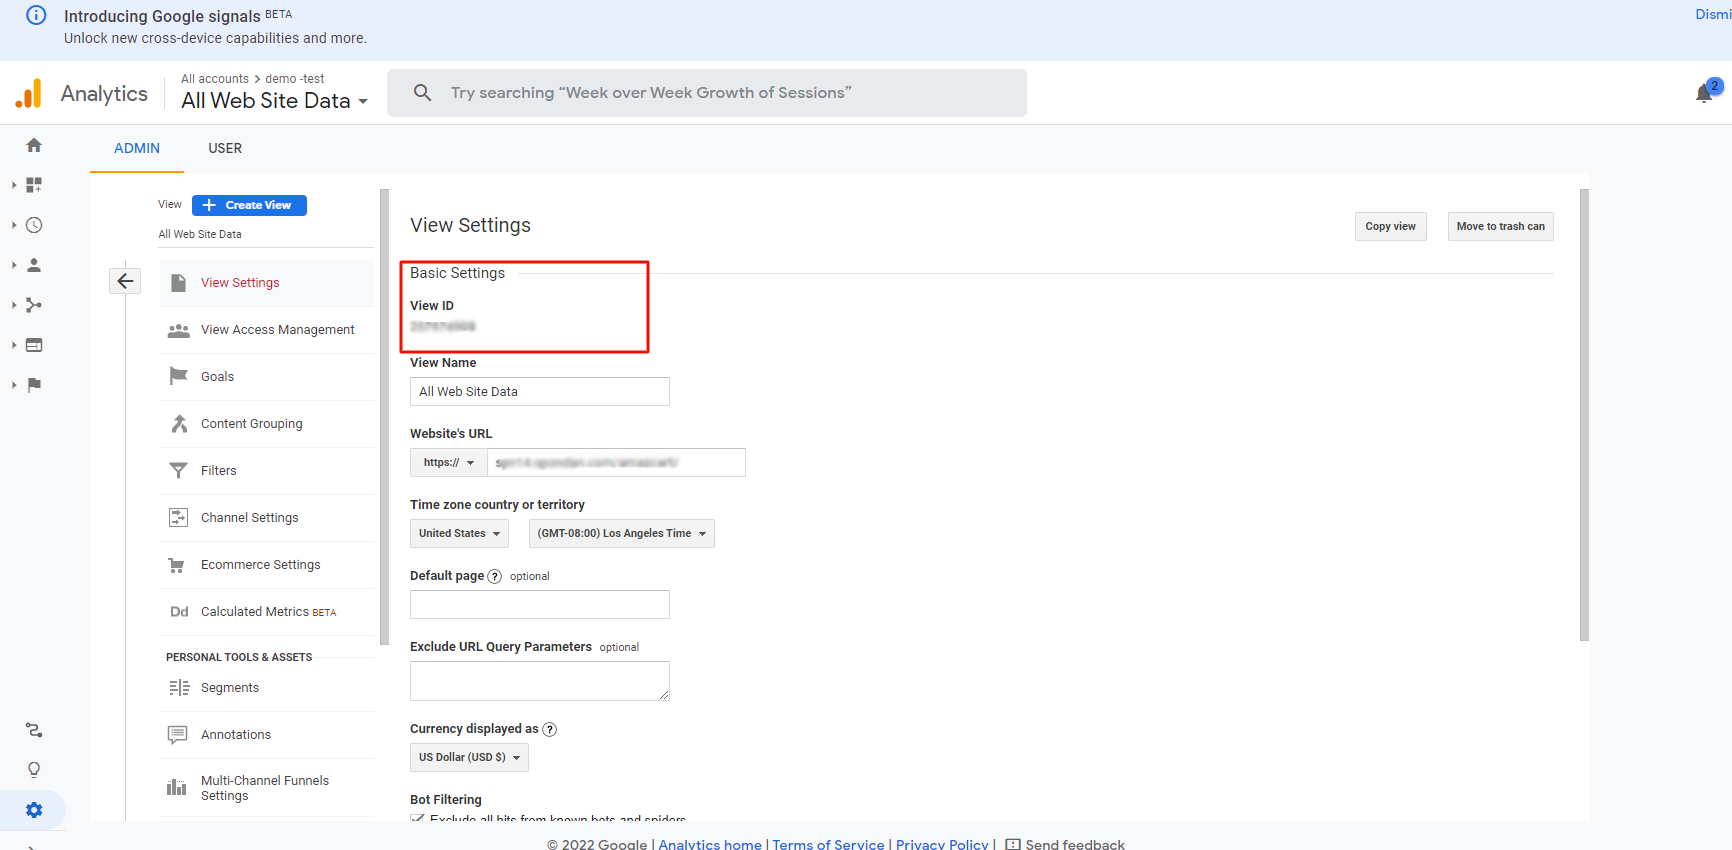
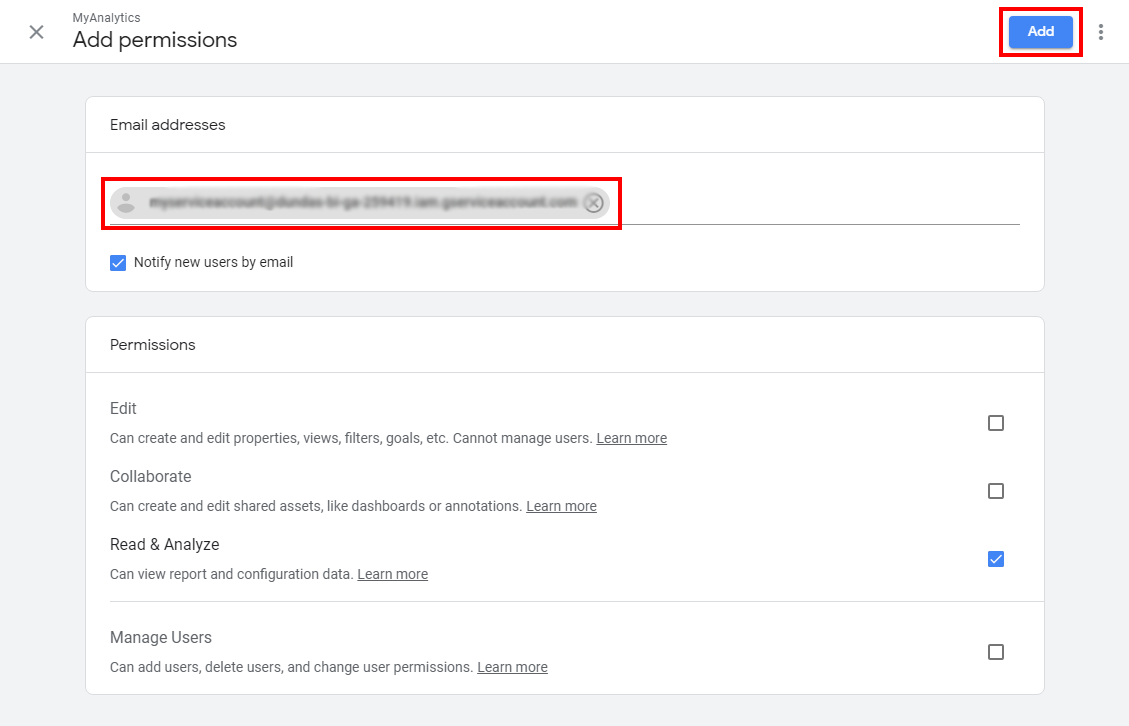
Now that the client credentials have been generated, sign into your Google Analytics account in order to give authorization to these credentials.
Go to the Admin area and click User Management.
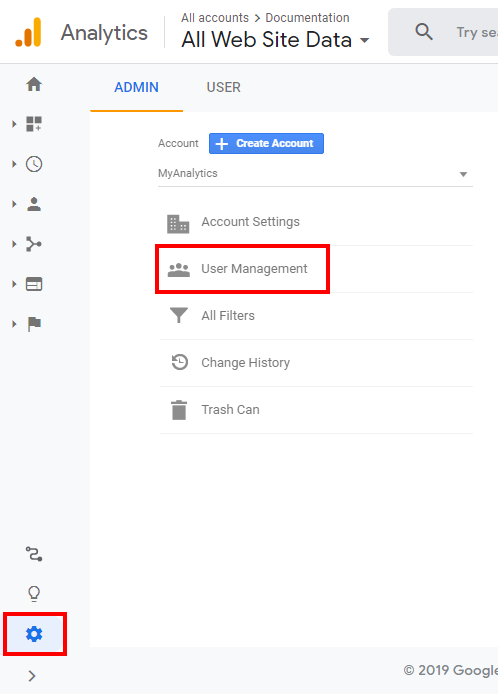
In the Add permissions box, enter or paste the service account email address that you recorded earlier. Then click Add.
Activation
Activation
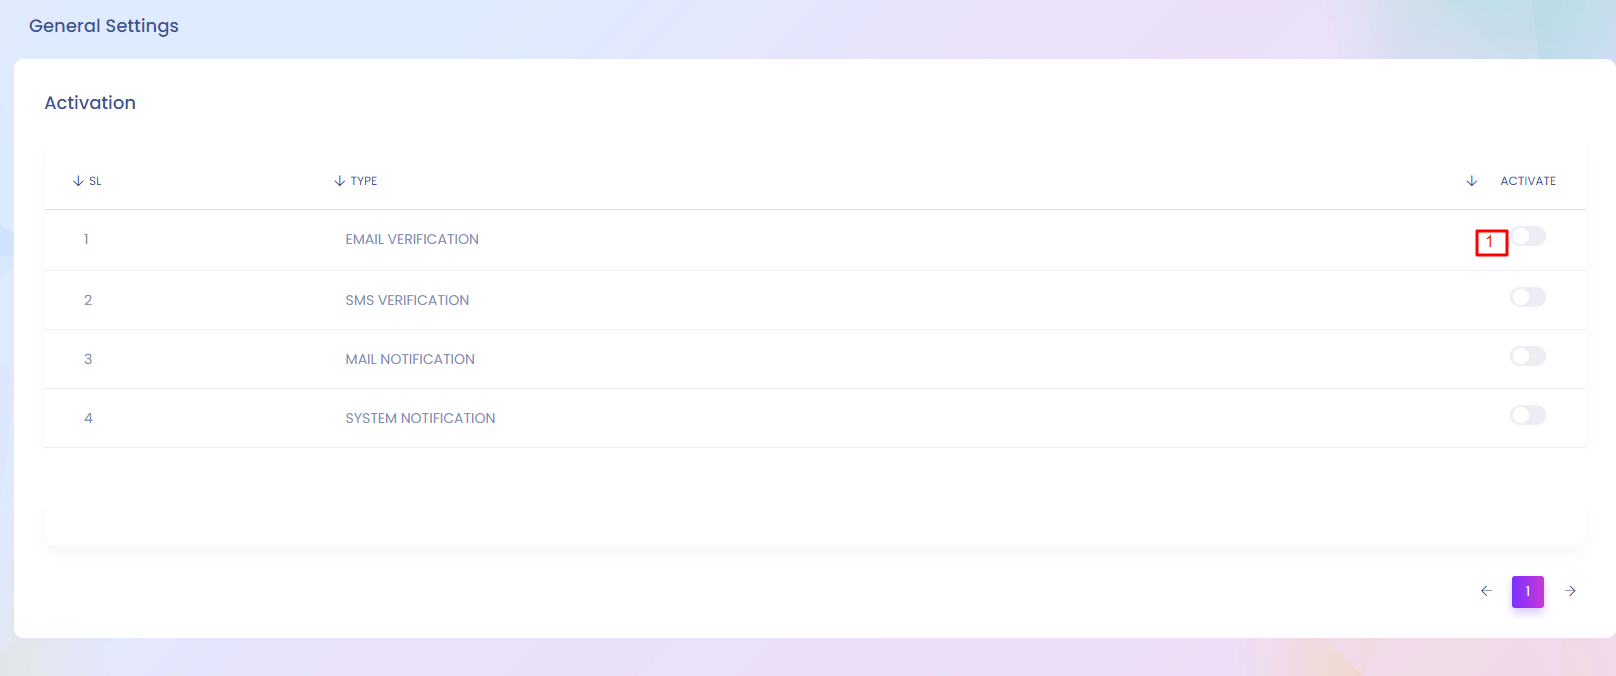
Activation
You can activate and deactive different functionalities from here.
1. Activate
Admin can activate and deactivate many settings.
Notification Setting
Notification Setting
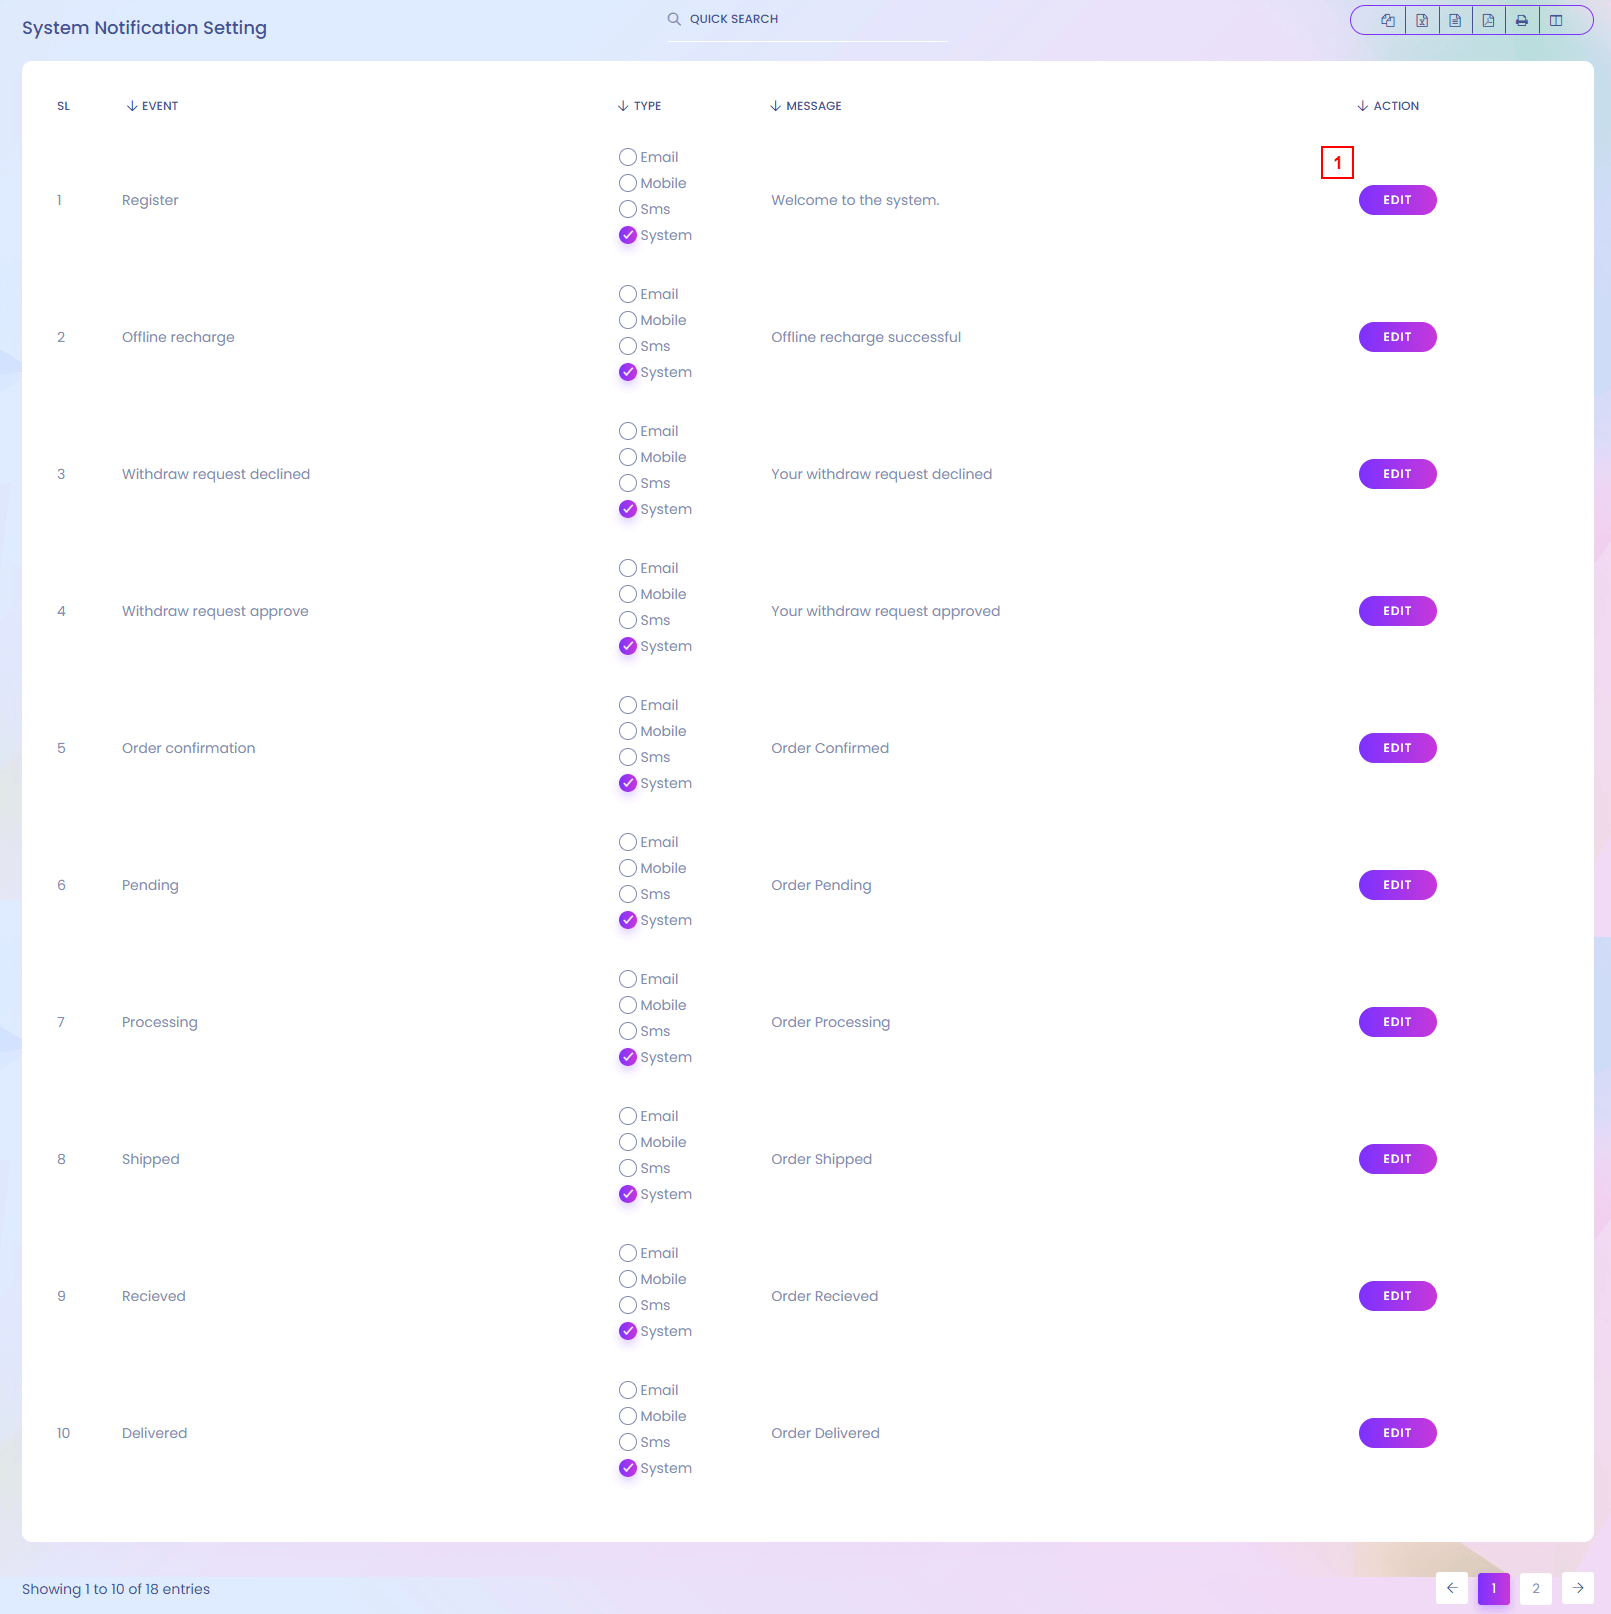
Notification Setting
You can defined how the notification will send from the system.
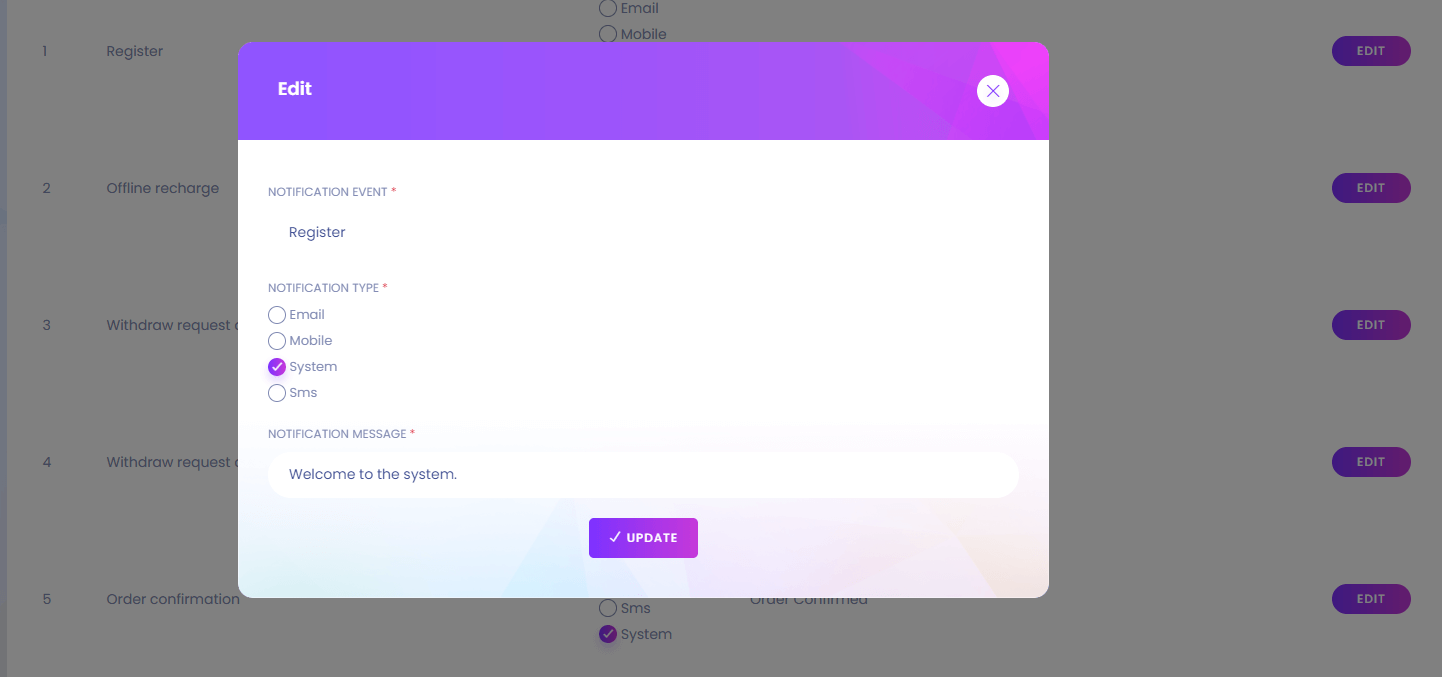
1. Edit
You can edit notification message and type.
Notification Setting Edit
Social Login Configuration
Social Login Configuration

Social Login Configuration
User can login to the system using social site. You have to configure the api key from here.
Maintenance Mode
Maintenance Mode
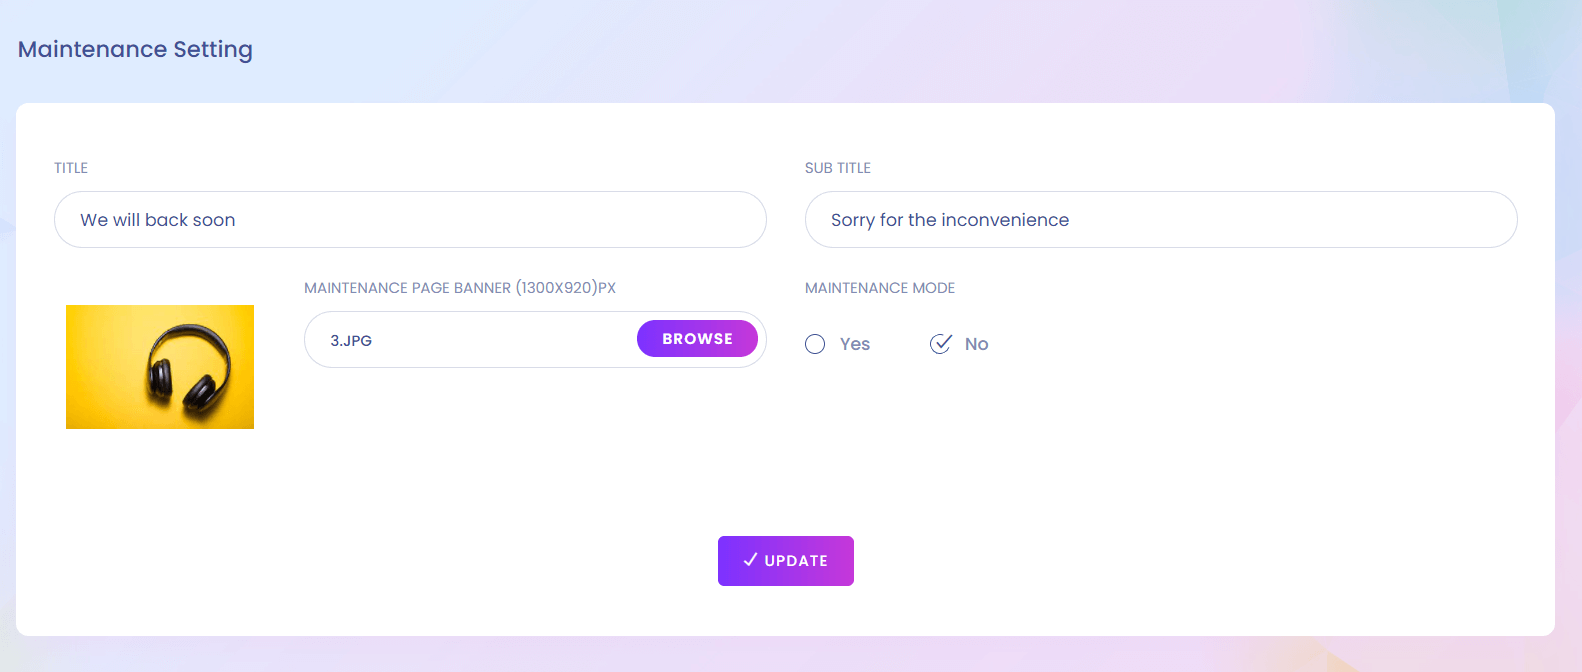
Maintenance Mode
In maintenance mode users cannot access to the system. You can go the maintenance mode according to your necessary
About & Update
About & Update

About & Update
You can update the system from here.
Module Manage
Module Manage

Module Manage
You can add, buy, update different types of module.
1. Add
Add or update module.
2. Buy now
Buy new module.
Homepage SEO Setup
Homepage SEO Setup
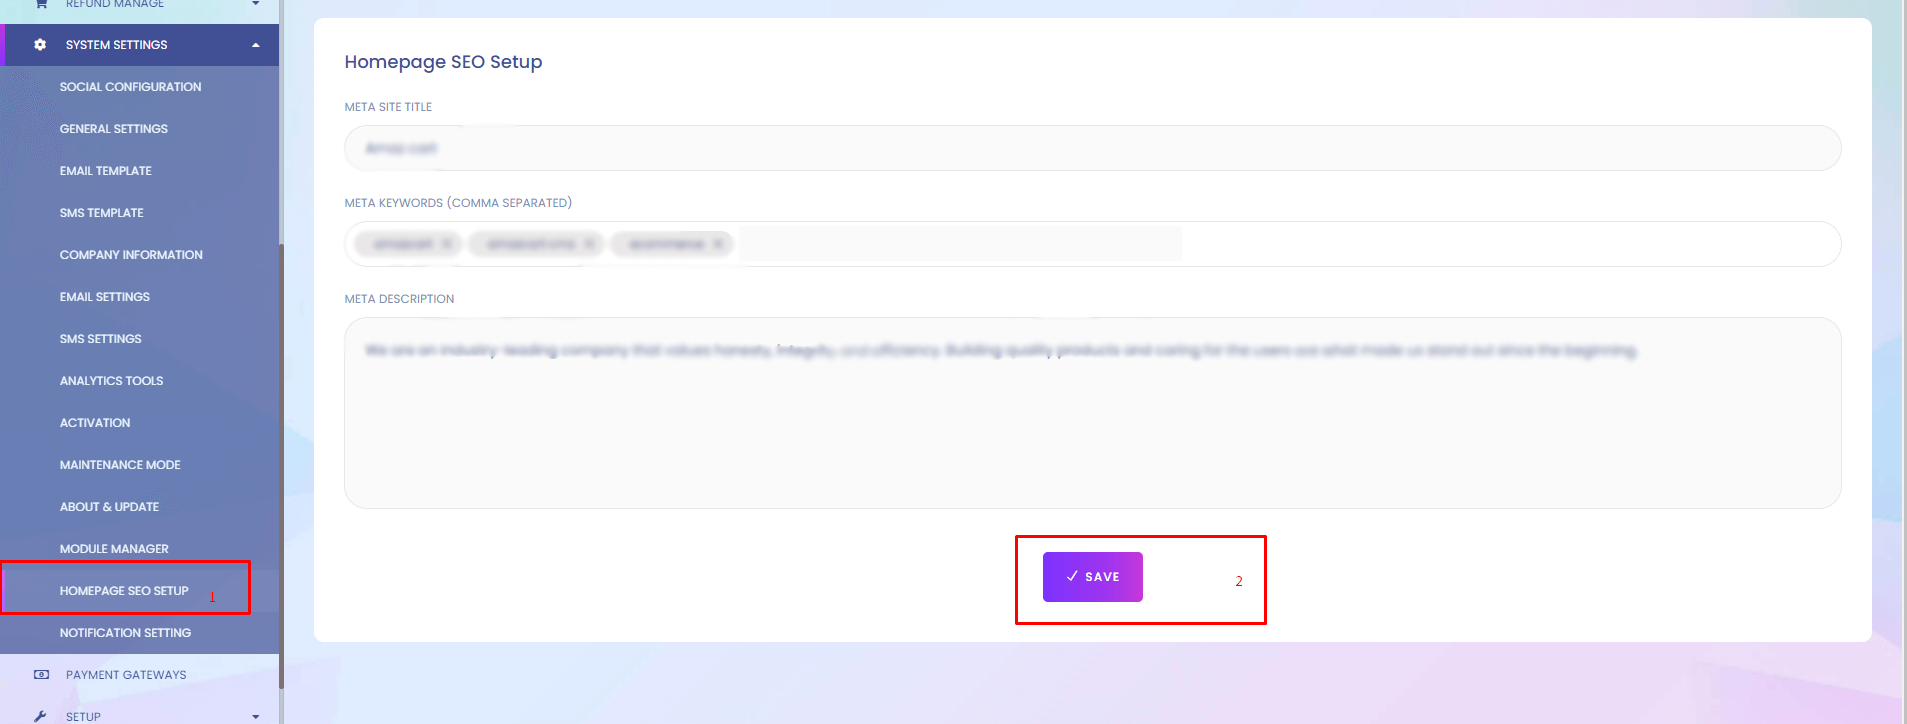
Homepage SEO Setup
This is use for frontend homepage seo meta data.
2. Goto section
Goto the section. This is under general setting.
2. Update
Fill up the meta data & update
Payment Gateways
Payment Gateways
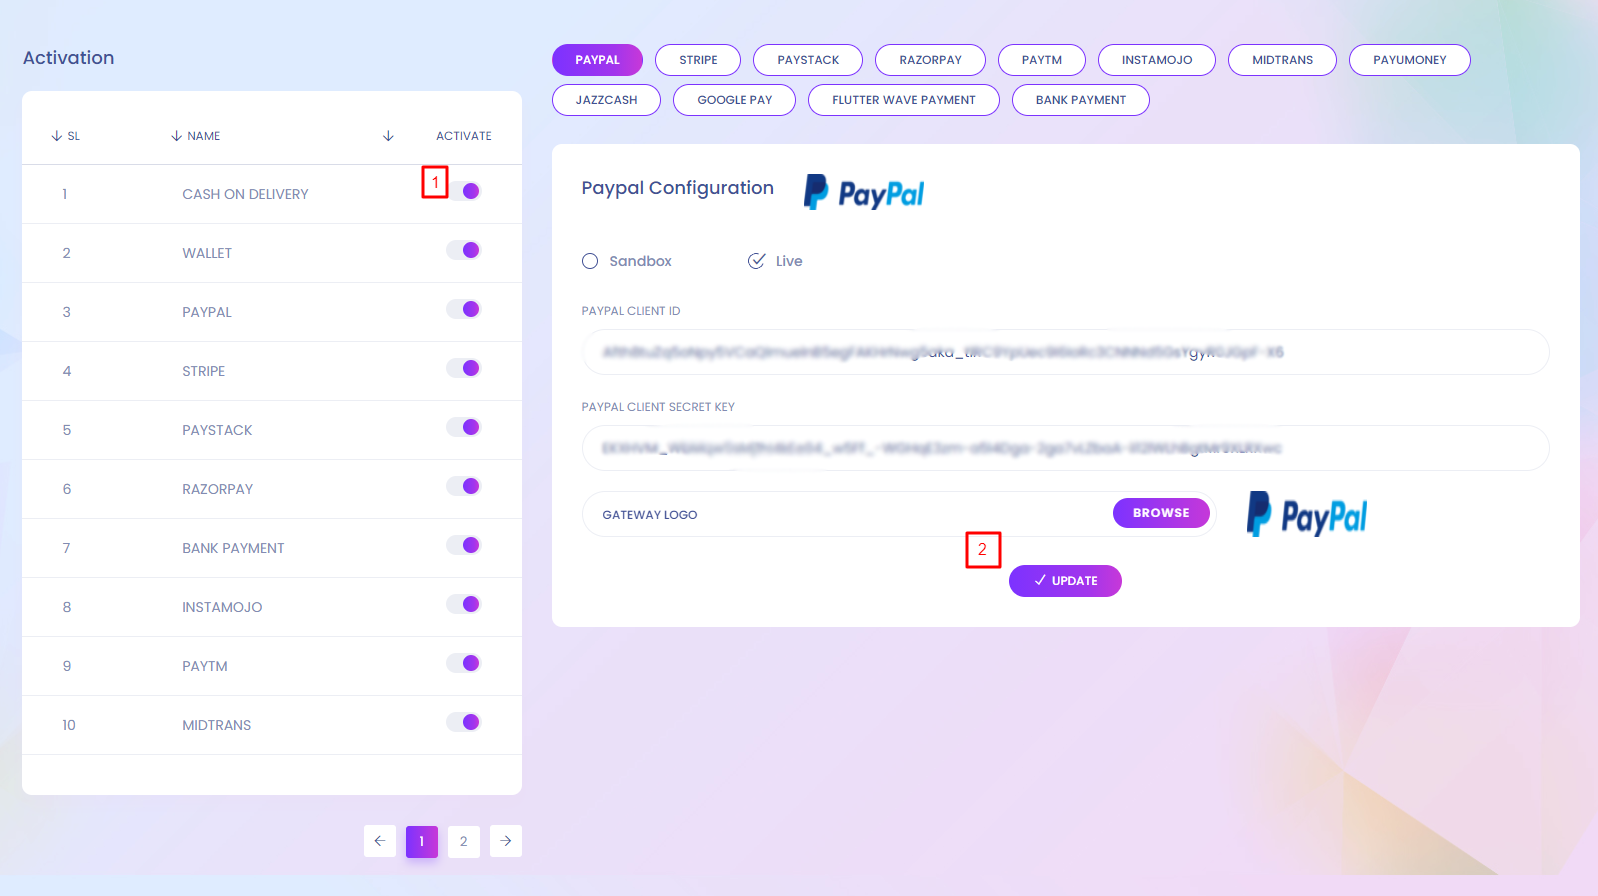
Payment Gateways
User can pay using different payment gateways. You can setup payment gateways here.
1. Activation
Admin can change the activation. If any gateway is active it will show in the side panel where payment gateways information can be updated. It will also show in the website for the users to pay through this gateway.
2. Update
Give necessary details of payment method and update it.
3. For Instamojo payment gateway:
Sandbox URL: https://test.instamojo.com/api/1.1/
Live URL: https://www.instamojo.com/api/1.1/
Payment Gateways Website View

Language Settings
Language Settings
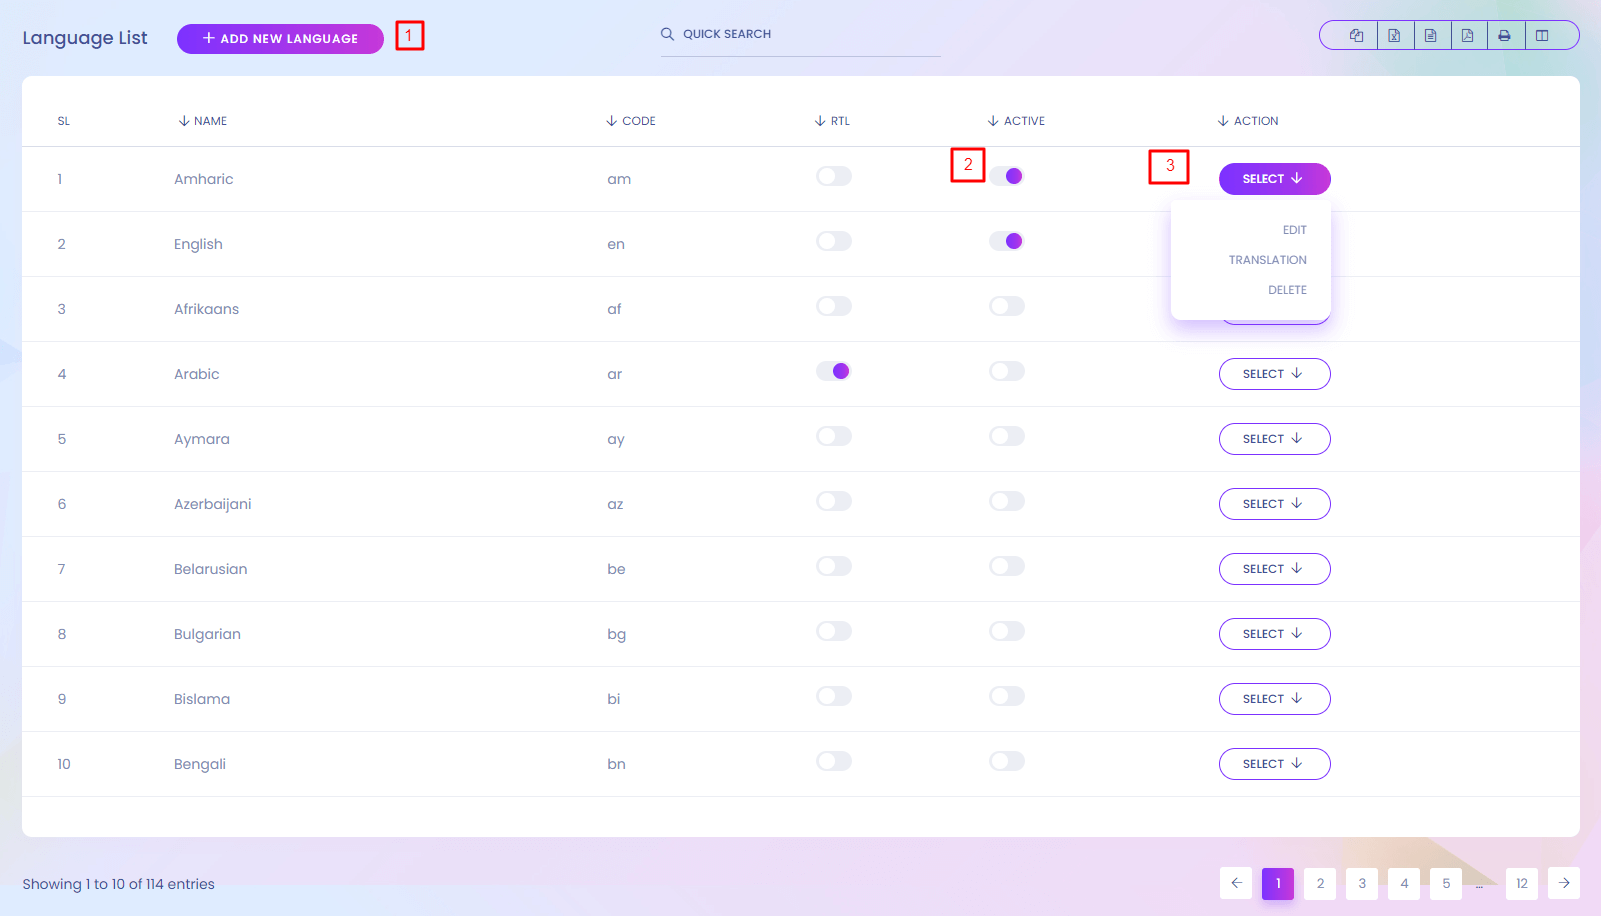
Language Setting
Setup the languages for the website. User can change the lauguage.
1. Add New Language
Admin can create new language.
2. Activate
Admin can activate and deactivate any language.
3. Action
Admin can edit, delete any language. Language translation can be added from here.
Language (Create)
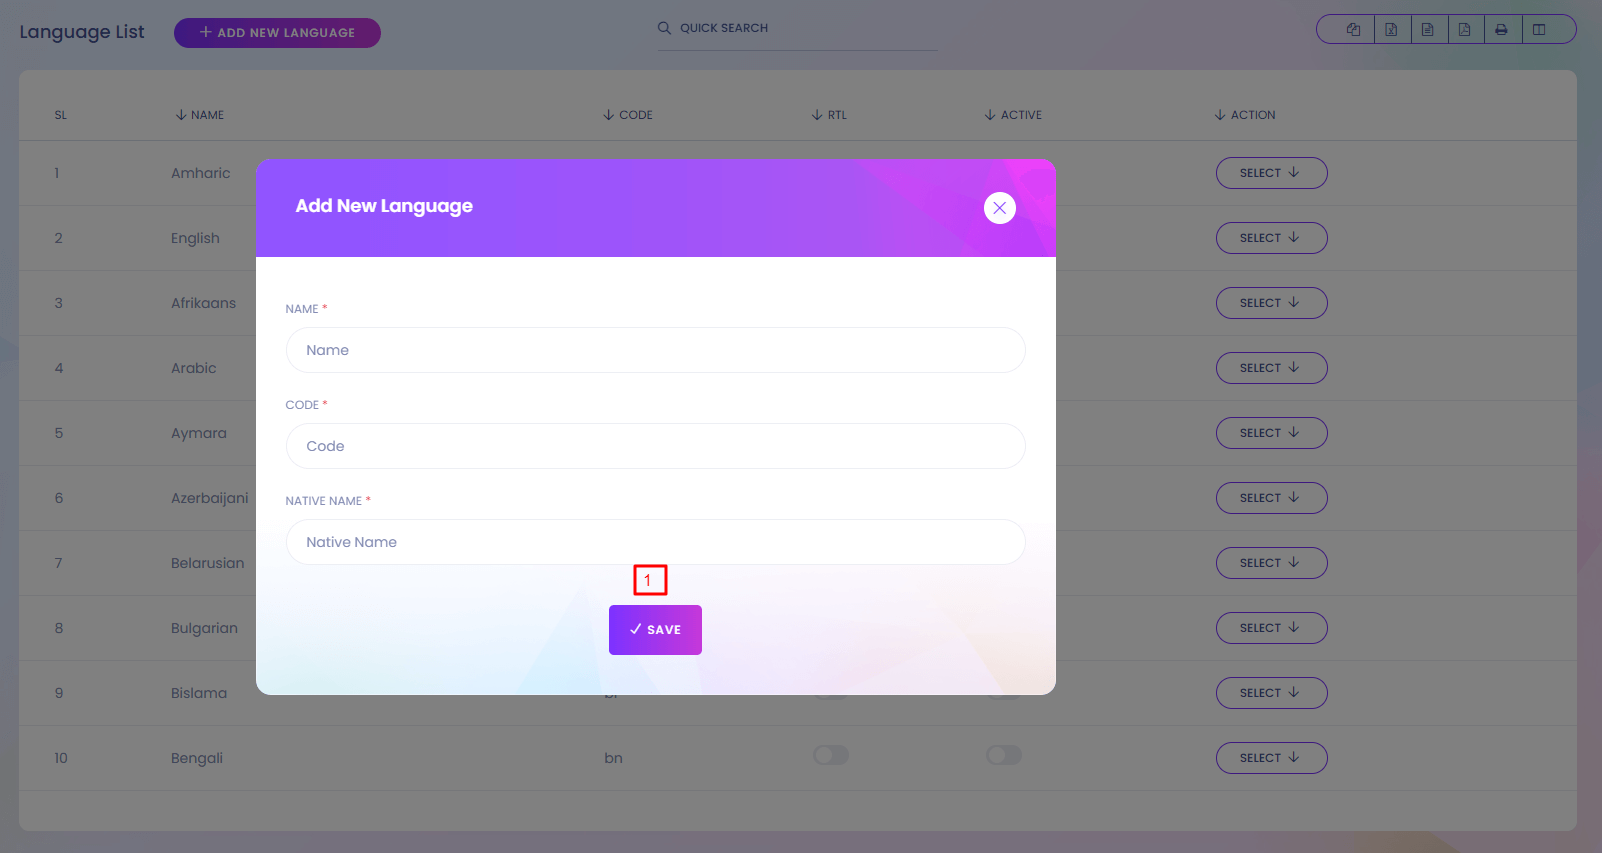
1. Save
Save the language.
Language (Translation)
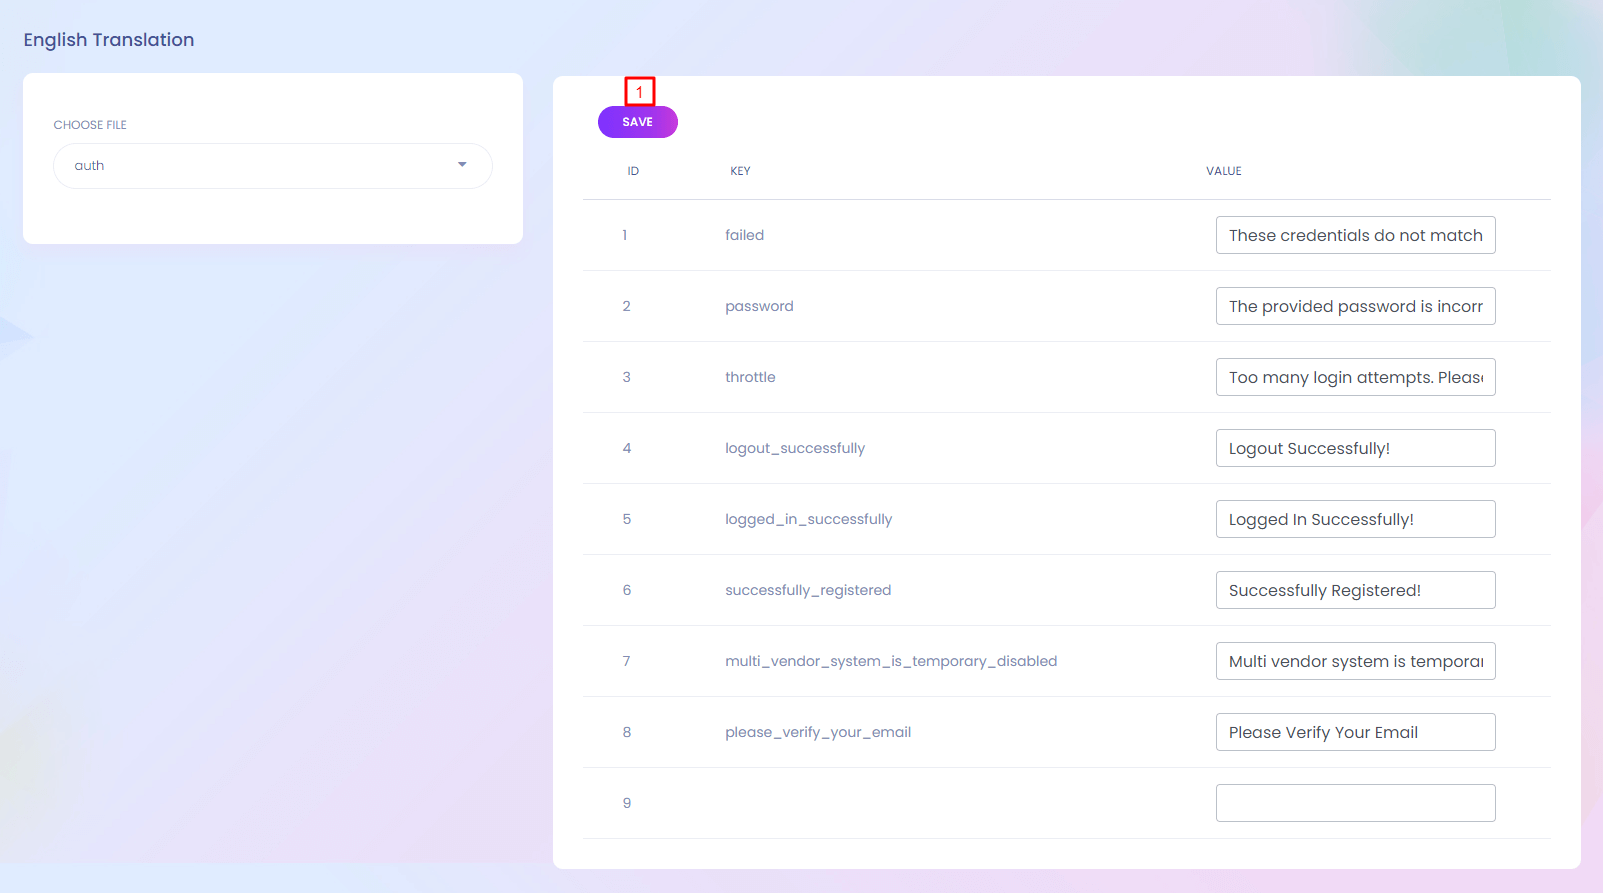
1. Save
Save the language translation.
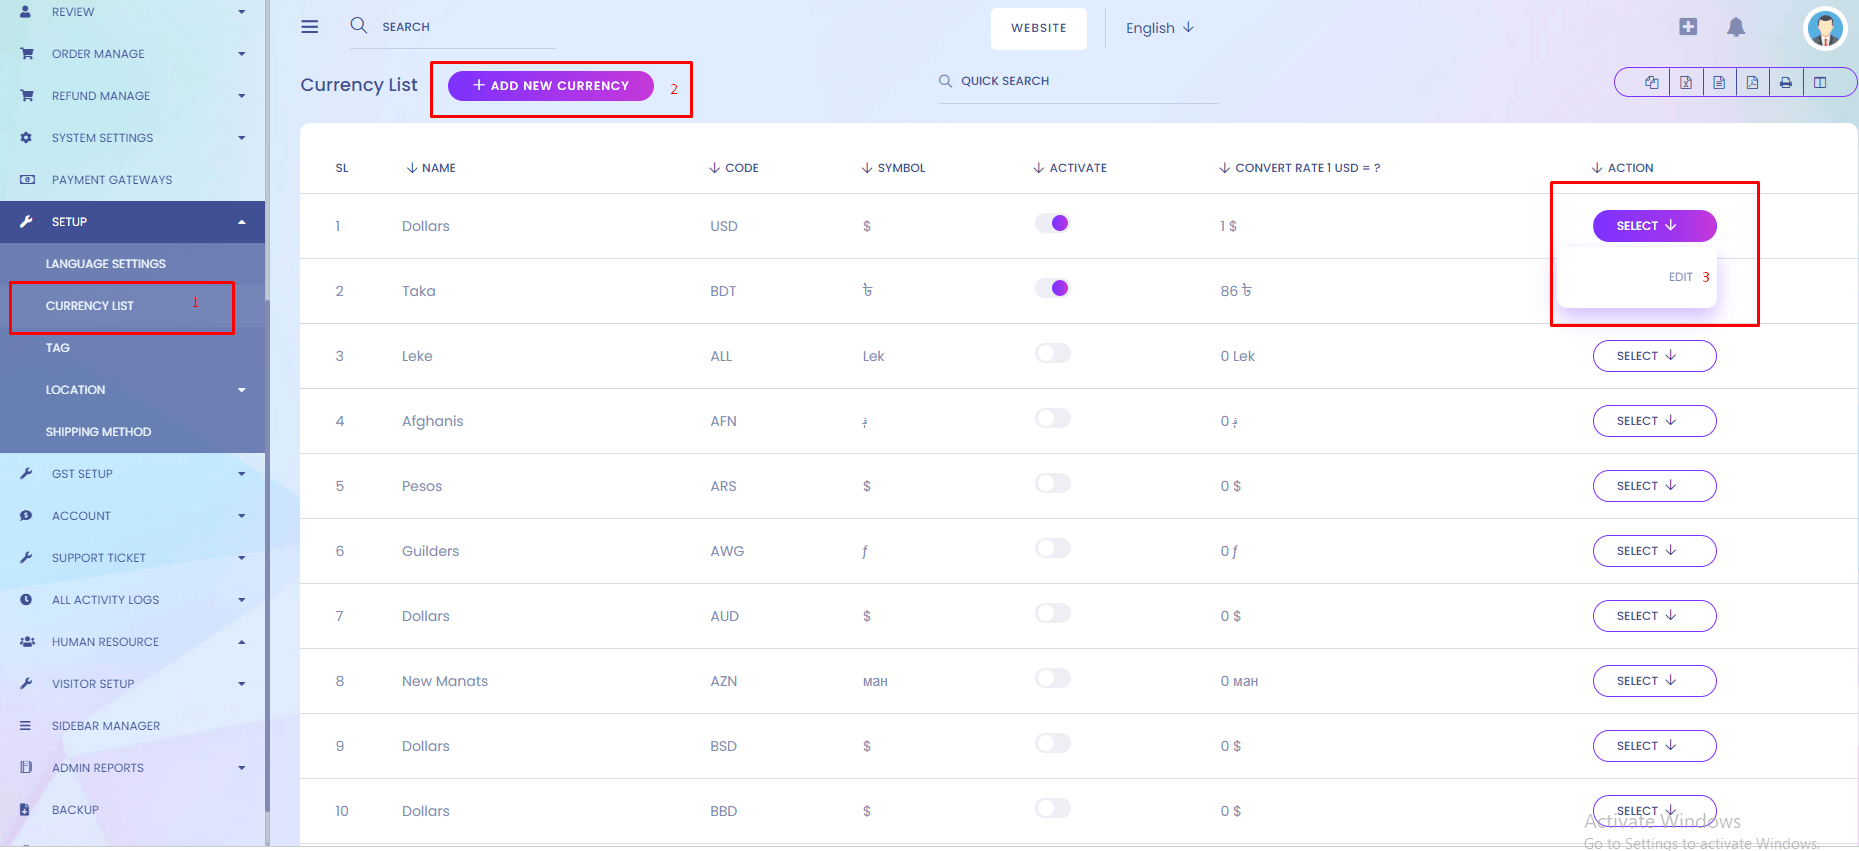
Currency List
Currency List
Currency
You can setup the currency for the website. User can change currency. First Setup Default Currency From System Setting.
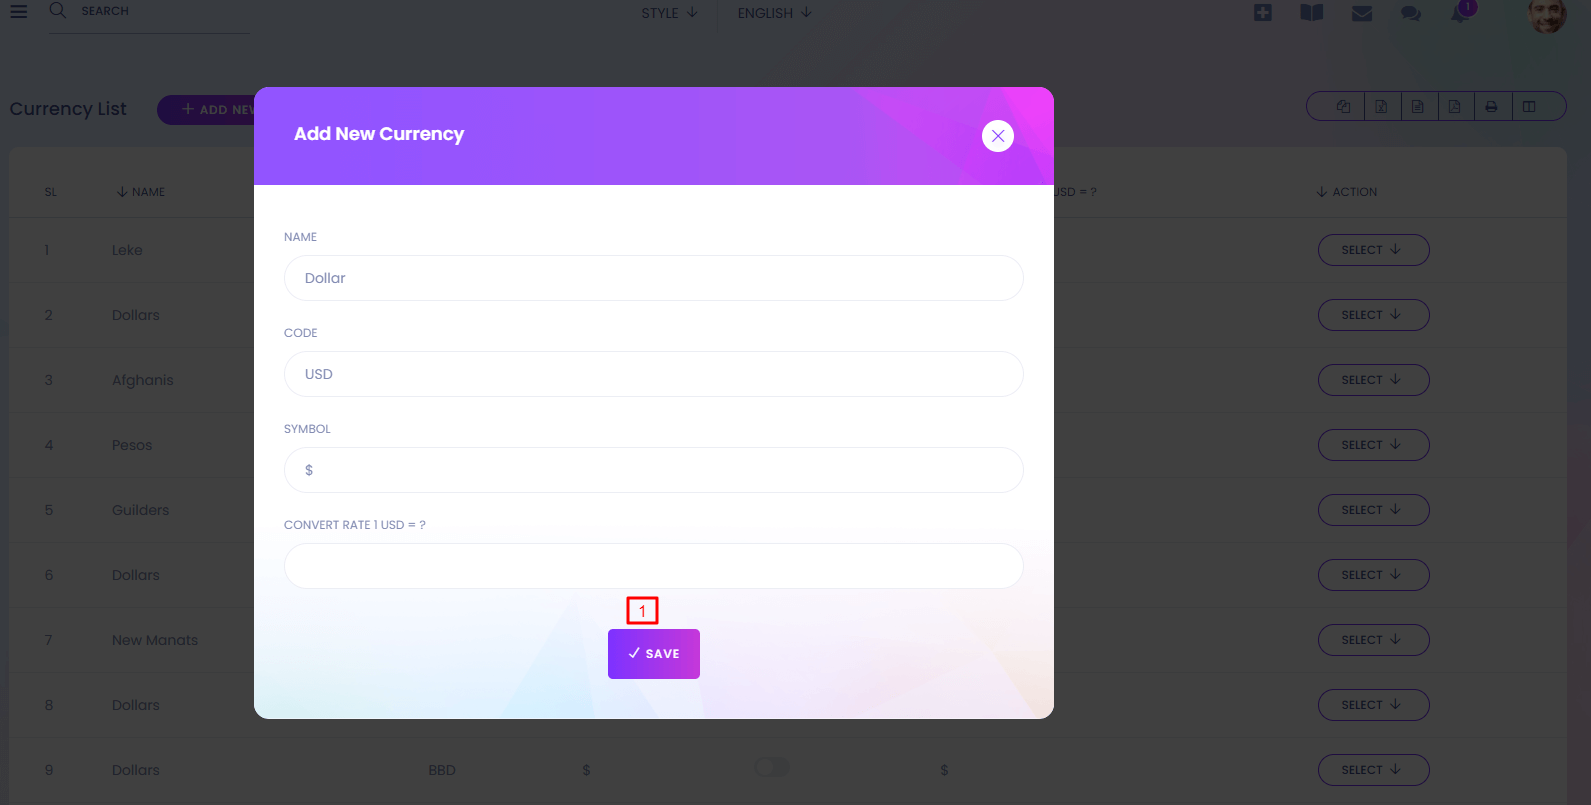
1. Add New Currency
Admin can create new currency for the system.
2. Action
Currency can be edited from here.
Setup Default Currency Rate
Setup default currency rate always 1.
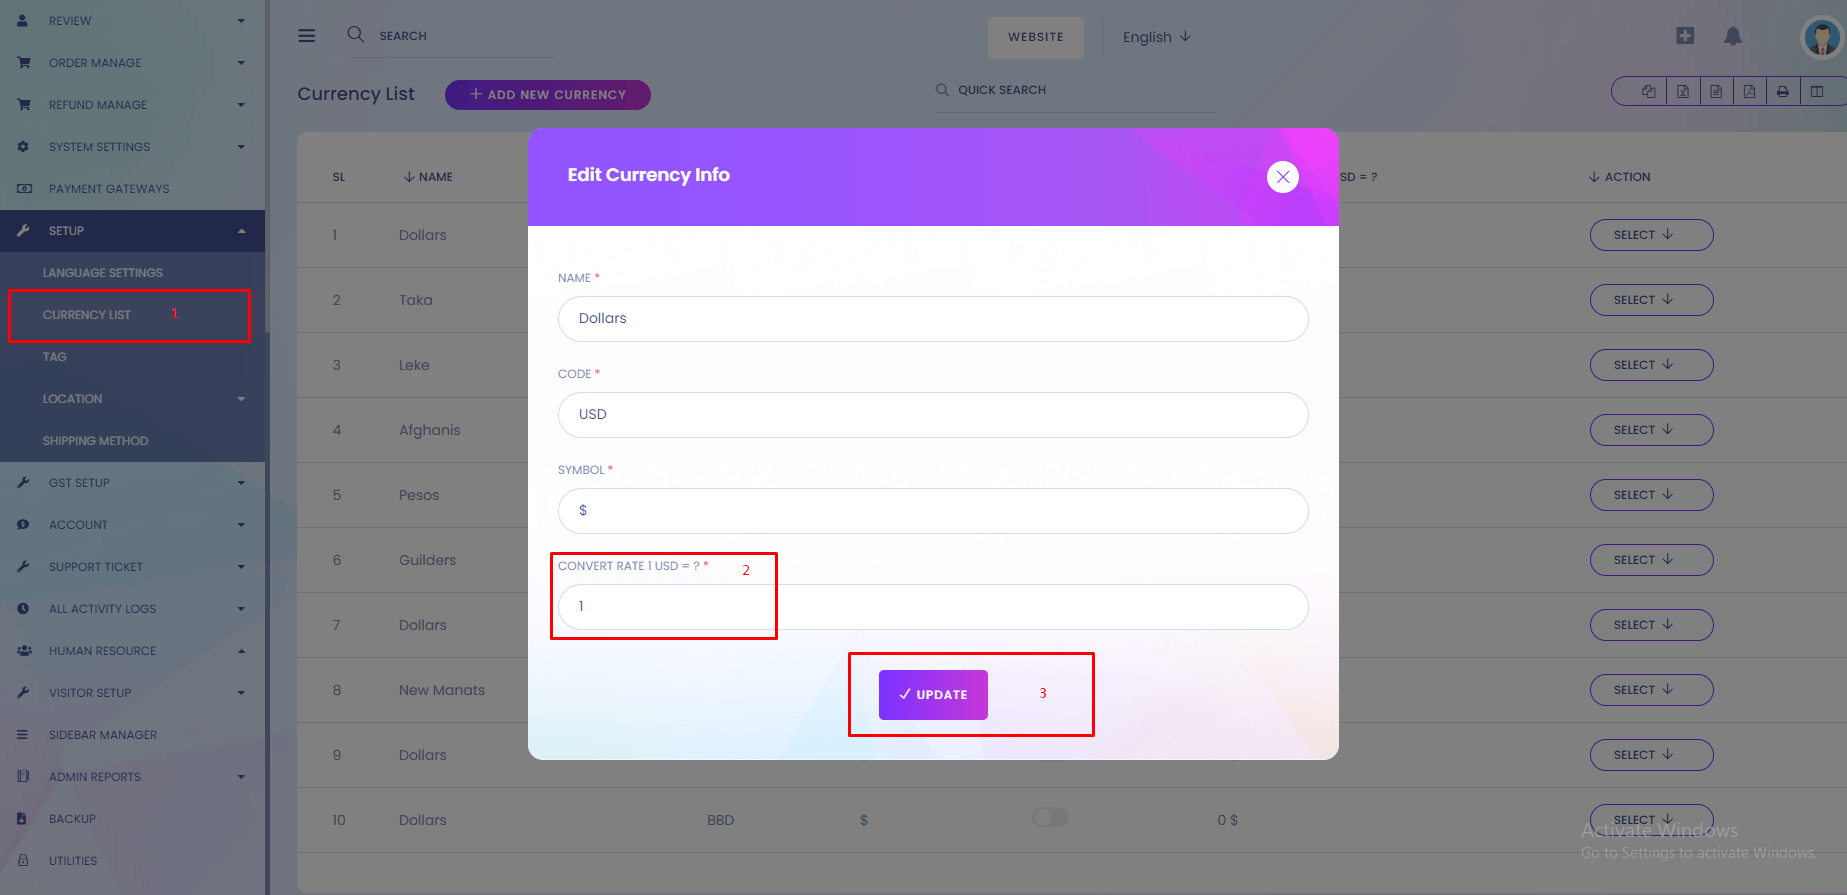
Setup Setup Others Currency If You Have Multi Currency System.
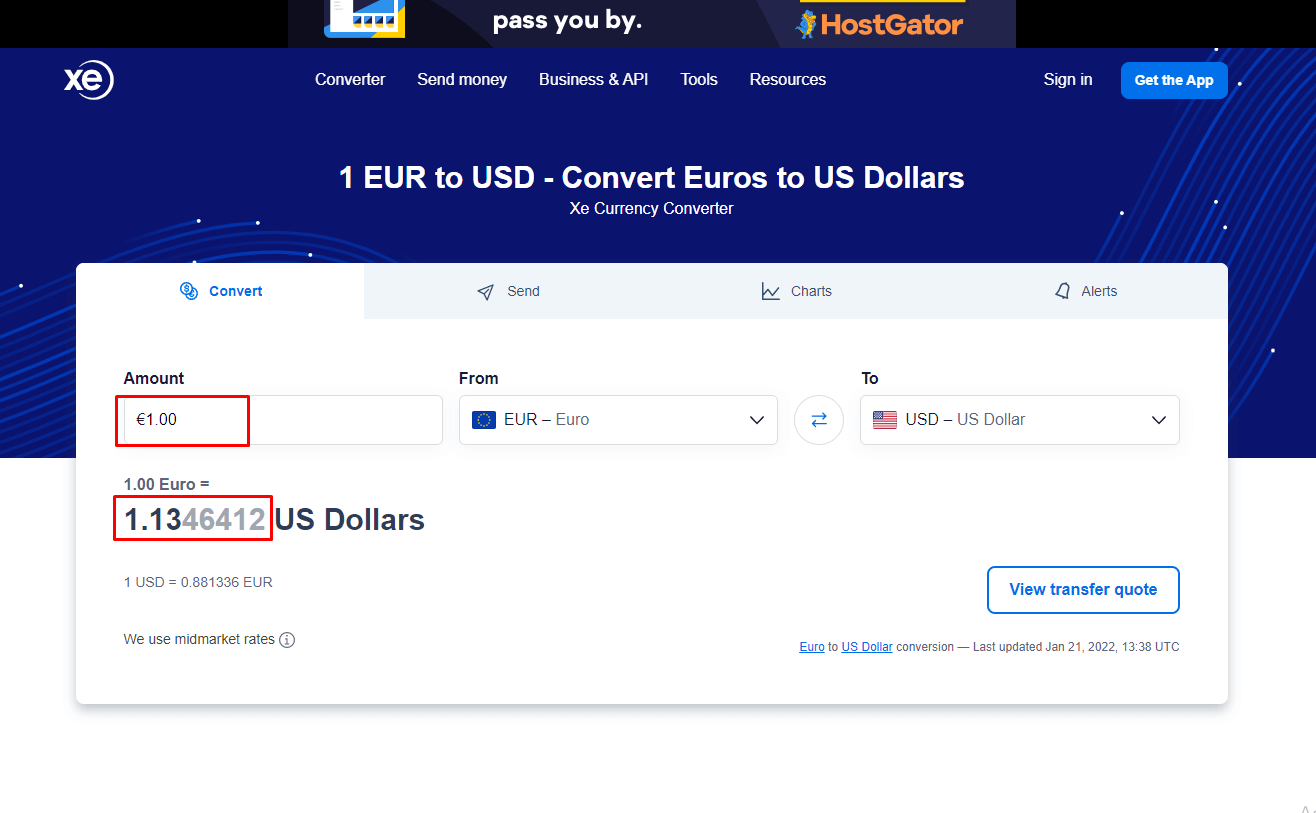
For get accurate result, please update with accurate convert rate.
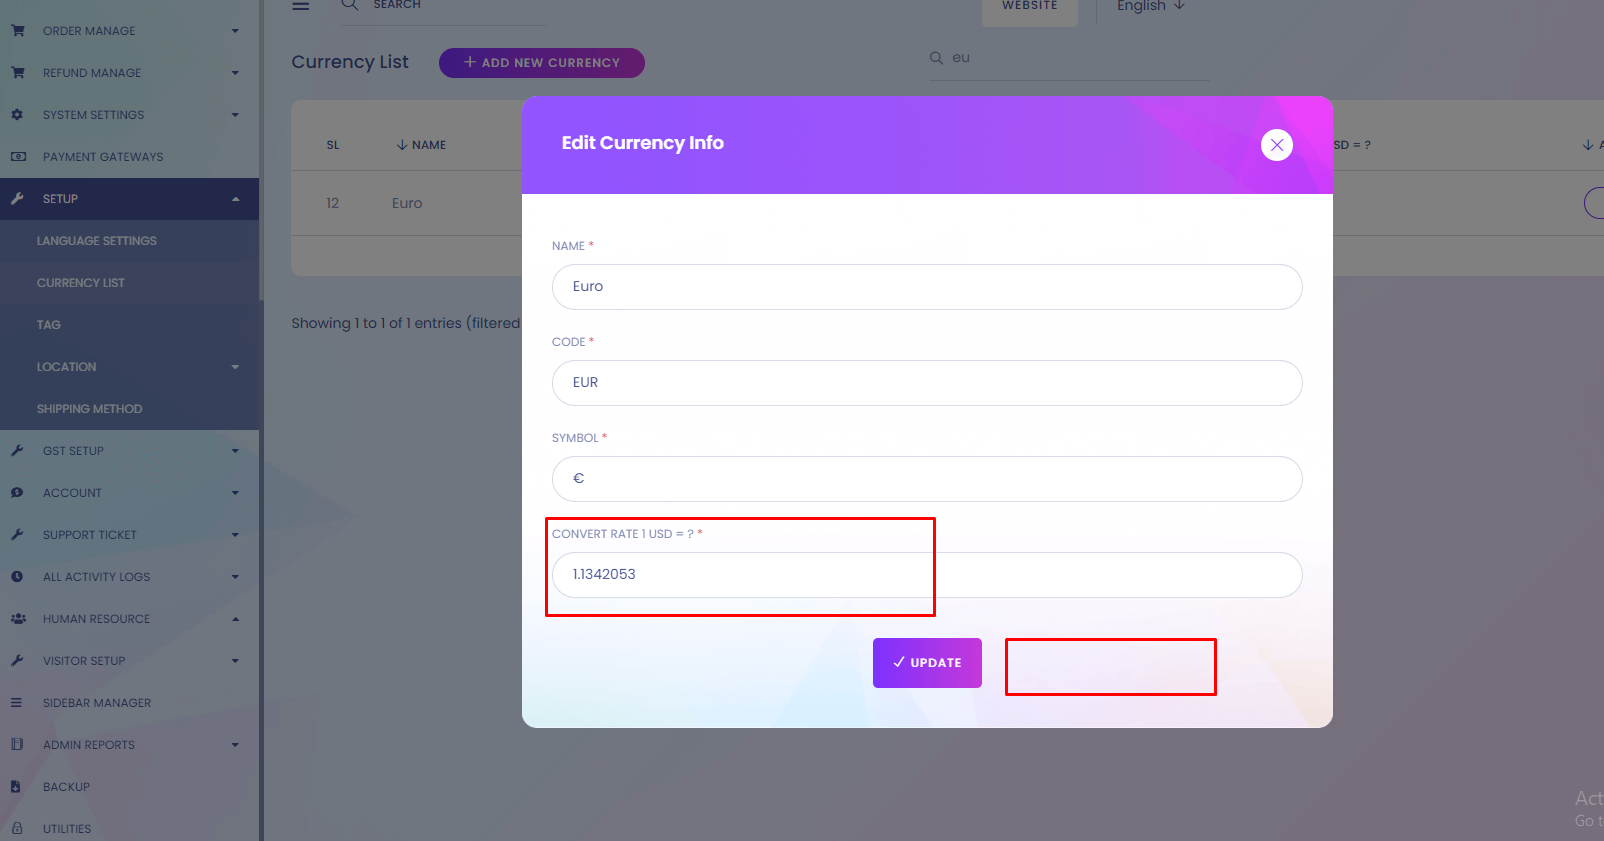
You can get accurate from here
Tag
Tag
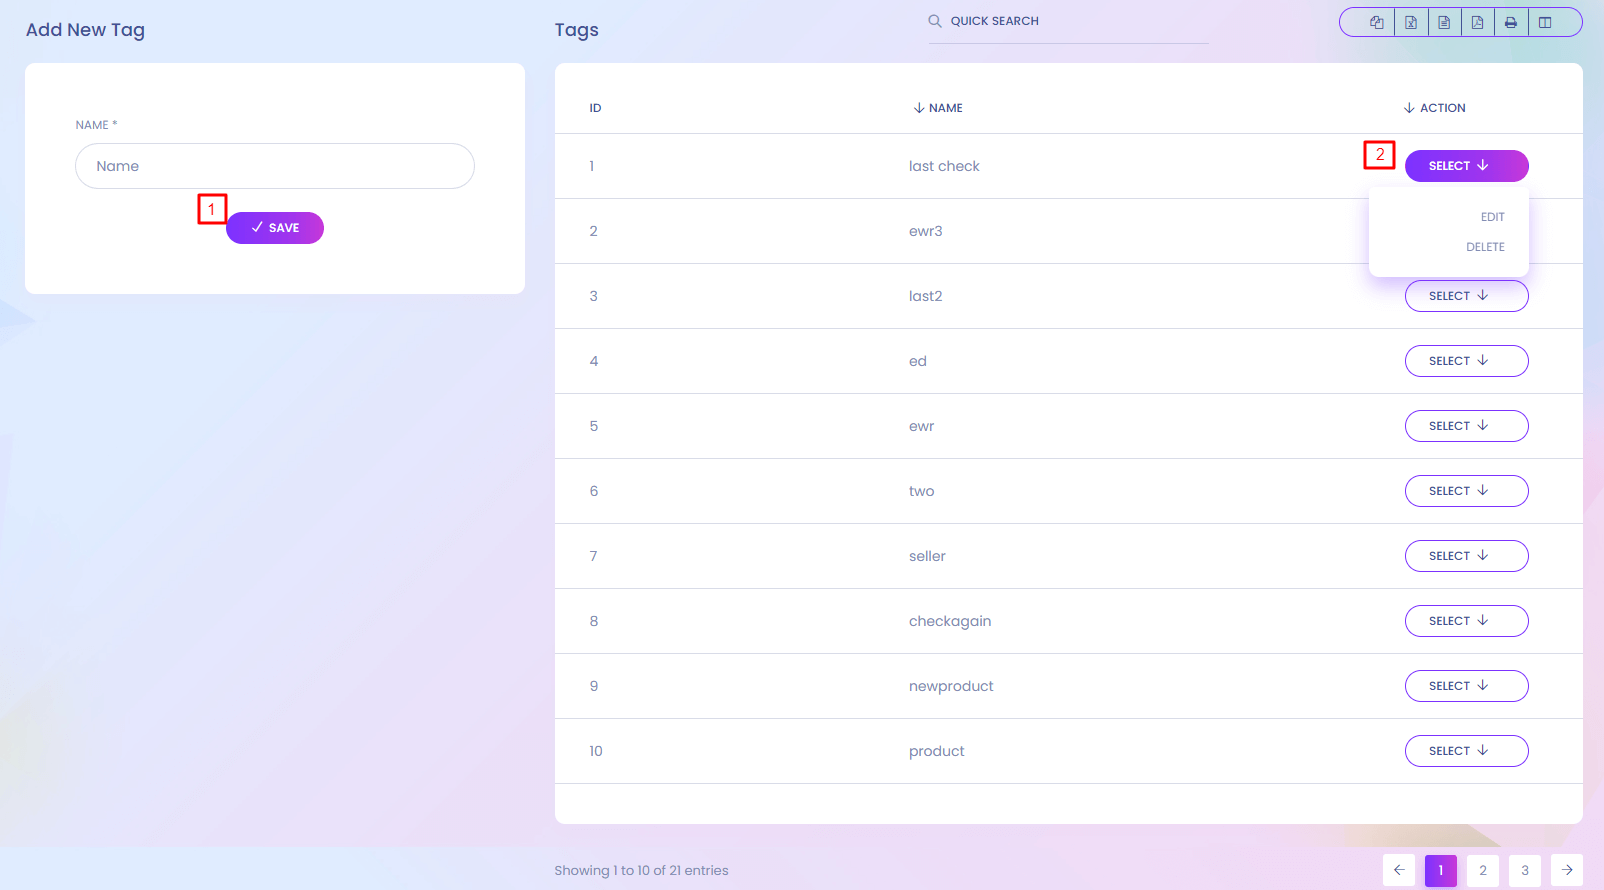
Tag
Tag is import for search any product or blog or gift card.
1. Save
Add new tag.
2. Action
Edit and delete the tags.
Location
Location(Country)
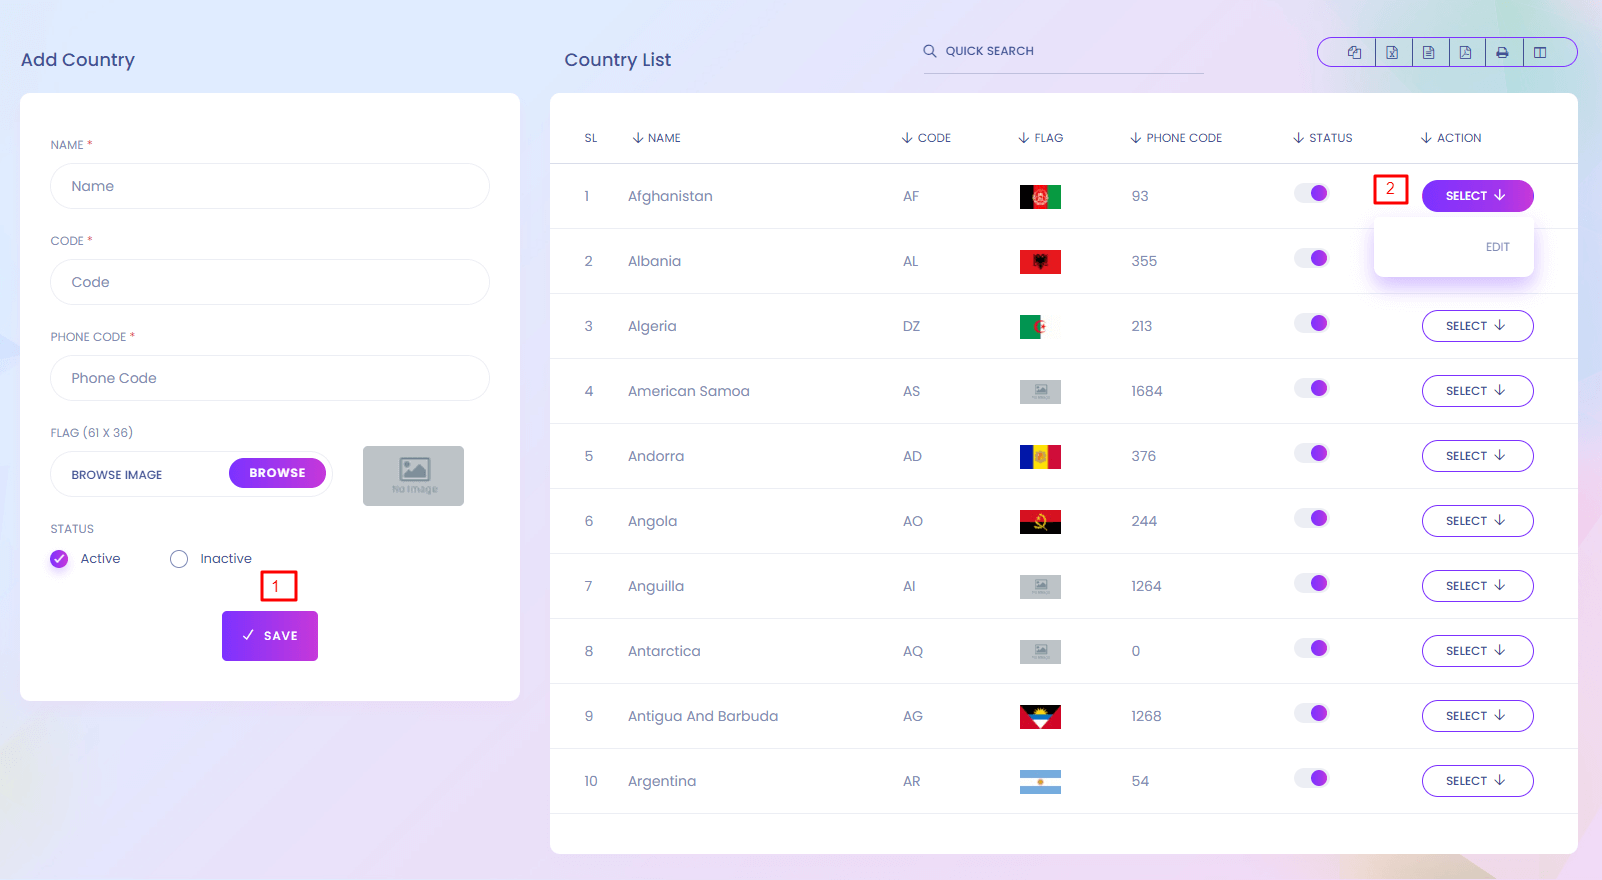
Location
You can setup the locations. When user add a delivery address he/she can choose the location.
1. Save
Add new country.
2. Action
Edit the country information.
Location(State)
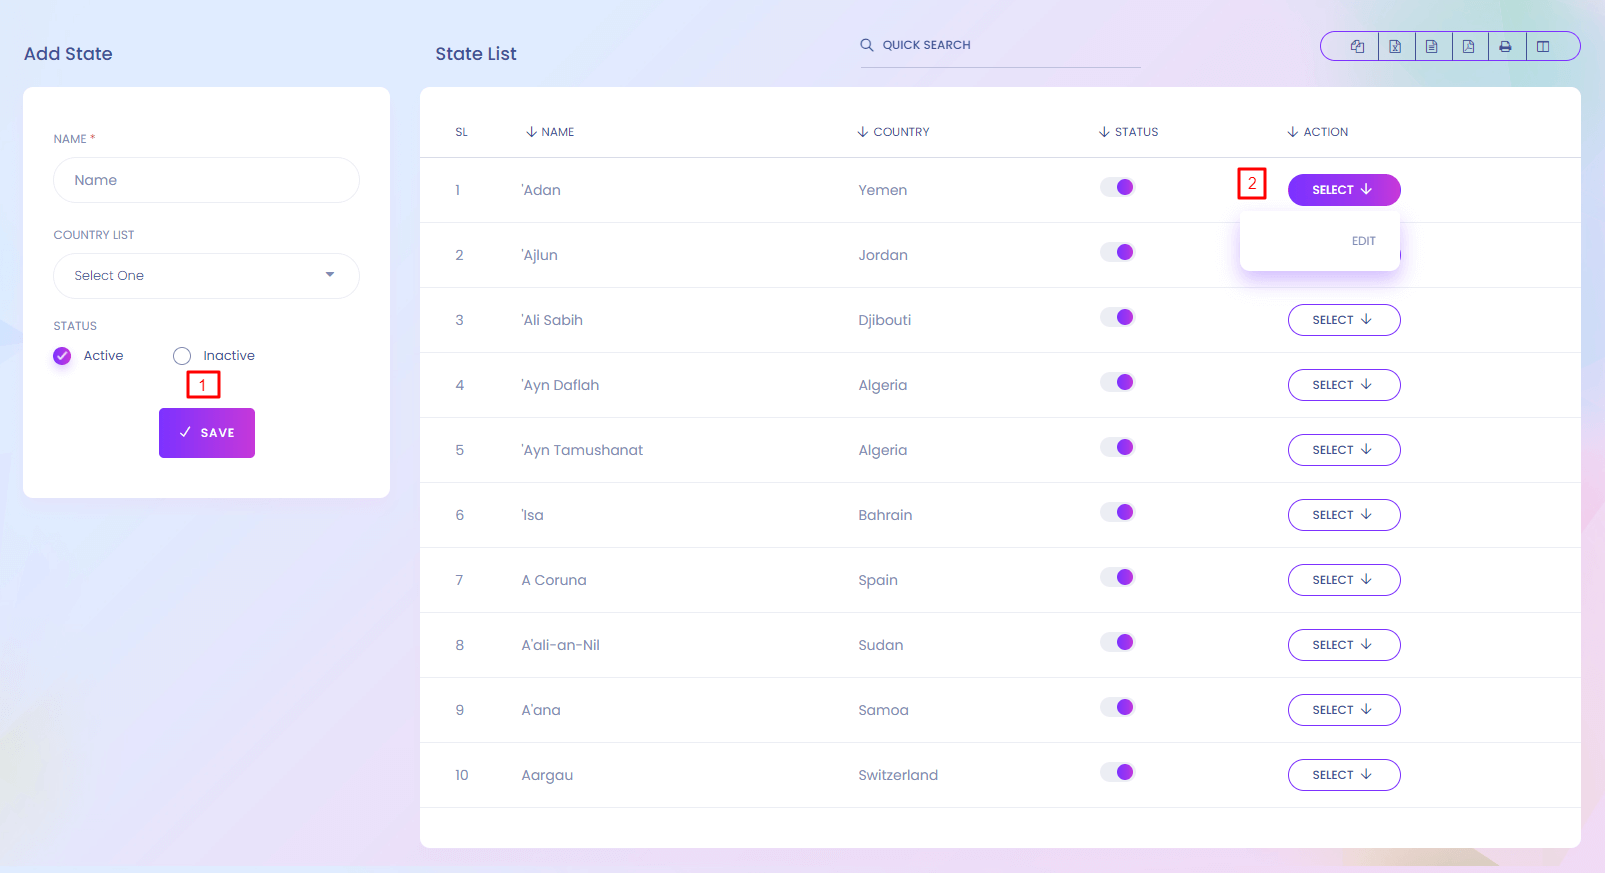
1. Save
Add new state.
2. Action
Edit the state information.
Location(City)
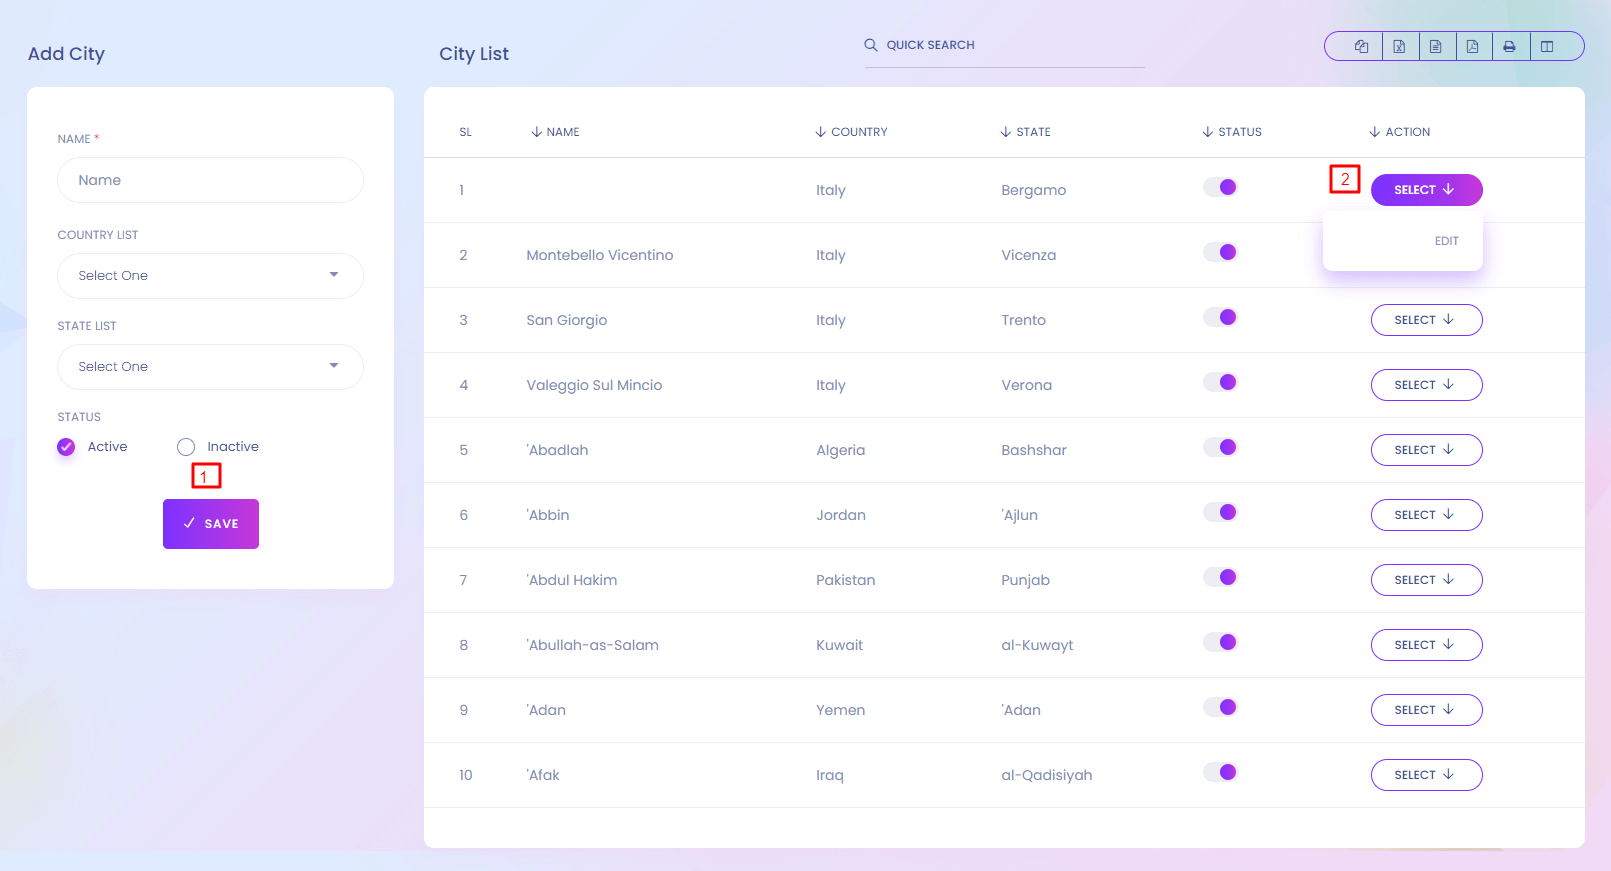
1. Save
Add new city.
2. Action
Edit the city information.
Media Manager
All Upload Files
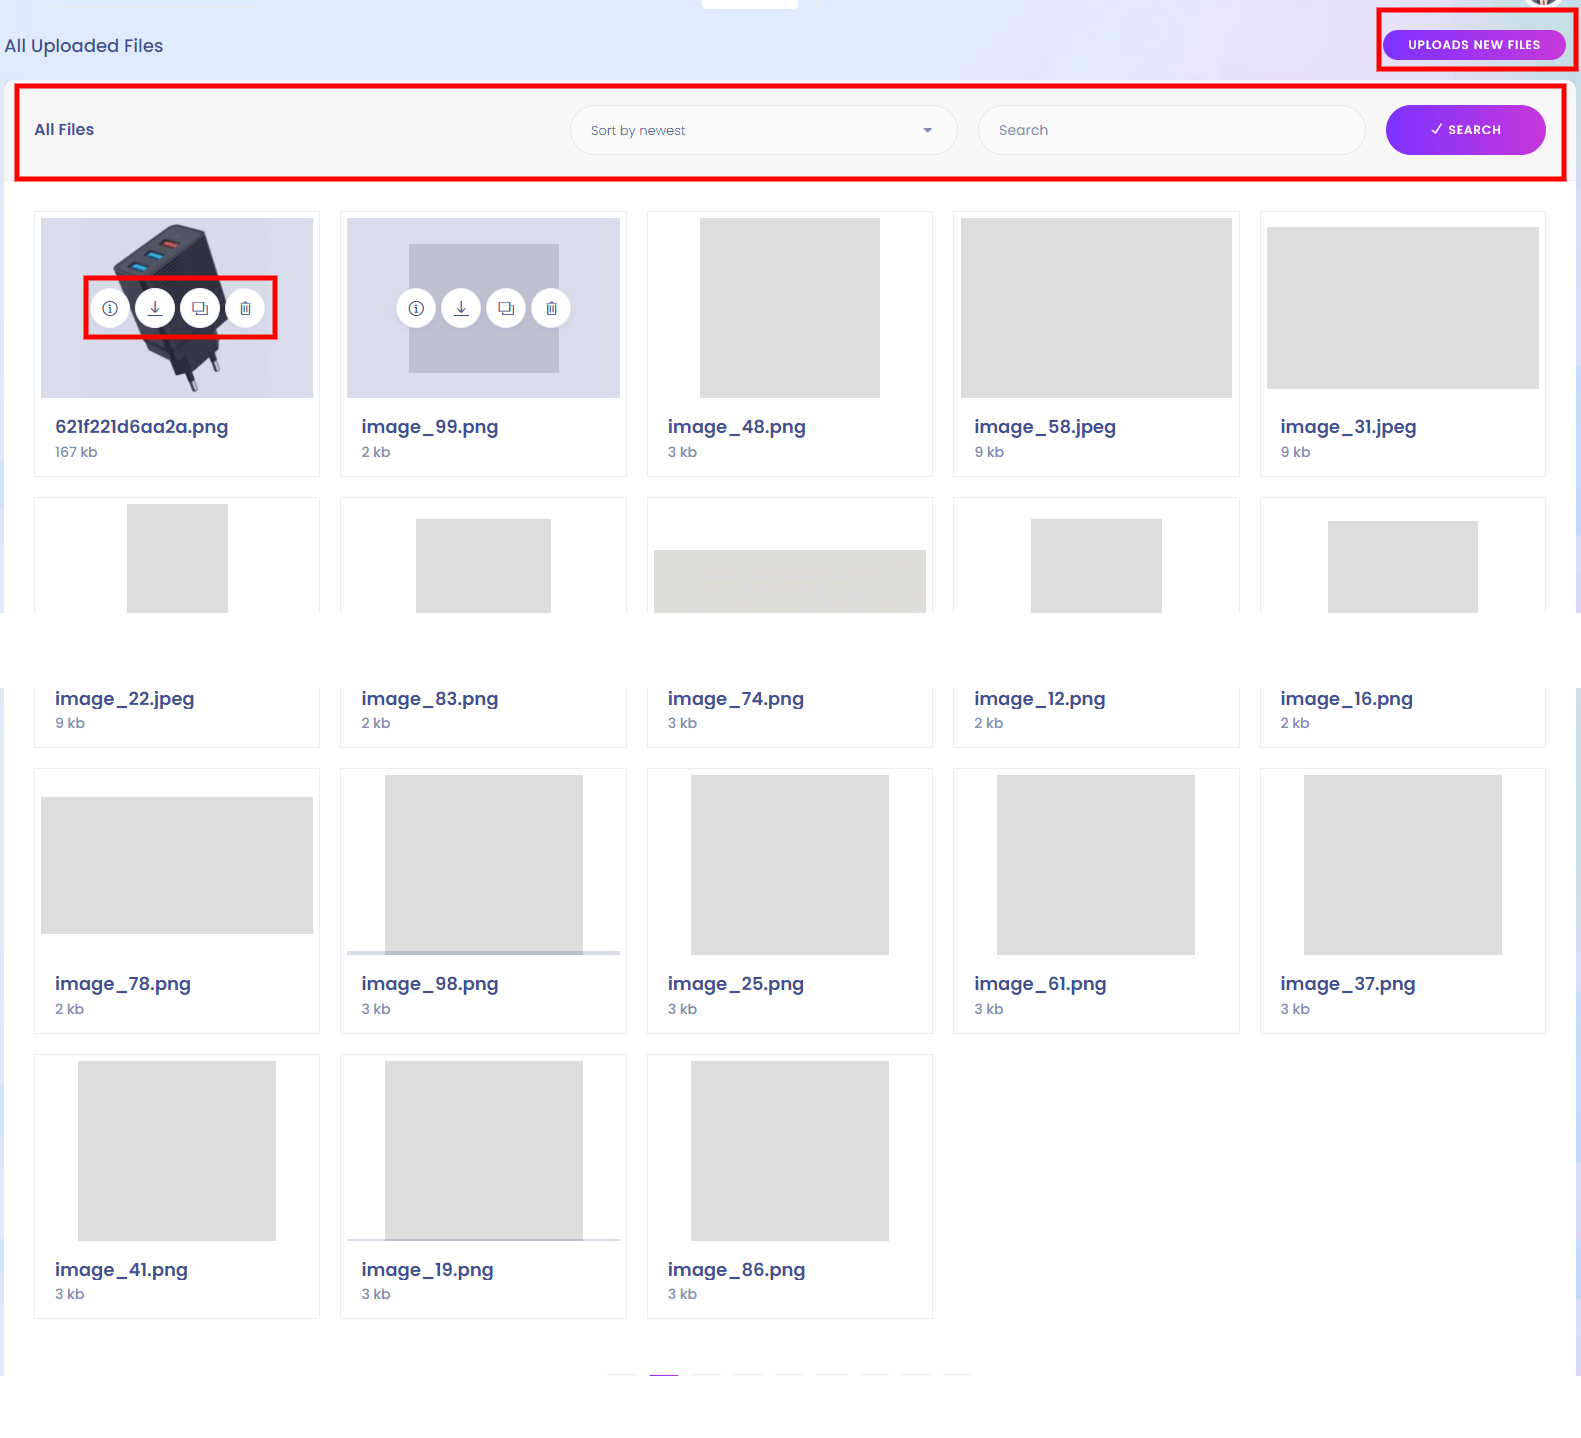
All Upload Files
All uploaded files you found here. Media manager also managle from here.
1. Uplaod New Media
When you click uplaod new, goto to the new upload drag & drop page.
2. Filter Media
You can filter media from here.like search, sorting.
3. Action
You can delete, copy link, downlaod, info from here.
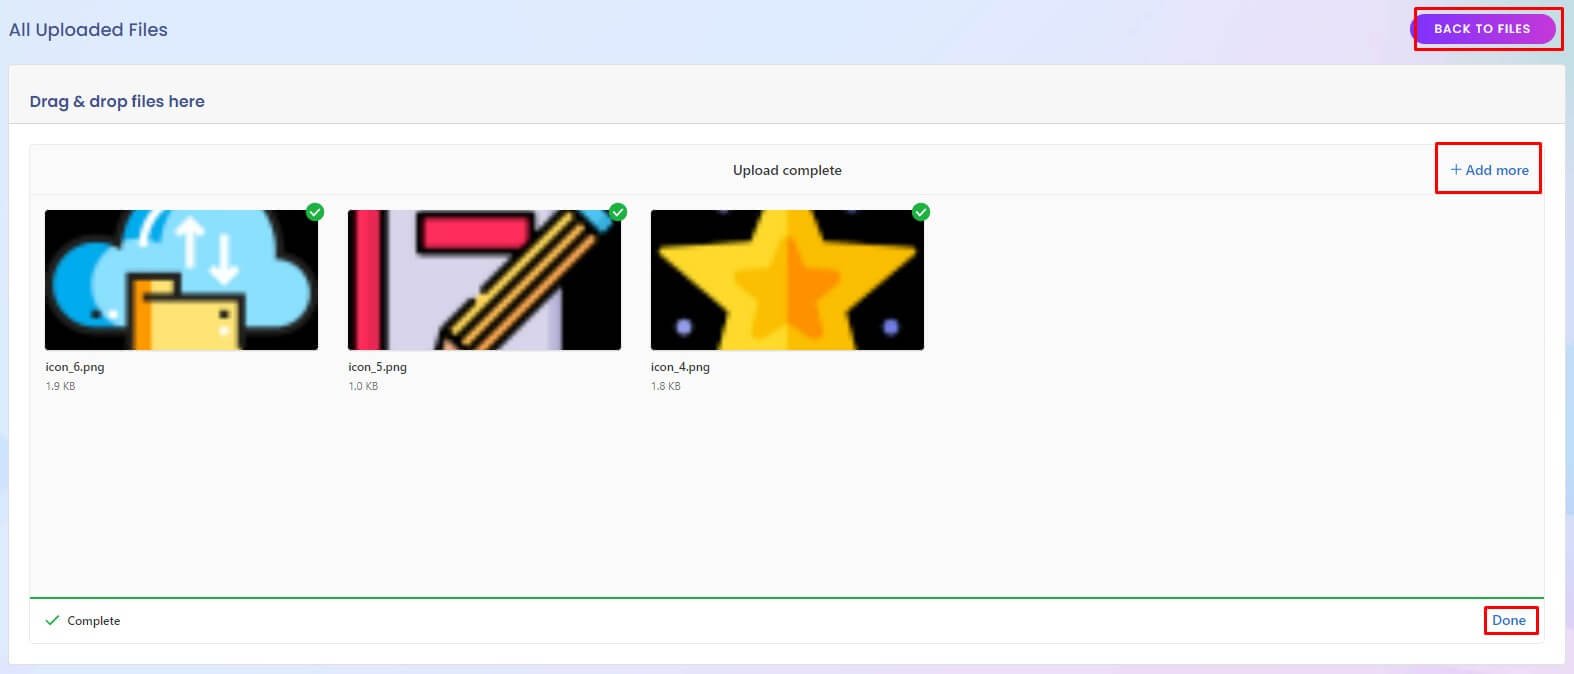
Upload New Media

1. Uplaod New Media
After Drag & drop or browse image, file automatically uploaded here.
2. After Upload
After uploaded you can see uploaded info form here.
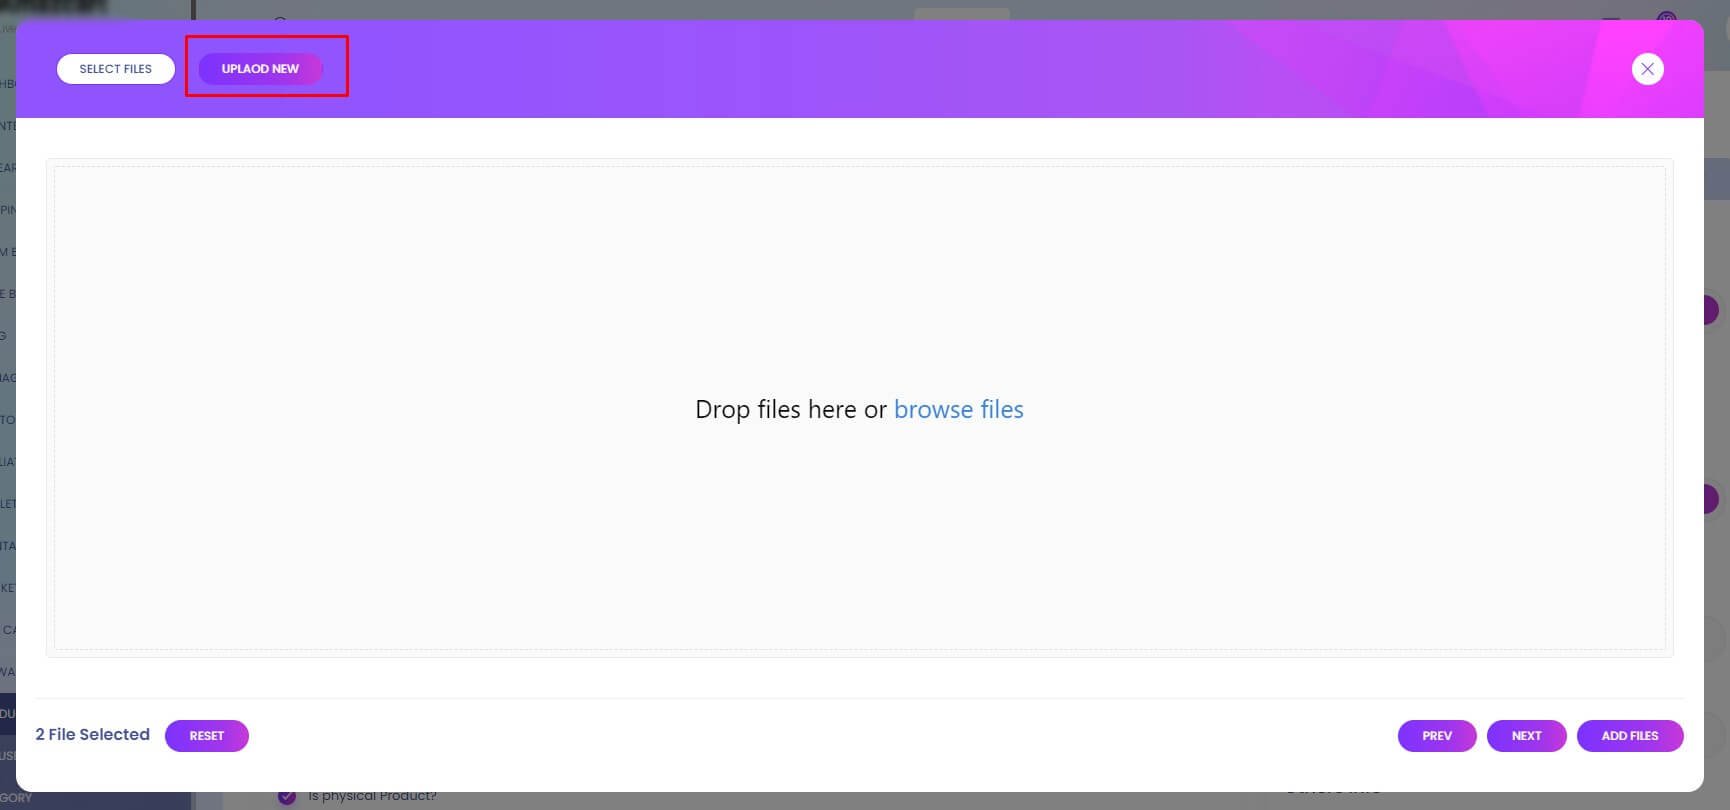
Select Media From Modal
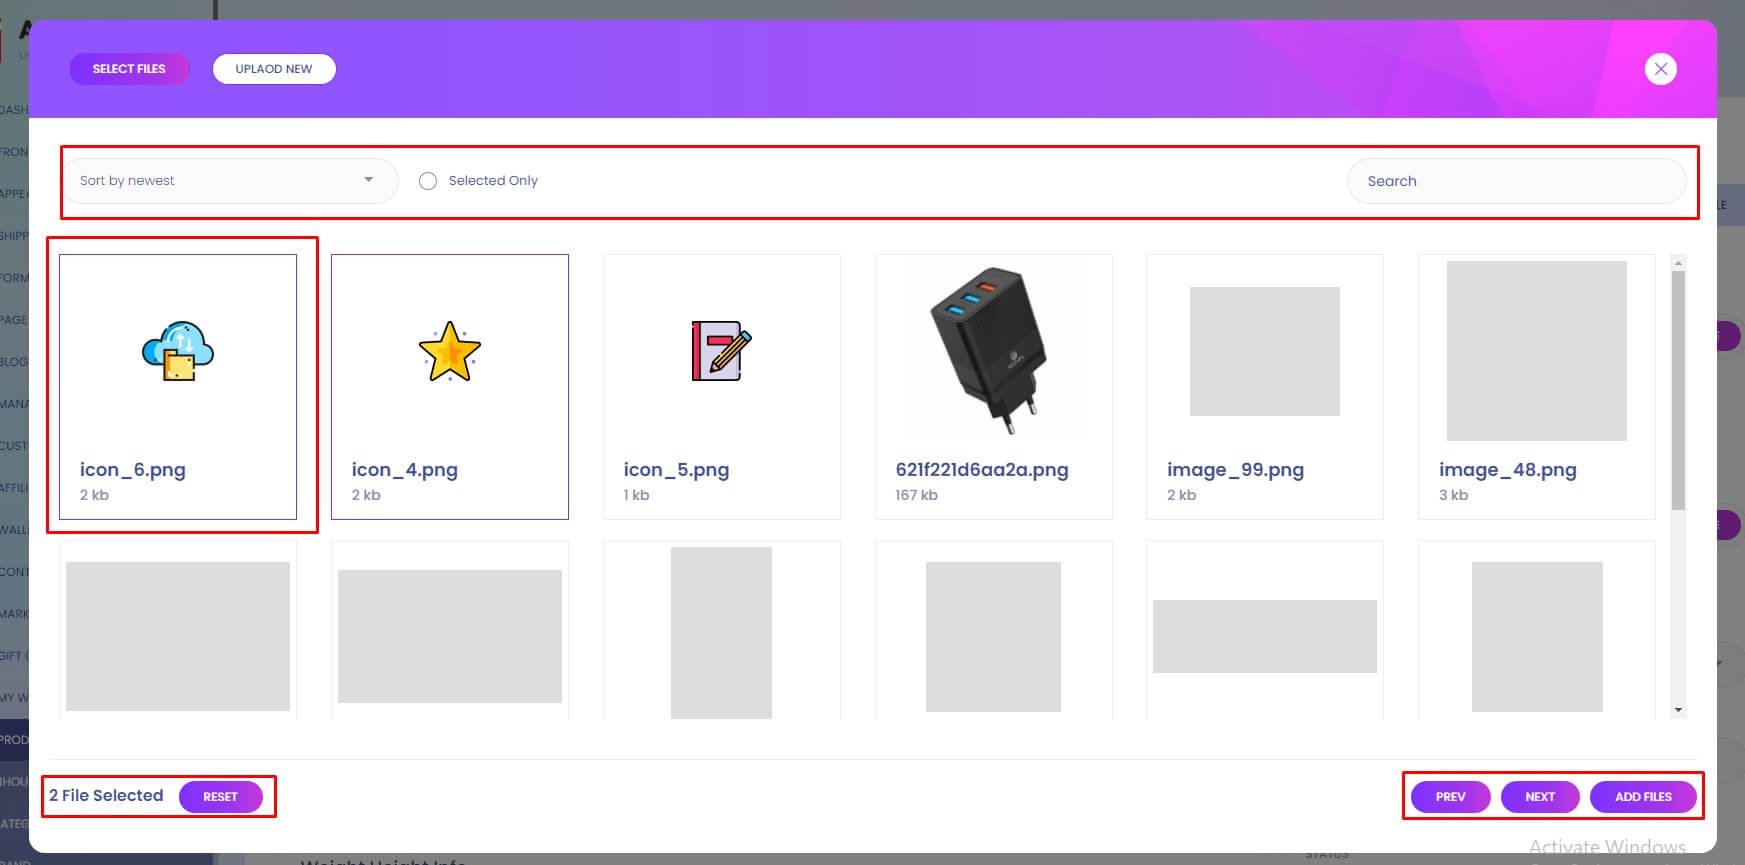
1. Select New Media
Uplaoded Media can be multiple time use from here. Also can upload new media from here.
Gst List
Gst List
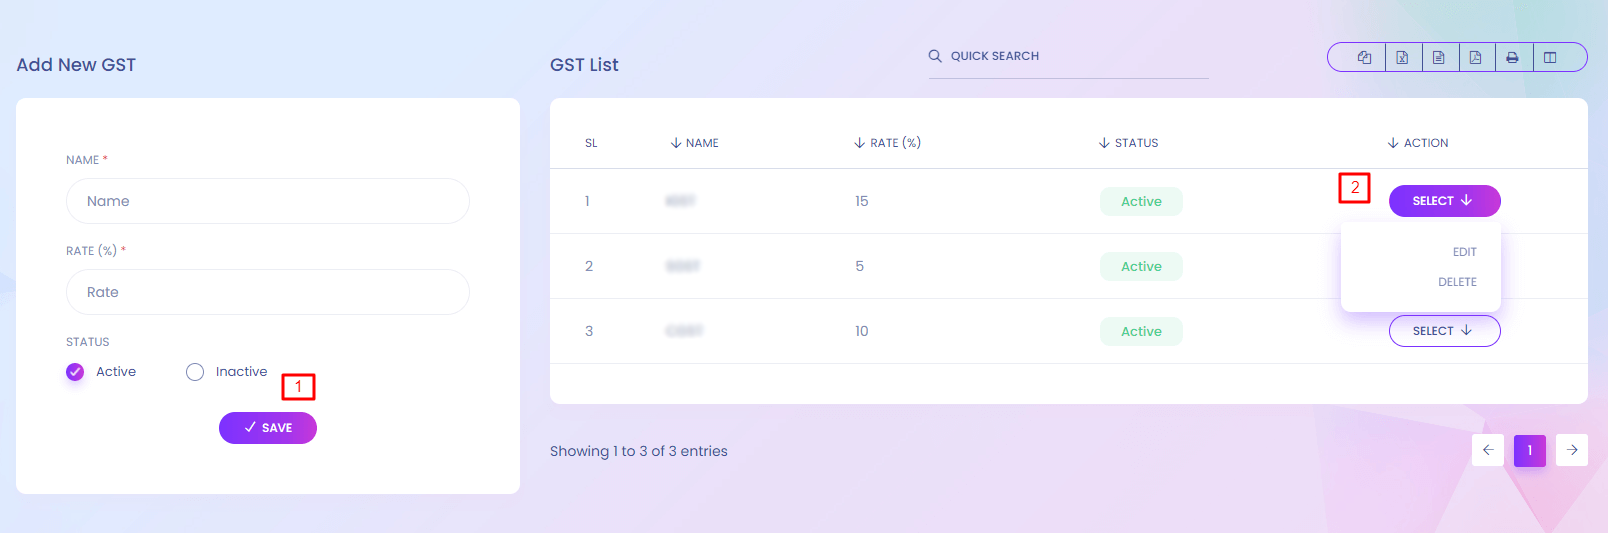
GST List
You can manage different type of gst here.
1. Save
Add new gst.
2. Action
Admin can edit and delete GST.
GST Configuration
GST Configuration
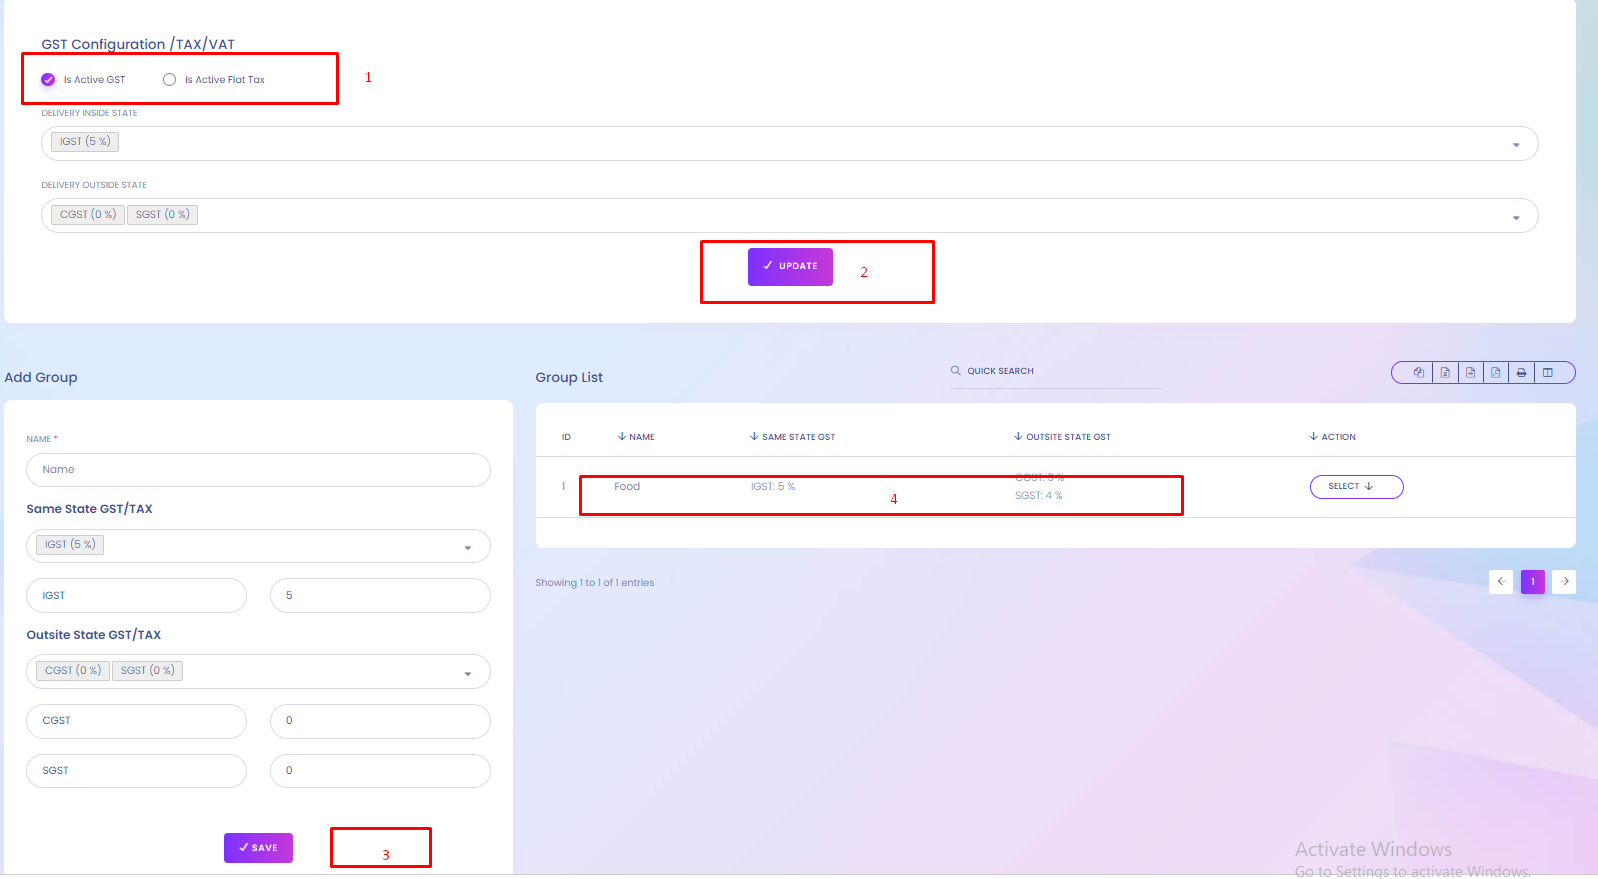
GST Configuration
You can configure the gst from here.
1. Update
Update the GST configuration values.
Chart Of Account
Chart Of Account
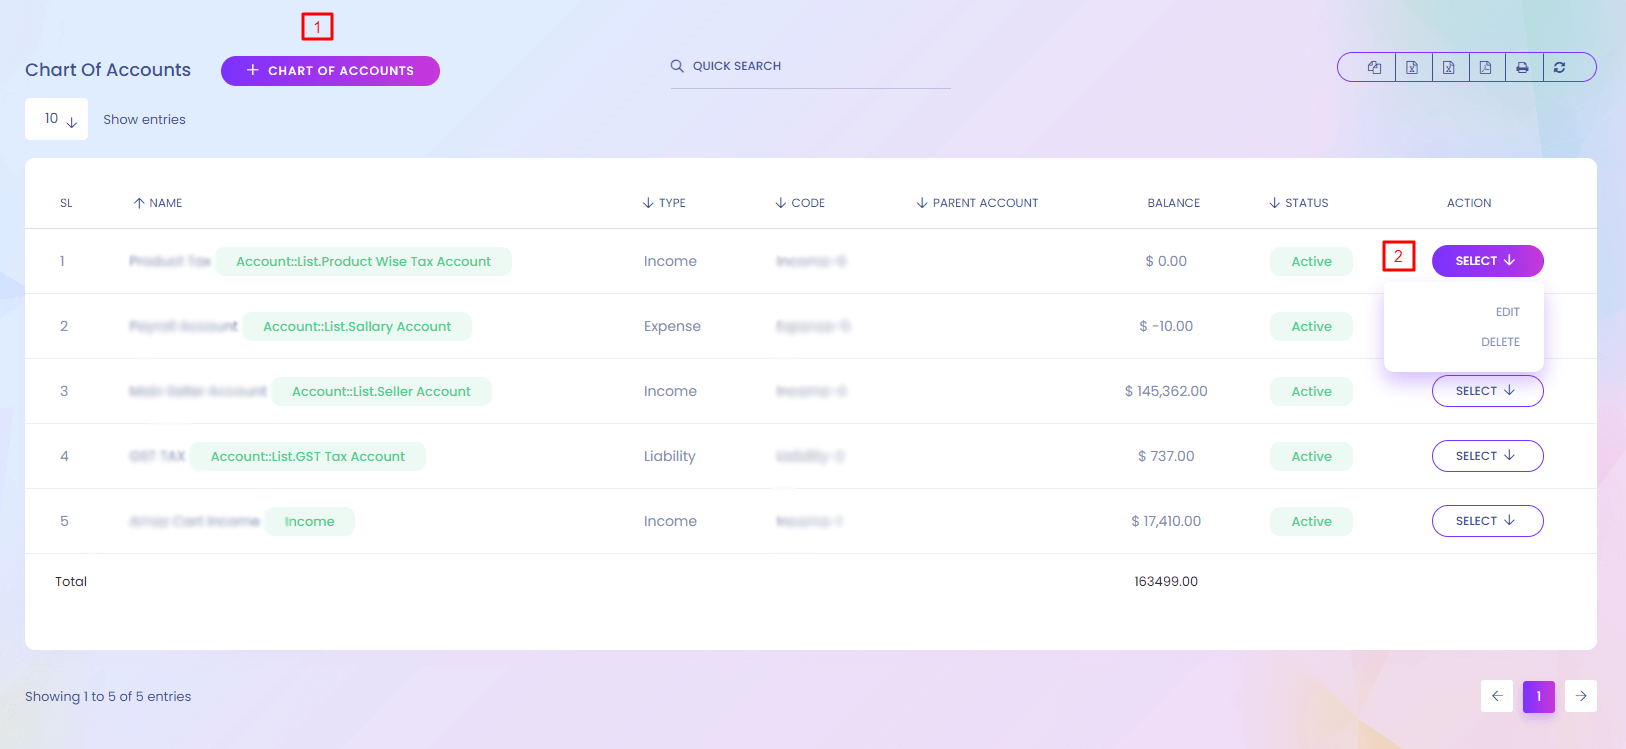
Chart Of Account
You can manage differeny types of account here.
1. Chart of Account
Create new chart of account.
2. Action
Admin can edit and delete chart of account.
Chart Of Account (Create)
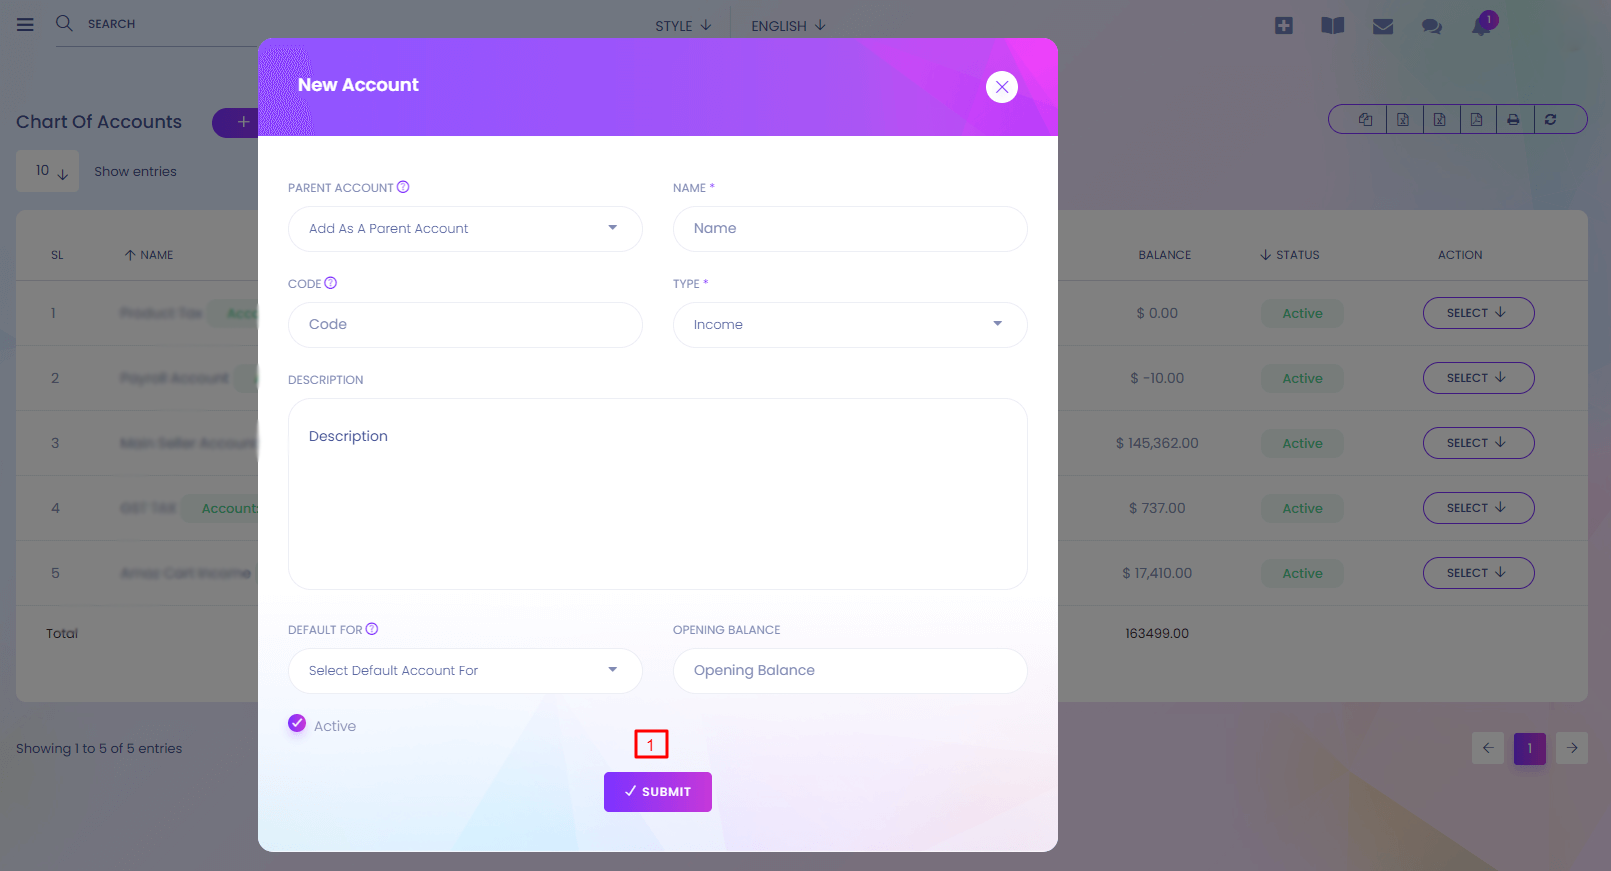
1. Submit
Save the new account.
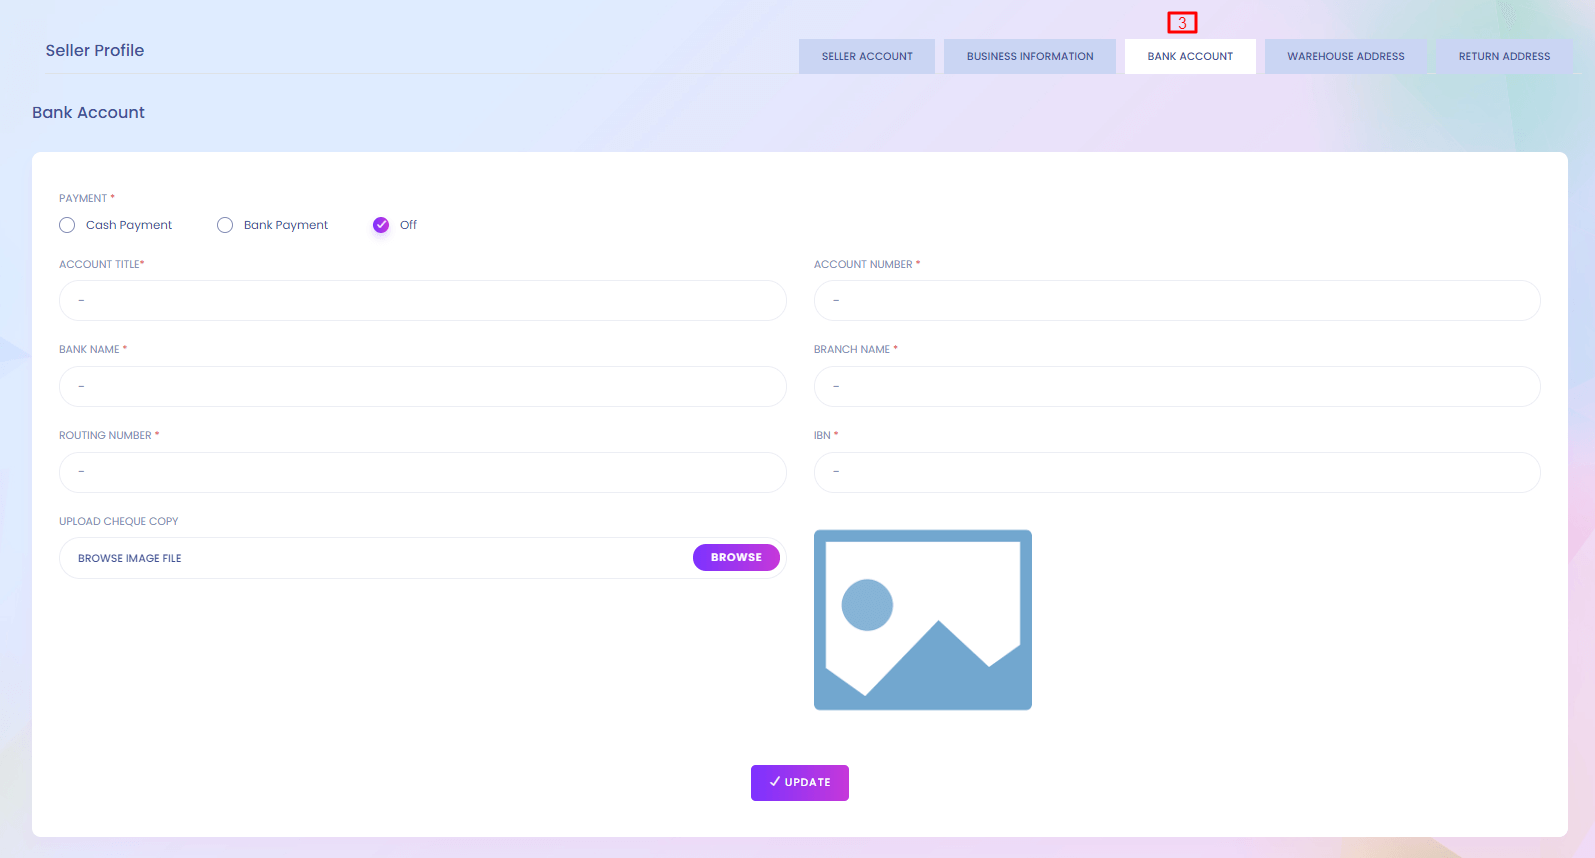
Bank Accounts
Bank Accounts
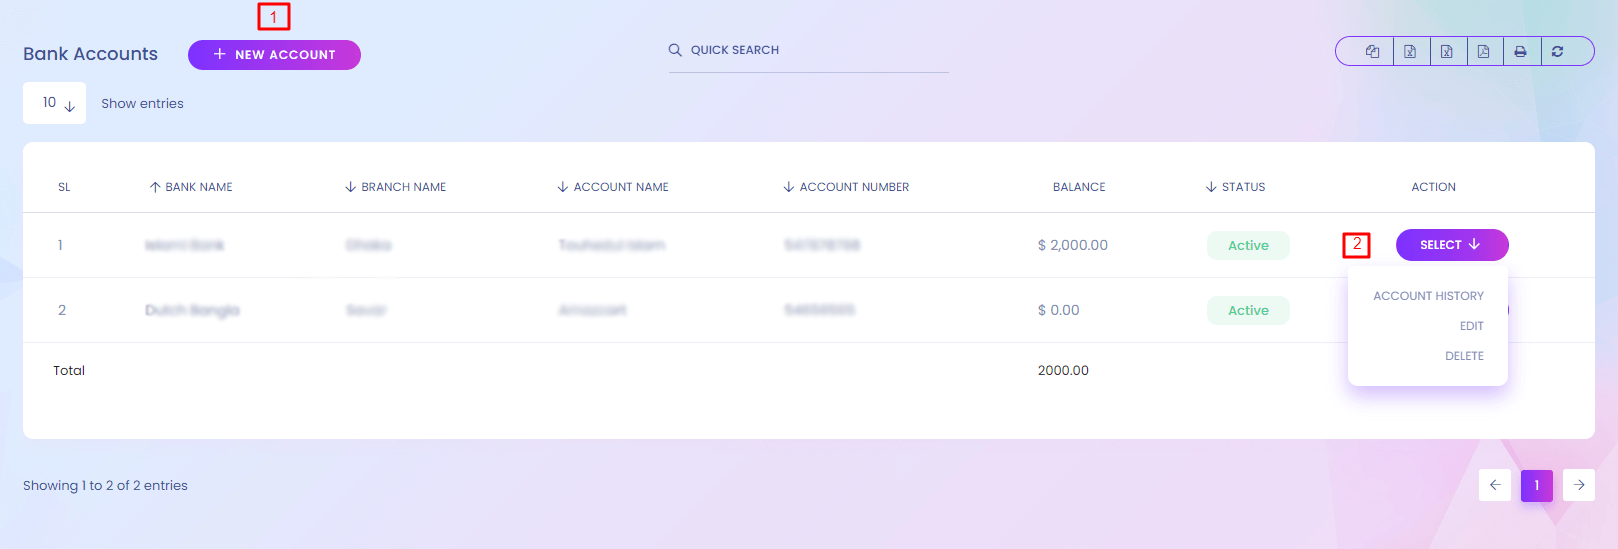
Bank Accounts
For receiving payment you might be need bank accounts. You can manage bank accounts here.
1. New Account
Create new account.
2. Action
Admin can edit and delete account. Account history can also be seen from here.
Bank Account (Create)
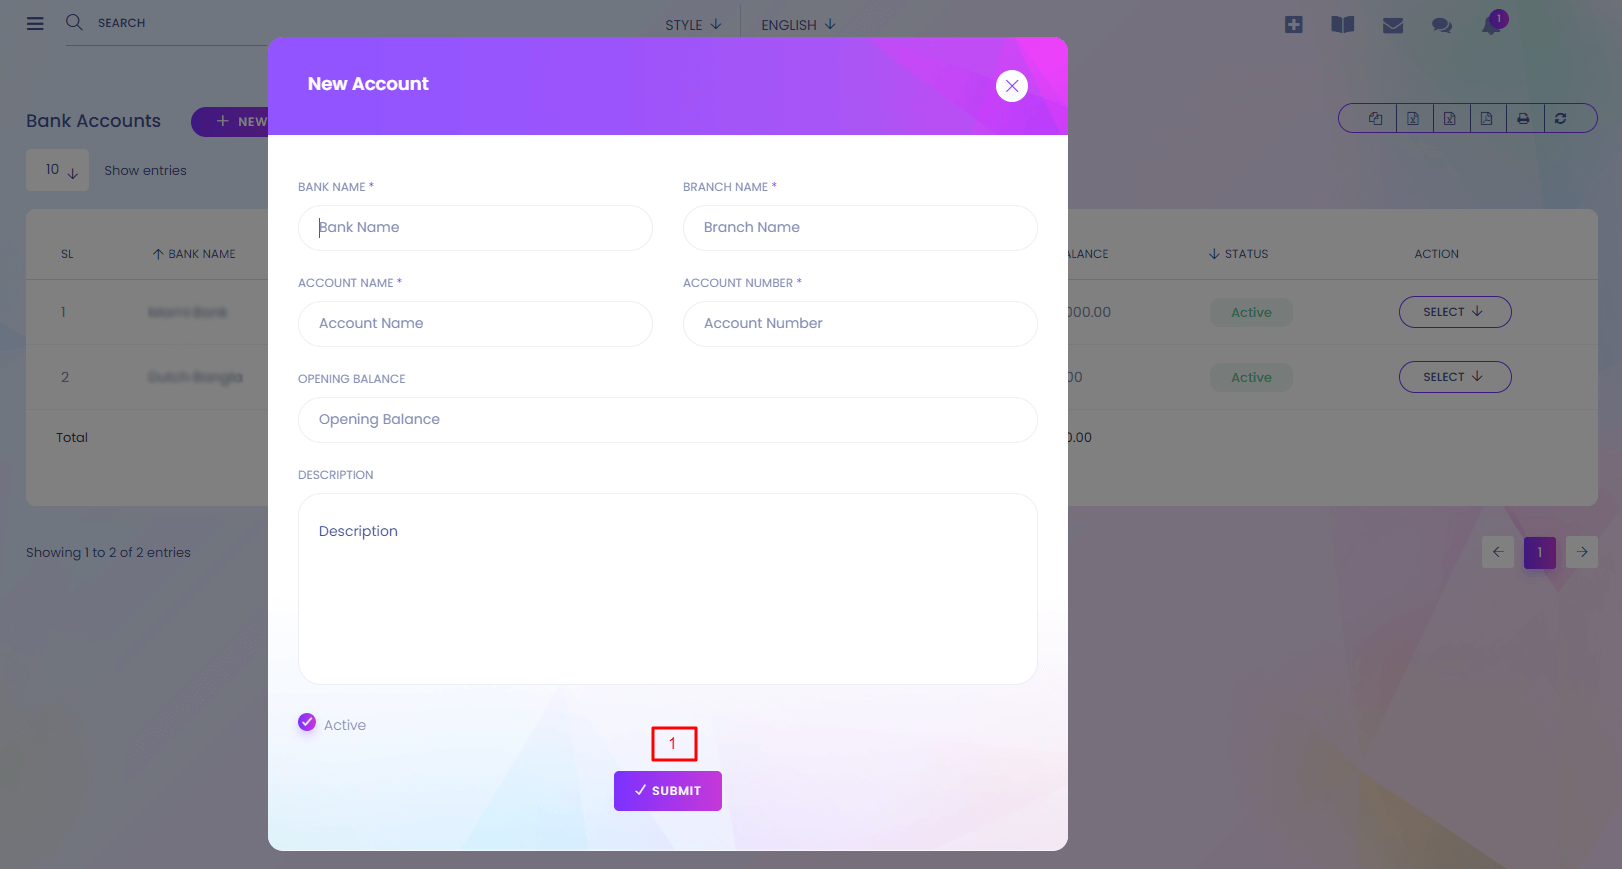
1. Submit
Save the new account.
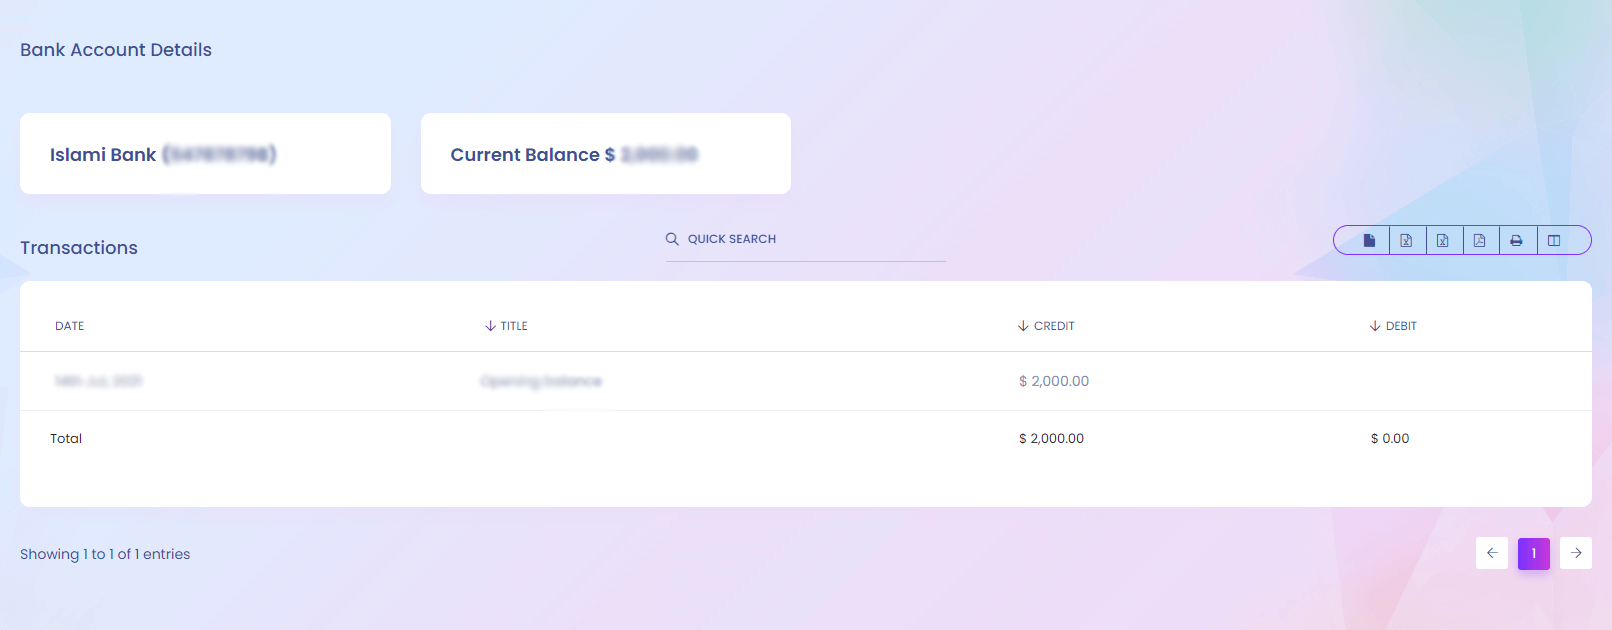
Bank Account (Details)
Income
Income
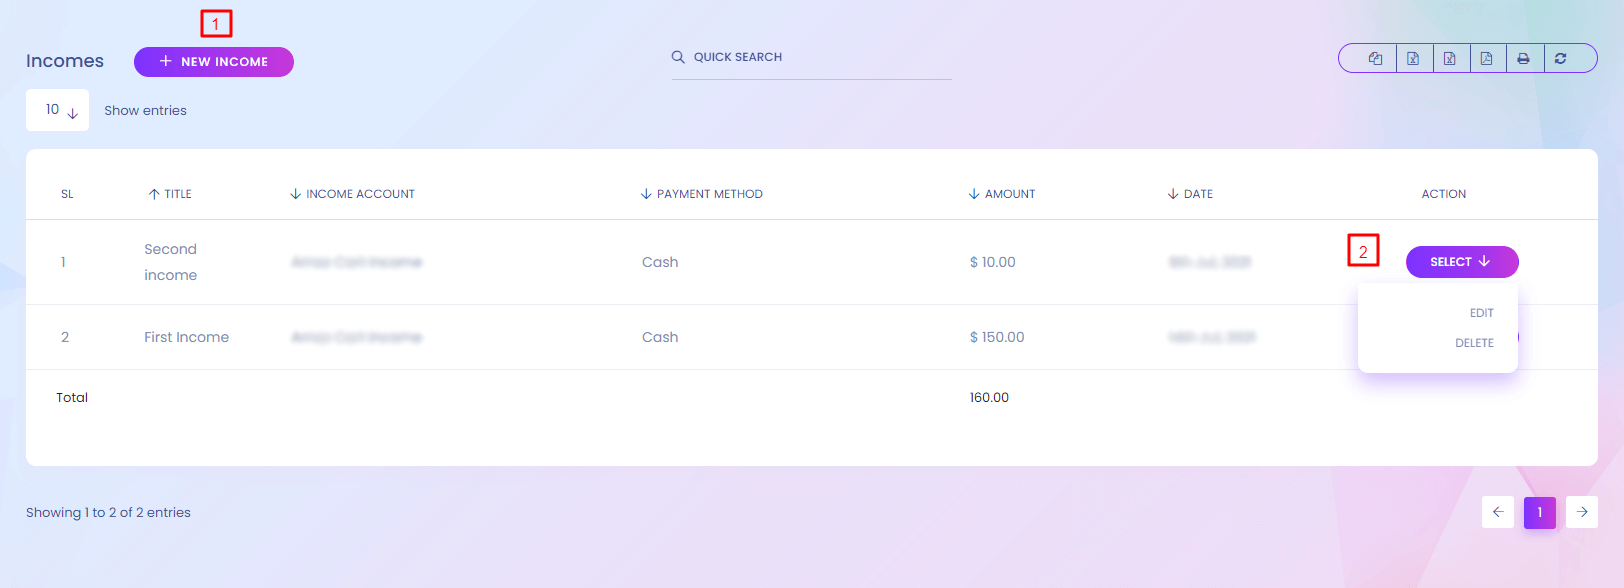
Income
Calculate your income here.
1. New Income
Create new income.
2. Action
Admin can edit and delete income.
Expenses
Expenses
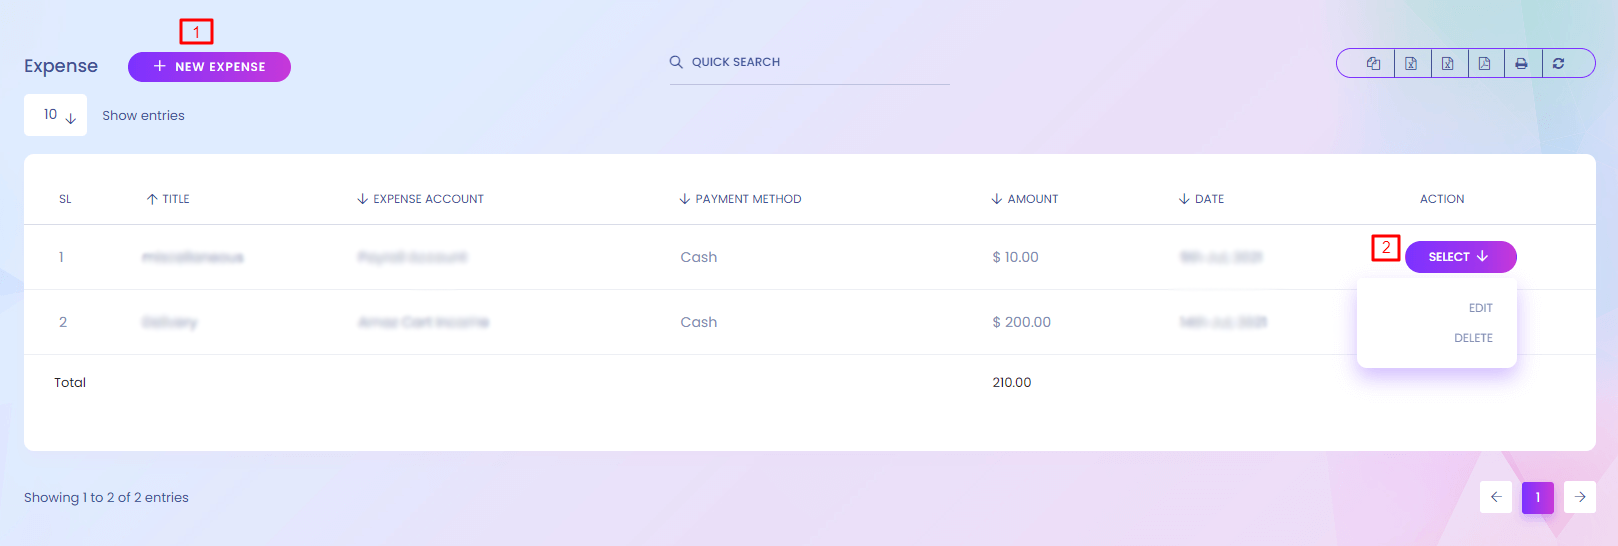
Expenses
Calculate your expenses here.
1. New Expenses
Create new expense.
2. Action
Admin can edit and delete expense.
Profit
Profit
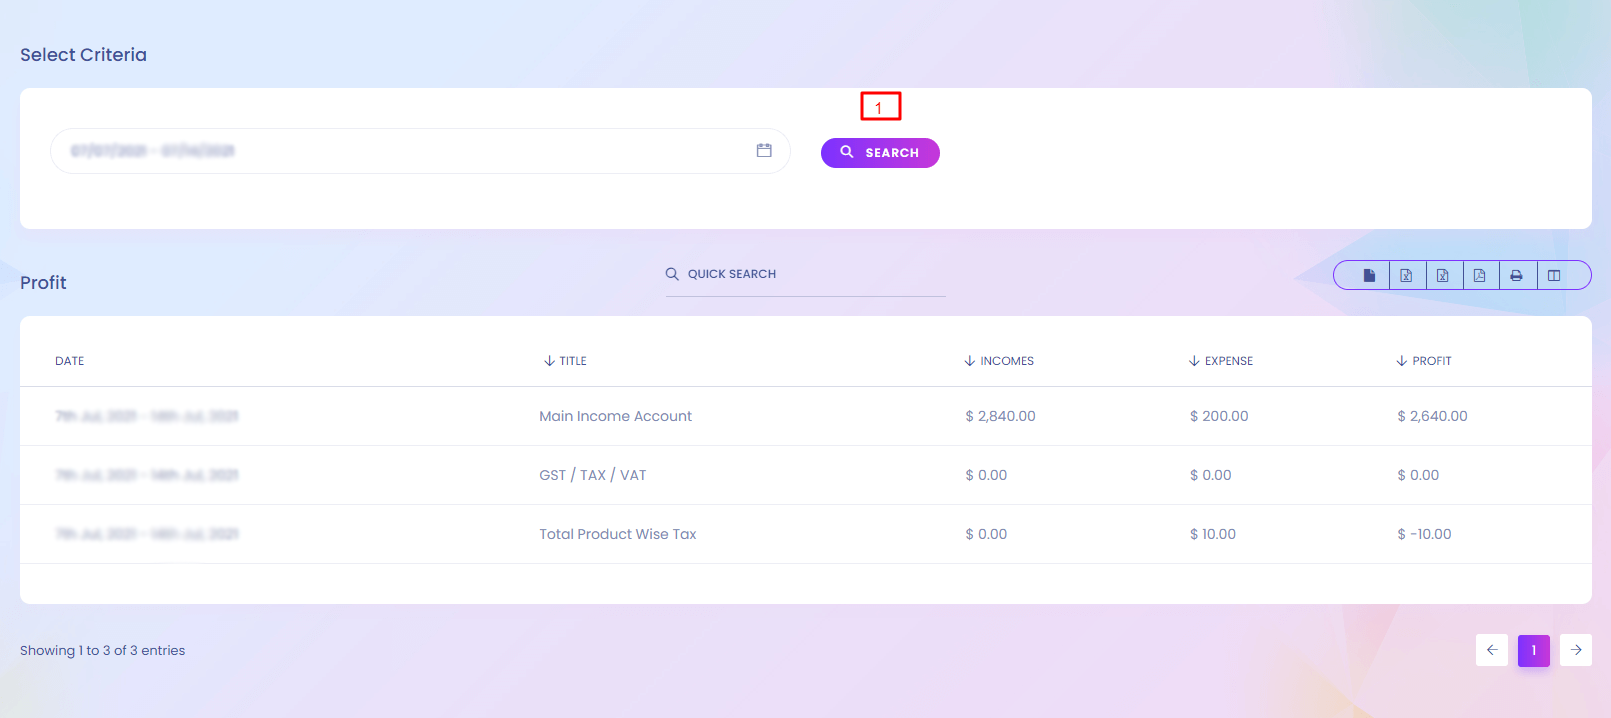
Profit
When you add your income and expenses the system will automaticall calculate your profit. You can find the details here.
1. Search
Search profit according to date range.
Transaction
Transaction
Transaction
When any user use payment gateway to pay , it creates a transaction history. You will find all the transaction history here.
1. Select Criteria
Transaction details can be found according to date range.
Statement
Statement
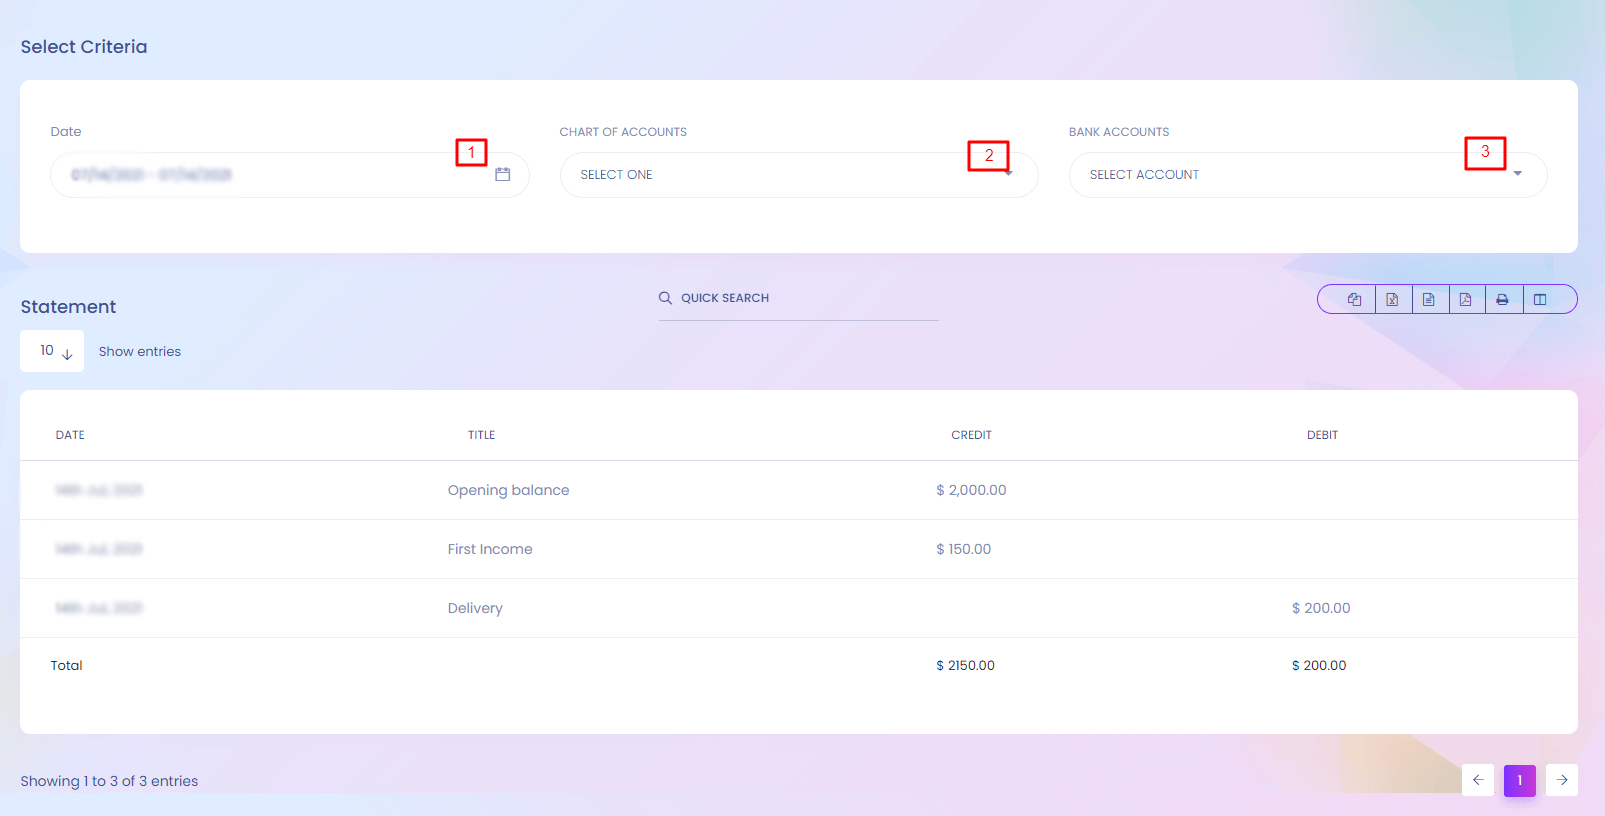
Statement
Manage different types of statements.
1, 2 & 3. Select Criteria
Admin can choose different criteria.
Support Ticket
Support Ticket
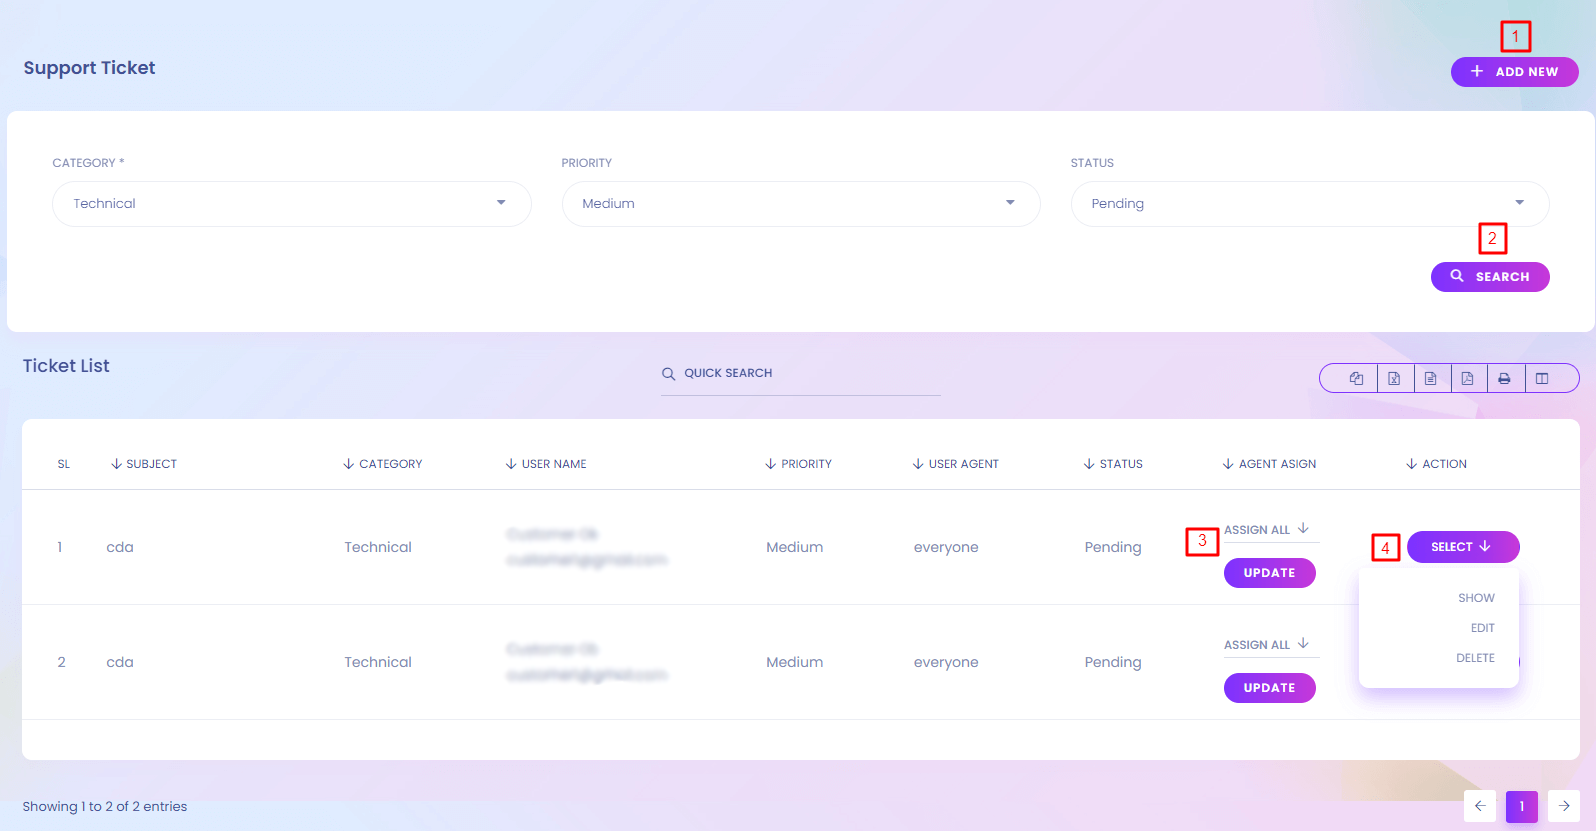
Support Ticket
For different types of support , user can create support ticket. You can manage support ticket here.
1. Add New
Add new support ticket.
2. Search
Search support ticket according to category, priority and status.
3. Agent Asign
Admin can change who will be assign to the ticket.
4. Action
Admin can show, edit and delete support ticket.
Support Ticket (Create)
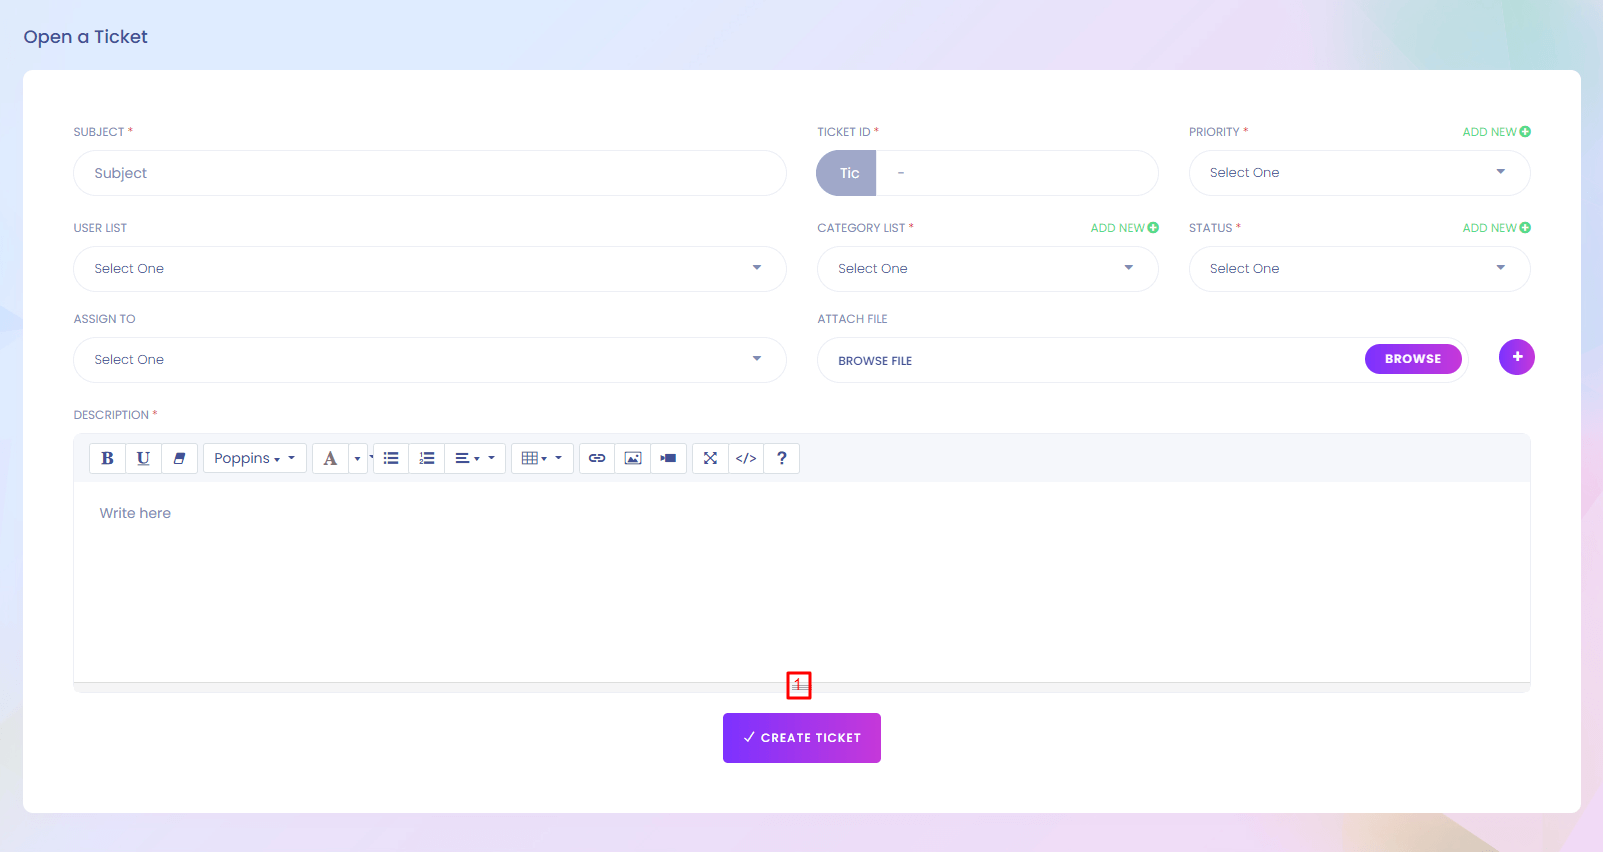
1. Create Ticket
Create the support ticked by giving the necessary information.
Support Ticket Category
Support Ticket Category
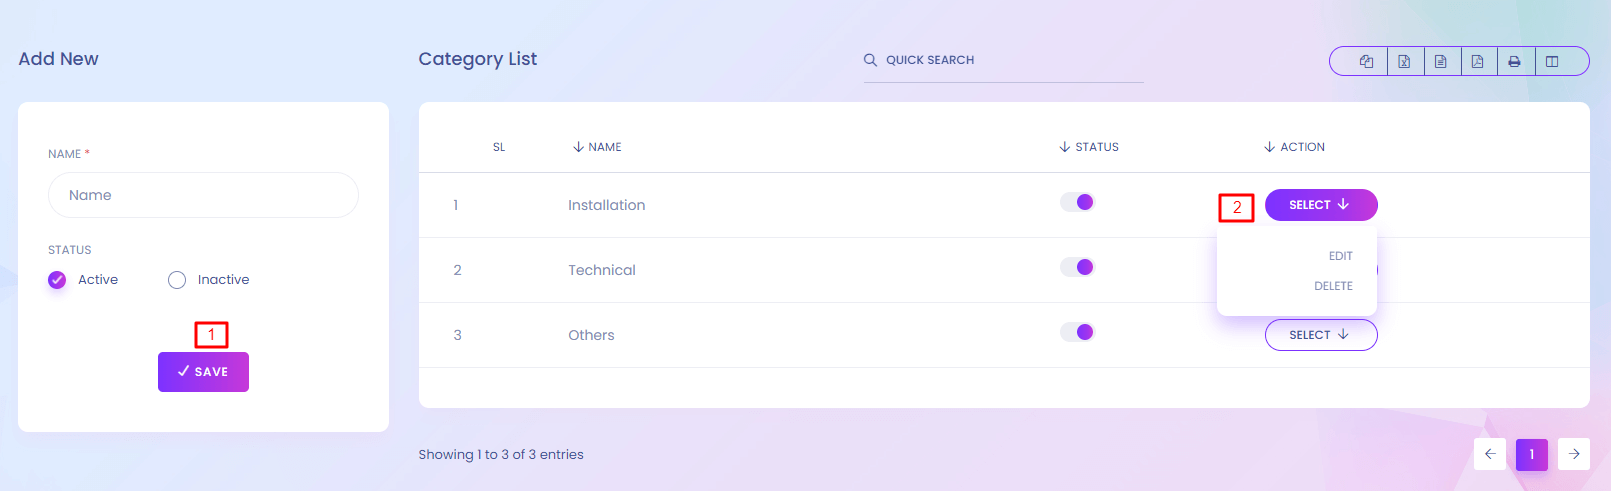
Support Ticket Category
For creating a support ticket you need to choose a category. You can manage the category here.
1. Save
Create new category.
2. Action
Admin can edit and delete any category.
Priority
Priority
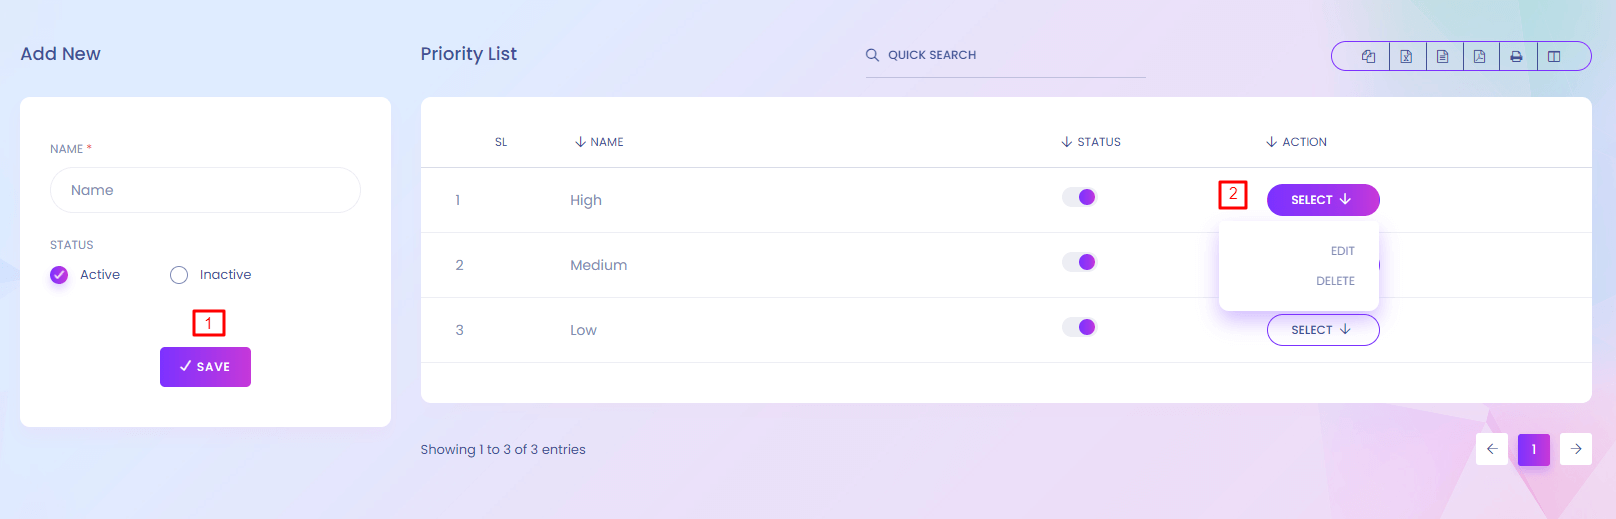
Priority
Support ticket has different priority. You can manage support ticket priority here.
1. Save
Create new priority.
2. Action
Admin can edit and delete any priority.
Status
Status
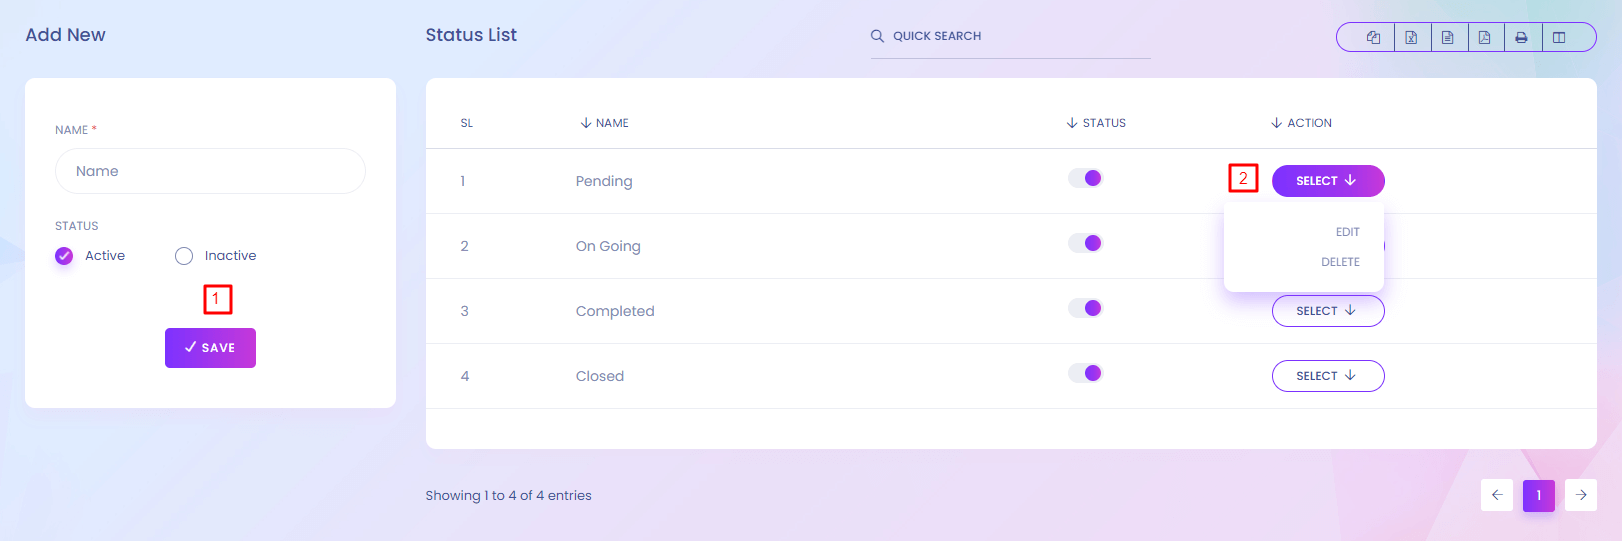
Status
Support ticket has different status. You can manage support ticket status here.
1. Save
Create new status.
2. Action
Admin can edit and delete any status.
Activity Logs
Activity Logs
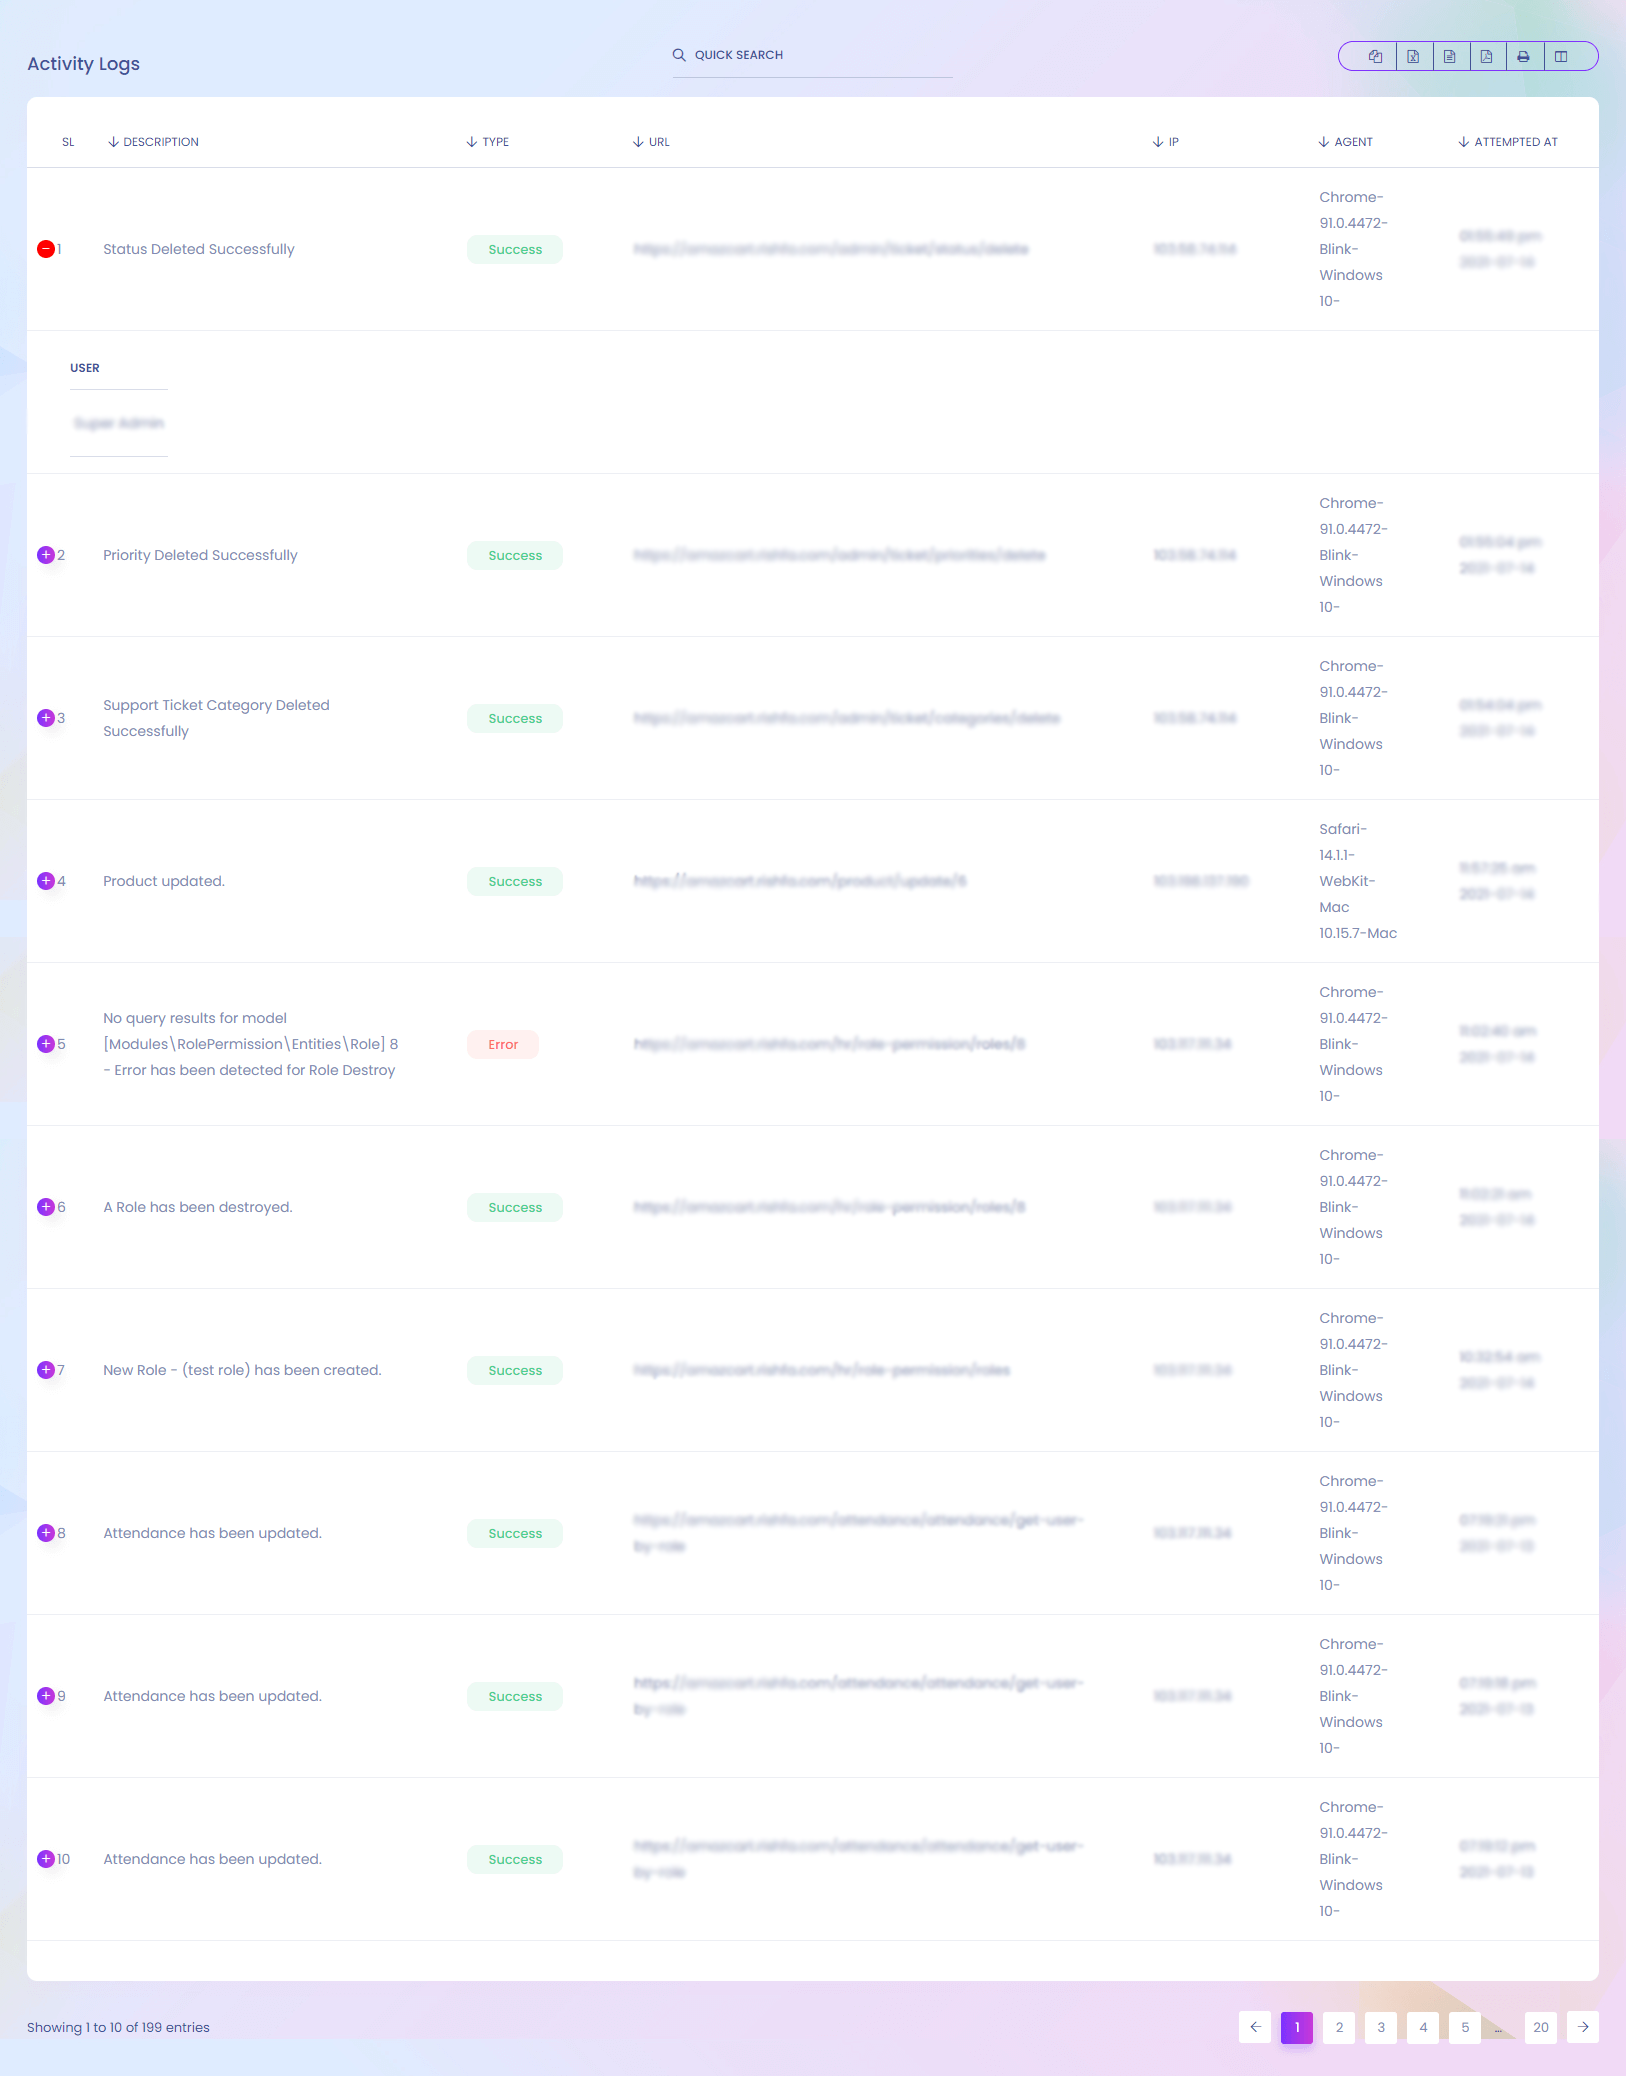
Activity Logs
All the activities of the system is stored. You will find it here.
Login Activity
Login Activity
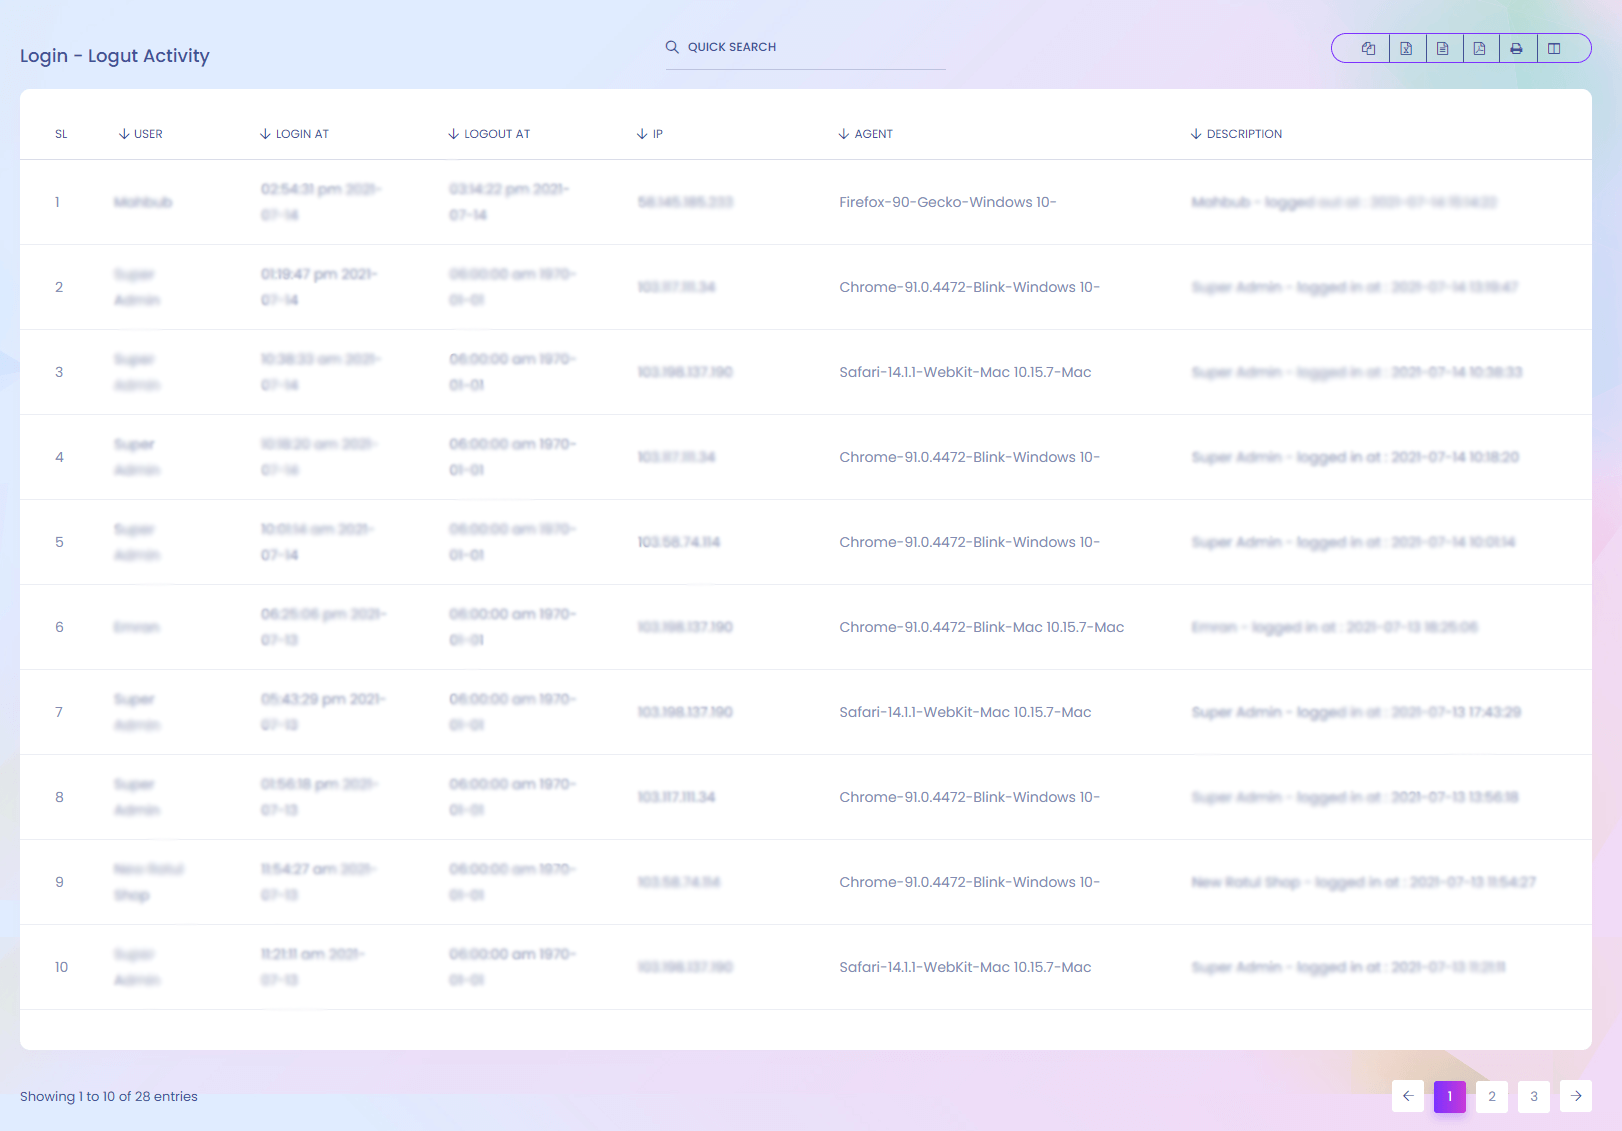
Login Activity
System stores all the login and logout information of the users. You can find it here.
Staff
Staff

Staff
Staffs are like your company employee. You can use them to do specific task.
1. Add New Staff
Admin can create new staff.
2. Action
Admin can view, edit and delete staff.
Staff (Create)

1. Save
Save the staff.
Role
Role
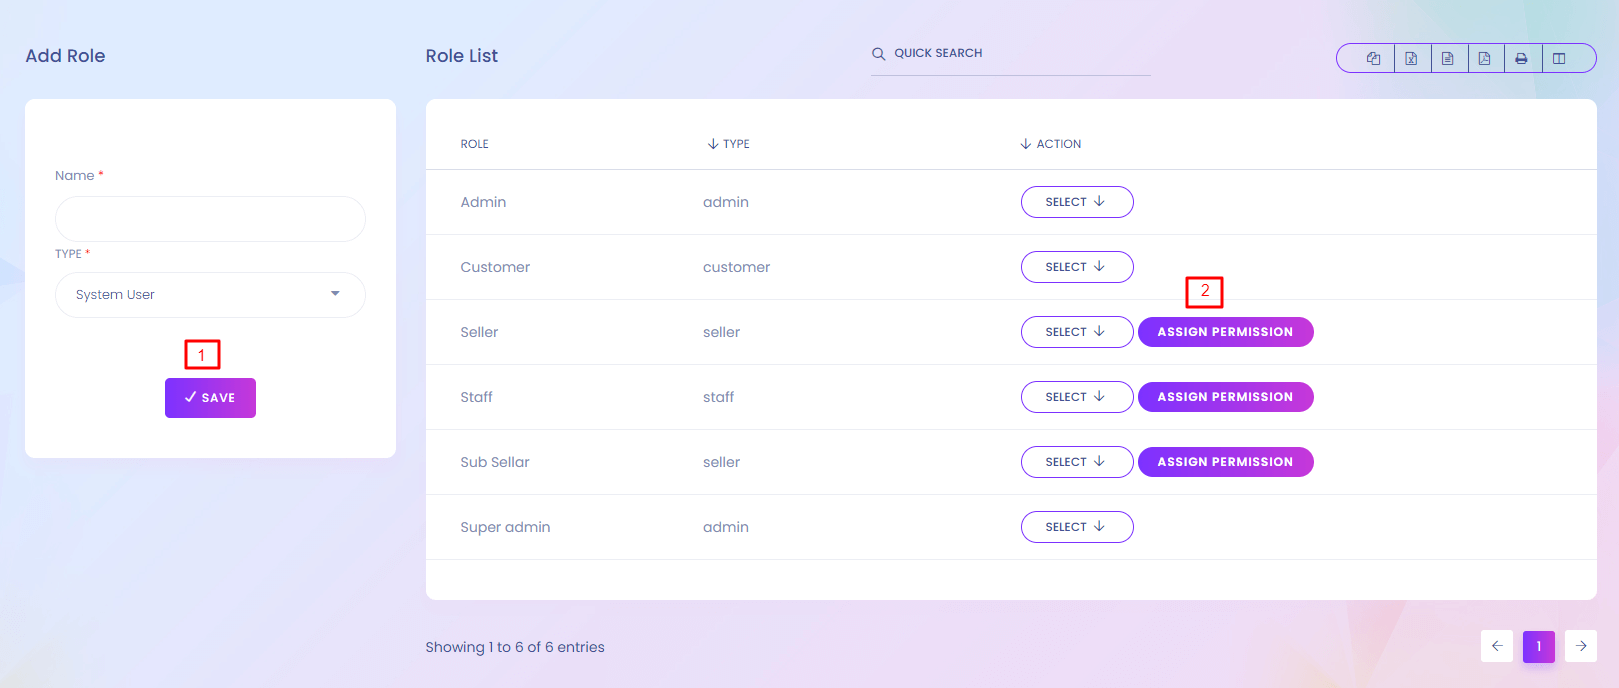
Role
Every staff and user has a specific role. Role means what a user can do. Different types of permissions are given to a specific role.
1. Save
Create new role.
2. Assign Permission
Admin can assign permissions to any role.
Role Permission
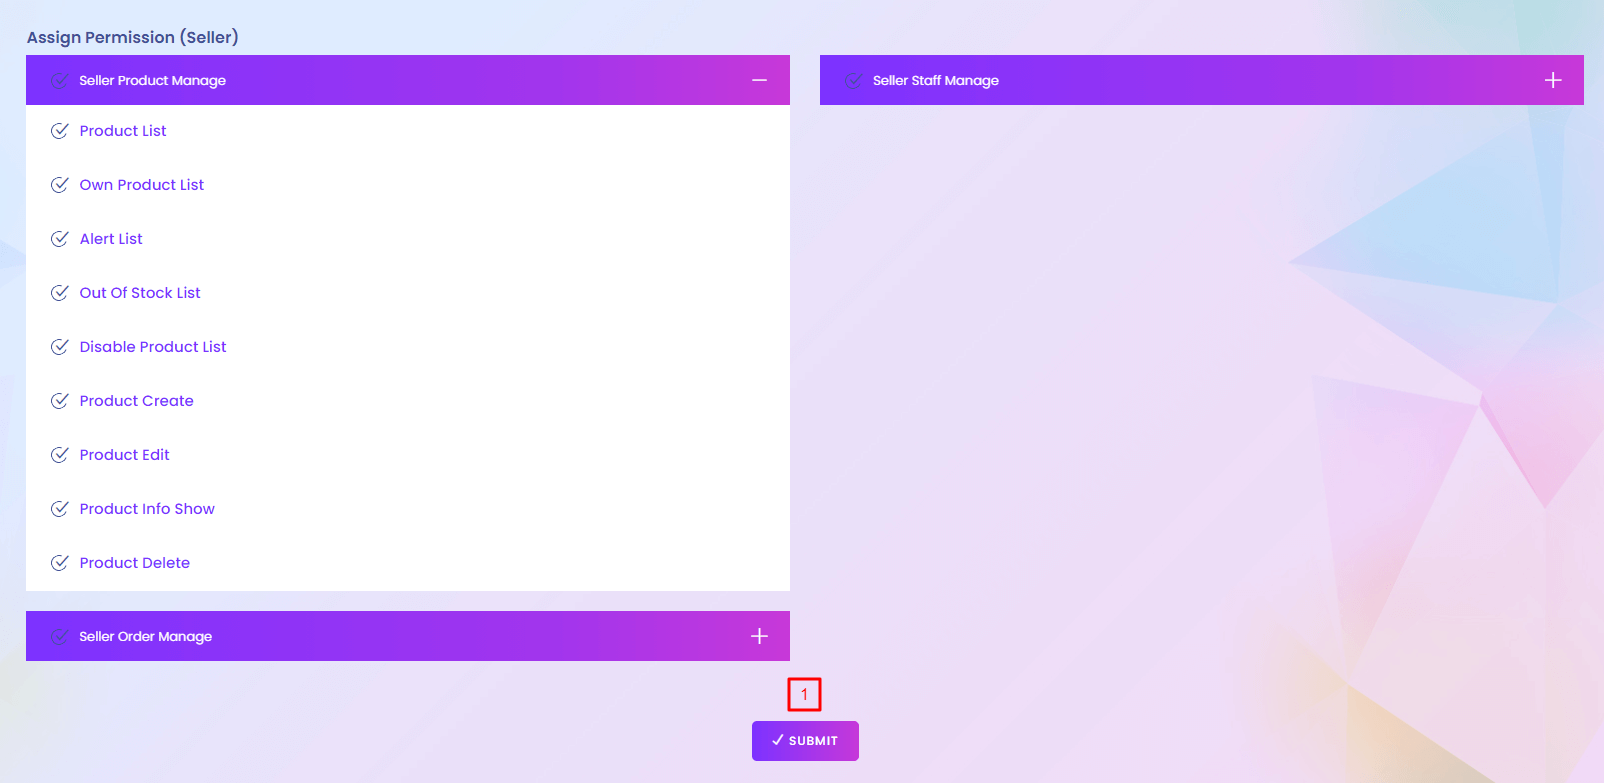
1. Submit
Assign the specific permissions to the role.
Department
Department

Department
You can manage your company department.
1. Add New Department
Admin can create new department.
2. Action
Admin can edit and delete department.
Department (Create)
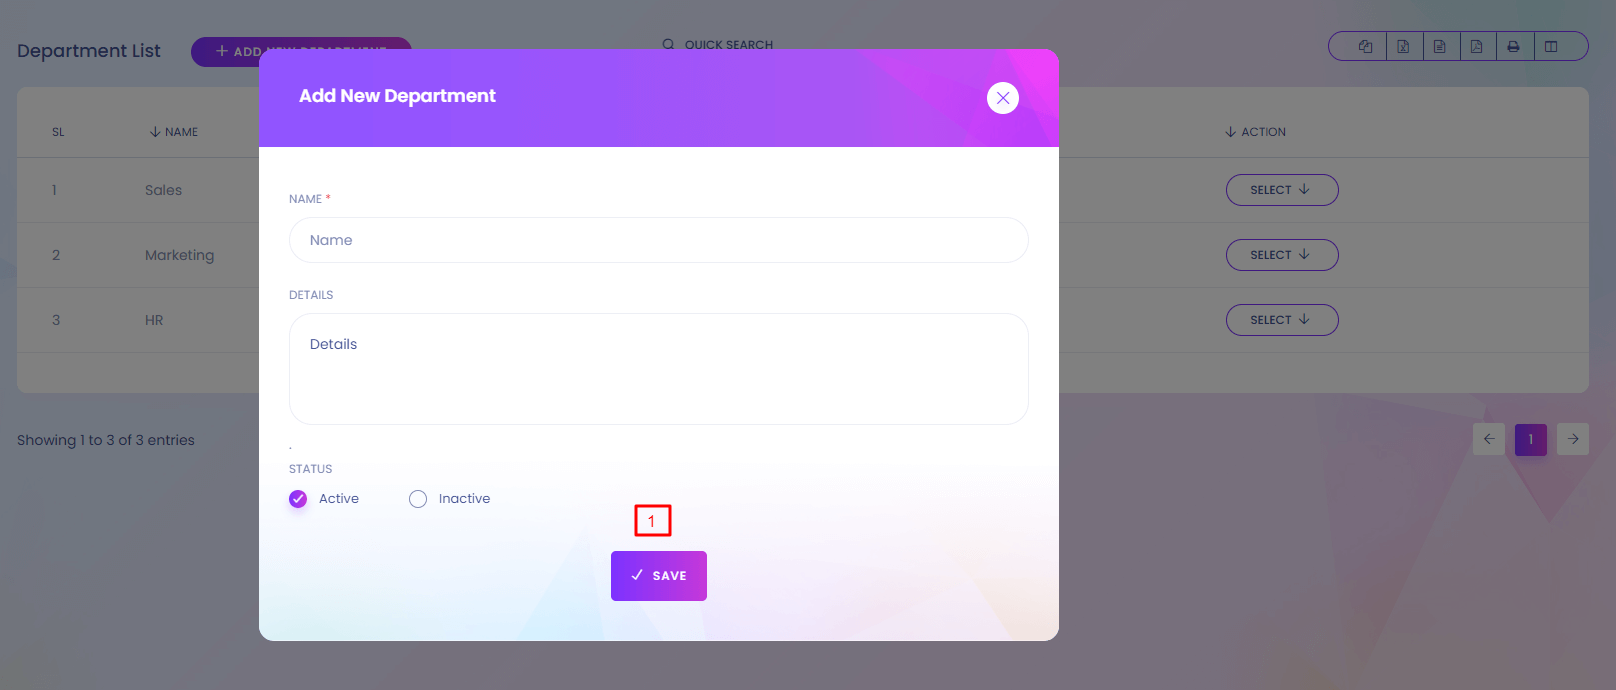
1. Save
Save the department.
Attendance
Attendance

Attendance
You can take your staff attendance here.
1 & 2. Select Role and Date
Select role and date to give attendance.
3. Save
Save the attendance.
Attendance Report
Attendance Report
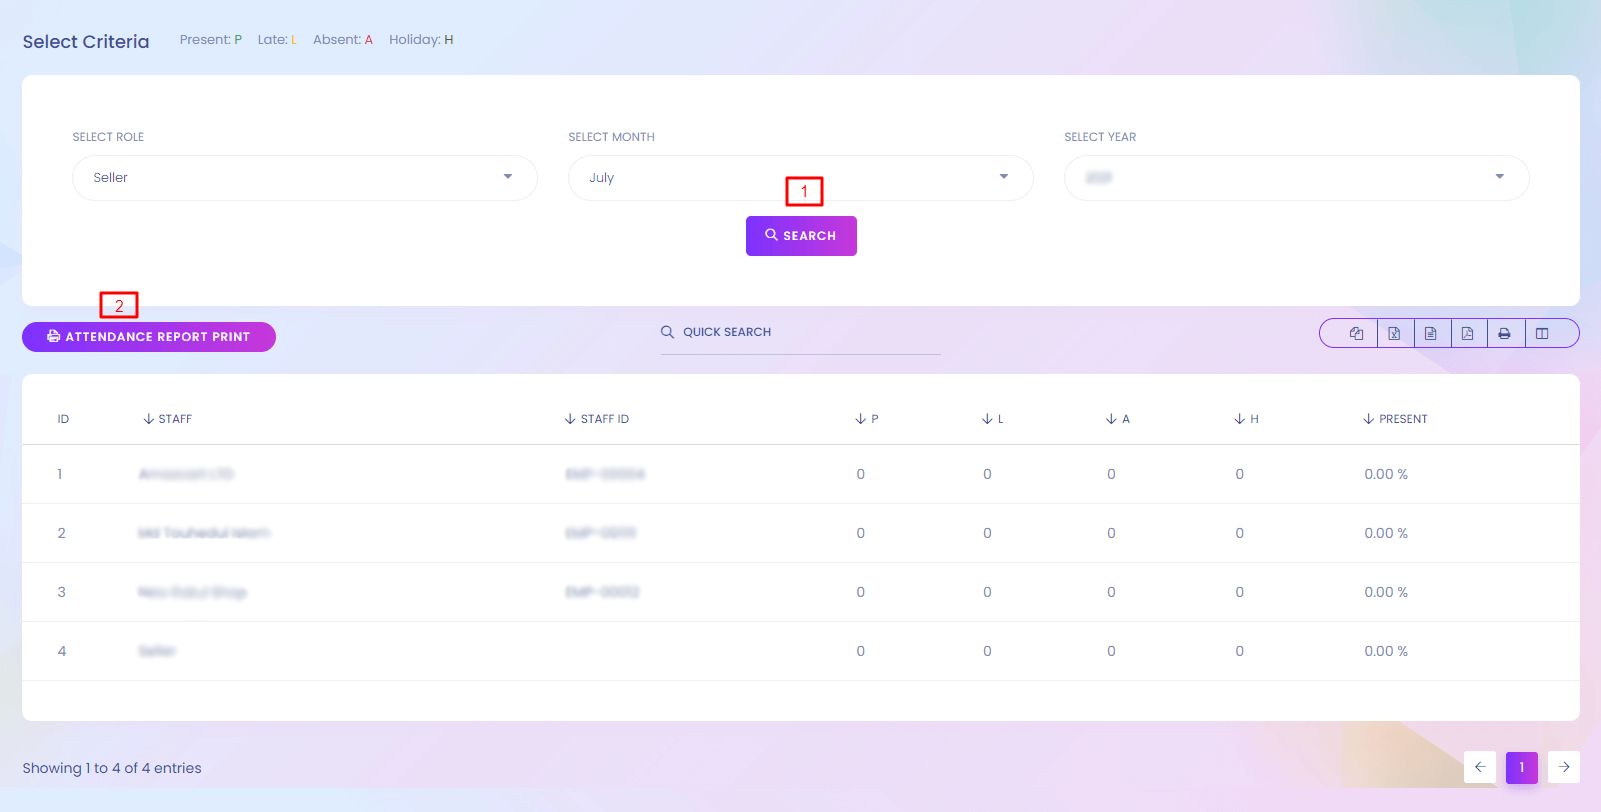
Attendance Report
You can generate your staff attendance report here.
1. Search
Select role, month and year for attendance report generate.
2. Attendance Report Print
You can print the attendance report.
Event
Event

Event
You can manage event here.
1. Save
Admin can create new event.
2. Action
Admin can edit and delete event.
Holiday Setup
Holiday Setup
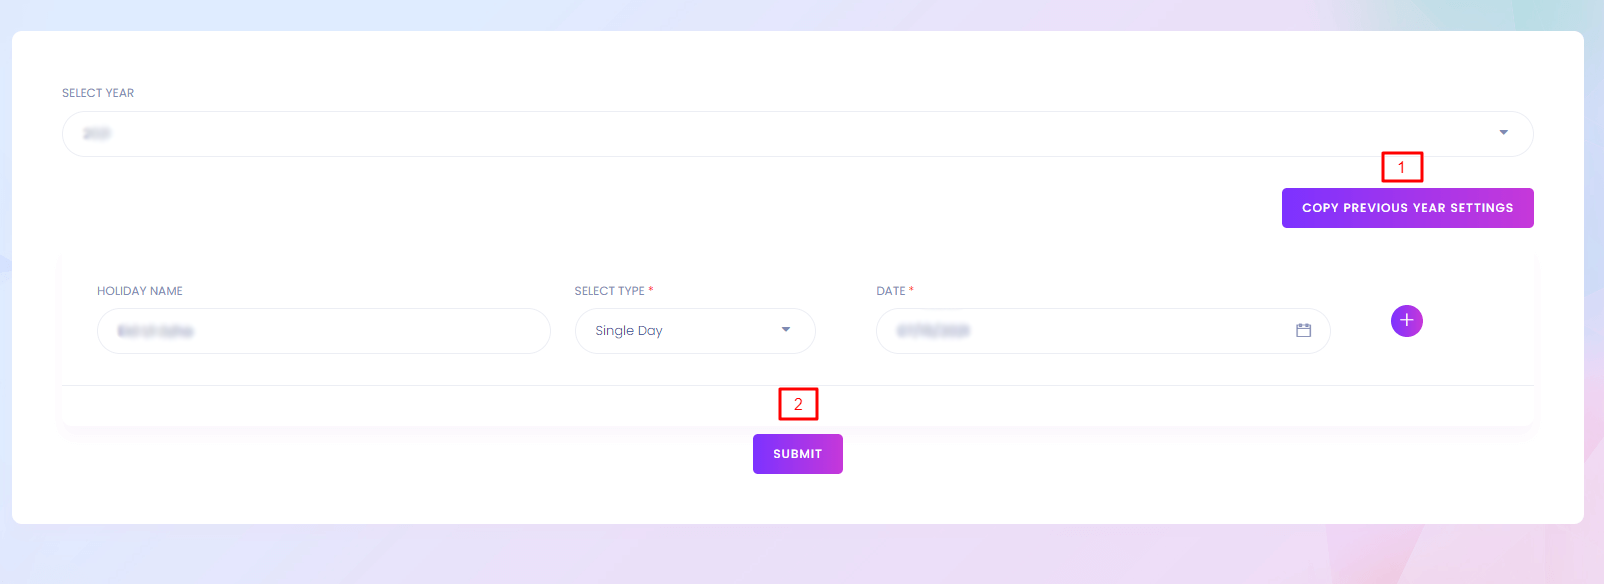
Holiday Setup
Setup holiday for staffs.
1. Copy Previous Year Setting
Save the previous year setting for the year.
Submit
Admin can add new holiday.
Ignore IP
Ignore IP
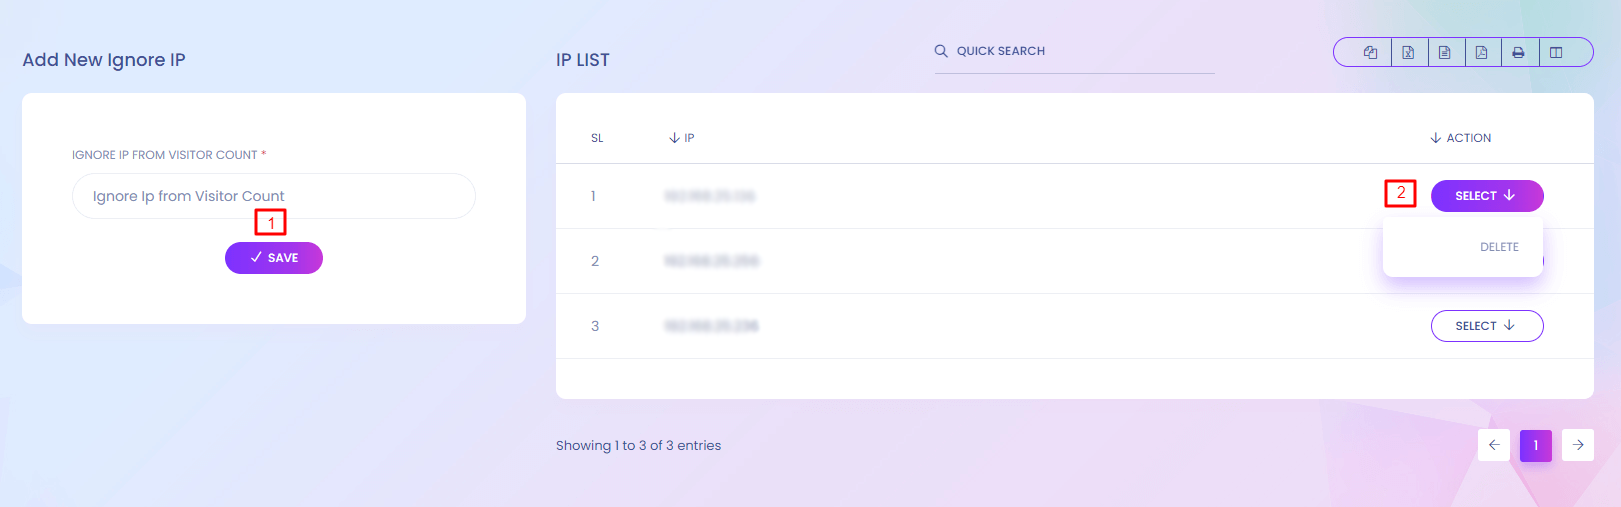
Ignore Ip
If you want to prevent a user to use the application you can do it by giving the IP address in ignore IP.
1. Save
Ignore IP cannot enter the website. You can add new ip address from here.
2. Action
Delete any ignored IP.
Sidebar Manage
Sidebar Manage
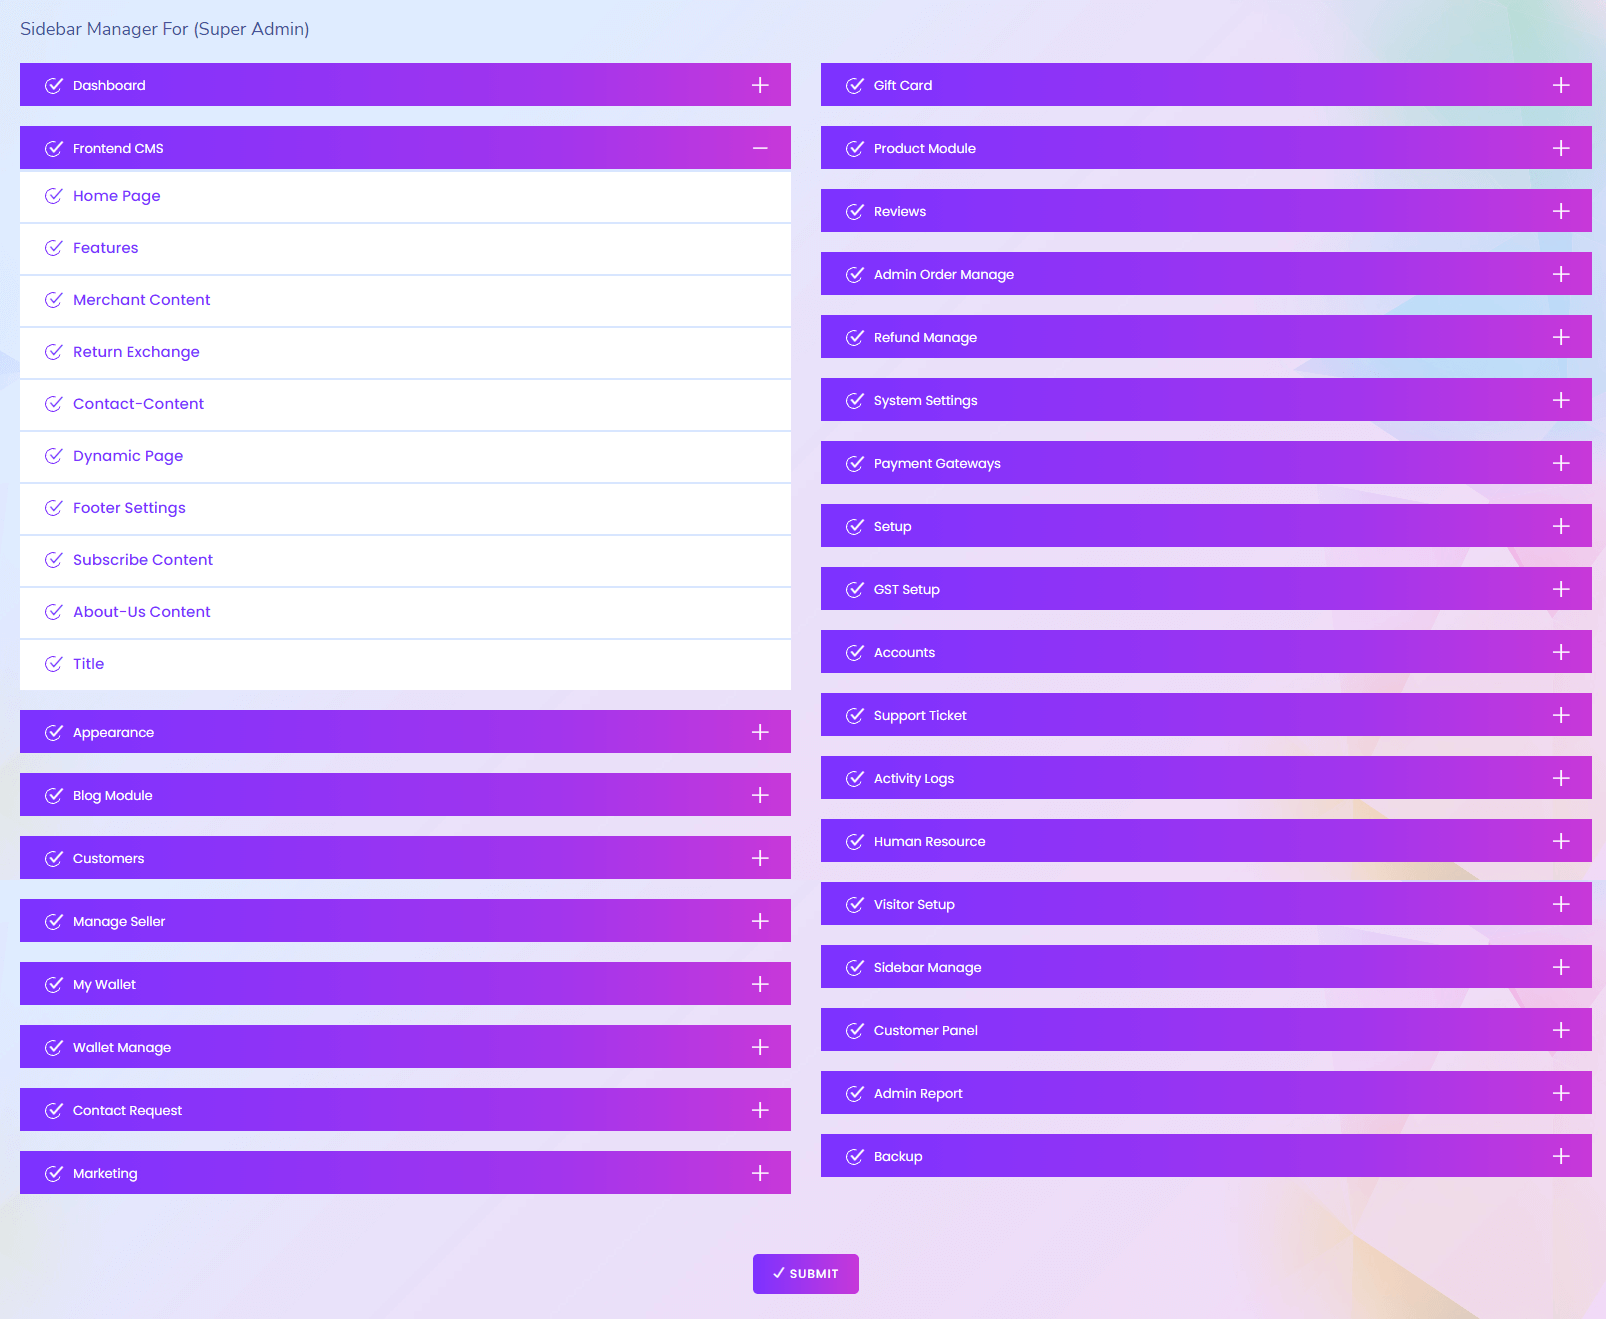
Sidebar Manage
Admin can rearrenge the sidebar from here by drag and drop.
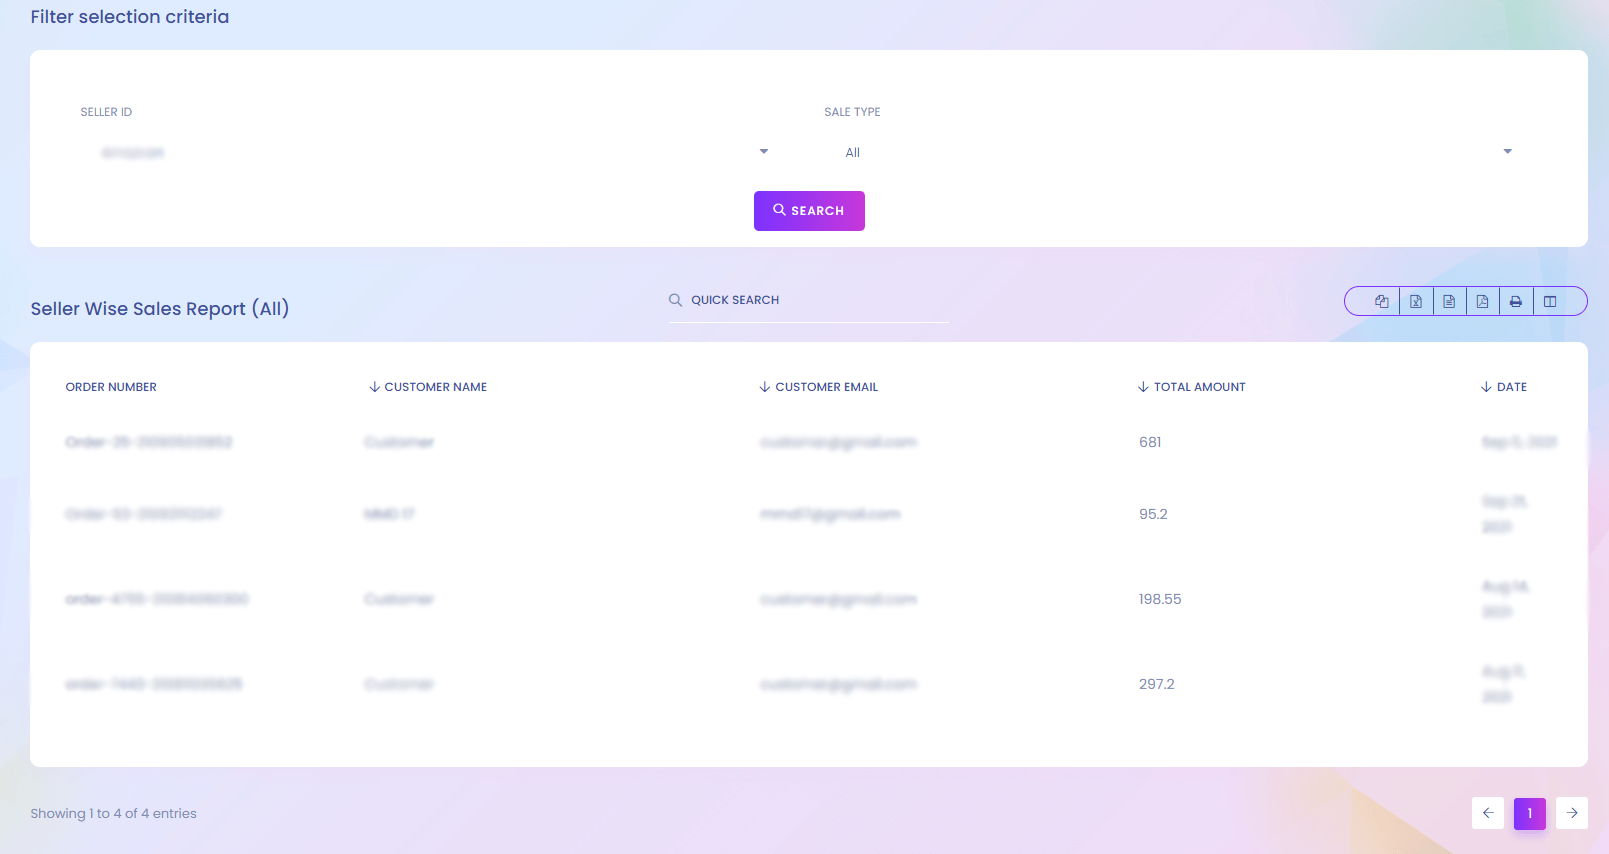
Seller Wise Sales
Seller Wise Sales
Keyword Searches
Keyword Searches
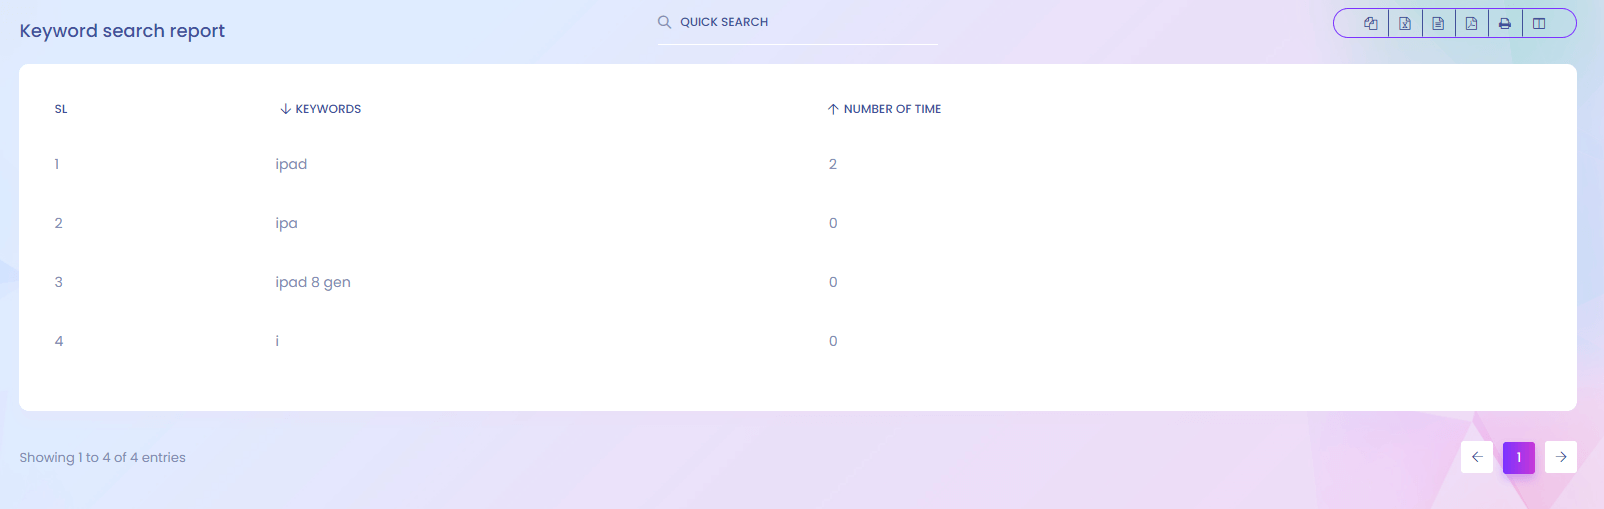
Keyword Searches
You can find the report of which keywords are searched in the application.
Visitor
Visitor
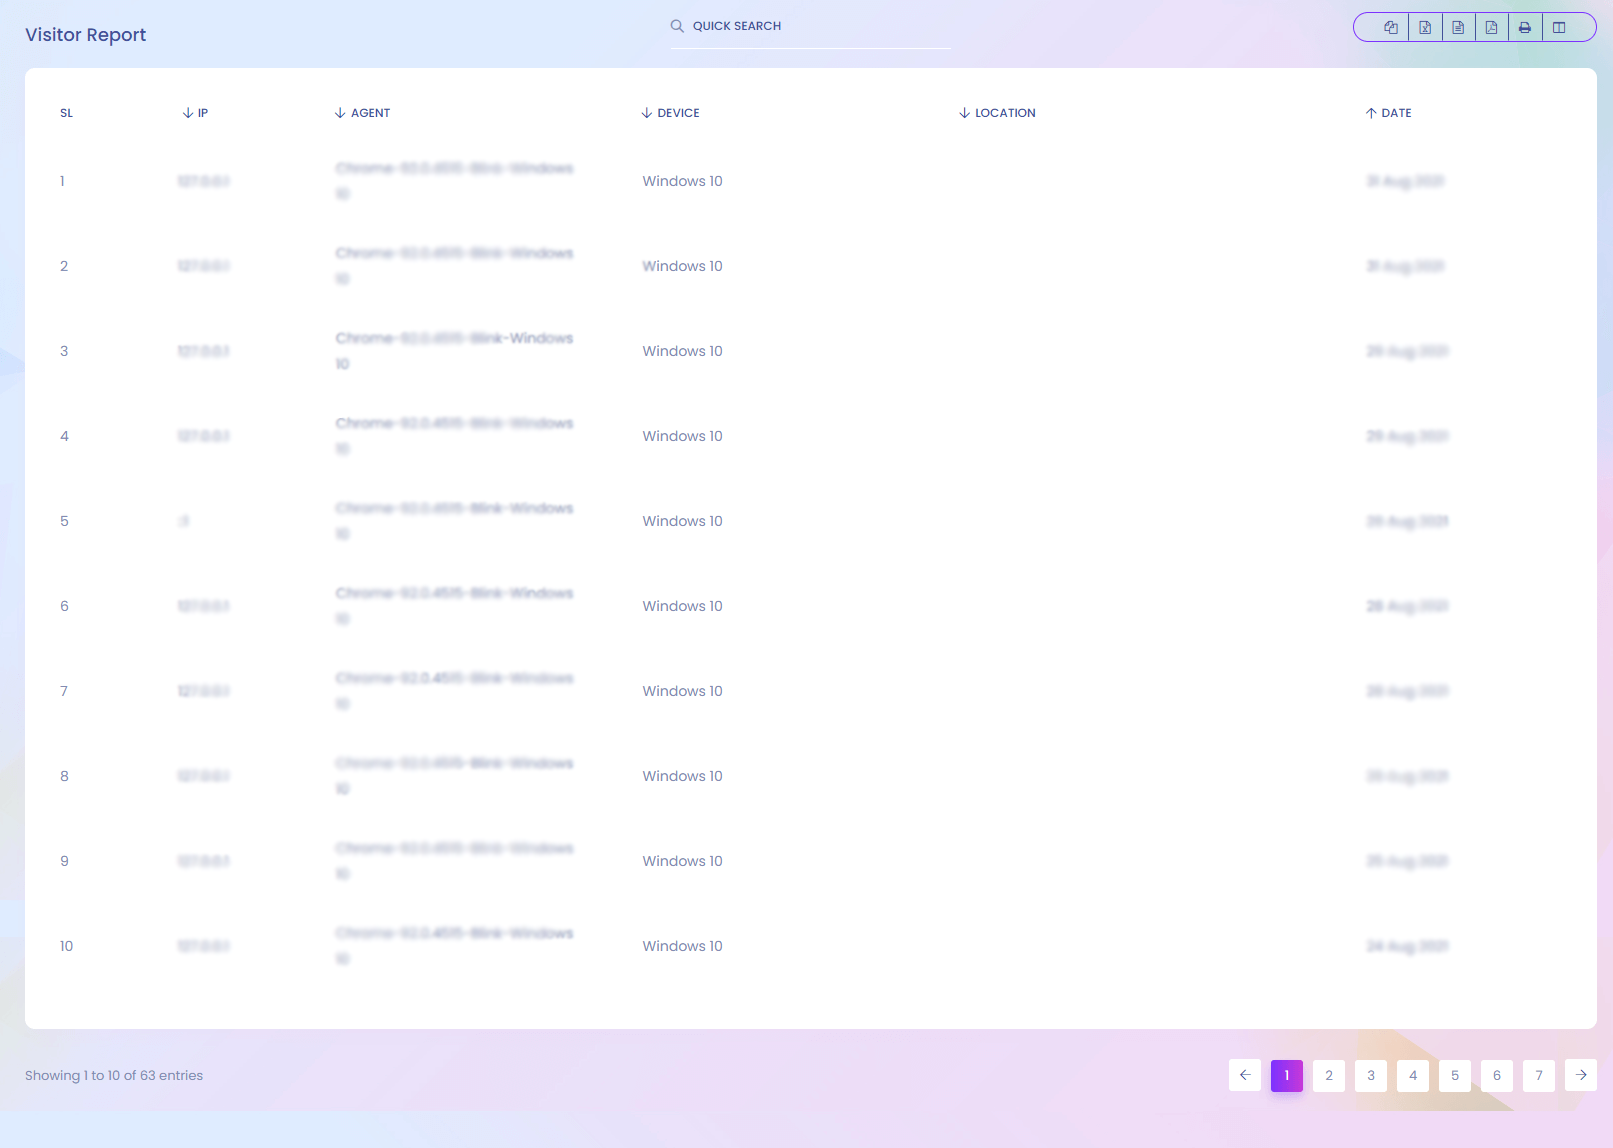
Visitor
If anyone visit the website, the system store the ip address of the user. You can find the visitor list here.
Inhouse Product Sale
Inhouse Product Sale
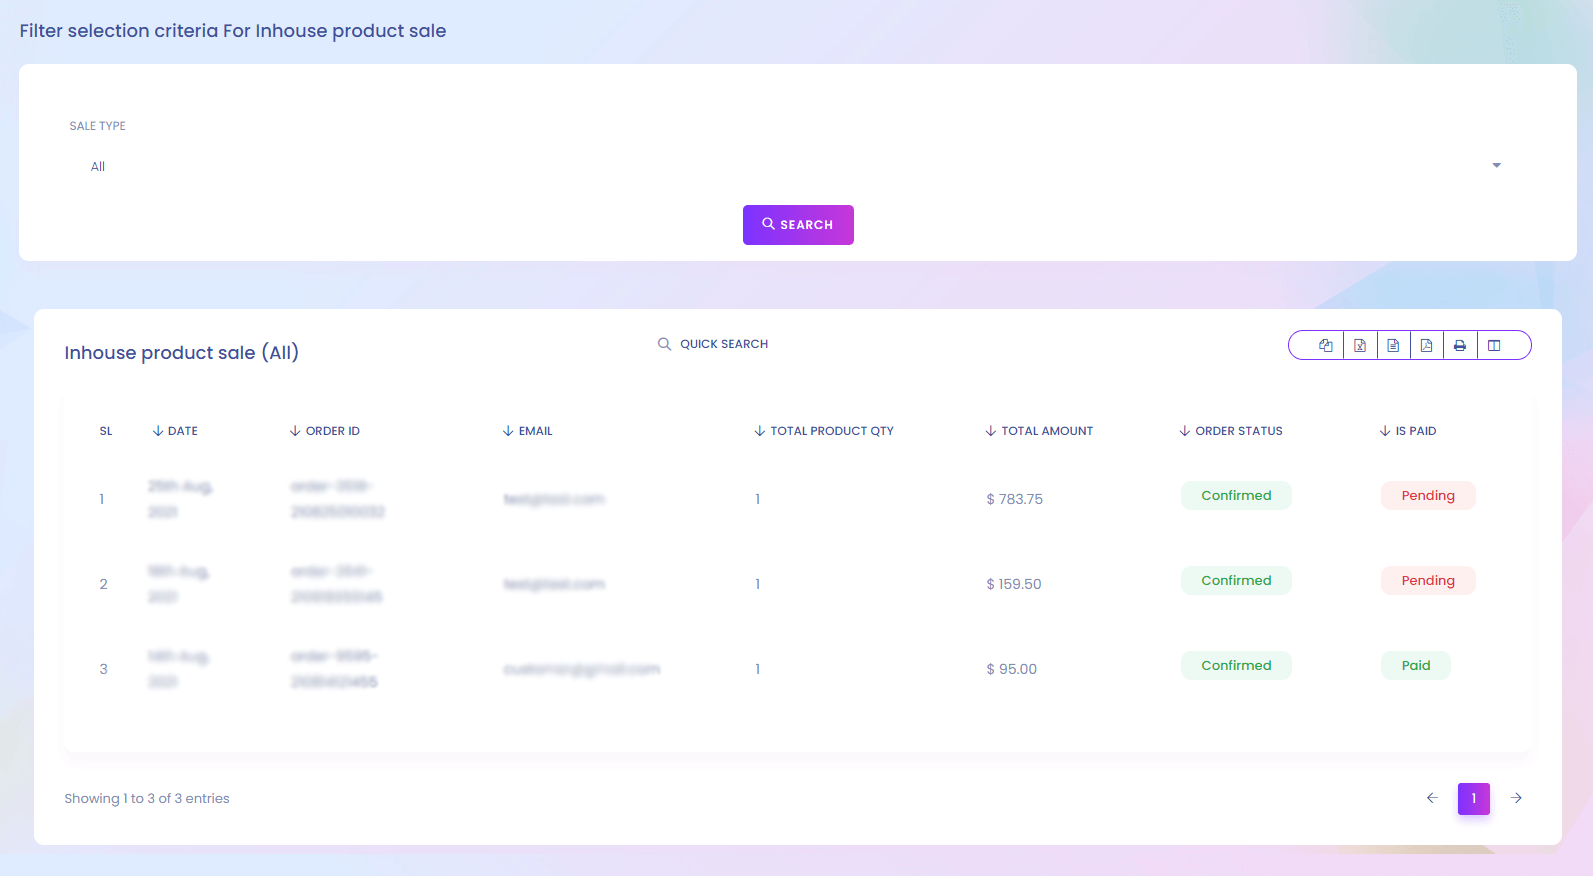
Inhouse Product Sale
You can find the inhouse product sale report here. You can filter by sale type.
Product Stock
Product Stock
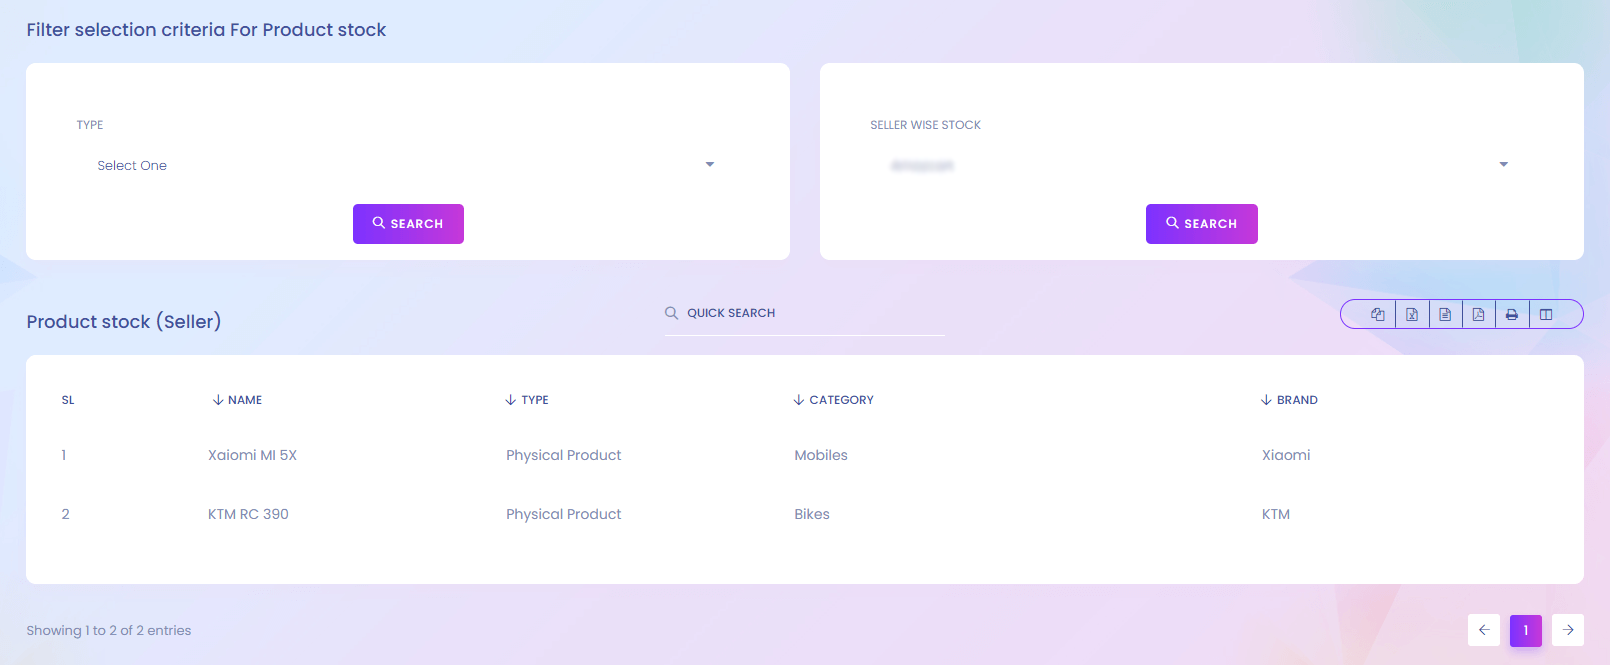
Product Stock
Product stock list is here.
Wishlist
Wishlist
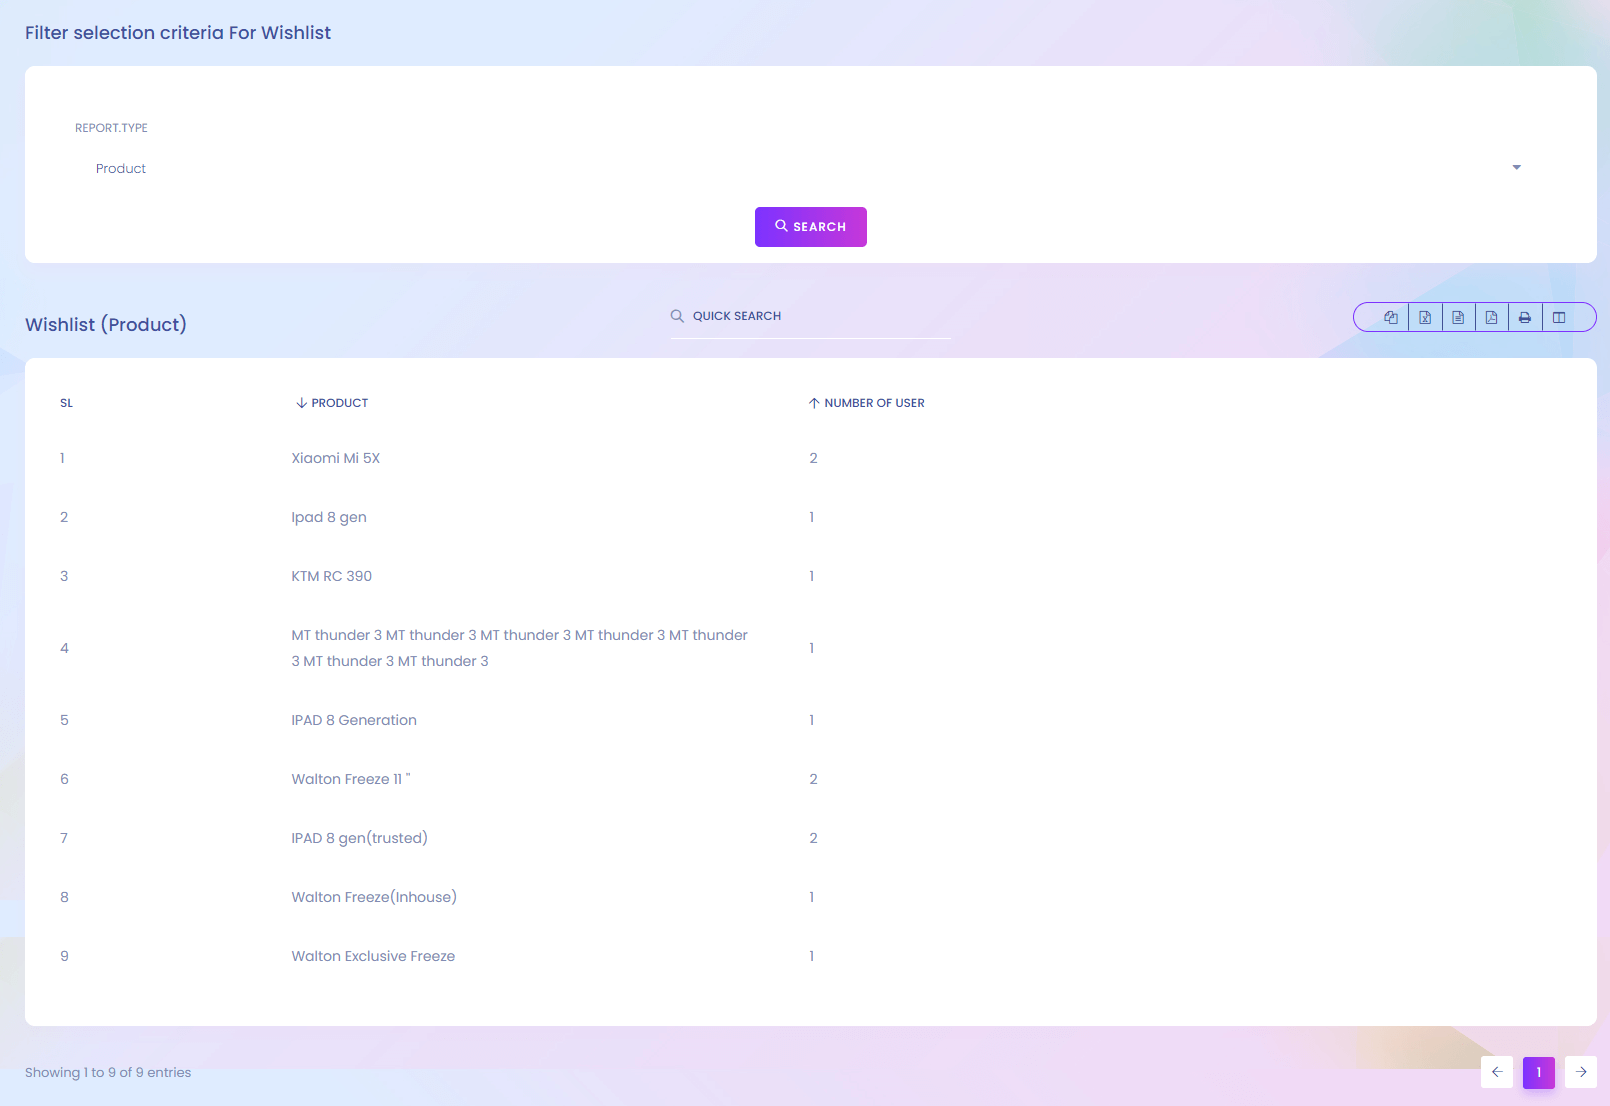
Wishlist
If any user add any product to his/her wishlist, you can find it here.
Wallet Recharge History
Wallet Recharge History
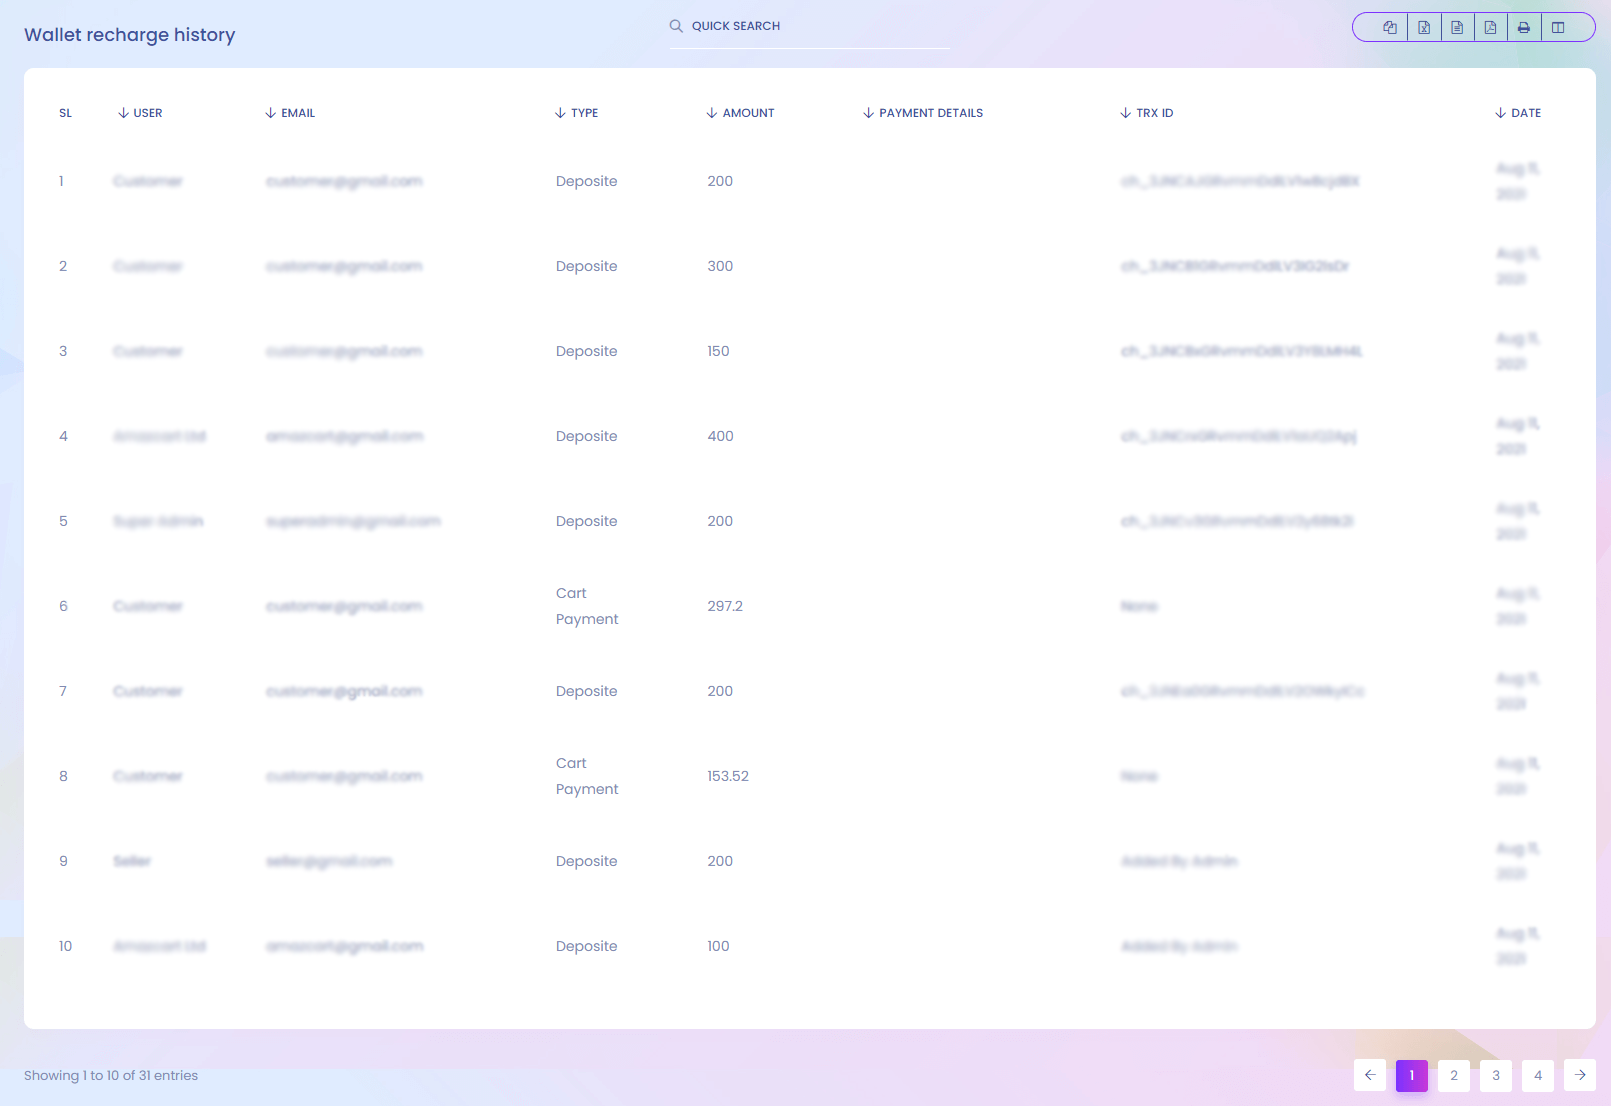
Wallet Recharge History
You can find the wallet recharge history report here.
Top Seller
Top Seller

Top Seller
You can find the report of top seller who sales the most.
Top Customer
Top Customer
Top Customer
You can find the top customer who spent the most.
Top Selling Item
Top Selling Item
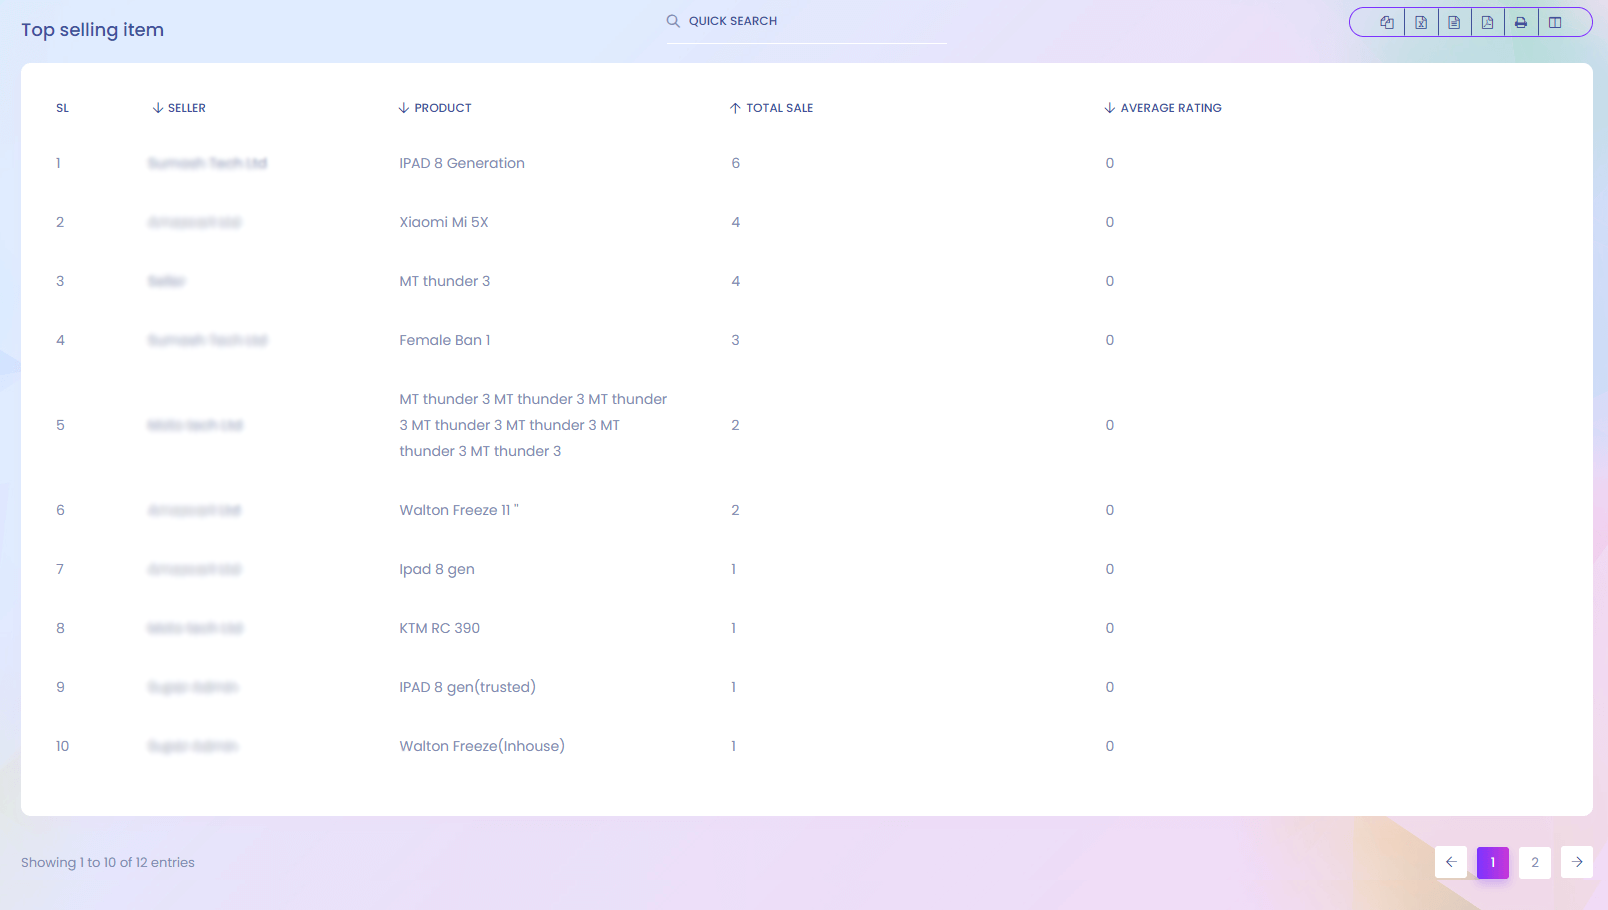
Top Selling Item
You can find the report of product which has sold the most.
Order
Order
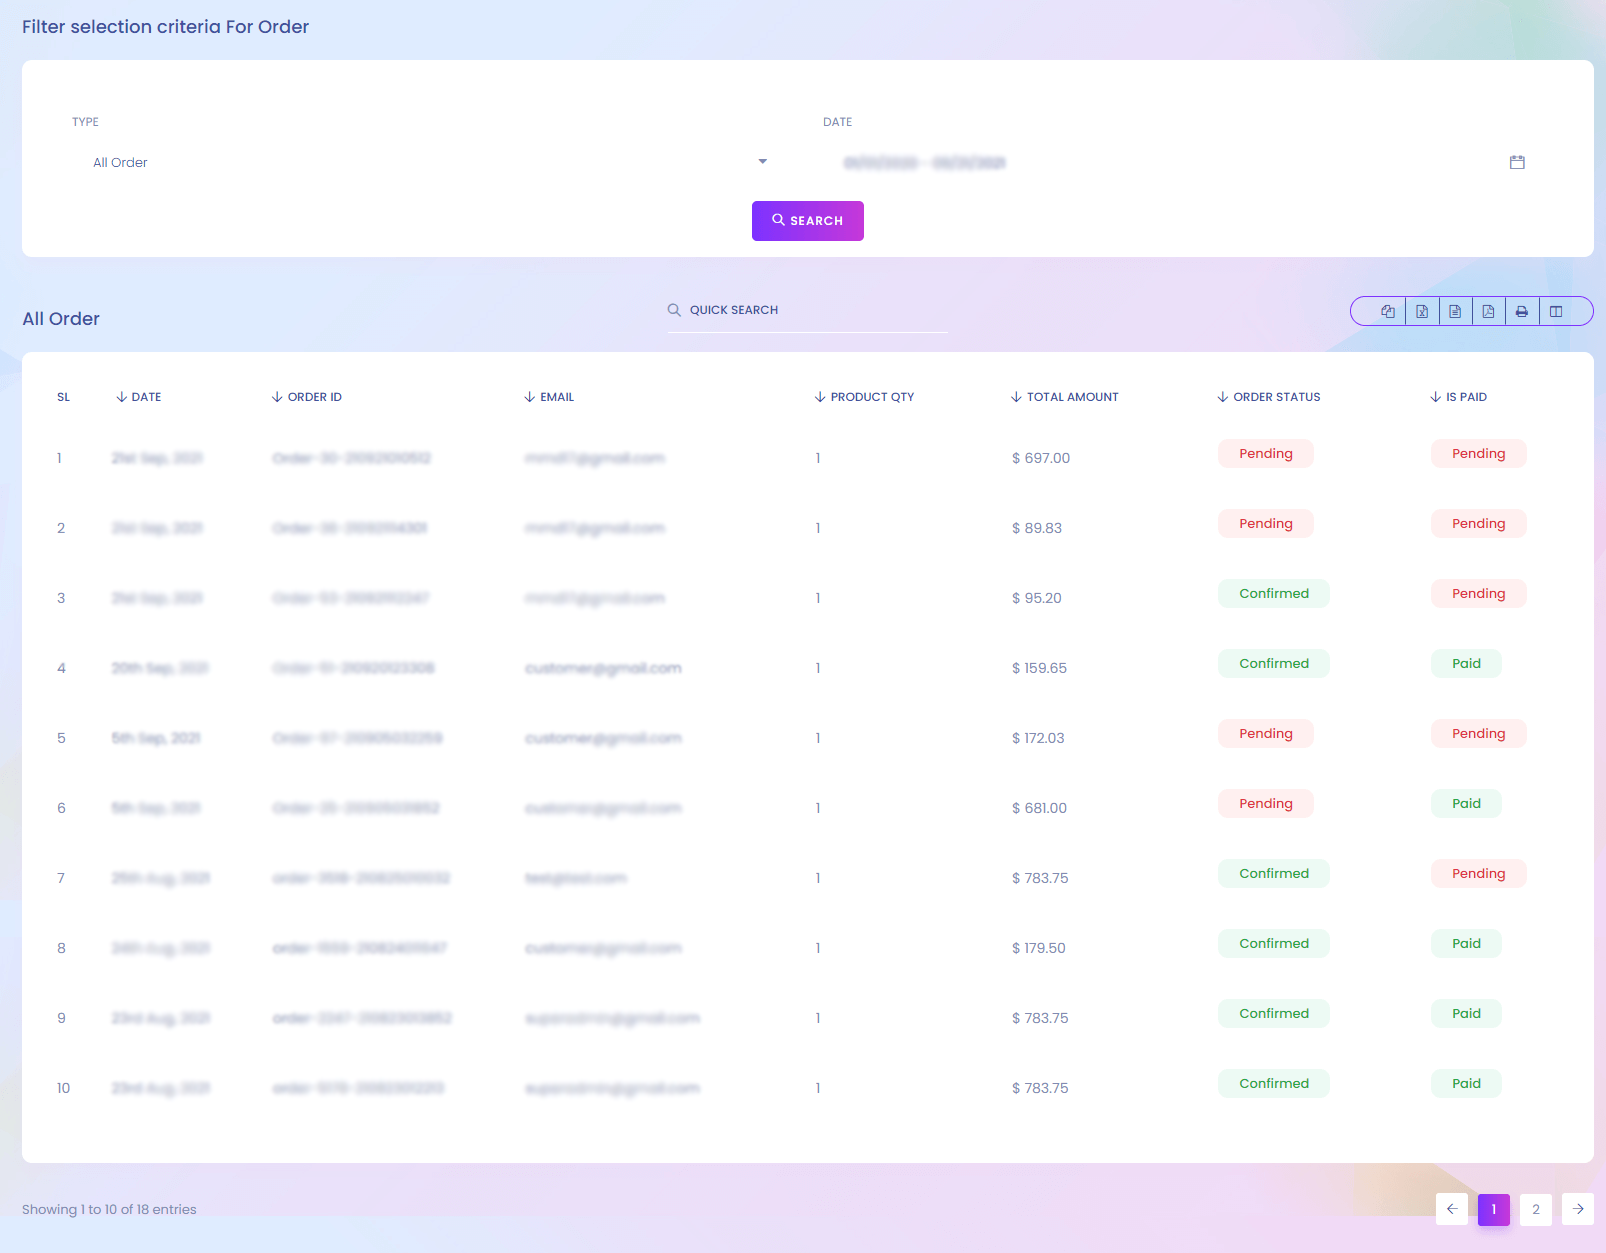
Order
You can find the order report here. You can filter the report according to your necessary.
Payment
Payment
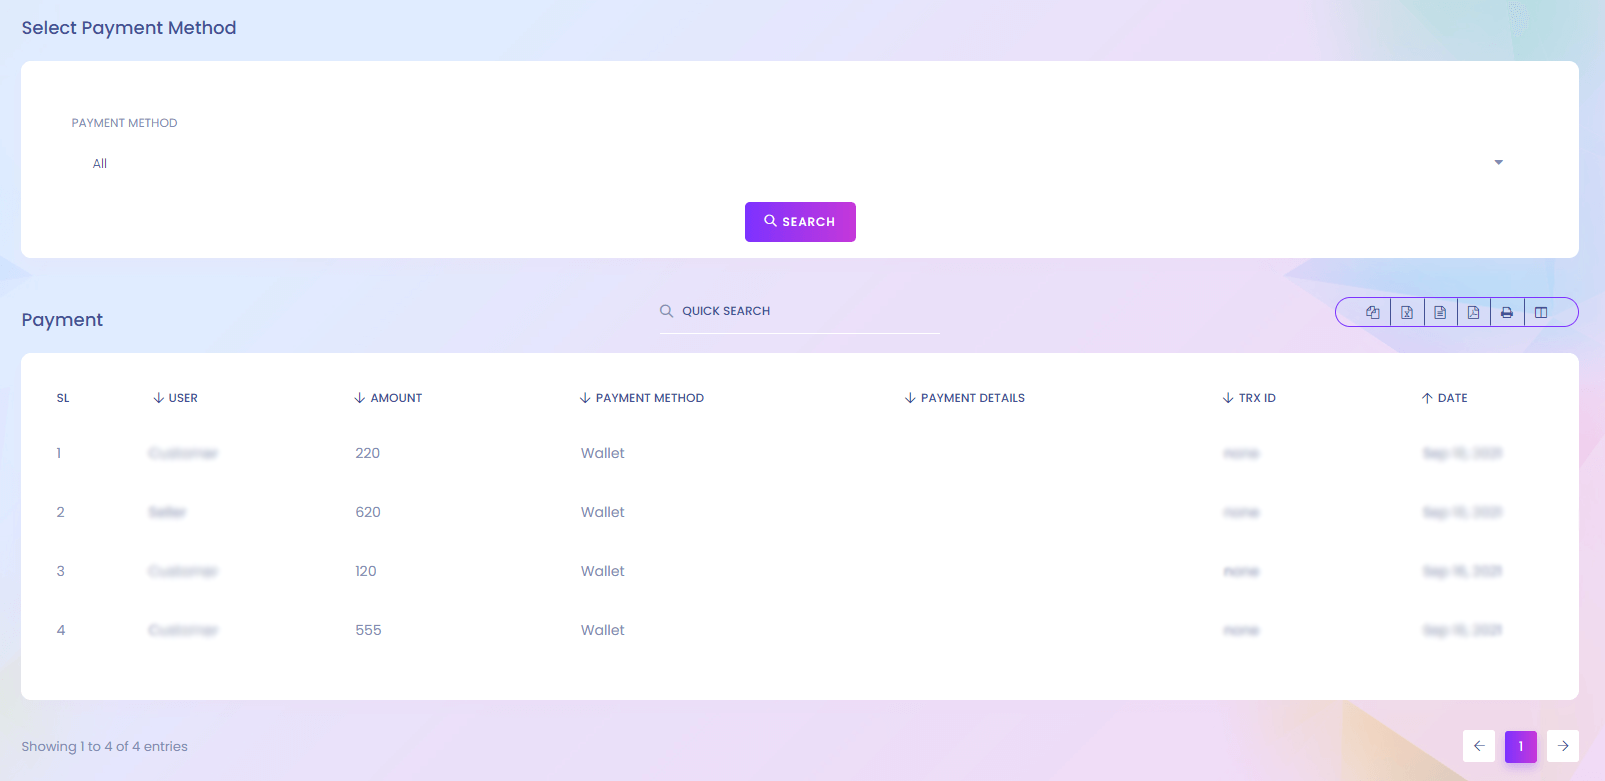
Payment
Payment history report is here.
Product Review
Product Review
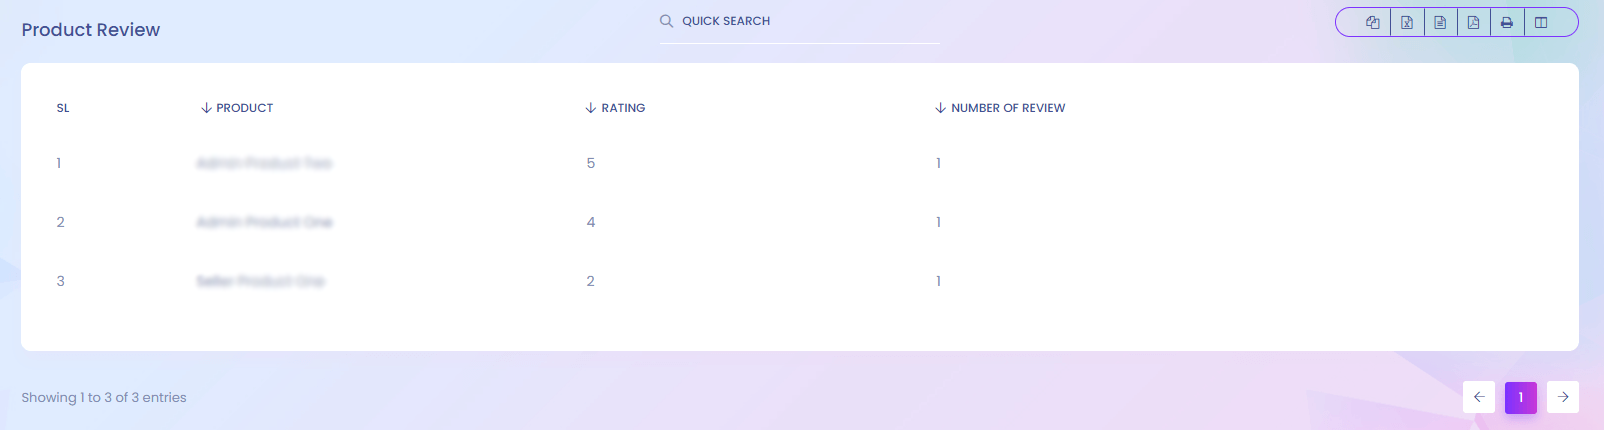
Product Review
You can find the product review report here.
Seller Review
Seller Review
Seller Review
You can find the seller review report here.
My Purchases
My Purchases
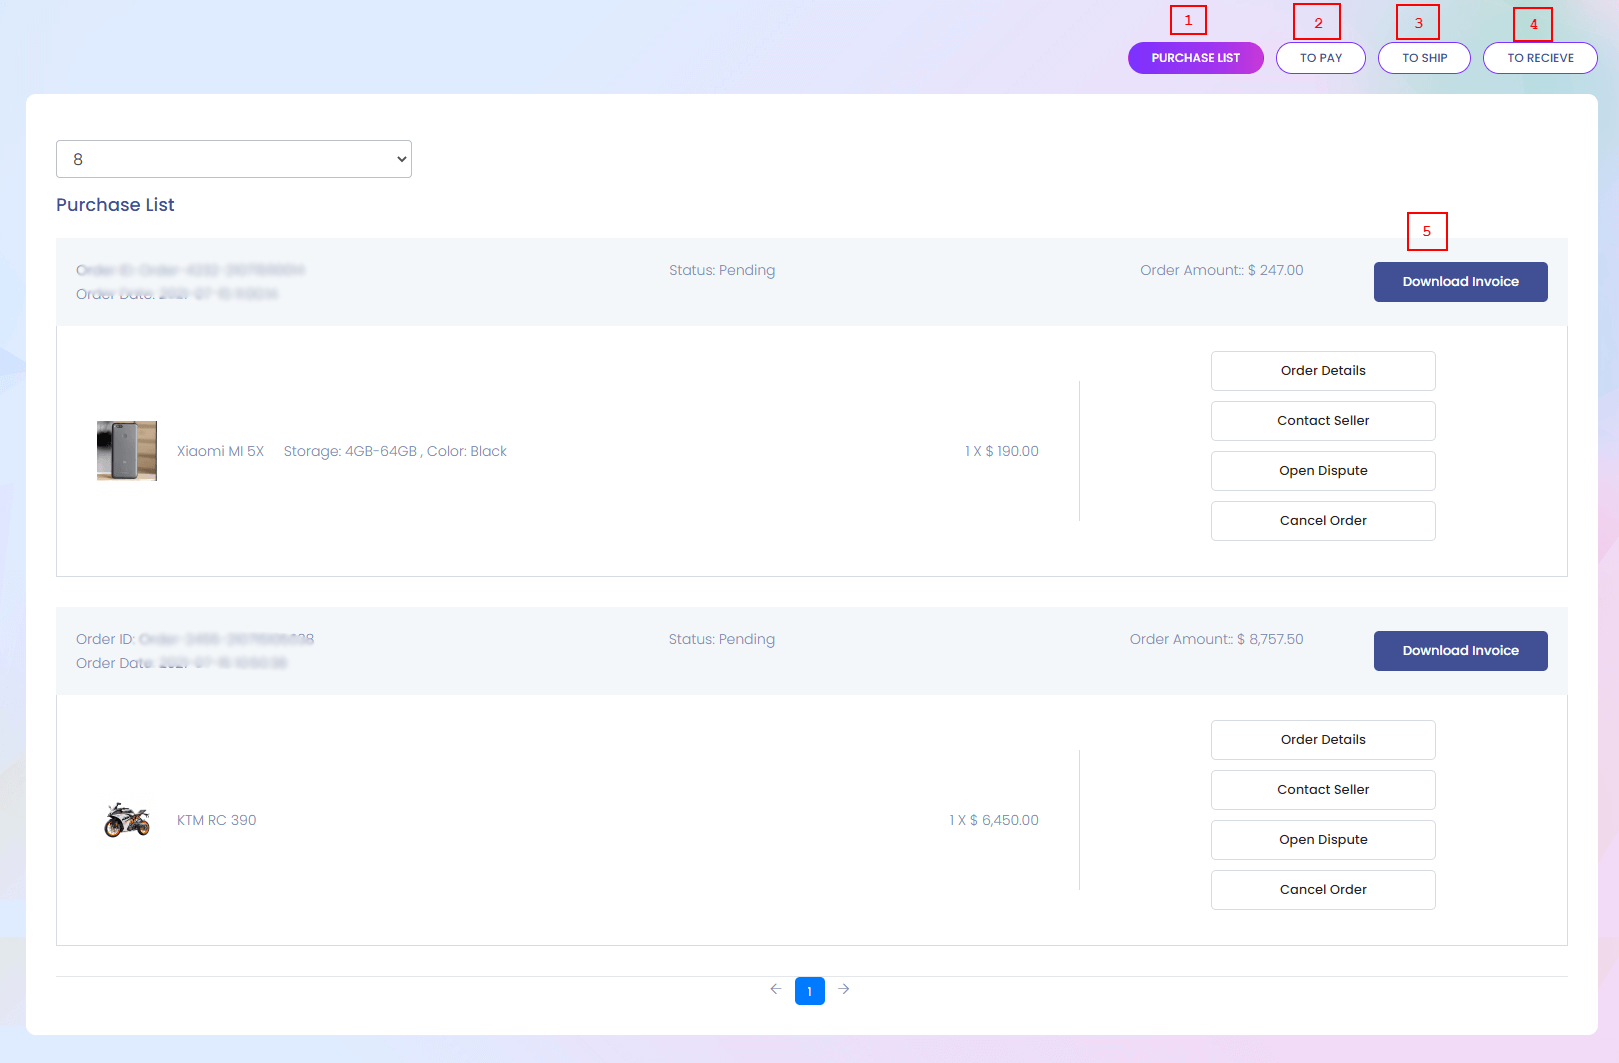
My Purchase
Whatever you purchase from the website you can find it here. You can also see different types of details of your orders.
1. Purchase List
View the purchase products.
2. To Pay
View the paying product list.
3. To Ship
View the shipping product list.
4. To Recieve
View the reveiving product list.
5. Download Invoice
Download the invoice.
Gift Card
Gift Card
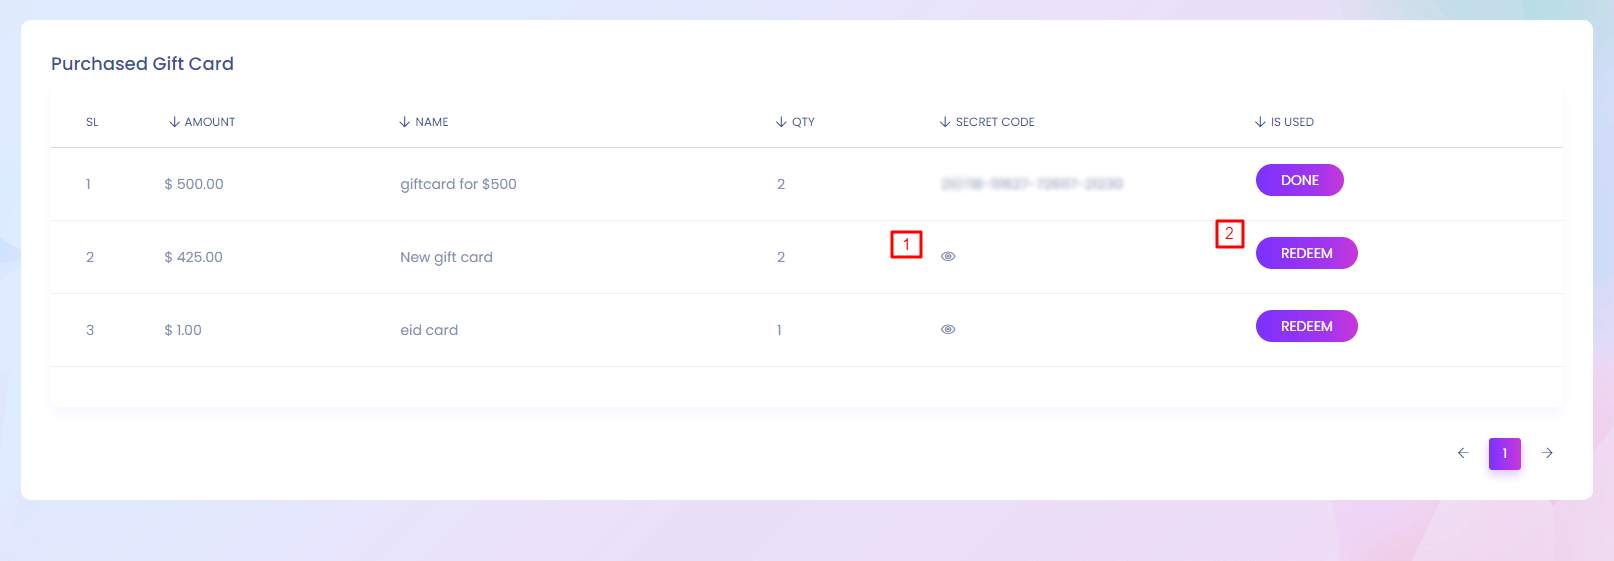
Gift Card
If you buy any gift card, you can find it here. You can use the gift card to recharge your wallet.
1. View
View the secret code.
2. Redeem
By clicking the redeem button you can add the balance to your wallet.
Digital Product
Digital Product
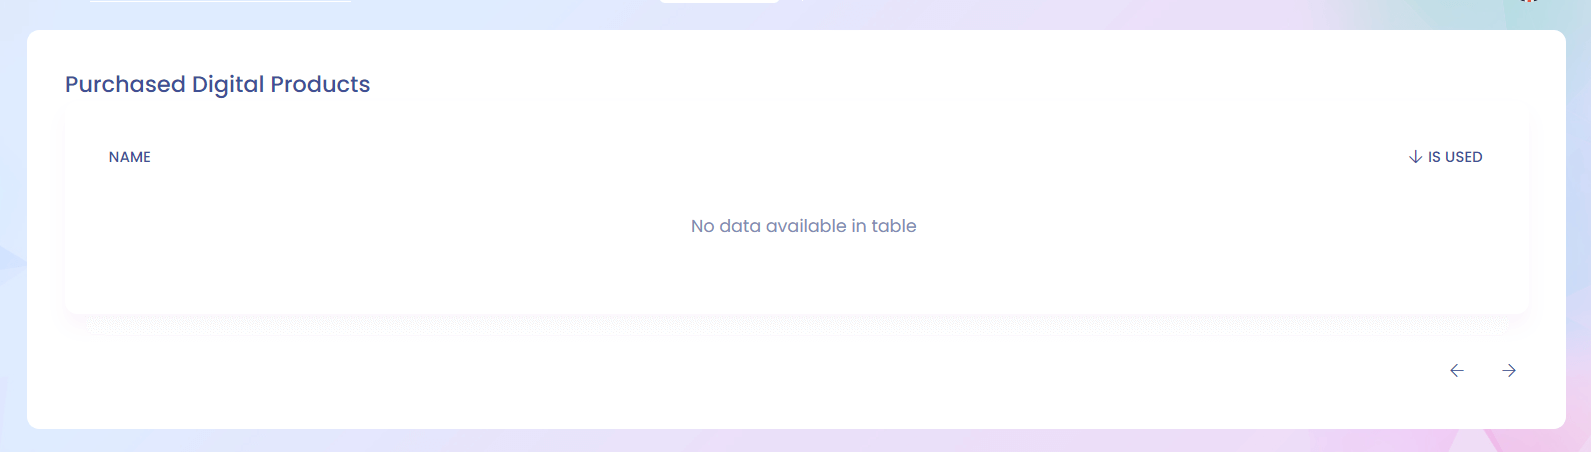
Digital Product
If you buy any digital product , you can find it here.
My Wishlist
My Wishlist
Wishlist
If you add any product to your wishlist you can find it here. /p>
Refund & Dispute
Refund & Dispute
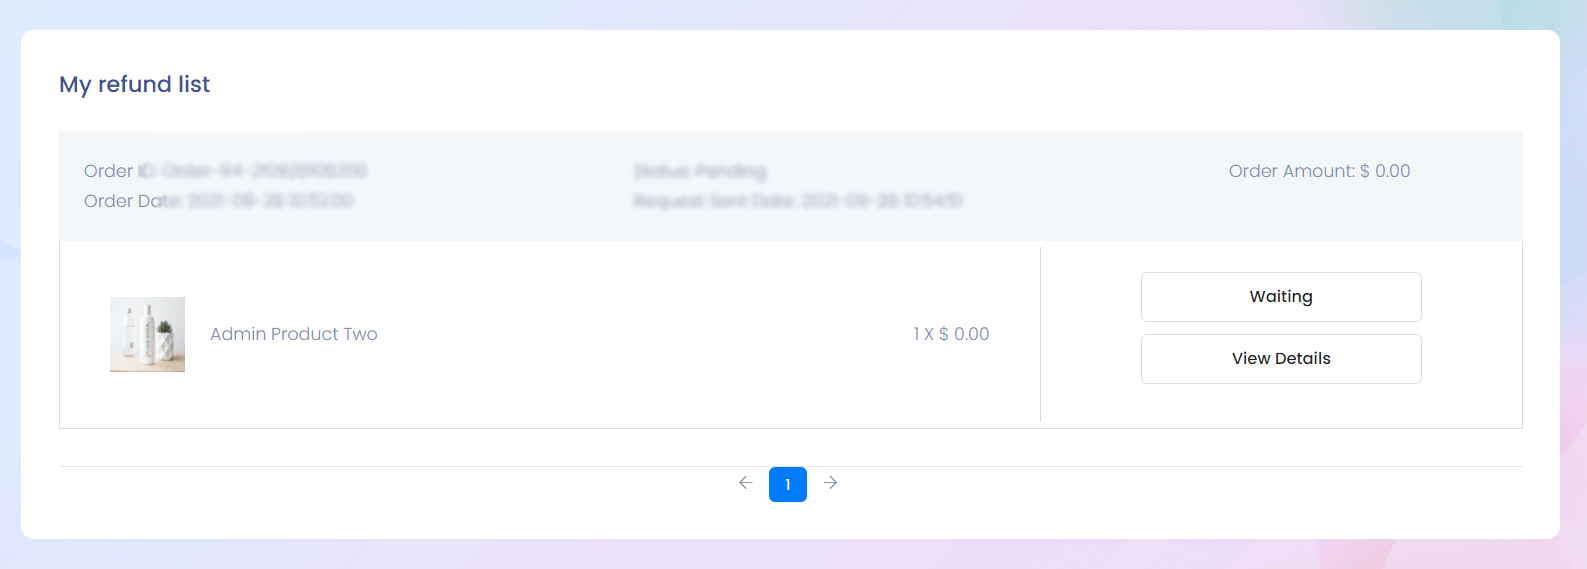
Refund & Dispute
When you request any product for refund You can see it here.
My Coupon
My Coupon
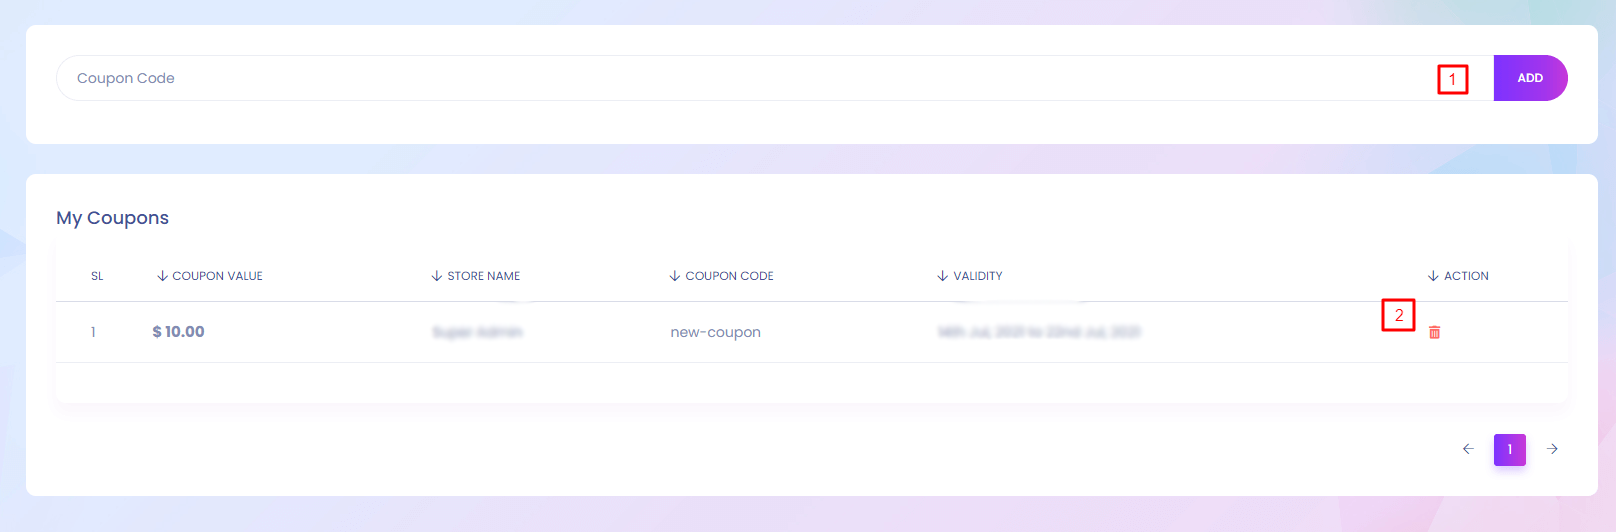
My Coupon
If you want to save any coupon for later use you can save it here.
1. Add
Add the coupon for later use.
2. Delete
Delete the coupon.
My Account
My Account
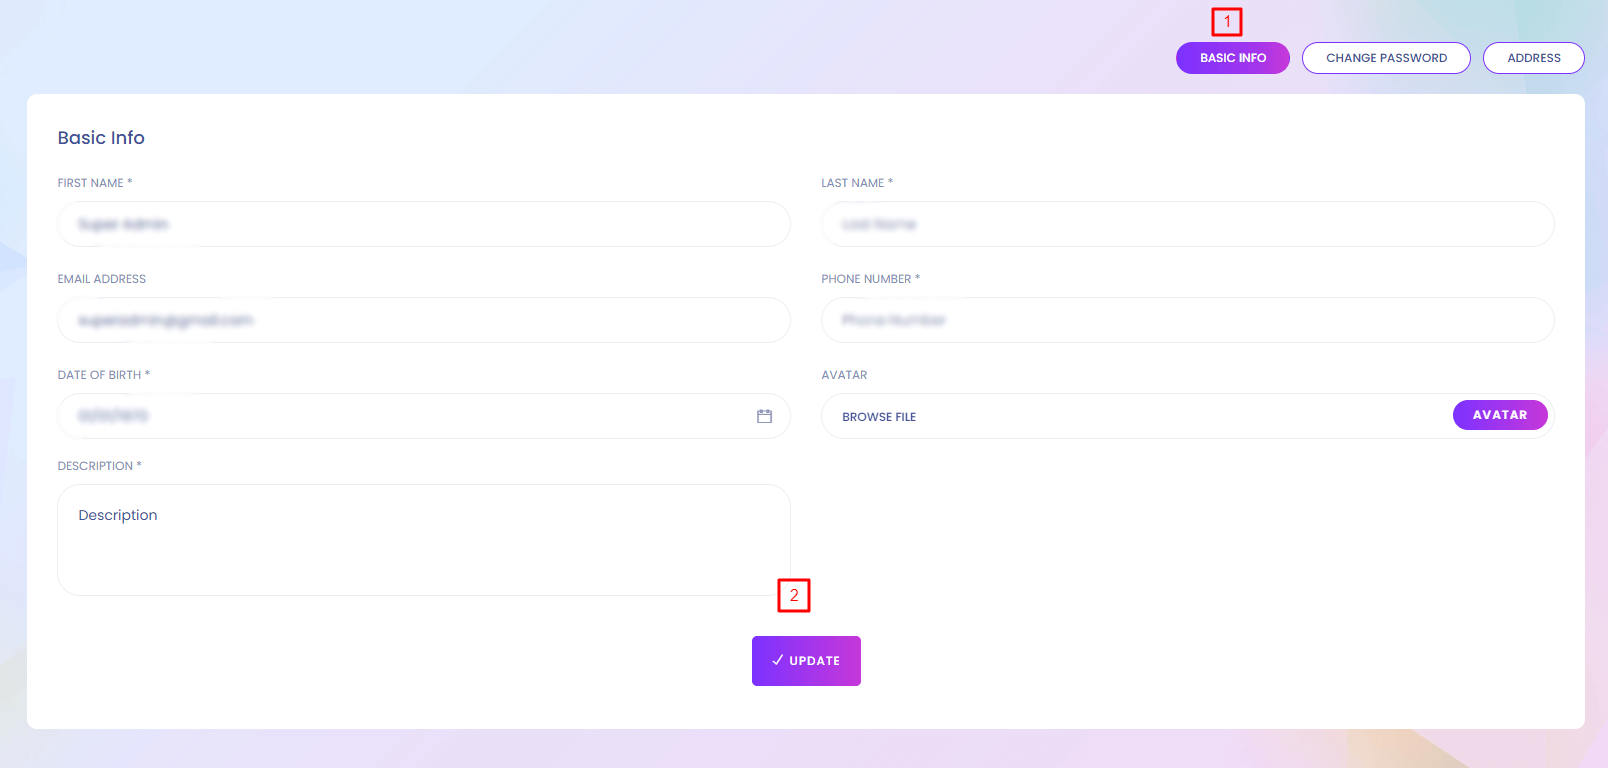
My Account
You can find your personal information here.
2. Update
Update basic information.
My Account(Change Password)
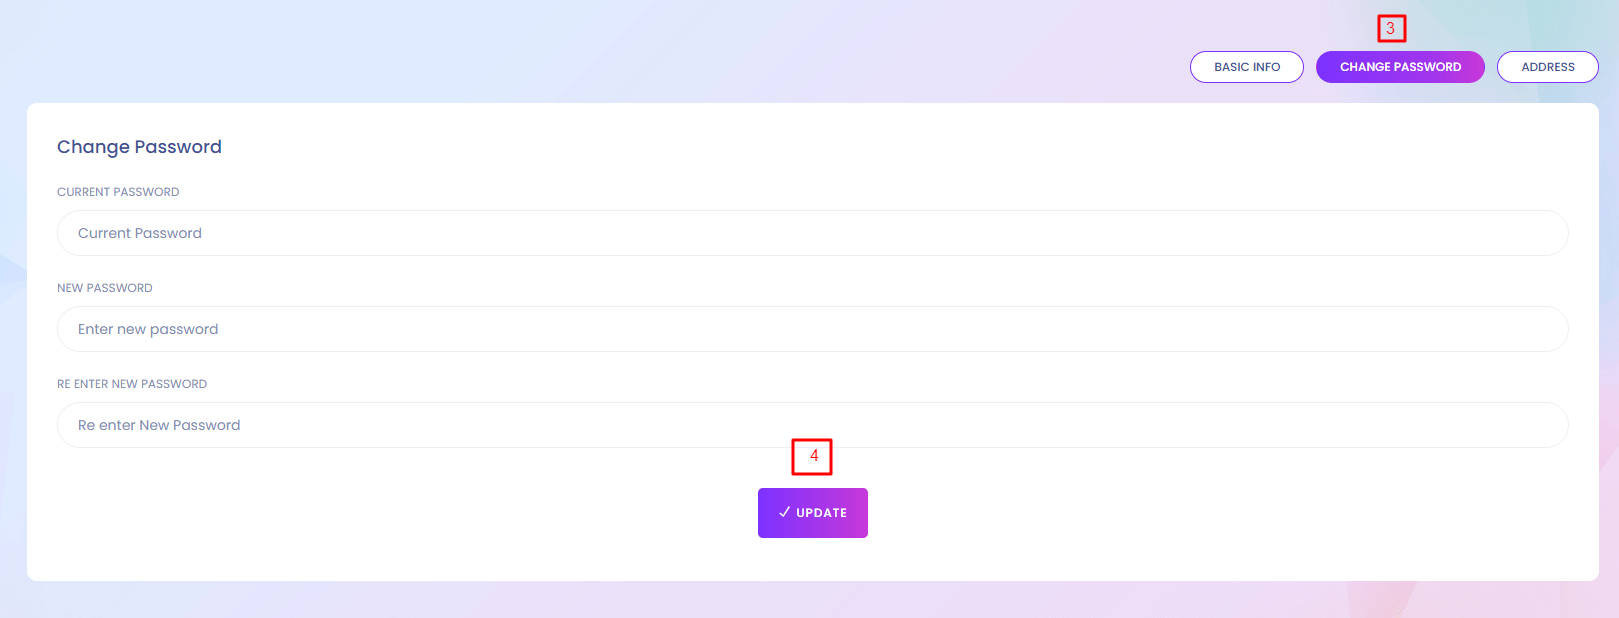
4. Update
Update the old password.
My Account(Address)

6. Add New Address
You can add new address to your account.
7. Edit
Address can be edited.
My Account
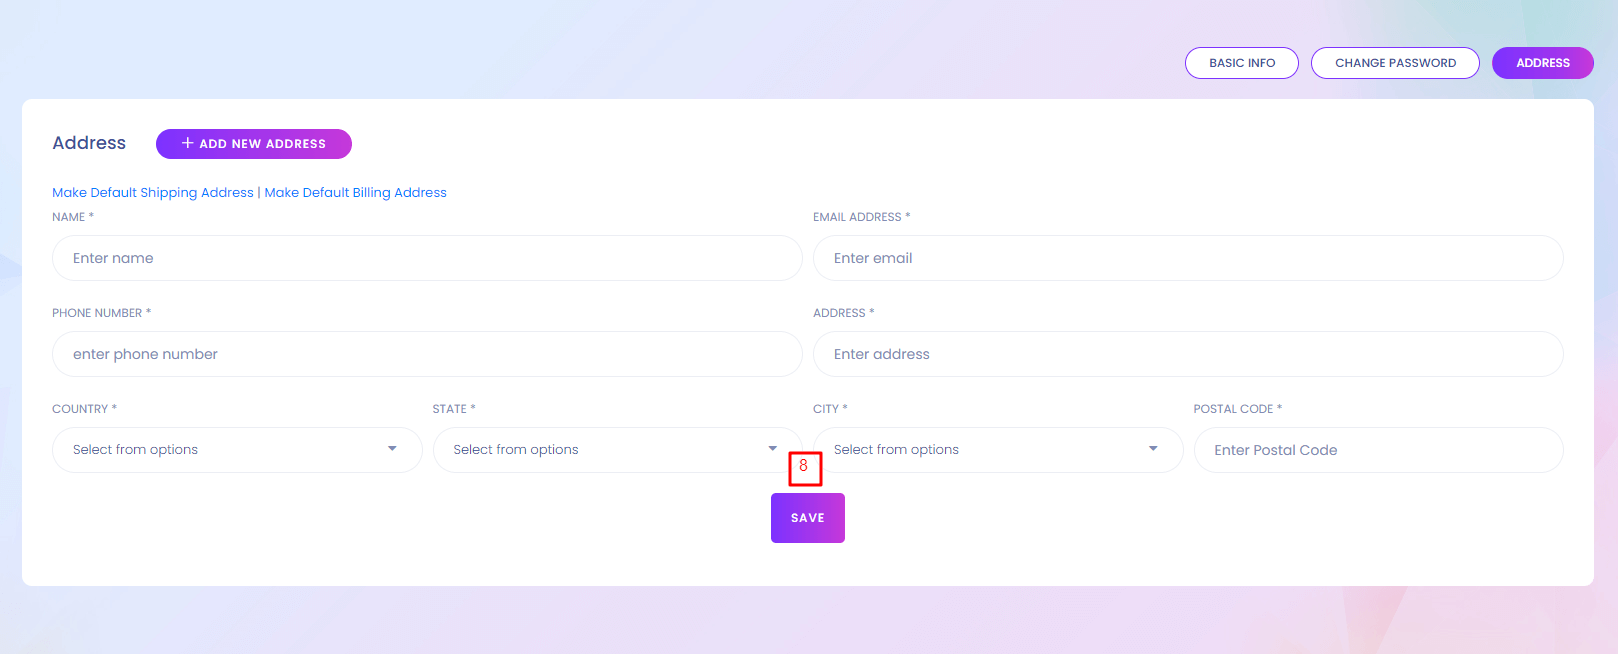
8. Save
Save the new address.
My Referral
My Referral
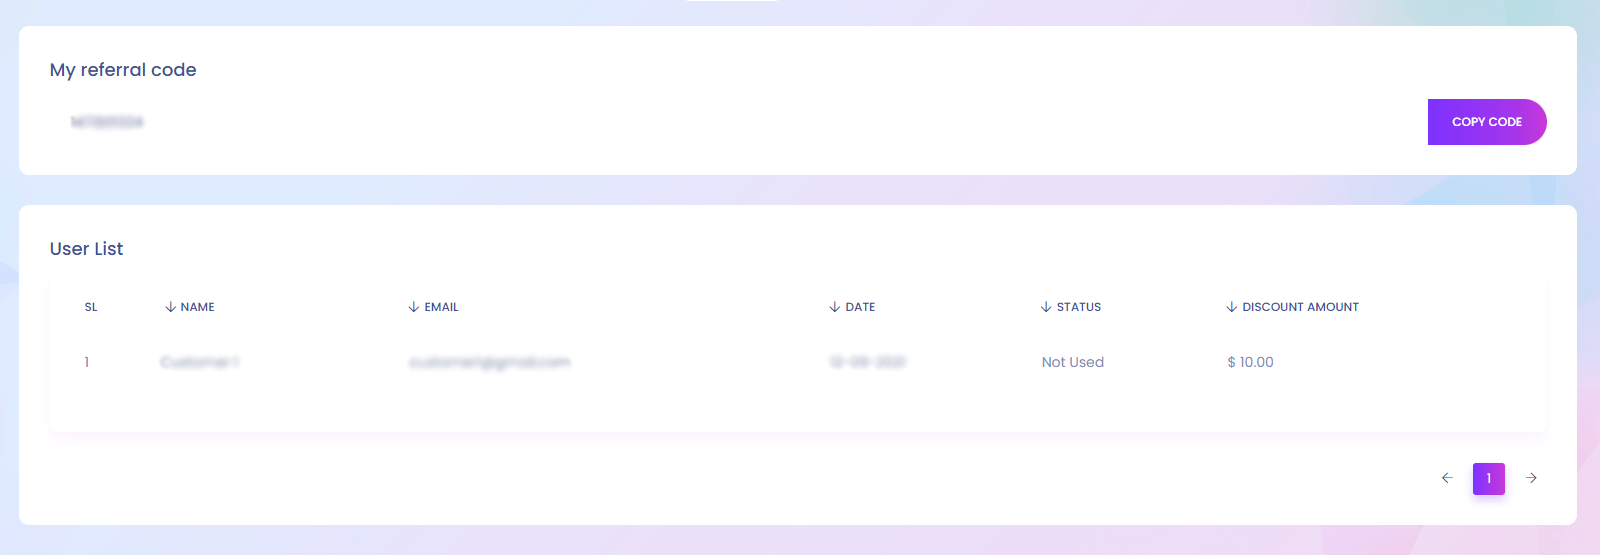
My Referral
Using referral code user can get discount. You can get your referral code from here and see the users who used your referral code.
Utilities
Utilities
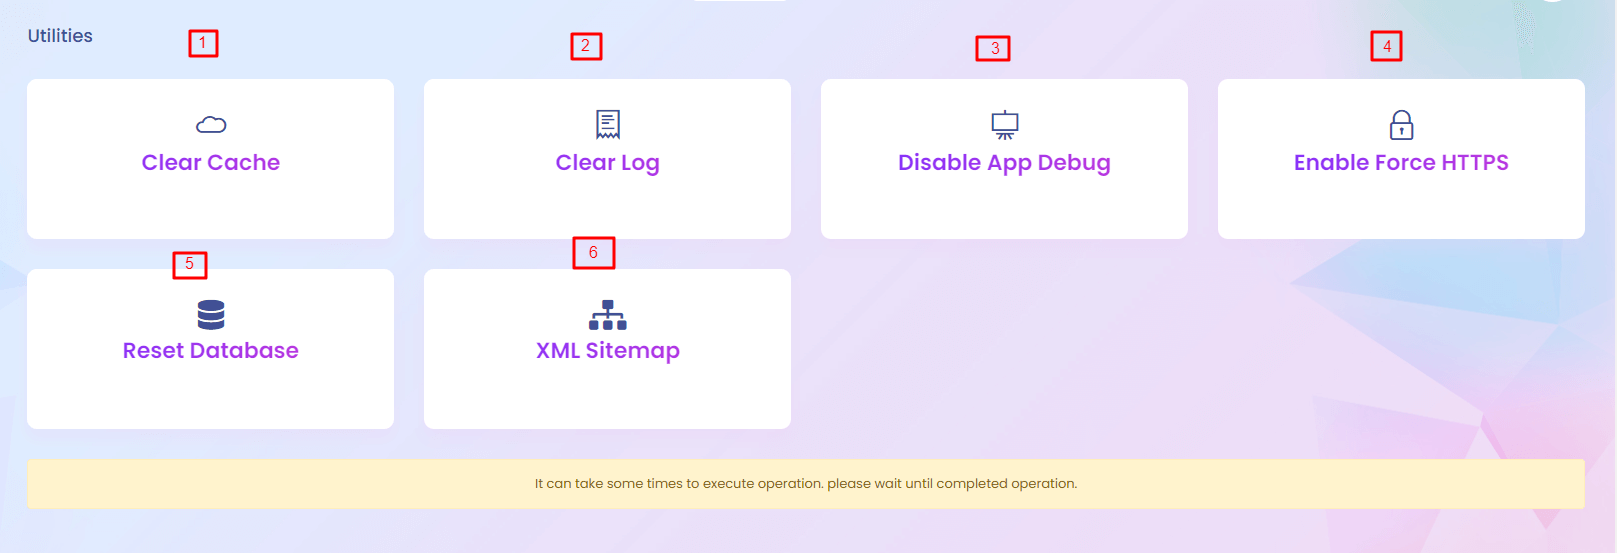
Utilities
Admin have different utilities in the system.Admin can perform different utility action from here.
1. Clear cache
Clear your application cache data.
2. Clear Log
For any action the system generate a log. You can create it from here.
3. Disable App debug
If you disable app debug system will show the error exceptions.
4. Enable force https
Https is a secure connection. You can enable https from here.
5. Reset Database
Be careful to reset your database, it will erase all your data.
6. XML Sitemap
You can generate xml sitemap from here.